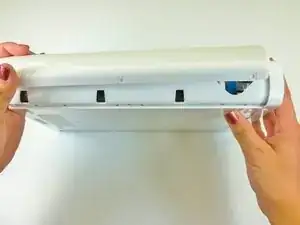
Einleitung

Hier wird der Austausch der Frontplatte gezeigt.

  1. JCHLhn5MYdDxfPrg
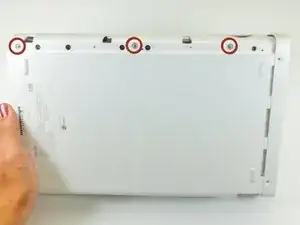
    • Lege die Konsole mit dem Boden nach oben. Unter den sechs quadratischen Gummiaufklebern befinden sich Schrauben. Ziehe die Gummiaufkleber ab und drehe folgende Schrauben heraus:

    • Drei 5,1 mm Kreuzschlitzschrauben

    • Zwei 6,1 mm TriWing Y0 Schrauben

    • Eine 13,2 mm TriWing Y1 Schraube

  2. aigP65yoJHPSGAir
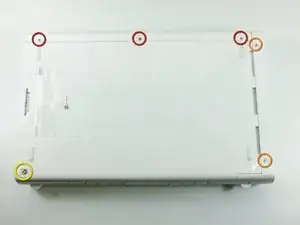
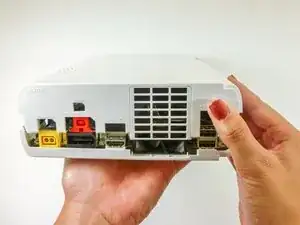
    • Drehe die Konsole mit dem Lüftungsgitter zu dir.

    • Entferne die beiden 7,1 mm Kreuzschlitzschrauben #00.

    Both screws are not “7.1mm” in length, only the one to the right is (center of the console’s side). The left one (towards the front of the console) is 5.1mm.

    LogicalMadman -

    There’s a third screw to remove bottom-left corner of this picture. On step 9 it’s already been removed, and you need it to be removed in order to remove the metal casing in step 13.

    Pascal Dagenais -

  3. 1Iyrqx4nOFBdCJ2h
    1Iyrqx4nOFBdCJ2h
    2NCIyw2H2DATp1Mk
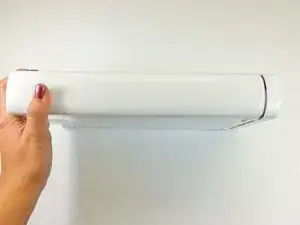
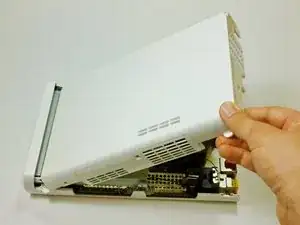
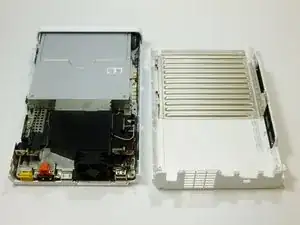
    • Fasse die obere Abdeckung gegenüber dem Lüftungsgitter an, schiebe sie nach hinten und hebe sie hoch, um sie abzulösen.

  4. BgtQWjfJFCI2Obtg
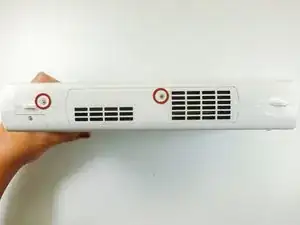
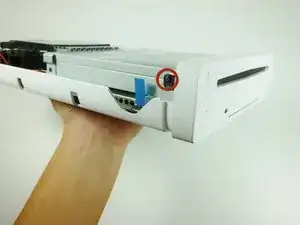
    • Auf der Unterseite neben der eben entfernten Abdeckung findest du drei 13,2 mm TriWing Y1 Schrauben. Drehe sie heraus.

  5. SFXFKigB4FgwXNHW
    SFXFKigB4FgwXNHW
    emE6ahHlKSKLyLVG
    XXLXP25j5OJr3Cu5
    • Hebe das obere Gehäuseteil hinten hoch und löse es vom Gerät.

    The front portion of the side of the cover with the vents was kind of stuck on mine. There’s a little rubber piece in there that was the cause of this. But that same rubber piece also makes up the little handle-shaped nub that sticks out of the side there. (There’s also one at the back of the same side, but that one didn’t stick for me.) Lifting also using the little handle made it easy to remove the cover.

    Nicholas Halderman -

  6. QANVbARsH6IjOTQI
    QANVbARsH6IjOTQI
    sPaqjSSEr66bZ6hX
    • Drehe das Gerät mit der Frontplatte zu dir.

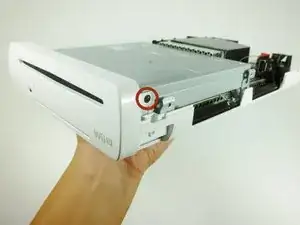
    • Die Frontplatte ist auf jeder Seite mit einer 3,5 mm Kreuzschlitzschraube am CD Laufwerk befestigt. Drehe beide heraus.

    My screw won't come out, and I feel as if my screw was screwed in too tight when they made the wii u, or the 3.5 #0 is too big. I have tried other screws and I think the screw might be done for because the metal is coming off of the top and deforming the shape. I am very lost and if anyone could help me, that would be amazing.

    Elijah Travers -

    Those #0 screws might be tight and they’re easy to strip. Put some force on the screwdriver to make sure you start unscrewing them and not stripping them.

    Pascal Dagenais -

    One of the screws started to deform instead of unscrewing. I used a bigger Philips screwdriver (size 1), added a rubberband between it and the screw and used more force to avoid stripping it more and make sure it would start unscrewing. It worked hopefully ! But I wasn’t sure it would.

    Pascal Dagenais -

  7. FGbMK3dG2BpKU2bJ
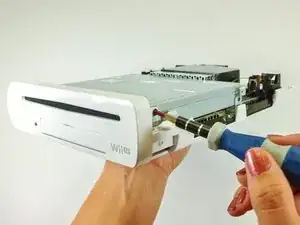
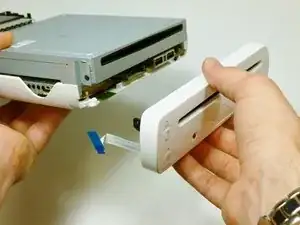
    • Drehe das Gerät so, dass die Frontplatte rechts ist und das Flachbandkabel sichtbar wird.

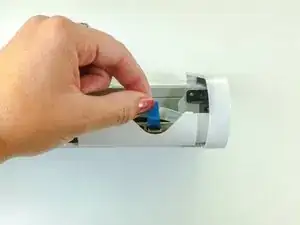
    • Ziehe an der blauen Lasche um das Kabel zu lösen.

    There is a step to do before to "lift up on the blue tab in order to release the ribbon cable". We must lift up the connector who maintain the ribbon cable. By default, his position his locked and in order to unlock it, must put it in his top position.

    Frederic Morelli -

  8. K23ibnjRbkeVBBoW
    • Entferne die Frontplatte.

Abschluss

Um dein Gerät wieder zusammen zu setzen folge den Schritten in umgekehrter Reihenfolge.

Kim Arre

Mitglied seit: 11/01/13

4544 Reputation

4 Kommentare

Great guide. I was able to fix the front USB door on my Wii u! Thanks guys!

Matt Jones -

My ribbon seems to work but the little connection it plugs into on the circuit board in the console broke off. Not just the black clip but the whole little circuit. Seems like a clean break. Can I solder it back on? If I push it back on and hold the ribbon in the red light comes on and blinks. Occasionally I can get the white light to come on for like a second but I never hear fans spinning/more of the unit coming to life before it shuts itself off.

Thoughts on how to fix it?

Gutzin Fish -

My daughter shoved change into my disc slot of my Wii I. I thought I got out all pulling through the faceplate dvd slot but now when I put in a game disc it won’t catcalls accept it. It pulls in, sounds like it turns a little bit and then ejects the disc. Could change still be stuck in the reader or do I need to replace it now?

Melissa -

Bit sad that it doesn't show how to re-insert the little ribbon cable. The tiny black latch came off, and there's no way to refix the latch back to the connector.

Regards,

Adrie

Adrie Lute -