Einleitung

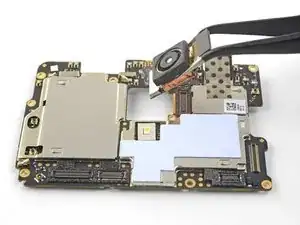
Diese Anleitung zeigt dir, wie du die Rückkamera des OnePlus3 entfernen oder ersetzen kannst.

Durch das Design des Telefons, muss das Motherboard gelockert/entfernt werden, bevor die Rückkamera entfernt werden kann. Der schwierigste Teil der Anleitung, ist die Gehäuse-Klammern der hinteren Gehäuseabdeckung abzubekommen.

"Auf manchen Bildern ist der Akku bereits ausgebaut, aber er muss nicht entfernt werden, um die Rückkamera auszubauen."

  1. bWOOVGdDbKGpCLTU
    bWOOVGdDbKGpCLTU
    pVAusTVePiIwsl1J
    n6Lt6ZEBkgHYKLjT
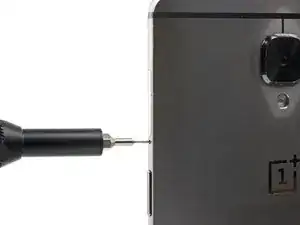
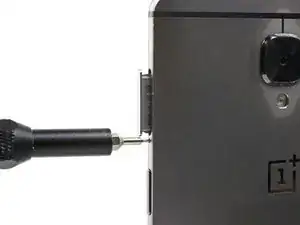
    • Nimm ein SIM-Auswurfwerkzug, ein Bit oder eine aufgebogene Büroklammer und setze es in das kleine Loch zwischen An/Aus-Knopf und SIM-Slot.

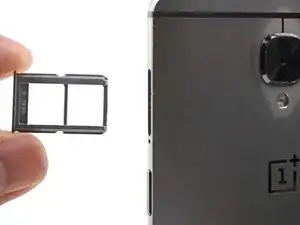
    • Drücke es kräftig hinein, um den SIM-Einschub aus dem Gerät zu lösen.

    • Achte beim Wiedereinsetzen des SIM-Einschubs darauf, dass dieser richtig herum eingesetzt wird. Eigentlich sollte nur eine Richtung passen.

  2. nEIagOe4n4VXZBxk
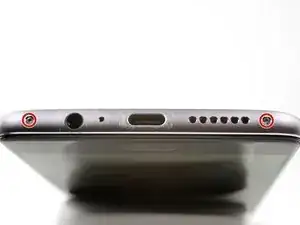
    • Entferne die beiden 2,6 mm Torx T2 Schrauben an der Unterkante des Smartphones.

  3. ieCpwZvVQETrWlDt
    ieCpwZvVQETrWlDt
    FlKfhyT4afkoj6XN
    nZdlPpQpmetaKaGF
    • Wenn du diese Anleitung nicht ganz genau befolgst, ist das Risiko sehr hoch, dass das Displayglas beschädigt wird.

    • Bei den folgenden drei Schritten musst du die Rückabdeckung vom Kunstoffrahmen abhebeln. Lies zuerst die Anleitung durch, bevor du den Ausbau versuchst.

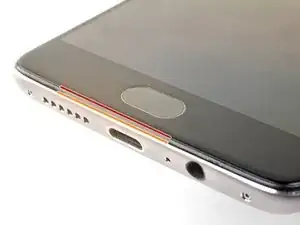
    • Zwischen Display und Gehäusekörper gibt es zwei verschiedene Nahtstellen:

    • Naht am Displayglas. Diese Naht gehört zur Displayeinheit. Heble nicht an dieser Naht, sonst trennst du die Bildschirmeinheit auf und beschädigst sie.

    • Naht am Rahmen. Hier sind der Kunstoffrahmen und die Rückabdeckung miteinander verbunden. Heble nur an dieser Naht.

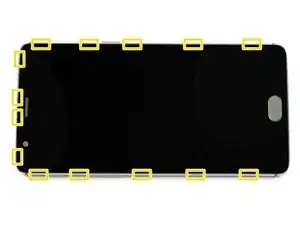
    • Der Rahmen ist mit vierzehn Rasten an der Rückabdeckung befestigt. Beim Abhebeln der Rückabdeckung musst du genau wissen, wo sie sich befinden.

    This picture is a bit misleading, the frame seam is actually sunk into the metal frame, and is not visible at first.

    With an older phone, it’s more likely to separate the display panel itself than to separate the displaypanel from the frame. If the top of the screen comes off first, before the part with the touch sensor, then you’re separating the wrong thing (ie displaypanel).

    Mind that the displaypanel itself seems as if it has two seams (the panel itself and the board).

    OnnoJ -

    Thanks for the helpful tip! I re-worded the step slightly to hopefully clarify where the frame seam is.

    Arthur Shi -

  4. YCvqLRPyVZwfurYA
    YCvqLRPyVZwfurYA
    GILoGP2T5crKBbC1
    KcwEIuUCLNbaMQHT
    • Achte darauf, dass du während der Arbeit das Smartphone nicht versehentlich einschaltest. Wenn es doch passiert, dann schalte es wieder aus, bevor du fortfährst.

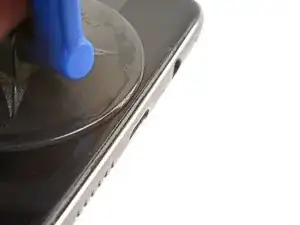
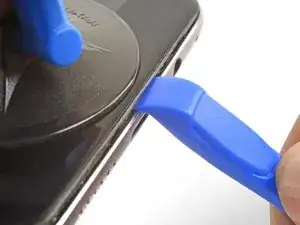
    • Bringe einen Saugheber nahe der Unterkante des Displays an.

    • Ziehe gleichmäßig und kräftig am Saugheber.

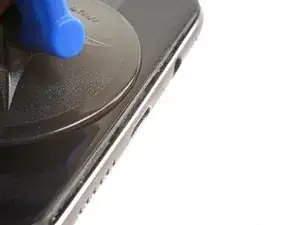
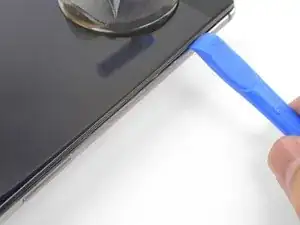
    • Drücke die Kante eines Plastiköffnungswerkzeugs direkt in die Rahmenaht nahe beim Saugheber, bis sich die Kante des Werkzeugs zwischen Kunstoffrahmen und dem Rand der Rückabdeckung einzwängt.

    • Da die Toleranzen hier sehr eng sind, musst du sehr stark drücken. Es hilft, wenn du ein neues Plastiköffnungswerkzeug mit unbeschädigter Kante benutzt.

  5. jMnsJFeDAs5jDrJs
    jMnsJFeDAs5jDrJs
    wLZnCNVZcWZwMDEc
    rEUupM53pgHslK5M
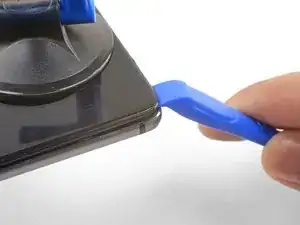
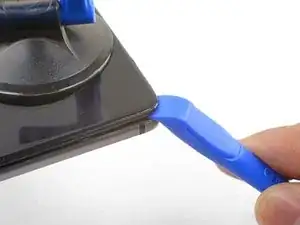
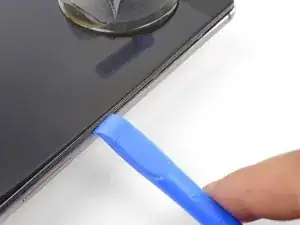
    • Wenn das Plastiköffnungswerkzeug eingezwängt ist, dann kannst du es sorgfältig an der Unterkante des Smartphones entlang schieben.

    • Führe das Werkzeug vorsichtig um die linke Ecke des Smartphones herum, halte es dabei immer in der Naht drin.

  6. SbNYL5FXtjpWlWRL
    SbNYL5FXtjpWlWRL
    23YBPCLmquo4N6iS
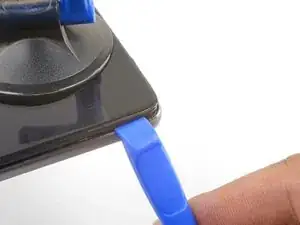
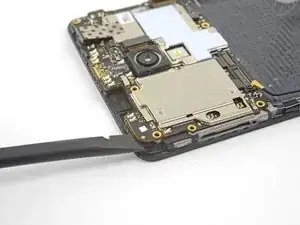
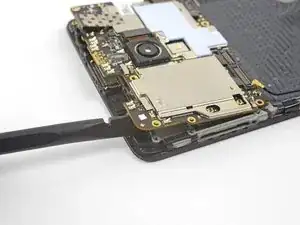
    • Schiebe das Plastiköffnungswerkzeug weiter die lange Kante entlang, wobei sich die Rasten lösen.

    • Die letzte Raste in der linken oberen Ecke nahe am Alarm-Schalter sitzt vertieft und ist oft schwerer zu lösen. Lasse dir Zeit und hilf mit dem flachen Ende des Spudgers oder einem Plektrum nach.

    I found I had to use a couple of those “guitar picks” to get the screen off, left the first one inserted on the bottom and then went around the side of the phone with the second.

    C McIsaac -

    I couldn’t get the last clip easily, so I also went around the other side, and then the last two clips left and right went out togther much more easily.

    Nikolaus Demmel -

    Yep, thanks for your note. It was far more easy to go round the other side.

    Sebastian -

  7. 2XT5ihxKlsPkBlKj
    2XT5ihxKlsPkBlKj
    51a4Pokx1lAxmFUb
    AtPFJ4KC5ExHHhcu
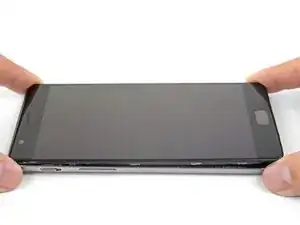
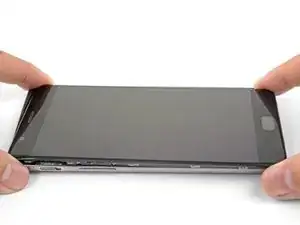
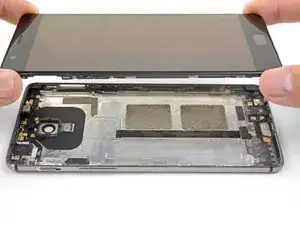
    • Wenn die untere und die linke Kante des Smartphones frei sind, kannst du vorsichtig am Rahmen wackeln, damit sich auch die Rasten an der oberen und der rechten Kante lösen.

    • Hebe den Bildschirm hoch und entferne ihn.

    • Halte beim Zusammenbau an dieser Stelle an und teste alle Funktionen deines Smartphones, bevor du die Rückabdeckung wieder befestigt.

    • So wird die Rückabdeckung wieder angebracht:

    • Richte die Oberkante des Rahmens an der Rückabdeckung aus und achte darauf, dass die oberen Rasten korrekt sitzen.

    • Drücke an den langen Kanten des Smartphones entlang, so dass die restlichen Rasten einschnappen.

    I’m having trouble putting on the back cover, anyone else had this issue?

    Jonathan Kjær Andersen -

    Hello.

    From this Step on I directly jumped to Step 13. Removing the 7 Screws. NOT removing the Mainboard. It is easy possible to remove the camera just like this if you loosen the Camera-cable and pull carefull on it. Because the 7 Screws are removed there is enough space to remove the old camera and bring the new camera in. I tried It various times to verify this.

    Kolja NovoKopteryx -

  8. mO1aHIL6y5oZ3L6W
    mO1aHIL6y5oZ3L6W
    hQ6S4NQKVFkv4lMc
    • Heble mit der Spudgerspitze den Akkustecker aus seinem Anschluss über der rechten oberen Ecke des Akkupacks hoch und trenne ihn ab.

    • Biege den Stecker vom Anschluss weg, so dass er sich nicht versehentlich verbinden kann.

    • Um Press-fit Verbinder wie diesen hier, wieder anzuschließen, musst du ihn sorgfältig ausrichten und an einer Seite nach unten drücken, bis er einrastet. Wiederhole das Ganze dann für die andere Seite. Drücke ihn nicht in der Mitte herunter. Wenn der Stecker falsch aufgesetzt ist, können die Kontakte verbogen werden, so dass der Stecker dauerhaft beschädigt wird.

    Why not removing the camera without removing the mainboard?

    Warum wird die rückseitige Kamera nicht ausgebaut, ohne das Mainboard auszubauen?

    Ingo Truppel -

    Hello Ingo,

    The rear camera is trapped under the motherboard. You must at least loosen the motherboard to remove the camera.

    Die Kamera befindet sich unter dem Motherboard. Sie müssen mindestens das Motherboard lösen, um die Kamera zu entfernen.

    Arthur Shi -

    During reassembly this part was tricky for me: the new battery couldn’t clip into place the way the old one did, resulting in a loose connection and “battery does not match “ message when trying to power the phone up. The new battery probably had a slightly different connector that than the old one. I even ordered another battery but the same thing happened. I finally managed to connect it by applying much more pressure on the press connector than needed for the other ones. it did not make any clip sound though.

    romDL -

  9. aqebtDglfoeaEQoO
    aqebtDglfoeaEQoO
    pEHVUlXpy3HZHS3v
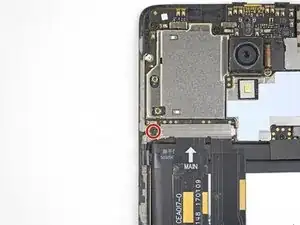
    • Entferne die 3 mm Kreuzschlitzschraube, mit der die Kabelhalterung befestigt ist.

    • Entferne die Kabelhalterung.

  10. ukSTTHKWXiZsgpMC
    ukSTTHKWXiZsgpMC
    H4w22csICbqPGpEH
    WYRvRgeGRaABj54N
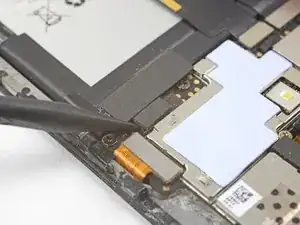
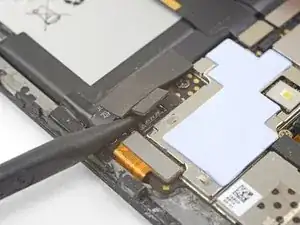
    • Heble das Verbindungsflachbandkabel mit der Spudgerspitze hoch und löse es oberhalb des Akkus von der Hauptplatine ab.

    • Trenne genauso das Flachbandkabel zur Tochterplatine von der Hauptplatine ab.

  11. PZRItWv2tRAgKOBG
    PZRItWv2tRAgKOBG
    3kND63jQhPIobiW2
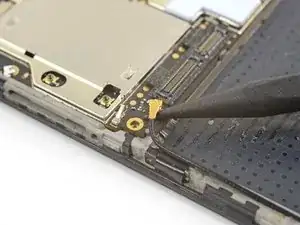
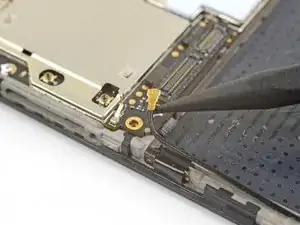
    • Schiebe die Spudgerspitze unter das Verbindungskabel zur Antenne in der linken unteren Ecke der Hauptplatine.

    • Heble das Verbindungskabel zur Antenne hoch und trenne es ab.

    Connector may go oval, push with spudger to make circular again

    Caidan Whittaker -

  12. ejJ6xDknxqc1WOqJ
    ejJ6xDknxqc1WOqJ
    oZqHqVGNcCYvyBEO
    • Heble den Displaykabelstecker mit der Spudgerspitze aus seinem Anschluss auf der Hauptplatine hoch.

  13. ZKwrYvGIYQwSjJvl
    • Entferne die sieben Kreuzschlitzschrauben, mit denen die Hauptplatine am Rahmen befestigt ist:

    • Vier schwarze 3 mm Schrauben

    • Drei silberfarbene 2,9 mm Schrauben

    • Auf manchen der Schrauben können Aufkleber sein. Entferne diese, um an die Schrauben heranzukommen.

  14. INytviJ5FTL6TPl1
    INytviJ5FTL6TPl1
    vgUNBZjXAOGASHeC
    • Schiebe das flache Ende des Spudgers unter die obere linke Ecke der Hauptplatine.

    • Verdrehe den Spudger und heble ihn hoch, so dass die Hauptplatine aus ihrer Vertiefung herauskommt.

    I find it easier to pry from the opposite side, where the antenna cable connector are as it required less force to release the motherboard.

    Munir Ibrahim -

  15. 5FFGtRoNMUAYXjIR
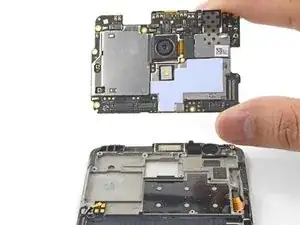
    • Entferne die Hauptplatine.

    • Achte beim Zusammenbau darauf, dass sich unter der Hauptplatine keine Flachbandkabel oder Antennenkabel verfangen.

    When removing the motherboard, the front camera module's connector on the backside of the board tried to be retained by its recess in the frame. I had to peel the tape off the back of the front camera, then remove the motherboard, and finally prise the connector away from the frame before reinstalling it on the motherboard.

    Philip Cobley -

  16. FZ4XPxjVVZYBkY61
    FZ4XPxjVVZYBkY61
    px5SEXF3U6QMICro
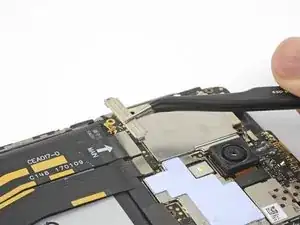
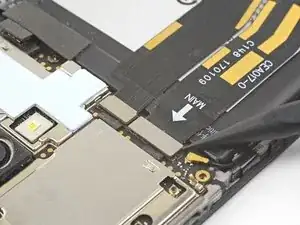
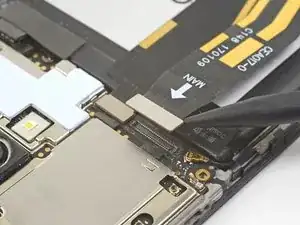
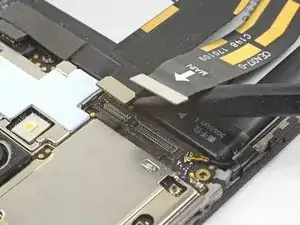
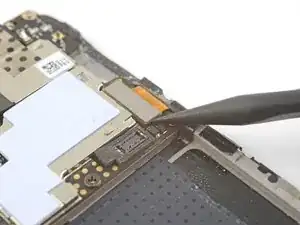
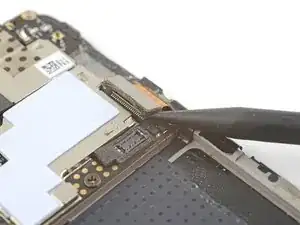
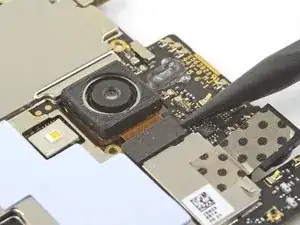
    • Benutze die Spitze eines Spudgers, um den Stecker der Rückkamera hochzuhebeln und ihn aus seinem Anschluss auf dem Motherboard zu lösen.

  17. EuVmsvJTFTyERZNE
    • Entferne die Rückkamera.

    • Falls dein Ersatzteil nicht mit einer schwarzen Abdeckung geliefert wurde, löse sie sorgfältig von deiner alten Kamera ab und übertrage sie auf dein Ersatzteil.

    My replacement camera didn’t have the black rubber cover as pictured in this step so I simply removed the one in place and put it on my new one. It’s not stuck with glue or anything, just placed on top. I assume it’s useful for something, keeping it in place perhaps, I just think it’s worth mentioning in this step.

    Billy Rooke -

    Hi Billy,

    Thanks for the tip! I’ve updated the step to mention that.

    Arthur Shi -

    Hey, thanks for the repair instructions!

    Worked all smooth until I was putting the screen unit back into the metal-case.. It just wouldn’t fit.

    Then I saw a little notch in the center, right on the top side of the mainboard, that has to be engaged to put the display back in the case.

    Leon Hummernbrum -

Abschluss

Um dein Gerät wieder zusammenzubauen, befolge diese Anleitung in umgekehrter Reihenfolge.

Entsorge deinen Elektroschrott fachgerecht.

Die Reparatur verlief nicht so, wie geplant? Auf unserem OnePlus 3 Antwortenforum findest du Hilfe bei der Fehlersuche.

Arthur Shi

Mitglied seit: 03/01/18

218614 Reputation

18 Kommentare

Why do I have to take out the MoBo? For me it looks like the camera connector is accessible without removing everything, one less step to swap screws etc...

Tilman Heß -

I haven't done this procedure yet, but it looks like there is a metal tab that protrudes from the top of the camera module that is tucked under the PCB.

Averie Albright -

Fantastic! Many thanks. That fixed the problem: no more blurry rear camera. For less than 9 €… You’re the boss!!!

Renaud Migeot -

under 10 bucks finally fixed my broken auto focus, great tutorial!
Sore Brain -

It worked pretty well for me, but I had to use a metal 0.3mm Guitar Pick for the very first opening step, as neither the plastic opening tools nor plastic picks worked for me.

@jackhutchinson60: The back cover is taken off first (which has no eletrical connections) and then the motherboard is removed, but it’s all screws and plugs, so no problem there. According to youtube lens cover fixes are cheap and doable as well.

Sebastian Jauert -

Very easy to follow! Great ten buck fix. The hardest part was definitely opening the phone, but with a little elbow grease it is possible. I used the iFixit opening tools, and would recommend getting a few, as you will dull some out at first. Overall, great guide. Took me about 90 minutes (mostly from trying to pry open the phone.

Eric Maines -

Thank you for this great guide!

I just replaced the rear facing camera on my OP3 (original was no longer able to focus image) and now I can finally use my camera again!

I used the iFixit Pro Tech Toolkit for the repair and that worked great. Only the opening tools did not work as well for removing the backshell as the ones pictures in the guide, but after some struggling, I managed to open the phone just fine.

Marcus Zottl -

a few tips from my repair: (*note 3T)

careful when prying the bottom of the rear housing off, there are rubber gaskets around the usb and speaker than can be damaged

the motherboard connectors are easier to remove before you unscrew it

the philips bits you’ll need are PH00 and PH000, and you’ll need tweezers (which are not listed in the equipment needed)

one of the small screws is covered with a water

the front facing camera does not come away with the motherboard, and is attached to security tape

otherwise, great tutorial. all is fixed, thank you.

Christopher Murray -

Great instructions, I’ve changed my faulty rear camera following your video in less than 1 hour, without any troubles.

The key is be patient opening the case, as it is very tight fit, but it’s all pretty straightforward as shown on the video.

Thanks!

Marc Bres -

Awesome guide, thank you very much for the steps. I have had some difficulty in removing the back cover, but completed the process successfully. I have just replaced my camera and so far so good.. hope the new camera lives longer than the original…

Anand Reddy Palugulla -

Great Instructions….Thanks Again

Katherina Nicols -

Worked really well, thanks for the detailed instructions!

Alex Mandel -

Thanks for this - a great guide! I would add that when prying off the mobo, it’s important to pay attention to a small plastic tab that clips it in place, in the middle of the top part. It seems much more secure to help that clip along while prying the rest of the PCB.

Michał Obuchowski -

Thanks Michał!

I updated the step to add that info.

Arthur Shi -

I followed the instructions step by step and everything worked as advertised. Opening the phone was easy with the required tools, with the most difficult part was lifting up the display, which took a couple of minutes.

Replaced the camera and had fixed my previously blurry camera image instantly after assembly.

I paid 18 $ for a new camera and tools vs well over 100$ I would’ve paired when having a repair shop do it.

Thank you so much for this article.

[deleted] -

Really good instruction. With a little fear, wrong glasses, armed with another smartphone-camera for optical documentation and illumination it works very good. Thanks a lot! The new camera works well and focused optimal.

Hartmut Schröder -

My Oneplus 3 rear camera has lost focus function and front camera is shattered.

Can I replace them with rear and front camera from Oneplus One/two model?

Santhosh -

Hi Santhosh, the cameras are different models in the OnePlus 1, 2, and 3, so they are most likely not interchangeable.

Adam O'Camb -