Einleitung

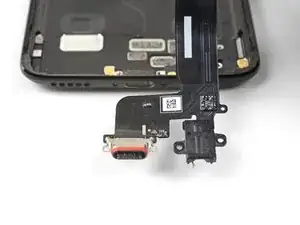
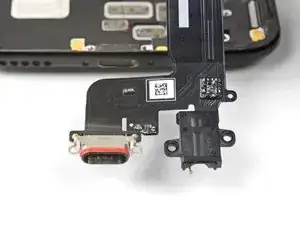
Diese Anleitung dient zur Reparatur eines defekten Ladeanschlusses und Kopfhörerbuchse im OnePlus 5. Diese sind Teil der unteren Anschlusseinheit und müssen gemeinsam ersetzt werden.

Am schwierigsten ist das Öffnen der Rasten am Rahmen, um die Rückabdeckung abzunehmen.

  1. SYlGM5WyOaBd6pLj
    SYlGM5WyOaBd6pLj
    QAibbw1Y4MJGdgwG
    GPrXnC6XtihhFYj6
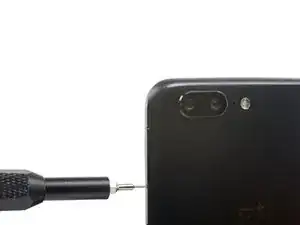
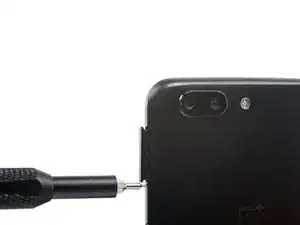
    • Setze ein SIM-Auswurfwerkzeug, Bit oder eine aufgebogene Büroklammer in das kleine Loch unter dem SIM-Einschub nahe bei den Rückkameras an der Kante des Smartphones ein.

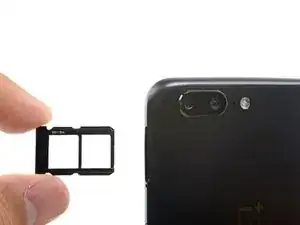
    • Drücke fest drauf, bis der SIM-Einschub herauskommt.

    • Achte beim Einsetzen darauf, dass er so wie gezeigt ausgerichtet ist.

  2. TBQWhWKy1QEZvuXb
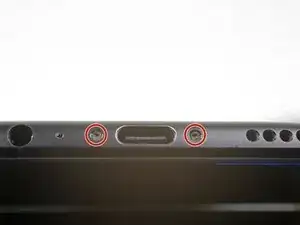
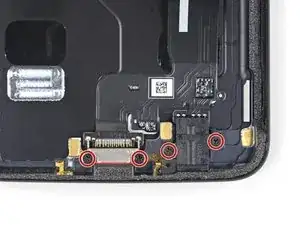
    • Entferne die beiden 2,6 mm Torx T2 Schrauben, mit denen der USB-C Anschluss an der Unterkante des Smartphones befestigt ist.

    What are the reference of the screws ? They are missing in the one I bought !

    Yôken Asakura -

    Hi Yôken,

    They help hold the back cover on. Most of the time, the clips are enough to hold the phone together.

    Arthur Shi -

    Just FYI, for whatever reason my brand new OnePlus 5 had 0,8 mm stars screws instead of T2 Torx.

    strixaluco -

    Same here, T2 doesn’t fit the screws on my Oneplus 5. More like T1’s

    Shaze An -

    Definitely T2 for me. Do watch out during assembly. I have a feeling that it’s easy to strip these.

    Juno Grégoire -

    T2 for me too. It was missing in my kit and iFixit sent it later when I asked them about it.

    Gitanshu Sardana -

  3. P3gkh4u1CW6BvaUT
    P3gkh4u1CW6BvaUT
    HZ2oq3334XBwxOSd
    Z2kNTKjf2Hn4xfhd
    • Es besteht ein großes Risiko, das Display zu beschädigen, wenn du dieser Beschreibung nicht genau folgst.

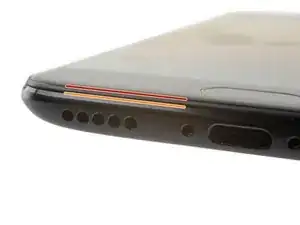
    • In den folgenden vier Schritten wird erklärt, wie du die Rückabdeckung vom Kunstoffrahmen abhebeln kannst. Lies zuerst die Anleitung, bevor du mit der Arbeit beginnst.

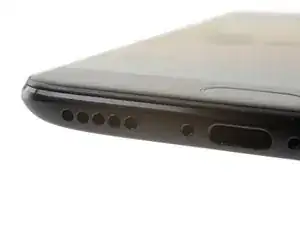
    • Zwischen dem Smartphone und dem Display befinden sich zwei verschiedene Nahtstellen:

    • Displaynaht: Diese Naht gehört zur Displayeinheit. Heble nicht an dieser Naht, sonst trennst du die Displayeinheit auf und beschädigst sie.

    • Rahmennaht: Das ist die Naht zwischen Kunstoffrahmen und Rückgehäuse. Heble nur an dieser Naht.

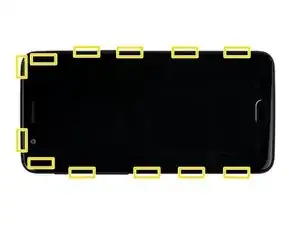
    • Der Rahmen ist mit zwölf Rasten am Rückgehäuse befestigt. Du musst die Stellen, wo sie sich befinden, beim Abhebeln in den folgenden Schritten genau kennen.

  4. etwdJRYqsaaDhSnk
    etwdJRYqsaaDhSnk
    KfBDXKWXddFXRNSI
    • Schalte das Smartphone beim Arbeiten nicht versehentlich ein. Wenn das doch passiert, dann schalte es gleich wieder aus, bevor du weitermachst.

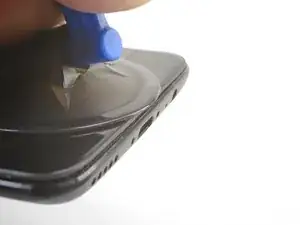
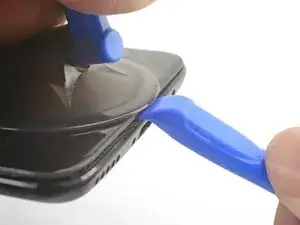
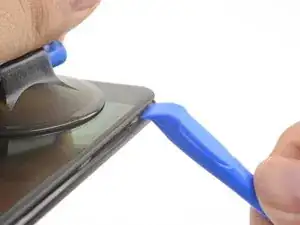
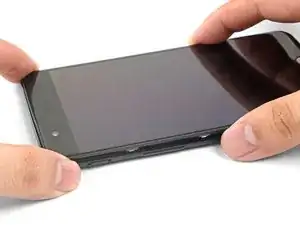
    • Setze einen Saugheber nahe am unteren Rand auf das Displays.

    • Ziehe gleichmäßig und kräftig am Saugheber.

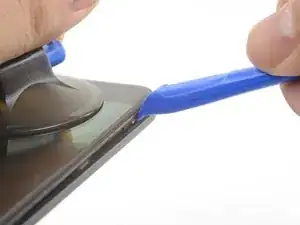
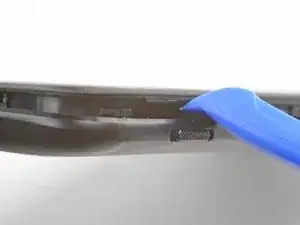
    • Drücke die Kante eines Plastiköffnungswerkzeugs nahe am Saugheber in die Rahmennaht hinein, bis sie sich zwischen den Kunstoffrahmen und dem Rand der Rückabdeckung hineinzwängt.

    • Da alles sehr eng eingepasst ist, benötigst du dafür ziemlich viel Kraft. Verwende ein neues Plastiköffnungswerkzeug, bei dem die Kante noch scharf ist.

    I found pushing open the frame seam at the corner works better than pushing from the middle like it is shown in the pictures

    Mark -

    I found the suction cup to be more of a hindrance and kept hitting the power button, making it necessary to stop and turn the phone off again. I watched a youtube video where the person didn't use a suction cup at all and decided to try that. I also found that a guitar pick type spudger worked far better than the one shown in the picture. If you're having trouble getting it started, I suggest trying those two things.

    Brett Gersekowski -

  5. G2EuFKReywNVunqY
    G2EuFKReywNVunqY
    2EGqswv53ufVdUop
    KCOec3LgxFrVKBPp
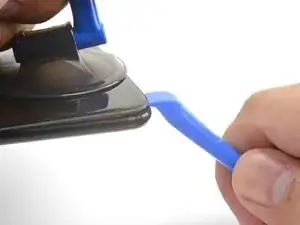
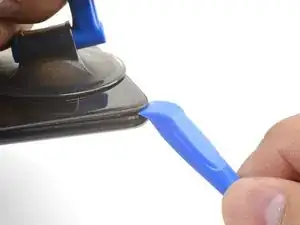
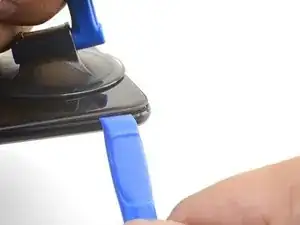
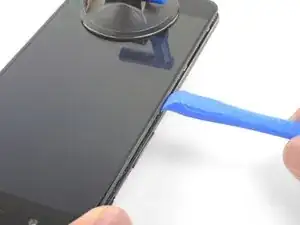
    • Wenn das Plastiköffnungswerkzeug drinnen ist, dann schiebe es behutsam an der Unterkante des Smartphones entlang.

    • Führe das Werkzeug vorsichtig um die linke Ecke des Smartphones herum, wobei es in der Naht drin bleiben muss.

    This was extremely difficult & took a lot of force. I needed a thin flat metal spudger and wrecked a couple of plastic ones in the process. I left a few scratches along the join in the process. It would be easier if I had something to hold the phone, in my hand I kept turning it on by accident.

    David Hoffman -

    what was the metal spudger did you use? I am having trouble as well. I cannot seem to pry the back cover and it feels like it is shut tightly, there are no crevices I can pry into. What was your strategy may I ask?

    Azure Shoti -

    At first, I slightly opened the body with a plastic tool, but it was not enough to actually open the back cover. Then I used a thin metal screwdriver for this. It was difficult but nothing special. Just be sure that you are opening the correct seam between the body and the screen and don’t make sudden moves. I bent nothing, everything came back in place when reassembled.

    ivan -

  6. rUcRRH2p6evfJ4RY
    rUcRRH2p6evfJ4RY
    DLUeRvMBGB6N1HCZ
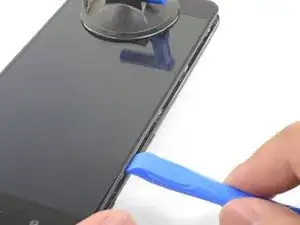
    • Heble mit dem Plastiköffnungswerkzeug, damit sich die erste Raste löst.

  7. 1IHQhNpSXtTNfbdc
    1IHQhNpSXtTNfbdc
    GdYPl1KTgPXLaenS
    23SiWCmSwCvYEIZ5
    • Lasse das Werkzeug an der langen Kante entlang gleiten, wobei du die Rasten öffnest.

    • Die letzte Raste in der oberen linken Ecke nahe der Frontkamera sitzt etwas vertieft und kann schwierig zu lösen sein. Lasse dir Zeit und nimm das flache Ende eines Spudgers oder ein Plektrum zur Hilfe.

    If you have difficulties with the last clip on the upper left. Try to go round the other side (right side), beginning at the bottom. This worked very well for me after having some difficulties with the clip near the front camera.

    Sebastian -

  8. 6ViL6JCT2JdJC2mB
    • Wenn die Unterkante und die linke Kante des Smartphones frei sind, dann kannst du die Rasten an der Oberkante und rechten Kante mit wackelnden Bewegungen befreien.

    • Der Rahmen ist immer noch mit einem Flachbandkabel an der Rückabdeckung angeschlossen. Entferne die Rückabdeckung noch nicht.

    • Halte beim Zusammenbau an dieser Stelle an und überprüfe alle Funktionen deines Smartphones, bevor du die Rückabdeckung wieder befestigst.

    • So wird die Rückabdeckung eingebaut:

    • Richte die Oberkante des Rahmens an der Rückabdeckung aus und achte darauf, dass die oberen Rasten richtig hineingeglitten sind.

    • Drücke fest auf die langen Kanten des Smartphones, bis die restlichen Rasten einschnappen.

    Reinstalling the back cover stumped me for a second… If you’re struggling with aligning the top edge of the frame, remember that the camera is going to look off/pointed a bit too low until you actually clip the frame back in.

    Really stupid but it was the only thing that tripped me up in this guide.

    Roger -

  9. s3eTthVrvSeQdHbg
    s3eTthVrvSeQdHbg
    OpemIa6DLGUeoyEj
    AwYBQfaKDAKrtFmE
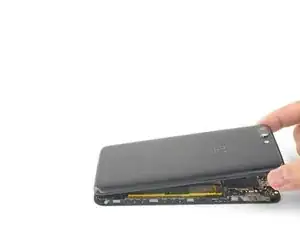
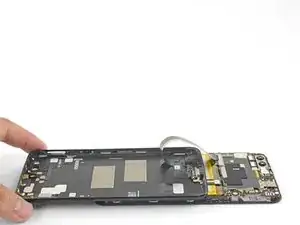
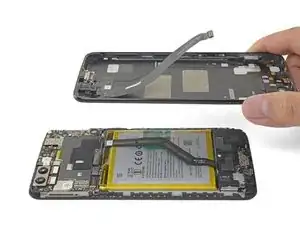
    • Wenn alle Rasten gelöst sind, dann drehe das Smartphone herum, so dass das Display nach unten zeigt.

    • Klappe die Rückabdeckung auf und lege sie auf den geöffneten Rahmen.

    • Achte darauf, dass das Flachbandkabel, das den Rahmen und die Rückabdeckung verbindet, nicht zu stark angespannt wird.

  10. pfyQGq3RaDESTTM2
    pfyQGq3RaDESTTM2
    rTFqnIgaPC1VYRKZ
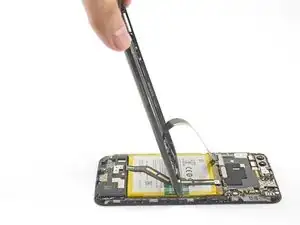
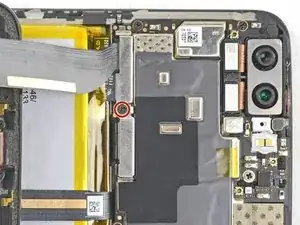
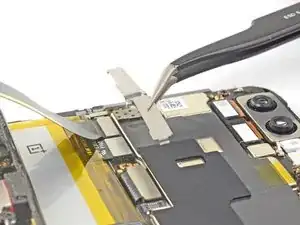
    • Entferne die 2,6 mm Kreuzschlitzschraube, mit denen die Kabelhalterung über dem Akku befestigt ist.

    • Hebe die Kabelhalterung hoch und entferne sie.

    • Zum Einbau der Kabelhalterung musst du erst ein Ende ausrichten und dann die Halterung am anderen Ende leicht biegen, so dass sie an ihren Platz einfedert.

  11. RJeEHKqpOLtBPtO6
    RJeEHKqpOLtBPtO6
    EANPufBOY5oCwAai
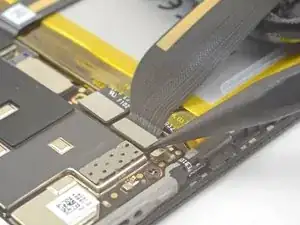
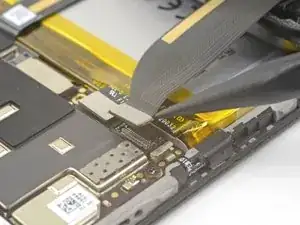
    • Heble das Flachbandkabel der Rückabdeckung mit der Spudgerspitze hoch und trenne es von seinem Anschluss ab.

    • Um Press-fit Verbinder, wie diesen hier wieder zu befestigen, musst du ihn erst sorgfältig ausrichten und dann an einer Seite herunterdrücken, bis er einrastet. Wiederhole das Ganze für die andere Seite. Drücke nicht in der Mitte. Wenn der Stecker falsch aufgesetzt ist, dann können du die Kontakte verbogen und dauerhaft beschädigt werden.

  12. CkrFZmYRNbVCqR4i
    • Entferne die Rückabdeckung.

  13. wSTQwwflitHl2gvU
    • Entferne vier 2,6 mm Kreuzschlitzschrauben , mit denen die Anschlusseinheit an der Rückabdeckung befestigt ist.

  14. P6SBKdWBTROPVyXu
    P6SBKdWBTROPVyXu
    yGTgbwalswkAZINj
    AHiNNRS3XZqPJPV1
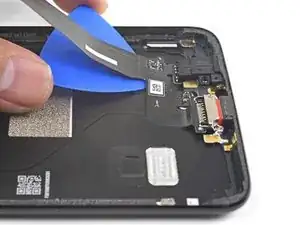
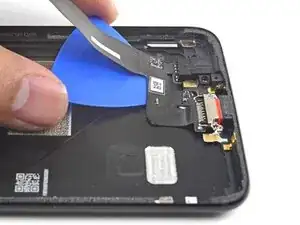
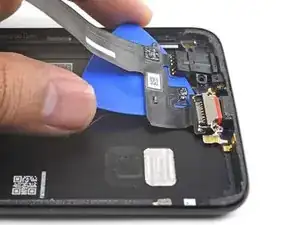
    • Schiebe ein Plektrum unter das Kabel der Anschlusseinheit, um sie von der Rückabdeckung zu lösen.

  15. dtXjH5fA4l31ToOo
    • Entferne den Ladeanschluss/die Kopfhörerbuchse.

    The cost of charging port

    Abhishek Parihar -

Abschluss

Um dein Gerät wieder zusammenzubauen, folge den Schritten in umgekehrter Reihenfolge.

Hat die Reparatur nicht den gewünschten Erfolg gebracht? Auf unserem

OnePlus 5 Antwortenforum kannst du Hilfe bei der Fehlersuche finden.

Arthur Shi

Mitglied seit: 03/01/18

218617 Reputation

25 Kommentare

The screen is a pain to pry up but the guide itself was good and helped me to successfully fix my phone thank you Jose

Christopher Farmer -

My headphone jack had stopped holding my headphones in place meaning that the headphones would pop out of the jack very easily. Replacing the jack using this guide was a breeze once the screen had been removed which was the most difficult part of the repair.

I did not have a suction cup to help lift the screen which I in retrospect would recommend anyone doing this repair to get.

Thanks Jose! :)

Andrée -

Great guide, simple repair. A new charging port fixed my connection issues. I used a plastic butter knife to pry the screen, it took some work but wasn’t that hard.

Thanks!
Filip Märling -

I just attempted to do this with my phone and the bottom two screws in step 2 were T-1 torx where the instructions are claiming a T-2.

Alan -

I had the same issue, defintely T1 on my phone rather than T2. T1 is not included in the iFixit srewdriver set unfortunately. Other than that, this guide is great, as other people mentioned prying the back of is difficult but doable. After that it’s a breeze.

Scott Marley -

Where can I buy this replacement part from?

Wilza -

Just search: OEM Charging Port + Headphone Jack Flex for OnePlus 5 on eBay or whatever

DANIEL MCMILLAN -

In step 11 what is there a specific name for the part that the flex cable plugs into and is there a way to replace it without having to replace the entire motherboard? I damaged it and now the headphone jack doesn't work.

Parminder Sidhu -

Those connectors are known as FPC connectors/sockets. They can be replaced, but you may have to take it in to a repair shop that can micro-solder a replacement. If a pin is bent and not broken, you may be able to re-bend it carefully.

Arthur Shi -

I did it but the screen cracked. The tool that came with my part was really cheaper (it wasn’t Ifixit, *but I still blame them* for not selling the jack) and the thin edge had worn out a lot before I separated the phone.

zebedeeweetaluktuk -

Perfect guide to an easy fix for my charging issues. Thanks for this guide, Arthur!

Mathias D'hoore -

where can I get the replacement part? (type-c and jack)

alex_angel_04 -

What would be a good price on the charger port for the 6t?

T C -

Is there anyplace i can get the bracket mentioned in step 10?

Ryan Braganza -

Easy to follow guide. Though The suction cup was more of a hinderance for me when disassembling. I just took the phone in 1 hand and used the tool in my other hand to pry away the back cover. All in all took me about 20 mins to do this repair. My charge port was worn out. Wouldn’t hold cables no more.

Juno Grégoire -

Thanks for the guide. Simple to follow and good to have the pictures as a reference too. It does take a lot of force to open the case. My initial problem was I lost the fast charge, then several months later was having to push the cable very forcefully into the port to even get a slow charge. Sometimes that would not work so I would just get a trickle charge with no charge light indication.

Marcus -

Charging blue light not coming only red there what is problem.

Praveen Maan -

Replaced my charging port because it was really loose and would only charge at a certain angle. Now it has a super clean snap when I plug it in… but won’t charge at all ? Anyone have any idea where I could have gone wrong? The phone works fine except for that

Jem Walker -

Edit: just went back in and deconnected then reconnected the flex cable to the motherboard. works fine now!

Jem Walker -

I successfully replaced the charging port using the guide. My screen was already cracked, but did not crack further when removing the screen. I stupidly read in the first step that you needed to remove the SIM card tray, remove the SIM and put it back. In fact you needed to remove the SIM card tray and only put it back when reïnstalling. Maybe it was me being too fast, or maybe it is just a little confusing that reinstallation steps are already added in the teardown steps. I noticed the reïnstallation steps were added in the teardown steps later in the guide, but had already forgotten about the SIM card tray at that point. This caused me to bend the SIM-card tray when removing the screen. This was my first iFix guide I followed and I’m pretty sure I will not make this mistake again.

Michiel Mariën -

Hi Michiel,

Thanks for the feedback! I’ll adjust the step to clarify the reinstallation bullet.

Arthur Shi -

Does the port allow USB connection after changing it? I changed mine with the aftermarket port and I can't seem to connect to my computer after that.

Mirza Iqbal -

Great guide. I managed to fix my USB-C connector when it stopped charging (after many months of having to wiggle in the charging cable) and it's working like new! The negative is that I had to cancel my new phone order :-)

Manny Singh -

Has anyone else had issues with the new port failing within a short time? I replaced mine in February and it was working perfectly until about 2 weeks ago when Android Auto stopped working. Then yesterday, I could no longer get it to charge. Port still locks positively on cables when plugged in. Tried with multiple cables, no difference. Tried same cables on other devices and they work fine. Removed the back cover today, pressed lightly on either side of the connector, then plugged in a USB-C cable and it started charging. Haven't re-assembled yet but wondering if perhaps the connector is misaligned or maybe aligned by not fully seated. The metal bracket is in place and screwed in securely. I'm assuming that misalignment would just not work at all, so maybe not fully seated? Anyone experience anything similar or have any ideas? I'm hoping to not have to re-open my phone every month or two for this kind of problem.

Brett Gersekowski -