Einleitung

Hier wird der Austausch des Bildschirms gezeigt, er besteht aus LCD und Digitizer.

  1. h5ynssrkDIBplqRh
    h5ynssrkDIBplqRh
    YKMQVLJXCqIuPSJQ
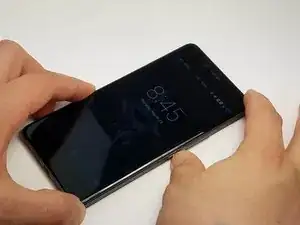
    • Schalte das Smartphone an der Einschalttaste aus. Das ist die kleinere der Tasten an der rechten Seite.

    • Halte die Taste einige Sekunden gedrückt, bis die Option "Ausschalten" erscheint.

    • Tippe darauf und das Smartphone fährt herunter.

  2. L2e5qBKbogbIsUd4
    L2e5qBKbogbIsUd4
    e1IwERvEbMF4kmKF
    KNwuu4XIgVyKg1wP
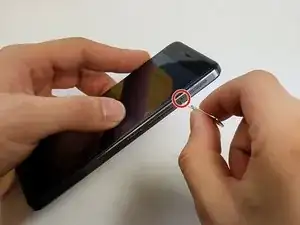
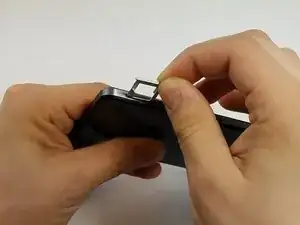
    • Setze ein Werkzeug zum Entfernen der SIM Karte in das kleine Loch oben rechts am Smartphone ein, über den Tasten der Lautstärkeregelung.

    • Wenn du nicht das Originalwerkzeug hast, kannst du eine aufgebogene Büroklammer benutzen.

    • Drücke das Werkzeug ein, der Einschub sollte herausspringen.

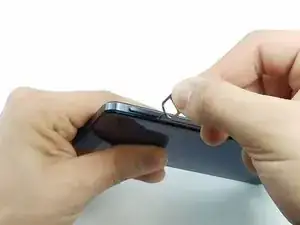
    • Entferne den Einschub vom Gerät.

    There is absolutely no reason to remove the sim tray, we're not removing the motherboard.

    Dennis Meerveld -

    You could at least save your SIM cards (and uSD card) some of the unnecessary heat treatment that way.

    S K -

  3. SYaDa1iqd2QjvDVL
    SYaDa1iqd2QjvDVL
    Y1hfpUJeNAN6muGo
    sPJPHMo2QQbPqIa2
    • Ziehe Handschuhe gegen die Wärme an und lege das Smartphone auf eine hitzeunempfindliche Oberfläche.

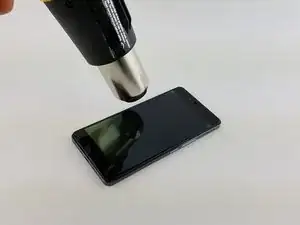
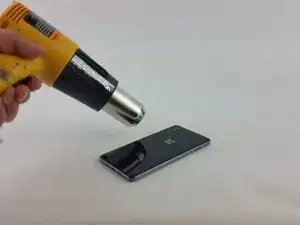
    • Erwärme die Rückabdeckung langsam und gleichmäßig mit einem Heißluftgebläse.

    • Verweile dabei nicht zu lange an einer Stelle. Zu viel Hitze an einem Punkt kann das Gerät beschädigen.

    • Während du die Rückseite erwärmst, kannst du mit einem Jimmy testen, ob der Kleber schon weich genug ist, dass er sich ablösen lässt.

    • Löse vorsichtig die Rückabdeckung ab. Benutze Plektren um die Teile getrennt zu halten.

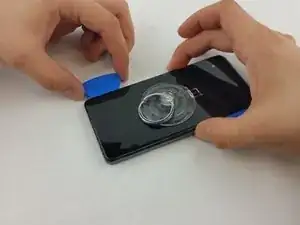
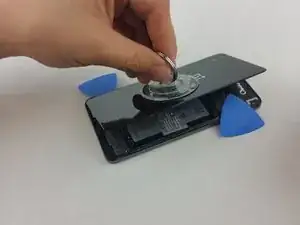
    • Wenn die Kanten genügend aus der Klebeverbindung befreit sind, musst du einen Saugnapf auf der Glasscheibe anbringen.

  4. xFJXCTP4OmExHHDQ
    xFJXCTP4OmExHHDQ
    GJxEsbXs2Q1nc5E4
    gUBkCDuyaddfrrf3
    • Drücke den Saugnapf an der Scheibe an, bis er gut festsitzt.

    • Ziehe mit Hilfe des Saugnapfs die Rückabdeckung vom Gerät ab.

    • Der Saugnapf hilft dir beim Ablösen der Abdeckung. Passe dabei auf, dass sie sich durch die vorhandene Restwärme nicht wieder verklebt.

    It can't be stressed enough to do this very carefully. I did it very carefully, but not carefully enough. Cracked a corner. Also not just the edges, there's extra adhesive on the lower 2-3 cm's of the back.

    Another remark, get in between the black bezel and the back cover, this is a bit unclear on the first picture. Same goes for the front, get in between the bezel and the front assembly.

    Dennis Meerveld -

    Most of the adhesive is on the top and bottom ends, yes.

    I would recommend one to steer clear of the camera assembly though (the LED lens is plastic and melts) + the center (where the battery is, mine swelled a bit).

    S K -

  5. DWbKZI4ntppac4P2
    DWbKZI4ntppac4P2
    oxXkYDUU3yQWaoLb
    gFI55jsX3Z5ZrlaI
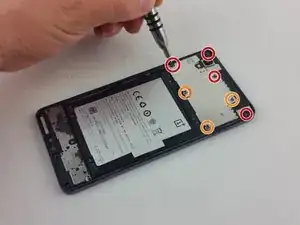
    • Drehe folgende sieben Kreuzschlitzschrauben #000 heraus:

    • Vier längere Schrauben

    • Drei kürzere Schrauben

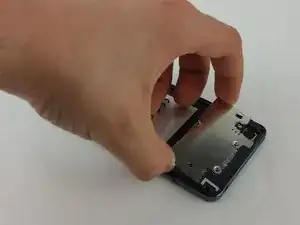
    • Wenn die Schrauben alle weg sind kannst du die Metallabdeckung mit einem Spudger hochhebeln.

    • Sie ist mit zwei Laschen unten direkt über dem Akku befestigt, beginne also an der Unterseite.

    What size of screw goes where?

    Will -

    Check http://imgur.com/wqD9Dis. Orange circles are the smaller screws (3 out of 7 are smaller than the other 4).

    Dennis Meerveld -

  6. uqBG3p4pVuLVS1Nw
    uqBG3p4pVuLVS1Nw
    MdPFnJIrgCjPreRA
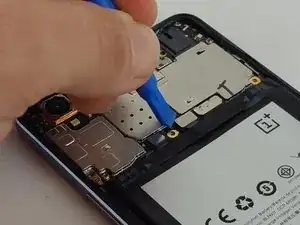
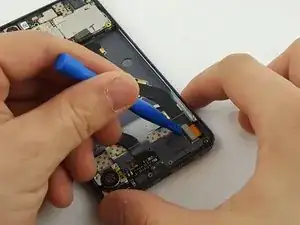
    • Wenn du die Abdeckung abgenommen hast kannst du den Verbinder des Akkukabels auf der Hauptplatine sehen.

    • Löse den Verbinder vorsichtig mit einem Spudger.

    • Dadurch wird die Stromversorgung abgetrennt. Das ist wichtig, damit kein Bauteil während der Reparatur unter Spannung steht.

  7. 6JMGGr6ExXkbNIOT
    6JMGGr6ExXkbNIOT
    Kpy6q4E4EsgbhNKU
    XjIb5Qpc1XySMZYb
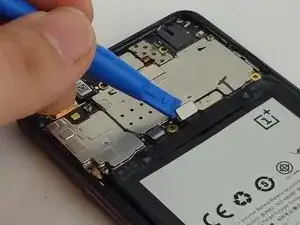
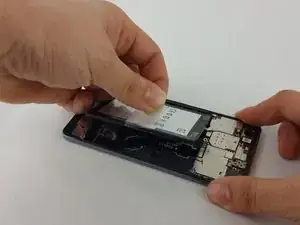
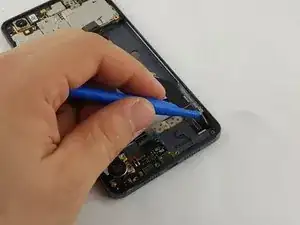
    • Finde am Akku eine aufgeklebte durchsichtige Zuglasche.

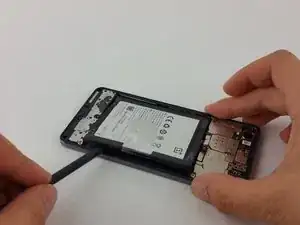
    • Fasse die Lasche fest an und ziehe sie hoch, weg vom Smartphone.

    • Lasse dir dabei Zeit. Wende nicht zuviel Kraft auf und beschädige nicht den Akku.

    • Der Akku ist auf der Unterseite festgeklebt. Es ist also hilfreich, wenn du den Spudger zwischen Akku und Gerät einsetzst, um die Klebeverbindung aufzutrennen.

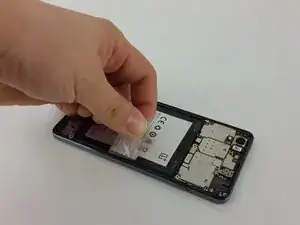
    • Ziehe so lange am Akku, bis er ganz frei ist.

    Strictly speaking, you don't need to remove the battery at all. The connector to the front assembly is underneath the speaker assembly.

    Dennis Meerveld -

    If your order the complete part you need to remove it.

    The battery is glued in very well and it bends pretty easy. It is wise to order a new battery aswell.

    Chris S. -

    I agree it's nearly impossible to remove the battery without damaging it. Even a tiny little bending can lower the capacity. And if you heat it up too much to soften the glue it can explode. Also never use metal tools on the battery in case u break through the protection foil it won't catch fire.

    Peerless Records -

    The instructions on the pull tab itself are pretty clear and contradict what's said here!

    "Tear from position 1, and then pull out the battery from position 2."


    The battery sits in a kind of a black "vest", which is the thing glued to the phone (not the battery itself).

    This vest can be "unbuttoned" from the top and bottom sides (position 1, visible on some of the previous pictures).

    After that the battery would pop out with much less effort (there is some adhesive in the "vest", but it's much less robust).


    What is being depicted here is quite dangerous and unnecessary, as it makes the battery bend heavily.

    S K -

  8. OAkJSAMNUSmJYiLA
    OAkJSAMNUSmJYiLA
    yqhEuTokPnXkF25F
    v2ukEeJPBxZHsCnW
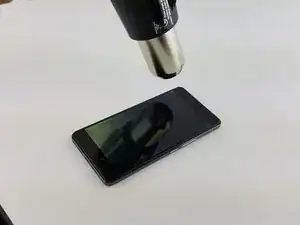
    • Wenn alle Bauteile auf der Rückseite des Smartphones entfernt sind kannst du dich auf den Kampf mit Heißluftpistole und Ofenhandschuhen einstellen.

    • Diese Reparatur ist eine letzte Möglichkeit. Wenn du das tust, wird dein Bildschirm wahrscheinlich beschädigt, zerbrochen oder entfärbt sein. Sei dir dieses Risikos bewusst.

    • Halte das Handy mit den Schutzhandschuheen fest und erwärme seine Kanten gleichmäßig.

    • Verweile etwa 15 - 20 Sekunden lang auf einem 5 cm langen Stück, so dass es heiß genug zum Ablösen wird.

  9. MoigajniydhfaVFG
    MoigajniydhfaVFG
    5rcAXoA2dEMGQmVP
    SLrJd2XKlLINfDK1
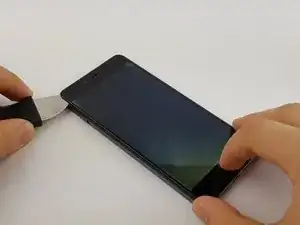
    • Wenn ein Abschnitt heiß genug ist, dann setze ein Jimmy ein und schiebe es zwischen Glasscheibe und Aluminiumblende.

    • Fahre vorsichtig fort damit, den Jimmy weiterzuschieben und zu erwärmen. Löse die Scheibe aus ihrer Klebeverbindung.

    • Du musst wirklich Ofenhandschuhe benutzen. Das Smartphone wird sehr heiß und du verbrennst dir bei direktem Kontakt die Finger.

    • Es ist praktisch einige Plektren zwischen Glas und Blende einzusetzen, damit die Teile beim Erkalten nicht wieder zusammenkleben.

    • Fahre mit diesen Schritten ringsum fort und löse den Kleber.

    if only mobile outer display glass is break then it essential to change whole display or we can only change the glass

    please reply fast

    Ajay Shete -

    My phone display is broke how to purchase display with touch

    …pls reply fast

    Neha -

  10. B62l6UXt3ZDbGNSx
    B62l6UXt3ZDbGNSx
    2WxLRUNJsokX5muV
    shocqCaaUQJlicaf
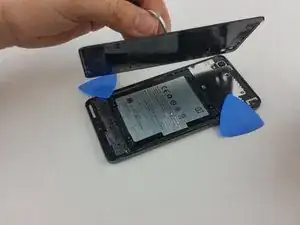
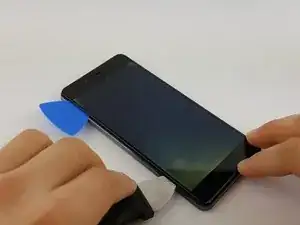
    • Wenn alle Klebestellen gelöst sind und der Bildschirm frei vom Gerät ist, wirst du sehen, dass er auf der Rückseite immer noch durch ein Flachbandkabel angeschlossen ist.

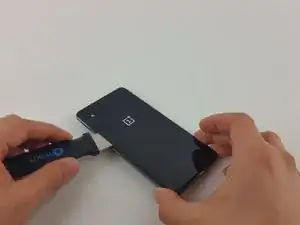
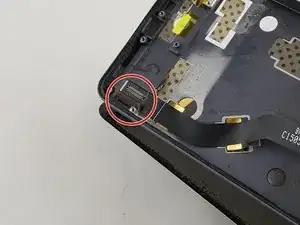
    • Löse den Verbinder zum Bildschirm am Smartphone unten rechts mit einem Plastiköffnungswerkzeug.

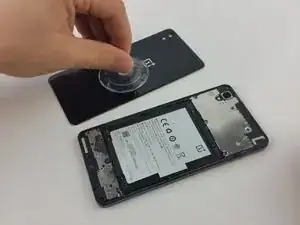
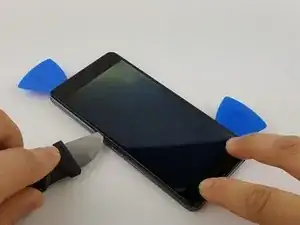
    • Jetzt kannst du den Verbinder vorsichtig durch die Öffnung auf der Rückseite des Handys ziehen. Der Bildschirm ist dann frei.

    • Wenn der Verbinder ganz durch die Öffnung gezogen worden ist, kann der Bildschirm entfernt werden.

    You'll notice we're missing a step here, the removal of the speaker assembly.. Needed to get to the display connector. Remove all 8 screws. The bottom ones are a tad lager than the top 4 ones, so be sure you don't mix these up.

    Also, once you have the front assembly loose, apply a bit of heat to the connector, so you can lift it up a bit. It will block the entry otherwise and you won't be able to pull the flatcable out.

    Dennis Meerveld -

Abschluss

Um dein Gerät wieder zusammenzusetzen, follge den Schritten in umgekehrter Reihenfolge.

Luis Castro

Mitglied seit: 08/02/16

2061 Reputation

19 Kommentare

Does anyone know where to get a screen for the opx?

Dan Redmond -

i just ordered one from aliexpress.

anyone knows the best way to glue the screen back onto the x? 3M 2 sided tape 2mm thickness is ok?

thanks

kili cos -

Hi Kill,

Did u order the display and touch or just the display? and which web site did u order it from?

Aditi Mangal

ADITI MANGAL -

I'm also interested! can you post a link of the site?!

andreaartico -

My one plus x got fell from my hand. Now the display slowly getting fading away with blurriness. It's almost completely over the phone now :(

whats the options available now? and what will be the cost of display set for the replacement?

Lakshmi Maguluri -

If it's just the display screen it's like 5-8 bucks on ebay, but the whole screen+digitizer+touch is like at leas $150, ranging up to 200. Might as well buy a new phone then.

maniac001 -

(addition) someone on the OPX forum tried to fix the cracked screen only and they said that the digitizer & screen are glued together, they broke the digitizer while trying to separate it. So they had to get the whole digitizer+screen assembly instead which was about $160.

the cheapest I can find now is this one http://www.ebay.com/itm/OEM-Full-LCD-Dis...

forum post: https://forums.oneplus.net/threads/onepl...

maniac001 -

Oneplus X Front Outer Screen Glass?

Sarthak Ahir -

I'm stuck on step 10 ...... my connector doesn't fit through the hole. Did you lift the ribbon connector for the screen and if so how?

Duncan Gillibrand -

Hello, my OnePlus X has a shattered glass. However, the touch is working just fine and so is the display. In this case, i need to replace only the front glass, right? Is separating just the glass an easy task or not? Im going to be ordering a glass front online and have a professional do the job. Is that a viable alternative? Please help.

Elizabeth Scots -

Definitely not a good idea, go for the full display assembly. The digitizer is glued and separating it from the glass is close to impossible without damaging the former, even for professionals, and then you'd have to glue the new glass to the digitizer which isn't exactly easy either.

Loic Nageleisen -

Where will I get the new LCD display for my OnePlus X, and how much does it costs??

SUBHAJIT SARKAR -

hi Shubhajit, Aliexpress is the best source. Mine arrived in 20 days…

Karunamaya Kajekar -

I have a one plus x. His screen is damaged. Please tell me his screen where available and which cost.thanks

Balmukand Rathore -

I have found a good OnePlus X screen on eBay, but they are quite expensive, about $100, €85.

Lieven Blancke -

My glass is cracked. Touch and display are just fine. I found a touch+digitizer online. Can this procedure be [relatively] safely used to replace those but keeping the display?

It would be performed by a professional who had never worked on this model before.

Wouldn't like him to damage other components. He does a fine job with other phones.

Acente -

My phone got wet. After a few days drying out it now boots. The display is fine but the time and date are incorrect and the digitiser is completely unresponsive so I can't get past the lock screen. Do I definitely need to replace it or is it possible that it is just a connector that needs cleaning/ drying or another could the failure of another component give these symptoms?

Jeremy Taffel -

Hello,

I have oneplus x and its glass got broken, touch is working fine. How do I replace the glass? Or where do I find the glass.

Thank You

Gundu -