Einleitung

Hier wird der Austausch der Micro USB Buchse an der Unterkante des Smartphones gezeigt.

  1. h5ynssrkDIBplqRh
    h5ynssrkDIBplqRh
    YKMQVLJXCqIuPSJQ
    • Schalte das Smartphone an der Einschalttaste aus. Das ist die kleinere der Tasten an der rechten Seite.

    • Halte die Taste einige Sekunden gedrückt, bis die Option "Ausschalten" erscheint.

    • Tippe darauf und das Smartphone fährt herunter.

  2. L2e5qBKbogbIsUd4
    L2e5qBKbogbIsUd4
    e1IwERvEbMF4kmKF
    KNwuu4XIgVyKg1wP
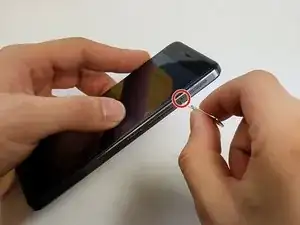
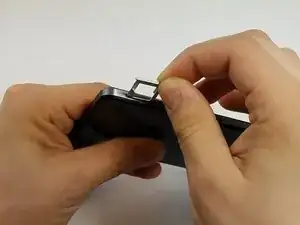
    • Setze ein Werkzeug zum Entfernen der SIM Karte in das kleine Loch oben rechts am Smartphone ein, über den Tasten der Lautstärkeregelung.

    • Wenn du nicht das Originalwerkzeug hast, kannst du eine aufgebogene Büroklammer benutzen.

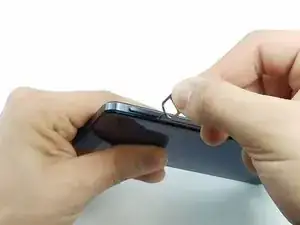
    • Drücke das Werkzeug ein, der Einschub sollte herausspringen.

    • Entferne den Einschub vom Gerät.

    There is absolutely no reason to remove the sim tray, we're not removing the motherboard.

    Dennis Meerveld -

    You could at least save your SIM cards (and uSD card) some of the unnecessary heat treatment that way.

    S K -

  3. SYaDa1iqd2QjvDVL
    SYaDa1iqd2QjvDVL
    Y1hfpUJeNAN6muGo
    sPJPHMo2QQbPqIa2
    • Ziehe Handschuhe gegen die Wärme an und lege das Smartphone auf eine hitzeunempfindliche Oberfläche.

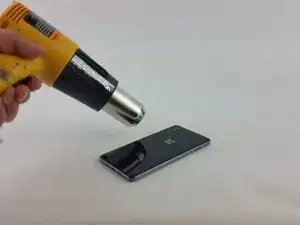
    • Erwärme die Rückabdeckung langsam und gleichmäßig mit einem Heißluftgebläse.

    • Verweile dabei nicht zu lange an einer Stelle. Zu viel Hitze an einem Punkt kann das Gerät beschädigen.

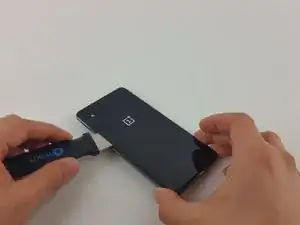
    • Während du die Rückseite erwärmst, kannst du mit einem Jimmy testen, ob der Kleber schon weich genug ist, dass er sich ablösen lässt.

    • Löse vorsichtig die Rückabdeckung ab. Benutze Plektren um die Teile getrennt zu halten.

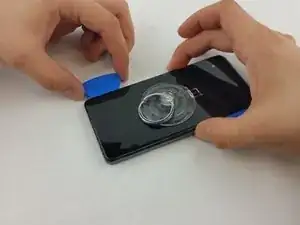
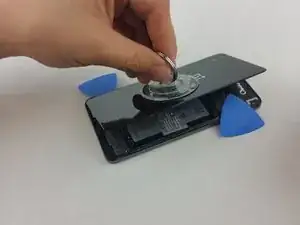
    • Wenn die Kanten genügend aus der Klebeverbindung befreit sind, musst du einen Saugnapf auf der Glasscheibe anbringen.

  4. xFJXCTP4OmExHHDQ
    xFJXCTP4OmExHHDQ
    GJxEsbXs2Q1nc5E4
    gUBkCDuyaddfrrf3
    • Drücke den Saugnapf an der Scheibe an, bis er gut festsitzt.

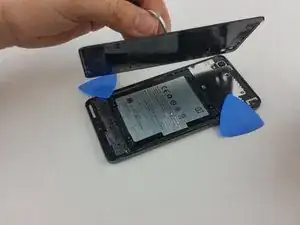
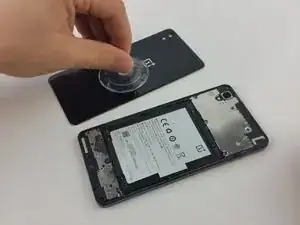
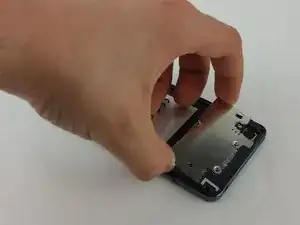
    • Ziehe mit Hilfe des Saugnapfs die Rückabdeckung vom Gerät ab.

    • Der Saugnapf hilft dir beim Ablösen der Abdeckung. Passe dabei auf, dass sie sich durch die vorhandene Restwärme nicht wieder verklebt.

    It can't be stressed enough to do this very carefully. I did it very carefully, but not carefully enough. Cracked a corner. Also not just the edges, there's extra adhesive on the lower 2-3 cm's of the back.

    Another remark, get in between the black bezel and the back cover, this is a bit unclear on the first picture. Same goes for the front, get in between the bezel and the front assembly.

    Dennis Meerveld -

    Most of the adhesive is on the top and bottom ends, yes.

    I would recommend one to steer clear of the camera assembly though (the LED lens is plastic and melts) + the center (where the battery is, mine swelled a bit).

    S K -

  5. DWbKZI4ntppac4P2
    DWbKZI4ntppac4P2
    oxXkYDUU3yQWaoLb
    gFI55jsX3Z5ZrlaI
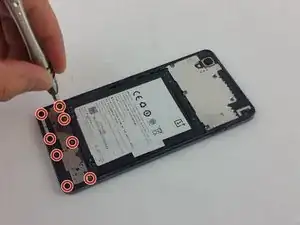
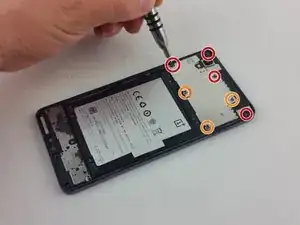
    • Drehe folgende sieben Kreuzschlitzschrauben #000 heraus:

    • Vier längere Schrauben

    • Drei kürzere Schrauben

    • Wenn die Schrauben alle weg sind kannst du die Metallabdeckung mit einem Spudger hochhebeln.

    • Sie ist mit zwei Laschen unten direkt über dem Akku befestigt, beginne also an der Unterseite.

    What size of screw goes where?

    Will -

    Check http://imgur.com/wqD9Dis. Orange circles are the smaller screws (3 out of 7 are smaller than the other 4).

    Dennis Meerveld -

  6. uqBG3p4pVuLVS1Nw
    uqBG3p4pVuLVS1Nw
    MdPFnJIrgCjPreRA
    • Wenn du die Abdeckung abgenommen hast kannst du den Verbinder des Akkukabels auf der Hauptplatine sehen.

    • Löse den Verbinder vorsichtig mit einem Spudger.

    • Dadurch wird die Stromversorgung abgetrennt. Das ist wichtig, damit kein Bauteil während der Reparatur unter Spannung steht.

  7. 6JMGGr6ExXkbNIOT
    6JMGGr6ExXkbNIOT
    Kpy6q4E4EsgbhNKU
    XjIb5Qpc1XySMZYb
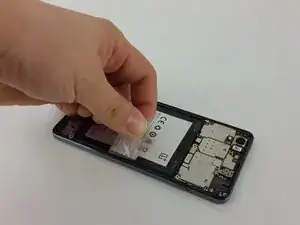
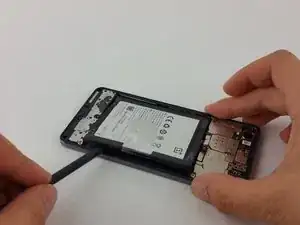
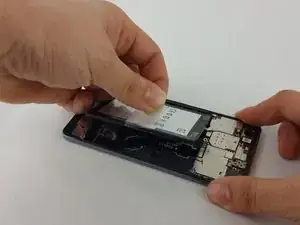
    • Finde am Akku eine aufgeklebte durchsichtige Zuglasche.

    • Fasse die Lasche fest an und ziehe sie hoch, weg vom Smartphone.

    • Lasse dir dabei Zeit. Wende nicht zuviel Kraft auf und beschädige nicht den Akku.

    • Der Akku ist auf der Unterseite festgeklebt. Es ist also hilfreich, wenn du den Spudger zwischen Akku und Gerät einsetzst, um die Klebeverbindung aufzutrennen.

    • Ziehe so lange am Akku, bis er ganz frei ist.

    Strictly speaking, you don't need to remove the battery at all. The connector to the front assembly is underneath the speaker assembly.

    Dennis Meerveld -

    If your order the complete part you need to remove it.

    The battery is glued in very well and it bends pretty easy. It is wise to order a new battery aswell.

    Chris S. -

    I agree it's nearly impossible to remove the battery without damaging it. Even a tiny little bending can lower the capacity. And if you heat it up too much to soften the glue it can explode. Also never use metal tools on the battery in case u break through the protection foil it won't catch fire.

    Peerless Records -

    The instructions on the pull tab itself are pretty clear and contradict what's said here!

    "Tear from position 1, and then pull out the battery from position 2."


    The battery sits in a kind of a black "vest", which is the thing glued to the phone (not the battery itself).

    This vest can be "unbuttoned" from the top and bottom sides (position 1, visible on some of the previous pictures).

    After that the battery would pop out with much less effort (there is some adhesive in the "vest", but it's much less robust).


    What is being depicted here is quite dangerous and unnecessary, as it makes the battery bend heavily.

    S K -

  8. TebQJGbcUMLSLUu2
    TebQJGbcUMLSLUu2
    bV2FoVEkJXWEFhug
    • Entferne die acht markierten Kreuzschlitzschrauben #000, welche das Logic Board befestigen.

    • Wir haben diese Schrauben entfernt, als wir auch die Schrauben für die obere Metallabdeckung entfernt haben. Solange sie ausgedreht werden, bevor irgendwelche Kabel gelöst werden ist die Reihenfolge der Schrauben egal.

    • Wenn alle Schrauben weg sind kannst du den Metalldeckel mit einem Spudger hochhebeln.

    • Der Deckel ist verklebt, er ist deswegen etwas schwierig zu lösen. Sei vorsichtig und bringe nicht zu viel Kraft auf.

    The four screws on the bottom are the long ones. The four near the battery are the shorter screws

    Chris S. -

  9. OKo1cVTyq2gLTj4I
    OKo1cVTyq2gLTj4I
    aguclcS5ObQKos1c
    wxEypNLM3wxEF2Nh
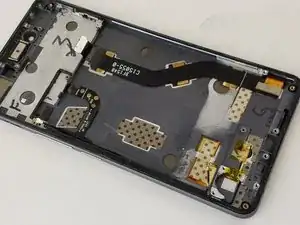
    • Die Metallabdeckungen sind weg, der Akku gelöst, es kann weitergehen.

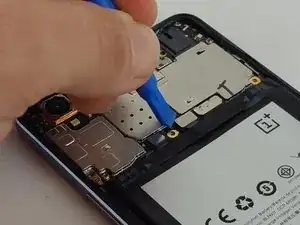
    • Finde die Rückkamera und clipse sie mit einem Spudger aus. Lege sie zur Seite.

    • Finde den roten markierten Verbinder und löse ihn mit einem Metallspatel. Schiebe ihn zur Seite.

    • Achte darauf, dass alle Kabel, Drähte oder Verbinder aus dem Weg sind, bevor du das obere Logic Board entfernst.

  10. WyFN1sfNY1WgFZwl
    WyFN1sfNY1WgFZwl
    iKtPE5NqoF6NyBXI
    YPyC3RLgVGRrJdKG
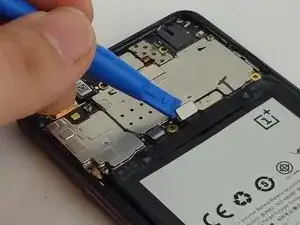
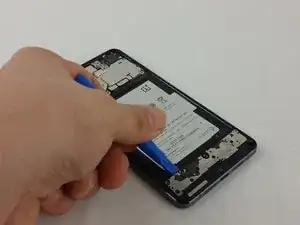
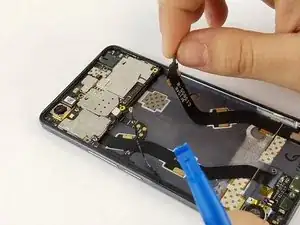
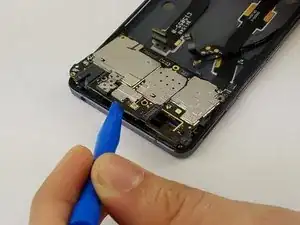
    • Nimm den Kunststoffspudger und fange an am oberen Logic Board zu hebeln. Hebe es soweit hoch, dass du es sicher ganz entfernen kannst.

    • Sei dabei vorsichtig, die Frontkamera ist unter ihr befestigt. Du könntest sie durch zu starkes Ziehen beschädigen.

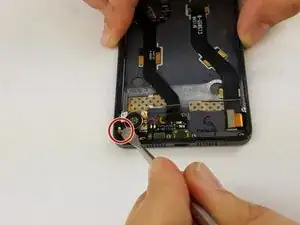
    • Unten links am Smartphone findest du eine kleine Kreuzschlitzschraube #000. Drehe sie heraus.

    Switch back to the plastic spudger and start to pry at the upper logic board. Carefully pry it up until you can safely remove completely.

    This should not been done from the top but from the bottom, just as the metal cover from step one.

    And before starting, make sure the three state button is in the top position.

    local host -

  11. GvOvu2ALGZ4BwrcT
    GvOvu2ALGZ4BwrcT
    yC3kfOKM3yu5FdVW
    iKcdsnnE2xZGfnJ4
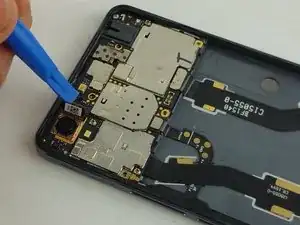
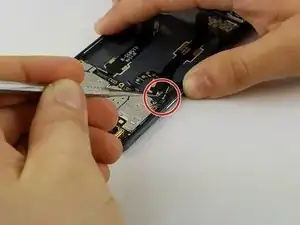
    • Nachdem die Kreuzschlitzschraube weg ist musst du ein schwarzes Kabel entfernen. Löse es mit dem Metallspatel.

    • Für die weitere Reparature ist es praktischer, wenn du das Kabel aus dem Weg biegst.

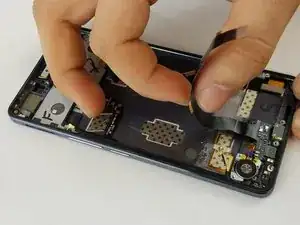
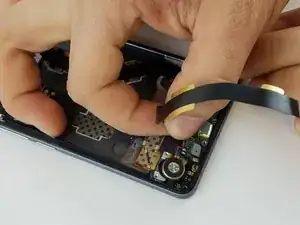
    • Ziehe das Flachbandkabel so wie im Bild gezeigt zurück. Es ist am Vibrationsmotor und an der Ladebuchse angeschlossen. Der Vibrationsmotor ähnelt einer Knopfzelle.

    • Hebele den Vibrationsmotor mit einem Plastiköffnungswerkzeug heraus. Sei vorsichtig, er haftet gut am Smartphone.

    • Du musst den Vibrationsmotor vor der Ladebuchse entfernen.

  12. 6fE4qEAB1QBClKTR
    6fE4qEAB1QBClKTR
    LCvUuOxVkSPFPckD
    XsJjJaFaRJOqhEHI
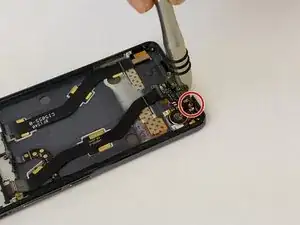
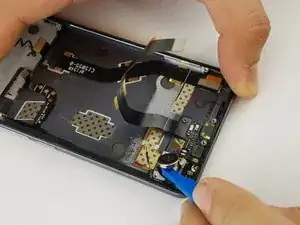
    • Wenn der Vibrationsmotor weg ist, dann ziehe vorsichtig am Kabel. Die Ladebuchse ist verklebt.

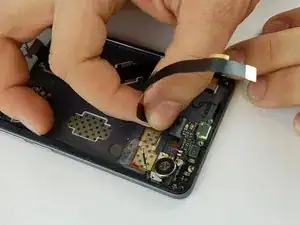
    • Nachdem du vorsichtig an der Buchse und dem Vibrationsmotor gezogen hast sollte alles frei sein; du kannst es dann austauschen.

Abschluss

Um dein Gerät wieder zusammenzusetzen, folge den Schritten in umgekehrter Reihenfolge.

Luis Castro

Mitglied seit: 08/02/16

2061 Reputation

7 Kommentare

So how do you replace the part with a new one? Says in the top description "no parts required"

Robin -

I had to reuse the vibration motor de- and solder it back on, because it is not included in the spare part.

Watch for the silence switch when you reasamble the phone. I had to unscrew the upper bord again because i didn't payed atention to it and it was locked. Also the mic is covered on the replacement part. Don't forget to remove the yellow "flag" there.

OxKing -

I replaced USB flex port, now working, but now phone dont recognize SIM card..what i must check? Thanks for any help

superlerry -

What is the price of charging port with vibrator module

santhosh gowda -

Good Instructions

In the upper right Corner is one more Screw

where the Logic-board is screwed directly.

That was not mentioned!

Also, you should pay attention that you do not pry where the PCP goes around the Camera.

I break off the Corner, fortunately it's only connected to the Status-LED.

Otherwise everything works.

Tesla Toni -

Thank for the instructions, this came in very handy!

I agree with all the above remarks:

- The screw in the upper right corner

- Battery comes out difficult, but you can listen the sealant come loose, so don’t force it!

- As well, don’t pry to much on the logic board, it’s being hold down by little ‘clips’ on the phone edge. Gently ply the edge toward the outside and it will click loose.

After reinstalling everything, all works perfectly! (saving me a lot of money !)

Thank you!

plessers_bart -

i did not try this out, since everything is ok with my phone (I was looking for polarity of the contacts of the battery connector actually), but this instructions seem very weird to me (as they are now): if you want to change the micro USB port, WHY on earth would you have to remove the logic board??? they are on opposing sides of the device and connected with a flex-cable, I don’t see the necessity.

Max -