Einleitung
Use this guide to ensure the CoughAssist works after a replacement, or when you don’t know what’s wrong and need to troubleshoot. The steps will take you through, testing all of the functions of the device separately, making it easy to find what isn’t working correctly. The first half of the procedure can also be done on the CoughAssist CM series.
-
-
Block the connector on the front of the machine using a rubber plug or similar item.
-
Check the pressure gauge. If it is not zero, see “pressure gauge reading is wrong” on the troubleshooting guide.
-
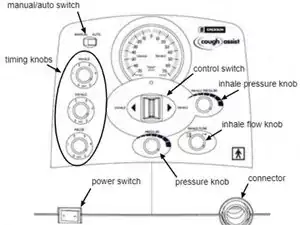
Set the inhale pressure knob fully clockwise, and the inhale flow and pressure knobs fully counterclockwise. On the CA models, set the manual/auto switch to manual, and set each timing knob to 1 second.
-
-
-
Turn on the power switch, checking that the light under it turns on. If not, see “indicator light won’t turn on” in the troubleshooting guide.
-
-
-
Turn the pressure knob slowly clockwise, noting that the speed of the motor increases steadily. Once it’s fully clockwise, allow the unit to warm up for 1 to 2 minutes.
-
-
-
Reset the pressure knob counterclockwise, then set the control lever to inhale and check that the gauge reads between 2 and 5 cmH2O.
-
Move the control lever to exhale and note that the gauge reads between -2 and -5 cmH2O.
-
Repeat the inhale and exhale tests with the pressure knob fully clockwise, seeing if the gauge is between 57 and 63 cmH2O.
-
Release the control lever and note that the lever moves to the center and pressure drops immediately to 0 cmH2O.
-
If any of these pressures are wrong, see “limited pressure” on the troubleshooting guide.
-
-
-
With the control lever on inhale, adjust the pressure knob to 40 cmH2O.
-
Turn the inhale pressure knob fully counterclockwise. Check that the gauge is between 18 and 22 cmH2O.
-
Slowly returning the inhale pressure knob clockwise should increase the pressure gradually back to 40 cmH2O.
-
-
-
5. Turn the pressure knob fully clockwise, set the control lever to inhale, remember the gauge reading, and release the control lever.
-
Set inhale flow to minimum (clockwise). Set the control lever to inhale and check that the pressure is within 10 cmH2O below the previous reading (maximum flow).
-
-
-
Remove the rubber plug. Check the flow by pushing the control lever to inhale and feel the airflow out of the unit. Release the control lever.
-
Set the inhale flow knob fully counterclockwise, and repeat the test, checking for a large increase of airflow.
-
-
-
Set the pressure knob to minimum. Move the switch from manual to automatic.
-
Verify that the unit immediately begins with the inhale pressure, followed by exhale (negative) pressure then drops to 0 cmH2O and continues to repeat.
-
-
-
Set the switch back to manual and verify that the pressure drops to 0 cmH2O. Return to auto.
-
-
-
One at a time, set each timing knob to 5 seconds and verify that each knob affects the correct phase.
-
-
-
Set the timing knobs to 5 seconds and use a stopwatch to check that each one lasts between 4.8 and 5.2 seconds.
-
Set the knobs to 1 second and verify that each phase lasts between 0.9 and 1.1 seconds.
-
If the timings are off, see “incorrect timings” on the troubleshooting guide.
-
