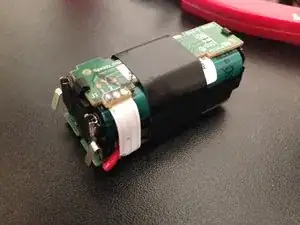
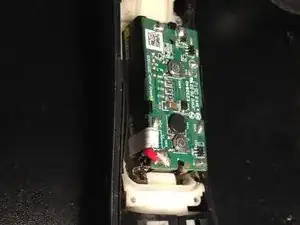
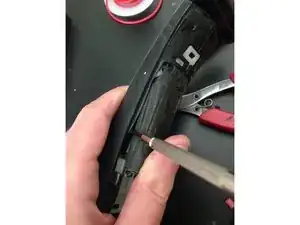
Einleitung

Die Lebensdauer dieses Akkus ist beklagenswert. In dieser Anleitung wird gezeigt, wie du ihn durch einen besseren ersetzen kannst - wenn du welche finden kannst!

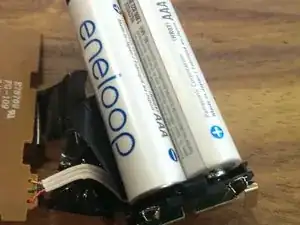
Der Akku, den ich hier ausgetauscht habe ist schon nach ein paar Wochen ausgefallen. In den Kommentaren steht, dass moderne NiMH-Akkus nicht kompatibel zur Ladeelektronik wären. Das kann sein, es gibt aber auch Erfolgsmeldungen. Manche Leute sagen, dass Eneloop AAA ein guter Ersatz wären.

Diese Anleitung ist also für Leute, die es probieren wollen. Seid aber gewarnt: es muss nicht immer funktionieren. Es ist wirklich schade, dass Akkus alle zwei Jahre weggeworfen werden sollen.

  1. mETqx5Ru4ZFRWI6U
    mETqx5Ru4ZFRWI6U
    dgX4uWwTLBIhJUc1
    vBP2ICAIUXKHx1Vl
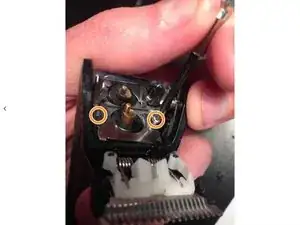
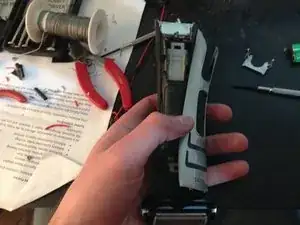
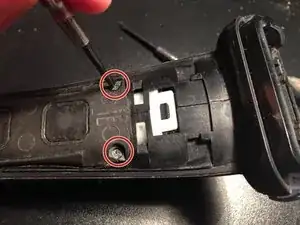
    • Drücke mit dem Daumen auf die Scherfolie, so dass sie sich an ihrem Gelenk öffnet.

    • Entferne die beiden Metallschrauben.

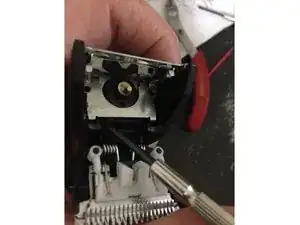
    • Heble den Metallclip mit einem dünnen Schraubendreher auf.

    Tools section doesn't say that you need a soldering iron!

    dorianworkman -

    Hi, hope you read this comment as I found a video to accompany this guide on the "doing" part. I found it helpful and maybe will you.

    https://www.youtube.com/watch?v=h7_UTAi1...

    I accedentally fitted that battery with the wrong polarity to is began smoking and I fried the board. Fit the battery correctly ++ and - - and success is near...

    PS. I feel like this is like a souls game where players are leaving clues for one another to beat the boss (greedy corporatists planing for product obsoleteness) May you win and prolong the life of your tech and reduce e-waste for future generations...

    I wish they made a trimmer with replaceable batteries... but I guess the bottom line would suffer from that.

    Nick -

  2. khQ3NCLnL1PMwbeY
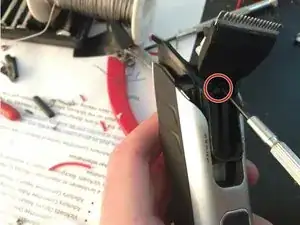
    • Nachdem die beiden Schrauben draußen sind und die Metallhalterung entfernt ist, lässt sich die Schneideeinheit herausholen. In den meisten Fällen kannst du sie einfach mit den Daumen behutsam herausschieben.

  3. yTyJPpxBZdwNeLhI
    yTyJPpxBZdwNeLhI
    2IUcGiWrrJBjSTDW
    • Halte den Bodygroom mit einer Hand, die Schalterseite nach oben und die Scharblattseite nach oben. Lege deinen Daumen auf die Gummitasten.

    • Drücke den Daumen vorwärts, so dass sich die verchromte Plastikschale leicht etwa 3 mm verschiebt. Dann kannst du sie abnehmen.

    • Die Plastikschale auf der anderen Seite lässt sich in gleicher Weise entfernen.

    if you remove the two screws in the first step, then remove the metal under the screws, just pull the trimmer unit out of the Philips. Then you can simply SLIDE BOTH of those chrome housing parts from top and bottom, just slide them from the Philips bodygroom, no need to make it harder than it is

    Broxin -

    Great guide, but let me re-emphasize an earlier comment that Step 2 should state that the chrome piece simply slides using two thumbs to unlock - NO PRY TOOL NECESSARY. In fact, attempts to pry the part off will risk damage to the slide-lock tabs. Much simpler to unlock as designed. Thanks for the help!!

    Paul Wiese -

  4. u6peyNLZsNHKjenj
    u6peyNLZsNHKjenj
    TFfYJuYZXl6NBP3T
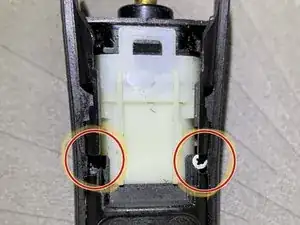
    • Entferne vier Kreuzschlitzschrauben und ziehe die Kunststoffabdeckung ab.

    • Die unteren beiden Schrauben sind möglicherweise nicht gleich zu erkennen.

    • Die Abdeckung kann mit Hilfe eines Spudgers/iSesamo gut abgenommen werden. Fange an der Oberseite damit an.

  5. Hrquv6vhMlPCqR4U
    Hrquv6vhMlPCqR4U
    HQIoRJQImOhiGgrK
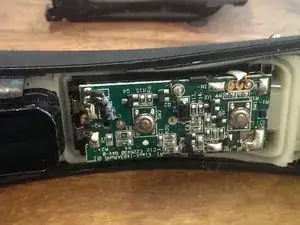
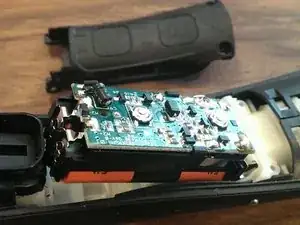
    • Hole die Leiterplatte und die Akkueinheit behutsam heraus.

    • Auch hier kann ein Spudger/iSesamo sehr hilfreich sein.

    Rather than PRYING the electronics out, because the batteries have some mass, you can instead invert the razor (electronics side down) and give it a few light slaps into your empty hand.

    Jim Cowles -

  6. gwJWA4ktwespOB3Q
    gwJWA4ktwespOB3Q
    ves2udelNtFDWZPJ
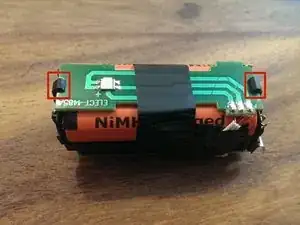
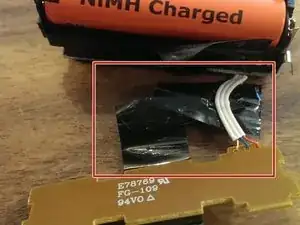
    • Entferne das Klebeband, mit dem die LED-Platine am Akku befestigt ist.

    • Die Platine ist mit drei Kabeln angeschlossen. Achte darauf, dass du diese Kabel nicht biegst, sie gehen leicht kaputt und es ist schwer, an sie heranzukommen. Es kann nützlich sein, wenn du die Kabel während der Reparatur an der Verbindungsstelle zur Hauptplatine mit einem Klebeband festklebst, so dass du sie nicht hin- und herbiegen musst.

    Start with prying up the bottom piece of the board where the 3 cables are not present and wiggle it out with your hands and nails... that worked for me

    Nick -

  7. 2Ig5OgZtgJx3YQan
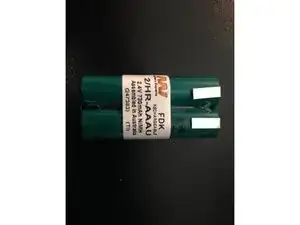
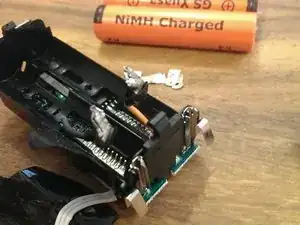
    • Den richtigen Akku zu finden, ist schwer. Ich bin sehr unsicher, welcher der richtige ist. Dieser hier stammt von Battery World aus Australien - und ist später ausgefallen. Bitte kommentieren, wenn du eine gute Lösung gefunden hast.

    • Philips hat das Akkufach so konstruiert, dass es etwa 1 mm zu kurz für die Standard-AAA-Größe ist. Solche geplante Obsolenz sollte verboten werden.

    Can I use a Li Ion Battery instead of a NiMH battery????

    bsanlao -

    No, Li-Ion and NiMH batteries have different voltages and charging requirements. They are not interchangeable.

    Kevin -

    My trimmer came with green "Suppo" brand batteries, and were identical in size to the regular AAA batteries I bought to replace them. Perhaps your contacts ended up thicker than the original battery pack?

    Casey Barton -

    I tested some ordinary disposable AAA batteries that I had in hand and they fit, so I ordered the highest capacity, highest rated NiMH rechargeable AAA I could find on Amazon- “Synergy Digital Battery 1.2 Volt, 1000 mAh”. Everything worked just fine.


    The trick, is the soldering, I think- all of these connections need to be as flat as possible to ensure that the battery pack will fit back in the enclosure. The battery is a big heat sink, so you need a fairly powerful soldering iron, but it’s electronics, so temperature control is important. Definitely use flux on both the battery faces and the wire leads, and pre-tin everything. Beyond that, use vices and 3rd hand clips to hold everything in place, and use a spudger or small dental pick tool type thing to hold the lead in place and tight to the battery face while the solder sets.

    CONTINUED…

    Gerry Pehl -

    …CONTINUED

    After that, reassembly was fine, it charged in an hour or so, and it worked better than ever the first couple of times I’ve used. Seriously better- I think the old batteries must have been so bad that even for the short time that they worked, the whole thing was under powered.

    Yes this was tricky, but I’ve done stuff like this a bit, and so it was very satisfying to stick it to the man.

    And yes, I believe manufacturers should pay a hefty fee for all the trash/pollution they create with such obsolescence. Pollution and natural resources are not priced correctly in our economic system, IMHO.

    Gerry Pehl -

    I strongly recommend using Eneloop batteries with factory-attached metal tabs. I got mine for less than $3 a piece, and they make the process much easier. Just be super careful and do not touch these tabs against each other, or it’ll result in a dangerous rapid discharge. Because of that, in order to be safe, get a pre-built 2-pack or add some insulation for the duration of replacement. Don’t even try “being careful” - you’ll touch them.

    If you got them separately, you’ll want to salvage the bridge from the old set, as in step 8, or use a metal wire to connect them.

    While the batteries themselves fit without any issues (I think I had a newer shaver revision), connecting them just as the original ones required very flat solder joint. It may be easier to keep the bridge above or below batteries, rather than at the end.

    Marcin Smialek -

    Eneloop batteries worked for me - so far!

    Great fix :-)

    gilesrowland -

    My trimmer came with green Suppo batteries. I have found a good replacement on Amazon (HyperPS 1.2V AAA 600mAh Ni-MH Rechargeable Battery for High-Drain Devices, Quick Charge (Flat Top w/Soldering Tabs)). They fit nicely in the housing and I was able to solder contacts without issues. It was not the best soldering job but there were charging and providing power to the trimmer. Not the best capacity but much better than then original. I bought a 4-pack as I might replacement again sometime later.

    https://www.amazon.com/gp/product/B07BX4...

    kevinpaletskih -

    I havent tried this yet, but this is advertised as compatible with the 7100: https://www.amazon.com/dp/B08CCFPMLR?ref...

    Ivan Bliskavka -

    I followed these instructions with “Exell 2.4-Volt Nickel Metal Hydride Razor Battery, EBR-BG2040, 800 mAh, Batteries for Electric Shavers” found on Amazon, which came with factory installed metal tabs, and the result seems perfect so far.

    The tabs made the soldering easier: I cut half of the old tabs and soldered to the new ones, heatshrink around and voilà.

    Some guy in Montreal -

    Oh wow, I wish I had the skills to be able to do this. I have this shaver and it will not hold a charge, it works fine otherwise but only for a few minutes after it’s taken off the charging cradle. The never model that Philips released has longer cutting lengths so my only option really is to try and get this one working properly again but this all looks very fiddly!

    BlueLightAlarm -

    The right name of the battery form factor is AAAU. Not AAA.

    The contacts on the betteries are spot welded. Pull them with pliers or a small side cutter for electronics.

    When soldering the contacts and wires to the new batteries, apply solder on the battery tips and on the wires first.

    Gregor Volkmann -

  8. 2UiRUsLkHlAgMi5o
    2UiRUsLkHlAgMi5o
    1yFePy5nHjfuOVBh
    PsA1UnfAvXpvgR4w
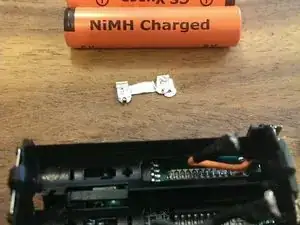
    • Dieser Schritt erfordert besonderes Geschick.

    • Löse die Kabel und Metalllaschen behutsam mit einer Spitzzange ab.

    • Achte darauf, dass die Metalllaschen/Kontakte nicht beschädigt werden, du brauchst sie später noch.

    • Wenn die Kabel nicht leicht abgehen, dann müssen vielleicht die Lötstellen, an denen sie befestigt sind, abgebohrt werden. Beachte, dass die Gefahr, etwas zu beschädigen, beim Bohren groß ist, mache das nur, wenn du dich sicher fühlst.

    Hey guys, the metal contacts on both sides are extremely difficult to remove. I am using needle nose pliers but they just don't seem to budge. Any tips? I really don't want to mess them up or destroy them. Thanks for any help

    Vladimir Kostek -

    Use an Xacto to cut off the battery welds. Came off really easily with no damage.

    Everett Goings -

    Gosh …. so much time consuming. Poor product design, I will not buy Phillips again for sure.

    Edi Harjono -

    Removing the batteries: Though the two batteries are attached to each other, the pair are merely press-fit into the electronics assembly.

    With the larger circuit board facing you, one end of the board has a small “window” where you can see the ends of the batteries. Stick a spudger or toothpick through the window, and gently push the batteries out of their holster.

    Jim Cowles -

    Hi, hope you read this comment as I found a video to accompany this guide on the "doing" part. I found it helpful and maybe will you.

    https://www.youtube.com/watch?v=h7_UTAi1...

    I accedentally fitted that battery with the wrong polarity to is began smoking and I fried the board. Fit the battery correctly ++ and - - and success is near...

    PS. I feel like this is like a souls game where players are leaving clues for one another to beat the boss (greedy corporatists planing for product obsoleteness) May you win and prolong the life of your tech and reduce e-waste for future generations...

    I wish they made a trimmer with replaceable batteries... but I guess the bottom line would suffer from that.

    Nick -

  9. aLG1SGDp3qxBuKRA
    aLG1SGDp3qxBuKRA
    rqUTB2tUvyms5Yqr
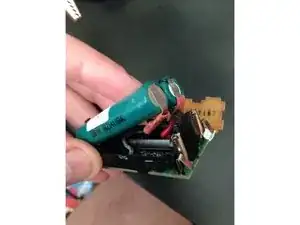
    • Der Austausch der Akkus ist schwierig. Die Kabel müssen so wie im Bild verlaufen - es gibt einfach nicht genug Platz für sie außerhalb des Gehäuses.

    • Bei diesem Gerät haben AAA-Akkus nicht gepasst, auf manchen Bildern werden aber passende gezeigt. Wenn das so ist, kannst du AAA-NiMH-Akkus verwenden. Die Anschlusskontakte etwas abzuschmirgeln ist keine gute Idee, wenn die Abdichtung zerstört ist, funktionieren die Akkus nicht mehr.

    • Achte sehr darauf, dass das rote und das schwarze Anschlusskabel nicht beschädigt wird. In diesem Fall müsstest du einen Weg finden, sie wieder anzulöten.

    • Achte sehr darauf, dass die Polarität der Akkus stimmt, so wie es im Gehäuse angezeigt ist. Wenn deine Akkus plötzlich heiß werden, dann hast du sie möglicherweise versehentlich kurzgeschlossen oder falsch verdrahtet.

    • Schneide 5 mm Schrumpfschlauch und schiebe sie über die Kabel, bevor du sie festlötest. Halte die Einheit während des Lötens gut zusammen. Sorge für eine gute Verbindung, da das Gerät im Betrieb stark vibriert, schlechte Verbindungen lösen sich bald. Und: rot geht an Plus, schwarz an Minus.

    put some sticky tape arround the battery and to hold the wires and the battery contact on the other side. put a good ammount around them so the contacts are pushed against the batteries because of the tape thickness after assembling them into the housing

    Broxin -

    Broxin,

    Does the little metallic contact has to make contact with the metals on the opposite side?

    Luis Sanchez -

    I found a generic Chinese Cordless phone battery pack which had 3 x 600mAh AAA batteries NiMH with the nob at the top the right size for this battery replacement. +- $3 for these batteries. Soldering worked okay without flux but recommended in future.

    Re-assembly went well and charging now.

    eel -

    I recommend obtaining a 2 cell AAA battery pack replacement for a cordless phone. The one I purchased was a Kastar 1000 mAh Phone Battery for Uniden BT-1008 BT-1016 BT-1021 BT1025. The pack is prewired, so there is no need to deal with trying to solder the tabs which is difficult. All I had to do was:

    1) Remove the shrink wrap casing from the battery pack

    2) desolder the wires attaching to old battery pack from the circuit board.

    3) Cut off the plug-in connector from the new battery pack

    4) strip the insulation off of both the red and black wires from the new battery pack.

    5) solder the red and black wires of the new battery pack to the points where the old wires were. Note: it will be helpful to have a solder sucker to remove any old solder from the pass thru holds for the battery wires.

    The batteries fit perfectly and performance is excellent.

    ATSCNTSC -

    Note: In step 4, remove only 1/4” insulation from both wires.

    ATSCNTSC -

    This exactly the product I purchased. Worked perfectly & the attached wires simplifies the process. Expecting this to work better than new.

    Kevin Step -

    It’s not quite that easy to desolder the old wires and solder new ones. The PCB is soldered to the contacts in the battery holders, so it’s not easy to squeeze wires in and through the contact holes in the pcb.

    Amey Parulekar -

  10. BuHJXqdrNEVQVJsP
    • So sollte es nach dem Verlöten aussehen.

    • Beachte, dass die Kabel den Motoranschlüssen nicht im Weg stehen dürfen.

    • Lasse die LED-Platine einrasten und befestige sie mit einem ausreichend großen Stück Klebeband.

    I put the trimmer to charge and the motor to the trimmer won't turn off.

    David Zapata -

  11. 15f46FVwMfmwsGK6
    • Richte das Akkugehäuse und die Leiterplatte aus.

    • Achte auf die Stelle, wo die Federkontakte an die Ladestifte angeschlossen sind, dort wo die Rillen mit den Motorkontakten an jedem Ende verbunden sind.

    • Wenn alle Kabel ordentlich verlegt sind, sollte es leicht rein- und rausgehen. Wenn das nicht der Fall ist, ist etwas im Weg. Wende keine Kraft an - hole es heraus und kontrolliere alles nochmal genau.

    thanks for the guide... it worked fine...

    but i got serious problems refitting chrome cover... it simply doesn't want to fit on the bottom side.

    any hint maybe which side to fit first or what to take care of?

    Sharak -

    finally made it... it's easier if you remove the 2 screws behind the trimmmer and pull out the plastic slider. then refit the chrome-cover and reassemble the trimmer

    thanks again :)

    Sharak -

    Removing the screws by the trimmer makes everything so much easier. You don't even have to pop the trimmer head out.

    huveu -

    Step 8, Should add comment to check the photo at step 4 when reassembling so that you can ensure the contacts are aligned with the charger points on the outside. I had to reassemble twice to make sure there was a solid contact, so that it charged.

    Thanks for the great instructions overall :) Very happy.

    brw -

    Did follow all of the instructions but it doesnt work. Thos black round kind of a chip on the board (approx. between the buttons) is getting very hot. The orange light was flashing x5 and then nothing. I put it on the charger but still nothing. I guess its not the battery after all. Any suggestions are greatly appreaciated! Cheers!

    Paul -

    Not sure then Paul, sorry. Unless it's something simple like the contacts not connecting...

    lf -

    • Es ist wichtig, dass du prüfst, solange du noch an die Leiterplatte herankommst:

    • Setze das Gerät auf die Ladeschale und schaue, ob geladen wird.

    • Wenn nicht geladen wird, dann hat wahrscheinlich der Akkuhalter keine gute Verbindung zu den Kontaktstiften an der Ladeschale. Überprüfe nochmals, ob das Akkufach richtig sitzt und dass die beiden Metallstifte/Schienen sauber sind und einen guten Kontakt herstellen können.

    • Wenn sich das Gerät nicht einschalten lässt oder nicht lädt, könnte es auch sein, dass der Akku geladen werden muss oder die Kontakte so verbogen sind, dass sie sich nicht verbinden können. Nimm die Elektronik heraus, kontrolliere alles nochmal und versuche es erneut.

    In the main comments below an electrical engineer said that using current Eneloop batteries in this might be able to run the shaver but it won't be able to recharge them due to incompatible technology. Can anyone confirm this? Check the comments below to see if that has been confirmed before using Eneloops.

    Balki Bartokomous -

    Instead of soldering, I have used standard office clear tape to push the metallic pieces which connect the batteries. It works perfectly.

    granavefenix -

  12. P6DKgUDybnODGWLH
    • Fange den Zusammenbau mit der schwarzen Abdeckung an. Sie rastet leicht ein, wenn du wie im Bild gezeigt mit einem kleinen Schraubendreher an jeder Seite nachhilfst.

    • Drehe dann die Schrauben ein.

    • Setze die beiden Chromschalen auf und schiebe sie gut passend fest.

    • Schiebe den Scherkopf auf.

    • Setze die Metallfeder wieder ein. Drehe die Metallschrauben ein. Klipse den Scherkopf zusammen und setze die Schutzabdeckung auf.

    • Glückwunsch, du hast die Akkus ausgetauscht, obwohl der Hersteller das Gerät so umweltfeindlich gebaut hat, dass sie fast nicht auszuwechseln sind.

    Can you send me a pic of side where there is a pin connector of the batteries thanks

    David Zapata -

    I found it much easier to reassemble if I put the battery assembly into the cover & insert the whole thing into the body. Otherwise, as noted, you have to pry the sides apart to fit the cover in place.

    Kevin Step -

    Yep that works really well. And then wedge it in with a driver or pry tool. Nice tip

    Nick -

Abschluss

Um dein Gerät wieder zusammenzusetzen, folge den Schritten in umgekehrter Reihenfolge.

Tim

Mitglied seit: 12/03/12

2127 Reputation

120 Kommentare

Can I charge newly installed Eneloop batteries via the same Norelco Bodygroom charger-stand?

Andy -

Absolutely! Just charge as normal.

Tim -

I replaced the stock battery with a 1000nAH battery. I believe the stock batteries were 600mAH. It runs fine, but when charging it continuously blinks. It never proceeds to a solid light & then off. I have not yet run it down completely, so I don’t know it it is charging completely.

Kevin Step -

thanks for posting this tutorial with photos. I just completed this job successfully, thanks.

jason keim -

Been looking to do this for a while. Caution on the "optional" step to solder the battery tabs. They were originally spot welded to the battery so you have to somewhat mangle them to pull them off. When I tried to solder them to the new batteries, they overheated and ruptured. Be very careful.

tydupp -
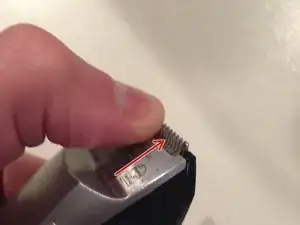
Heed Sharak's advice from the comments - removing the two screws under the trimmer allows you to slide off the plastic cover easily. I broke half of the tabs on mine trying to get it off, I wish I had known this before I started.

kyleaa -

I bought the Panasonic Eneloop AAA rechargeable batteries ($10.00 4-pack on Amazon) and the iSesamo opening tool ($6.00 on Amazon). This guide worked. I don't have a soldering iron so I just used some real good tape to tape the tabs to the batteries. Worked like a charm. Thanks for this guide.

IAmTheJody -

I bought the Panasonic Eneloop AAA batteries as somebody suggested. I didn't want to solder as I have no experience and did not want to damage anything. Besides what would one do after the batteries go bad and you have to replace them again. The metal wires are already damaged the first time after they get disconnected.

I used tape as somebody else suggested. Just tiny slices of tape to attach the wires to the batteries and it seems like all is working. My unit is currently charging and right after I will test if it operates correctly.

I would say that the panasonic batteries are longer so they don't fit perfectly but it's possible to fit them if you are careful. Just remember don't go crazy on the tape and straighten the parts of the wires that connect to the batteries so they don't take extra space!

Nikolay -

I swapped the batteries for GP 950mAh and it runs, but it's not charging :(

Oudeicrat -

Hi, did you get your battery issues resolved? Try double checking the electrical connections.

Tim -

I replaced mine with panasonic eneloop AAA's and get the same result. The unit runs fine but it doesn't look like it wants to charge because the light doesn't come on when it's in the cradle.

longislandcamper -

Hi guys I think Im doing something wrong. After I replace the batteries they warming up so bad. can you help me out pls?

brittany -

Hi Brittany, what kind of batteries are you using? Did you fix your problem?

Tim -

You'll need to solder the terminal or use some kind of highly adhesive conductive glue.

Jai Saini -

If it doesn't charge, maybe it's because there is no contact between the extrrnal charge pin (figure in step 4) and the internal metal pin.

It happens to me...

Nicola -

Hmm. Mine won't run, and the light will come on solid in the stand as if it is fully charged. I'll have to open it back up and check the connections. I may have to solder. The connections were pretty mangled from pulling them off the old batteries.

Lindsey -

Same problem with a solid green light as if it was charged. Did you fix your problem?

Kevin -

I had a similar issue, solid green light while charging and the motors wouldn't run. What I did was forget to add the small tab connecting the two batteries together. I ended up just shoving it in there and the pressure of the batteries kept it in place.

I would think if you get a solid light and no motors running then you're batteries aren't properly in place.

Josef K -

I ended up having to use a shim (a paper folded over 4 times) behind the metal connector piece.

Kevin -

Step 2 should note that the plastic (silver) cover should slide downward in order for it to come off, that makes it a whole lot easier. Otherwise the plastic clips will likely break.

brw -

Mine won't run. When I put it on the charger the green light is solid green but no power? I checked the connections twice with no success. Also would it be ok to use electrical tape to tape the connectors to the batteries? I have brand new eneloop batteries. Frustrated!

Brad -

Thank you so much for the guide! Worked great! Wanting to do this for a long time. No need to buy a new one now :)

Victor -

Great guide!

Thanks for posting this. Successfully completed with no significant issues. Back to strong battery life.

Cameron MacLeod -

What batteries did you use? Mine failed after a few weeks.

lf -

Done! Thanks so much for taking the time to create this tutorial. The only suggestion I have to offer is to be very careful placing the tabs from the wires if you choose not to solder. I originally did that and ended up with a short, making my batteries extremely hot very quickly. I took that as a sign to solder them, to make certain they don't move around on me. Works like a champ! Thanks!

pseal -

I've replaced the batteries but now the light just flashes orange when I press the buttons. Any suggestions?

tfprice -

Check the comment below, RE: Step 8, suggesting to make sure that the contacts are aligned with the charger points on the outside. I had the same flashing orange lights (which typically just indicates low battery), but couldn't get it to run nor charge. I saw brw's comment and re-checked how the battery assemble aligned with the points on the outside -- wasn't quite lined up so carefully pulled it out and re-inserted, placed on the charger and this time flashing green. I almost immediately took off the cradle and tried a button and it was running, slow, so back on charger and an hour later, perfecto.

JCR -

I have a couple of questions.

I was able to get it done all the way up to step 8.

I am using Energizer rechargable batteries (700mAh)

I have been struggling with the metallic plate that is supposed to make contact. It seems like is making contact, but when i put the piece back inside the unit, the buttons dont work.

I have noticed that when I put the metallic place to make contact with the batteries and the metal outside the casing, it gets really hot really fast. But when it makes contact with one of them, the unit turns on as soon as i put the piece in, but buttons do not work.

I was reading about copper tape. has anyone tried that?

Thanks

Luis Sanchez -

Hi, I am trying to change battery pack on my Philips Body Groom (exactly the same of this Norelco). I have a doubt about the charger. I checked the voltage of its recharging by a tester and mine is at 11V. Is it normal to overcharge a 2,4V battery pack with so high voltage? Could be my battery gone because of that overcharging voltage? Thanks for any reply. Regards

Perigo -

Can I use AA batteries instead of AAA??

kostasstefanidhis -

works like charm. I replaced batteries with eneloop 4th generation. thank you so much.

Hyuck Jang -

Holy crap, this actually worked for me! I used the batteries recommended and a small phillips screwdriver and flathead screwdriver. Needle nose pliers helped too. The batteries fit and I only used electrical tape, stretched tightly over the connections. I didn't want to spend extra money on a soldering iron or opening tool. (Didn't make sense to buy all that bc I wasn't sure this would work)

Let's see how long this fix lasts. Thank you!

Jason Lane -

Hallo,

I have a question, that i hope you can answer. I gave the exact same shaver as the one in your video. Mine was getting old, the rubbers that keep it waterproof broke down and battery life is poor now. I managed to get a hold of a new shaver, but it didn't come with the charger. But not a problem, cause i have one, i thought. But the new shaver won't charge on the older charger. The green led does blink (indicating it charges) but with a different frequency from the older one (slower). Did Philips change the internals on the newer ones maybe?

Et -

Thanks for the guide, it saved me 70+ bucks. The key to problem-free installation, in my opinion, is to use batteries that have flat end on the plus and to not solder. The heat from the soldering kills the batteries.

gdimiter -

Thanks very much for this. I've had one of these for about 4 years now and the battery was always awful. Just finished installing two eneloop battery replacements and so far all seems okay, the green light is flashing so I assume it's charging okay. I didn't use any solder, just a tiny bit of tape and the pressure from the batteries fitting. Fingers crossed it puts some life back into the unit! Thanks again.

James -

Thanks bunch! I bought one of these used on eBay a couple years ago and they never held a charge for longer than 10-15 mins. So I hardly ever use them. But I got inspired to research my options this week and found this tutorial. I had some spare Eneloops laying around, so I was ready to go. Worked perfectly. Glad I didn't opt to buy a new BodyGroom! Thanks!

mcswagger911 -

I'm in doubt about the type of battery, need to be exactly a battery of 730mAh to 2.4v ??? more volts can? more mah can? thanks

vaniltoncoelho -

Just want to say a big thank you for creating this. I was able to follow your instructions and get my batteries replaced. Shaver works better than new units since I'm using suggested batteries in this write-up and I think they are better than those generics.

danmann81 -

hey thanks for the step by step info , i changed my batteries for panaconic eneloops as recomended , all changed and reassembled but im having a problem i cant yet figure out, the unit charges fine with the flashing green light and works when charged (took around 15min) but when testing again the next day the unit is either completely dead with flashing orange light or goes for a min the flashes orange as if its about to die .

my question is could this be something to do with the memory of the unit being messed up ? i have the clippers on now and will run them flat then do a full recharge again , its been flashing orange for the last 15min while on so im hopping this is the case . Anyone else had this issue ?

daniel barron -

New batteries should be connected in a *depleted* state, otherwise the orange light keeps blinking for 8 times when switching on and the groomer does not work. Apparently the controller gets confused when the batteries are already charged at first power-up. After charging the new batteries, using the groomer's charger, it should operate properly. There seems to be no way to get out of the '8 times orange blink loop' than to deplete the batteries first before connecting them.

Hifi55 -

Electrical Engineer here. There are several problems with this tutorial, and after trying the procedure myself I think it's fair to say the average person should not bother proceeding.

A few criticisms of the instructions:

- Crux of the replacement is resoldering the battery back into place. Most (all?) battery housings are made of aluminum, they cannot be soldered with standard solder. Batteries are heat sensitive and excessive heat degrades the air seal which substantially reduces the life of the battery. In a worst case you'll actually cause the battery case to rupture.

- Author makes reference to "Get a good join" which is not possible for the above stated reason. Some people noted that they used electrical tape - this is smart, especially of you stretch the tape. This likely won't last that long though.

- Modern NiMH batteries are not compatible with the original charging circuit present in the original version of the device, so the device won't charge.

Best advice is to ignore this and buy a new one.

Kevin Kamel -

Good answer ! I would add "Buy another model where battery could be changed easily", if it exists ...

Sylver B -

Thanks, we'll change the guide to reflect this info. Any more info would be appreciated. We're really trying to avoid just buying another one; that's one of the biggest problems with this planet.

lf -

Best advice is to ignore your comment and try the repair without the need for soldering and to replace with eneloops, which have been stated by many others to charge just fine. Your comment is not only incorrect but further contributes to e-waste.

Bob Prang -

My batteries that I replaced from the unit were green "Suppo HSY-AAAD 75-PHP NiMh 750mAh 1211". I replaced them with some typical "Energizer Recharge Power Plus 700mah Rechargeable Batteries" that i bought from Amazon. I wasn't gentle with replacing the batteries. I literally ripped off the metal connectors and wires and taped them back on the net batteries in the same configuration as the original batteries. The enclosure it tight enough so that the connectors will stay in place without soldering. I also noticed that there is a tiny on-board LED which blinks 8 times once you properly connect the batteries in place. It's analogous to the orange device light that blinks 8 times when the device needs to be recharged.

Chunk 1978 -

It’s actually “SUPPO HSY-AAA0 .75-PHP / NiMH 750 mAh 1211”. Their site (http://www.suppo.com/products_detail.asp...) gives dimensions of 10.5mm x 44.1mm and 30mΩ impedance. Eneloops appear to be 44.5mm. Probably there are batteries you can get that are closer to the original dimensions and will not be such a challenge to squeeze in.

Mike -

Success! Swapped for Eneloop AAAs and the device is charging and working properly again! I did a pretty ratchet job with electrical tape on the batteries and metal prong connectors, but they still snapped in and managed to stay in place to work properly. Also watch out for connecting the batteries the right way, mine were backwards and started sparking at first until I realized they were incorrect. Overall very happy with this successful repair.

Alan Hadt -

The electrical engineer guy that posted above said that once you install Eneloops, the shaver won't be able to charge them because the technology is not compatible. Has anyone been able to confirm that? If I will have to go through this process every time the batteries die I am not going to waste my time.

Balki Bartokomous -

I've been charging my eneloops using the shaver charger for almost 2 years now. Works fine

Tim -

Another electrical engineer here and that previous statement isn’t accurate. The problem with soldering batteries is that that if you just attempt to solder onto them then the tabs won’t bond correctly. That is because batteries ship with a protective oxide coating on each of the poles. If you simply take a little sandpaper and scuff the battery surface necessary to remove the oxide then a quick dab of the soldering gun will set the bond without damaging the battery. Additionally, the circuit charges the battery just fine. If all steps are followed, the battery replacement will bring new life to the shaver.

christopher patten -

Just used this guide to fix to I'm very grateful. Those batteries though are pretty standard - at least in manufacturing. I bought them off the shelf over the internet but no, you are very unlikely to find them in any typical consumer store.

alanwaterman -

What is the voltage of this battery? I'm not sure of what kind of battery to get.

Leo -

Replaced mine with Ansmann 1.2v NiMh 1100mAh AAA batteries. They were out of an old remote so only part charged, they charged perfectly and have been working fine ever since.

Alex -

Physicist here. The tutorial is very good! Thanks a lot for the effort! I replaced the batteries with two Eneloop AAA as well (no soldering) and everything works like a charm! No issues with charging...

Christian Reindl -

Thanks for the tutorial, especially the clear steps on disassembly. I'm sure I would not have succeeded without this guide.

By chance I happened to have a spare battery pack for my cordless phone that was an exact fit. The Uniden BT-1008 battery consists of two NiMH AAA cells wrapped together with a small wire lead. I cut the wire lead about 3/4 inch from the battery and solder-tacked the wires to the metal tabs that I peeled off the old battery, then wrapped the connections with electrical tape. There is just enough room in the channels under the battery to hold the wires and the taped connections. I'll post a photo if I can.

I highly recommend the BT-1008 for this repair because it is commonly available, cheap (about $3 to $5 for third-party equivalents), and has wires securely spot-welded to the battery terminals already. Using a pre-made pack is much safer than trying to wedge loose wires against individual cells and the plastic wrapping keeps everything secure and insulated.

Kevin -

I successfully used Kevin’s technique using a $5 1000 mAh battery pack purchased off of Amazon. I cut off the connector and soldered the wire ends to the metal tabs as described in his post. It took a while to figure out how to position the wires as there is not a lot of room for them under the batteries and they are both on the same side of the battery pack. I was eventually able to press the pack into the cavity deep enough so I could snap the LED board into place. Taped everything together tightly. After that, easy peasy.

cartmans_probe -

I have one of these and the orange light would start flashing within seconds of me starting it, if I kept trimming I was OK, but the second I stopped or tried to change to the other trimming function, then that was that, stone dead, end of trimming.

So I didn't stop it, I left it running and I found it just kept going, for over half an hour with the orange light flashing all the time. When it finally died, I charged it again, which took much longer and now it seems to be working well again. It was like it had 'battery memory' and I got past it by leaving it running.

I'm currently 'exhausting' the battery again (20 mins so far) and then I'm going to see how I get on after that. It might not help those whose batteries are too far gone to start the trimmer, but it might help one or two prolong the life of the unit.

Maybe Philips should say in the instructions that the battery needs to be fully depleted and fully charged every once in a while, like you used to have to do with old mobile phones.

alan92 -

Confirmed that it works, i changed the batteries yesterday and it works perfect. bought eneloop 750mAh, i didnt eve solder the connections, the compartment housing the batteries is so tight that it holds the wires firm.

Thanks a lot and my respects to Tim and all who contributed to this guide .

Mike M -

Thank you, it works perfect!

Juan F. Navarro -

Does it still work? Mine failed shortly after.

lf -

Awesom-o.

I have a tt2040 from 2009.

I bought it for 55 euros.

Nowadays the same crap costs 79 euros!!!

Philips you suck.

Anyway, offcourse after 7 years the battery were worn down.

So i used this tutorial. It was GREAT amd word like charm.

One hard part was to remove the metal flaps from the old batteries because philips soldered them.

So i pried them with i small flathead screwdriver.

I replaced with eneloop batteries WITH pre soldered flaps

Used some eletric tape and voila. Everyting worked and stikl works.

I also replaced the shaving head for 15 euros.

Unkown Unknown -

I performed this replacement with the ENELOOP AAA rechargeable batteries.

Notes, scuffing up the terminals on the batteries was necessary to get good adherence of the solder.

I found good results with using the needlenose pliers to gently and slowly (s o s l o w l y) pry away the terminal connectors. They're not soldered to start, so it's a little weird. Then I had to smash down the bent up terminals to make them flat again. I imagine that this battery replacement will only be possible a couple times before that metal eventually fails.

Don't be too startled when you're putting it back together and you accidentally turn the thing on. Startling! :) But harmless.

Good luck all! Thanks for the guide!

keimel -

Worked well with no soldering, tested for 1 day so far. Will solder later if corrosion or circuit break occurs, but it appears that it does not need it. Great cost saver here - saved at least $50, and had the beneficial knowledge of the pride of DIY fixing!

mulletlogic -

I used AAA energizer 700 mAH NiMH batteries ,it is slightly larger than the unit mount.

does anyone use similar size and fit it in the unit and ultimately it works ?

Ramy Wahba -

I used these very well reviewed tenergy batteries, (https://www.amazon.com/gp/product/B0040Z...) i find that the batteries being a little bigger helped to secure everything in place…. i used electrical tape and just squeezed in the bottom battery tab using pressure and a small flathead screwdriver, that was prob the toughest part. Haven’t had a problem yet, have used about an hour total since the repair and have recharged the unit with no problems either a couple times. Here’s the link, these worked well for me and seem to hold a charge even better than the seemingly low quality factory batteries. Although any standard AAA rechargeables would prob work just as well in terms of fit.

Andy Freeman -

I used the 900mAh Eneloop Pros. Worked like a charm. Didn't weld the connectors, just used electrical tape. Removing the original battery connectors was really hard and took a long time. I scraped them off with a small flat screw driver. They didn't come off in perfect conditions so I straightened them out a bit afterwards. Putting the back cover was also a bit of a challenge!

Thanks a lot for this guide.

Murilo Pereira -

I put in a pair of GP 1000 AAA, which fit (just) and used scotch tape to fix the connectors to the batteries. Worked well. Thank you for a great tutorial, I would likely have not attempted this otherwise.

Jeff Mcneill -

replaced with eneloops in mine as well - worked relatively ok, had an issue with me having to push the buttons several times before it actually started, then it worked fine if i didnt turn it off during a shave. Read the post about depleting batteries to accomodate battery memory in the controller.

After depleting the batteries I found out that my charger does not charge the batteries :/ It blinks green but i cannot turn on the shaver even after hours of charging, it just blinks orange 8 times... any good advice on what to try :)

Christian Ludvigsen -

For all this trouble and then the batteries are not that cheap. Better to buy a new unit….. Less hassle.

N T -

After all this …. and the battery is not that cheap. Half the price of the Unit. Better to buy a new Unit.

N T -

I read somewhere the metal hydrate batteries don't take kindly to heat….ill be getting a new one soon….hope it lasts for a long time. Also, it takes a long time for metal batteries to charge. Maybe pre charging or charging for 24 hours might work? I've changed my shaver and old beard trimmer each one time but used nicad since they were what was in them to start

Brad -

Worked with 2XGP1000 without soldering and with tape.The charger works also with GP1000.

Gordan Gabriel -

Thanks for the great tutorial! Fixed mine with Panasonic eneloop AAA’s and gaffer tape. Charges and works flawless. The last post above me.. NT, has no idea what he’s talking about. Pack of 4 eneloop’s was $16 CAN and I only need 2. The other2 can go in my tv converter. This shaver costs $150 in Canada! Philips/Norelco should be ashamed of themselves to build an expensive shaved to throw away! Shame!

brock.entwistle -

Thanks for the tutorial, i’ve changed the batteries on a European model Philips Series 7000 All-in-one Bodygroom Pro, and works like a charm.

I’ve used GP AAA 800mAh batteries and it worked even better than original battery pack.

Carlos Saraiva -

My unit was originally from the UK (there it went by the name Philips TT2040), but the innards were exactly the same.

Used a pair of old (Sanyo) AAA eneloops. It took a bit of force to get the batteries in place (as noted, they felt a bit oversize, but I wasn’t sure if it was my shoddy soldering, or the actual enclosure size). On the first try, the module was not aligned properly - I was getting 8 orange flashes on button presses and no reaction on the charger. Once I managed to insert the module correctly, with all the pins/slots touching correctly, it started working like a charm.

4 Chip 4 -

I purchased Panasonic Eneloop AAA rechargeable batteries ($6.95 4-pack on Amazon). This repair was quite simple and the guide is perfect. I had no issues with performing the battery swap. The only issue I had; I did not have the electric package seated fully, just make sure you press it fully into the cavity.

TIP: one trick to soldering to batteries. Use a fine metal file and just rough up the surface of the battery contacts. just want to take the shine off of them with the file. They will take solder without issue and little effort. The bonus is you can place the solder perfectly in the location you want it to stay.

Michael -

I just did this replacement. I recommend against standard AAA with the nipples, instead get flat-top NiMH AAA batteries with solder tabs pre-attached. You can buy them pretty cheap on Amazon:

https://www.amazon.com/Exell-Rechargeabl...

https://www.amazon.com/Combo-Battery-sol...

Then you can make a decent connection with soldering optional as follows. Fold/clamp the solder tabs on the free end with a spare solder tab or the one from the old batteries. Do the same with the wires on the other end. Optionally, solidify the connection with solder if desired. This way you only need to solder the solder tabs together, don’t have to solder the battery directly and risk damage, fire, or explosion.

Alex -

Thanks for the guide. Soldered in eneloop AAAs. Solder seemed to adhere ok to the terminals on the battery. The terminals heated up a bit but didn't seem to do any damage to the cell. (Although I wasn't trying to heat the connector like in a proper solder job, really just heating the solder enough to drip it on the terminal, then heating it again once on the terminal to stick the slightly mangled tab into it. The soldered batteries were a little bigger than the originals but the end of the battery holder bent enough to get them in(used a bit of good electrical tape to hold them in since the tabs were now spread a bit too for the smaller circuit board to clip in and hold them properly) and the holder snapped back into the shaver body fine. Got a flashing orange light even though the batteries were mostly charged, so popped the shaver on the charger and it charged for 15 mins or so and then went full green. Shaver works fine and seems stronger than new now. Will update if any changes or problems…….

NVB -

OK, I’m an expert at this.

1: ONLY get “flat top” Nimh AAA batteries, Those with nipple will NOT work, too long!

2: Soldering batteries is OK! BUT! Use good clean hot iron, FRESH flux.

Lightly sand ends of batt. very fine sandpaper, then apply flux, then tin both ends

(tin= apply light coat of solder) tin wires also.

3: Now solder wires to batt, quickly. have helper hold for you.

4: You DID put heat shrink tubing on wire BEFORE you soldered wire… didn’t you???

5: batts. with tabs that are flat top will not need sanding, fluxing, tinning (duh)

6: As soon as solder hardens, blow on batt. to cool.

7: If u were stupid enough to try to JAM nipple batts. into this TIGHT unit, U WILL NOT get

the contacts to connect and you WILL get a flashing orange light.

Any questions? then ReRead from #1 !

Sir Reginald Wafflepants -

NEVER trust an engineer, they know everything about nothing. I’m an astrophysicist and a psychic!

I have NEVER seen a AAA battery made of aluminum, NEVER. I bet it is someone from Phillips

trying to scare DIYers.

Instructions unclear, D size battery did not fit with help of hydraulic ram, unit broken ;-)

Sir Reginald Wafflepants -

Hi,

I tried the replacement for BG2028 model which had some green Suppo hsy-AAA Nimh batteries and replaced them with Eneloop AAA rechargeable batteries.The connection looks ok as when I press the power button, orange led blinks and also when I place the unit on charger green light starts blinking. However after hours of charging, the shaver doesnt work and orange led blinks . I also tried to start the unit with fresh AAA alkaline batteries, used some tape to put the battery in place and again the orange led blinks. Can these all mean my unit also has a problem other then battery?

Deuce -

Okay I changed out the batteries to the Eneloop AAA rechargeable ones and at first everything was good the unit was charging. However, I think something must have shorted out because it would not charge no more after that. Now I did not solder the batteries just put them on and one thing I do notice is that the big black chip on the board gets very hot. However, I am lost I do not know what to do now.

Jose Gomez -

Thanks for posting this guide Tim. I just successfully replaced my BG2040’s batteries with two Eneloops. I went with electric tape instead of soldering and still managed to jam everything back in there. Everything tested fine. Fingers crossed it lasts. My old battery was on death’s door, so this is already way better.

Doogie -

I purchased two enaloops that had tabs welded to them then using the peace of metal for the original battery soldered the two together, all is working perfectly good work people made working out how to take it apart far easier

elliott.gardner -

Works just fine ! Dit werkt perfect , hartelijk dank voor deze How to .

I also purchased two Enaloops , same as above !

Yvan Van Wymeersch -

I replaced the batteries two years ago with eneloop pro AAA batteries and it worked well for 1.5 yrs. Then it started to shut down after about 10 minutes of use.

I opened the unit and tested old batteries using ZTS MBT-1. Oddly, it showed 80%. Shaver didn’t run and would blink orange.

Regardless. I put 2 new batteries in it, and exactly same behavior!

Did another test. Disengaged the trimmer blade and let the motor run to see when it shuts off. It ran for solid 2 hours before it shut off, but still the batteries were not depleted (about 60%). I did this test to make sure that there is no timer on the chip that’s causing it.

Then followed the advice that batteries should be depleted when installed. Took out the batteries, depleted all juice in them. Installed and let the shaver charge. Took out the batteries, charged at 100%. Depleted again and put them back to charge. The overall behavior very slightly improved, but in the end, shaver shuts down at 80% charge. Blades are lubed and running smoothly.

Any Ideas?

Maziar -

For people from Europe, I bought the battery on the following link…works fine

https://www.akku-wechsel.de/shop/tt2040

Art Veeckman -

I underestimated how difficulty it is to get the cable terminals and tabs off the battery. Those things are soldered tight and it’s near impossible to do the job and leave them intact. Most of the soldered parts remain stuck to the original batteries . Fortunately, I was able to strip off more of the contacts from the cables. I did a ratchet job with electrical tape (it was an ordeal to keep the contacts in place) and depend on the pressure from the batteries being jammed into the battery case to hold everything in place. I used partly depleted Eneloop AAA batteries. I haven’t used the trimmer yet so I’m not sure if the contacts will stay in place under vibration. First time DIYers should expect a whole lot of frustration and panic.

The trimmer began to charge after I pushed out the spring contacts a little to engage with the charging pins. Took about 30 minutes to charge the batteries. Haven’t tested how long it’ll hold a charge.Thanks Tim for the clear guide and warning. Thought all was lost a few times.

Gavin Tilman -

Thank you for this post with a great description for replacing the batteries. I have an old BG2040 and your instructions worked real well. I got the batteries from Amazon with tabs and just cut them to length and tinned them and the tabs I had pulled (with pliers) off the existing batteries and everything went back together perfectly. I’m now charging it, we’ll see how that goes, should be OK, I accidently turned both the trimmer and shaver on several times during putting it back together and it doesn’t stall after trimming mustache with the charge that came in the new batteries (like the original batteries after a full charge). The Amazon order was:

Combo: 2 Pcs - AAA NiMh 800/850 mAh Flat Top Battery with solder tabs for Electric Shavers, Razors and Battery Packs

Tom Norris -

The battery holder will hold 2 standard AAAs just fine. They are the same overall length as the OEM batteries. The only difference is that the positive contacts protrude on a regular battery, and are flush with the case on the OEM battery. But the overall length is the same.

Thanks for the instructions, did the whole job and replaced with 2 Eneloop batteries.

Ken Hosch -

Amazing guide! All the covers removed easily. I had trouble with rubber cover (no iOpener tool here) but after few minutes with an old bank card I was able to remove it. I’ve used GP 1000 mAh batteries and even though they were not “flat-top” they fit perfectly well. No soldering required (even though I had my soldering iron ready) just some scotch tape and when batteries are inside the compartment there is simply no way they could detach—it fits them very tight! I’ve run it idle (without attachments) in order to discharge but even after 2.5 hours it was still working, though with attachments it will be less but still a major improvement over original 750 mAh batteries (especially the old ones).

vladimiraienabledkozlov -

Delicate touch needed throughout this process. Begin with a clean, flat working area. Followed these instructions and it worked perfectly. Could not have completed without them.

Patrick MacConnell -

I followed the instructions and it worked perfectly. I used a phone batteries pack (AAA 2.4v 700mAh nimh) with wires. I joined wires with the ones on the board. Soldered them. Puted shrink wrap. Removed the plastic on the pack to fit it. It’s holding the charge better than a brand new Bodygroom.

https://www.batteriesexpert.com/en/small...

Kolia Cambron -

Great to see people everywhere having a go at repairing. Always have a go!

lf -

I finally got to this and was able to successfully put this together. The soldering was a pain and I had to switch to using aluminum foil to keep the wire in contact with the battery terminals. Thanks again for this guide. It was super helpful !

S Mitra -

After weeks of deliberation, I bought some batteries from eBay, followed the guide (also watched a few youtube videos of the same project). And finally did this project. The instructions and comments really helped, so make sure you read them all.

I didn’t solder, just used thin strips of electrical tape. I also reinforced the white wires that join to the board, so that they didn’t break while manoeuvring everything around.

The end result was a perfectly working shaver, best AU$15 spent. Managed to save a device going to landfill and save AU$120 in the process.

Lee McGurren -

Tim, many thanks for this detailed guide, still helpful in 2020 for repairing my old Philips Body Groomer. Took me 2h15min because I had trouble getting a snug fit for the battery housing. The two new batteries were shrink wrapped together and I had to cut the bottom part away to get them low enough in the cavity. I agree entirely with your views on companies building rechargeable products whose batteries only last two years - it would be so easy to modify the battery housing to accept a simple push fit and at least make the replacement quicker! Cheers. Alan Craig.

Alan Craig -

Excellent instruction and I was able to install battery that I purchased from china for $1 piece and I solder the battery and it housed and it works great.

Sen Selvan -

I just did this with my 7 year old shaver, it was a challenge, took some time to get everything to fit right I used the BT-1008 battery pack from Amazon, 3 of them for $7.50. One note on fit, I removed the outer wrap from the battery pack to make it fit deeper in the battery holder. It all worked really well, a soldering iron and a little electrical tape made it all go together pretty well…. Shaver saved, nice cost savings. Thank you.

tengu_ni -

From a PhD EE - The comment about a device designed for NiCd batteries being unable to charge NiMH batteries is incorrect, all of the charging strategies used for NiCd are equally effective for NiMH cells. The type of smart-charger used in this product delivers a rapid charge using a peculiar property common to both NiCd and NiMH batteries to terminate rapid charging and switch to trickle charging for a fixed time period before stopping completely. As NiCd and NiMH cells are charged the cell voltage gradually rises, but after it is nearly fully charged the cell voltage slowly falls. At this point charged cells start to heat up rapidly so the charge control IC switches to a low-rate charge for a fixed time before switching off all together. Heat was used by early 30 minute chargers for laptops and RC toys. NiCd cells tolerate heating better than NiMH in the sense that a 250 cycle NiCd and a 1000 cycle NiMH both last less than 100 cycles using a temperature terminated rapid charger.

Oliver Street -

From a PhD EE - The internal charge controller in these shavers seems to keep track of how much running time it can accumulate between charges before the battery voltage drops below 1.00v/cell. It will refuse to allow the shaver to start to run if either the battery voltage is low or the charge controller thinks it’s running time is depleted. This strategy for tracking the state of charge of a battery pack can’t track the self-discharge rate of the battery. When the shaver sits unused the battery self discharges and becomes depleted quickly setting a low running time. A very short time allows the shaver to be turned on just once between charges. Likewise when a battery is replaced the chip still retains the estimated life of the battery that was replaced. One way to get the chip to use a longer running time is to charge the shaver and start it and leave it running until it stops because the battery voltage falls too low then charge it fully.

Oliver Street -

I have just installed these batteries, they fit ok

https://www.reichelt.com/gb/en/eneloop-2...

Paul -

After 7yrs of use, the batteries in my Bodygroomer finally died! They refused to recharge. The batteries in my unit were green colored Suppo HSY-AAA0.75-PHP NiMH 750mAh. I replaced them with Eneloop AAA 800 mAh, bought for $5.70 off Lazada Thailand, for a 4 pack. Because I’m not home, I wasn’t able to solder. I used electrical tape instead. The battery pack has a snug fit in the unit, so I’m hoping the electrical tape holds. Once I return home, I’ll solder the connections. Disassembly was not difficult for me. My biggest issue was prying the metal tabs off the batteries. I used a pocket knife to scrape them off, being extra careful not to break them. The eneloops came pre-charged, so I was able to see if the bodygroomer turned on, and I did. It’s currently on the charge stand. Thanks for the “How To!”

R M contreras -

Great Guide! Worked like a charm. AAA was definitely hard to get into the space but it made it in.

Eneloop AAA is what I used.

Vitaly Em -

Just did this today. Used Enloop AAA batteries. I also used foil and electrical tape to hold certain electrical parts down. Everything works! Just need to get home and test out the charging stand. Cheers!

ravenrue -

Excellent write-up. Followed the steps today for my repair. Unsure of the replacement brand given, Batteries Plus locally made a custom cell pack on the spot after seeing the expired batteries from the trimmer. They tested voltage, soldered tabs, and installed everything into the housing. Just over $10 for everything. Highly recommend for those like me without all the tools and experience/expertise with soldering. Returning home, re-assembling carefully has seen functionality return equal if not better than before. Time to open: 10 minutes, including removal of the battery pack. Trip to the store took around an hour all in. Re-installation another 25 minutes, taking caution not to force anything and also missing the separate button panel initially. Thanks!

Dipakkumar Patel -

I added 2 AAA Amazon Basic rechargeable batteries, works just fine! Thanks!

ShotgunFred -

kudos to author :)

I got my batteries from here:

https://www.akku-wechsel.de/shop/akku-fu...

I just drilled a small holes in each connector, so it was easy to solder them to the wires. The whole process took me less than half an hour, even with my almost non existing soldering skills.

Jernej Bevk -

kudos to author :)

I got my batteries from here:

https://www.akku-wechsel.de/shop/akku-fu...

I just drilled a small holes in each connector (already installed to battery), so it was easy and fast to solder them to the wires. The whole process took me less than half an hour, even with my almost non existing soldering skills.

Jernej Bevk -

Thank you so much for this!! The battery pack I bought on Amazon I didn’t need to solder. So it made it much easier.

Andres D -

Great info. Well explained. Good pics. I was successful Got it working. The problem was the bottom of the batteries. The connection was broken. I soldered the break. 1/2 hr charge & it fired up. I’m 71 & love to tinker. I win some & lose some. Thnx. Bob.

Bob Widders -

Thank you, worked wonderfully!

eBay Manga -

I ordered a Kastar battery pack from Amazon. It comes assembled, with solder tabs welded onto the terminals. I peeled off the welded foil tabs from the original battery pack and soldered the ends onto the new battery tabs. It works great. The battery pack: https://www.amazon.com/gp/product/B08CCF...

James McAllister -

I ordered a Kastar battery pack from Amazon for $8.99. It comes with two solder tabs welded onto the terminals. I peeled off the welded foil tabs on the orignal battery pack and soldered the ends onto the new battery tabs. No damage to the new battery and it works great. The battery pack: https://www.amazon.com/gp/product/B08CCF...

James McAllister -

Thanks from the Netherlands for the great and really detailed guide! Although I own a slightly different type, the assembly is almost identical. I managed to buy a kit of 2 spot welded AAA Nimh batteries of 1000Ah each. Hope these will last longer and better than the original ones which are rubbish.

Ron Van Gils -

Thanks for this excellent guide. I used the same Kastar pack mentioned above, nipped off the battery wires as close to the tab as I could, trimmed off the remaining heatshrink from the wires and then soldered them to the Kastar pack's pre-fitted tabs. I may have lost a millimeter or two of length by just chopping them but the Kastar pack's tabs are long enough that everything still went back together. The batteries are labelled 1000mAh vs 750mAh OEM ones. Appears to be working fine and glad to have avoided the cost and waste of replacing the entire device. The throwaway design of items like this is shameful.

Earl Grey -

Thanks for this tutorial - The device has the same base builtin as a Philips TT2039 and I just successfully completed the replacement
I'm not a soldering guy so I asked a local tech store to replace the batteries in the battery pack. But very doable for disassembling and assembling again if you're not afraid.
Cost me 20€ which is now a new working device.

Kristof Van Den Ouweland -

Thank you to the author and the community, very helpful!

My experience was the following:

-North American 7000 model, had the green Suppo batteries

-replaced with two Amazon rechargeable NiMH AAA batteries; they fit fine

-used electrical tape, didn't (have) solder

-hardest part was to put back on the black cover over the battery/switch unit, had to to squeeze its body into place, took some time! I didn't find that a tool helped here much, used my fingers to squeeze it in. Be careful not to snap this thing.

-initially the battery/LED unit blinked 8 times in orange, when not attached to the shaver; once attached, I charged it, it blinked green, until a solid green. works as expected.

-didn't read until later, other comments about installing depleted batteries first, but my already charged batteries seem to be working fine and can charge.

Jogill -

The right name of the battery form factor is AAAU. Not AAA.

Gregor Volkmann -

I just ordered the OEM batteries from AliExpress (GS Yuasa 2.4V NiMH) for AU14.78 including delivery. The only down side is the expected delivery is May 7 so around 8 weeks. The batteries come complete with soldered bridge and end connections so should make the repair much easier also.

Derick -