Einleitung
By following this guide you'll be able to prolong the life of your trimmer instead of buying a new one.
Werkzeuge
Ersatzteile
-
-
Use the plastic cards to pry open the case.
-
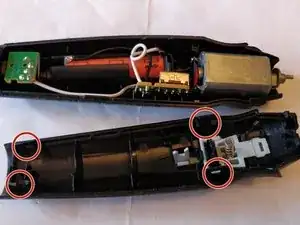
The markings show where the upper part feet are.
-
You need to apply a bit of pressure to dislodge them (careful not to break them, the plastic is not that great)
-
-
-
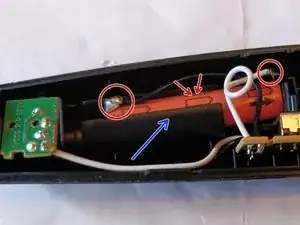
Take note of the polarity of the battery (red arrows)
-
The plastic casing around the battery (blue arrow) can be easily removed. Battery slides out of it
-
Battery can be de-soldered. Just remember which color wire goes where. In this case, black for negative(-) and white for positive(+).
-
Replace the battery and re-solder the joints
-
Use a brush to clean the inside of your trimmer before re-assembling it. After so many years of service, hairs have surely gotten inside of it.
To re-assemble the trimmer carefully place the top part over the bottom one (make sure no wires get in the way) and press down until the to parts snap into place. You'll have to use a bit of force. Also, make sure the charging port at the back is placed properly.
In the end there will be some marks left on the plastic even if you used plastic cards to help protect the case but nothing as bad as using metal tools for the job. I don't believe that Philips intended for this to be repairable.
On choosing the right rechargeable replacement:
I went with a 800mAh NiMh. Sure, without the plastic casing around the battery you could fit an AA size rechargeable in there. However, keep in mind that while a bigger battery will hold a charge for a longer time (more trimming sessions) but it will also take a lot longer for your included charger to actually charge it.
Philips says that their original battery takes ~10h to fully recharge. The 800mAh will take roughly 16h.
4 Kommentare
I proceeded as suggested, purchasing this little guy : http://www.all-batteries.fr/accus-nimh-i...
I borrowed a soldering iron from my neighbors and tried my hands at fixing it.
It has entirely revived my trimmer for the cost of a 3.50€ battery. Overall a pretty good deal !
Thanks @Silviu for this guide, I couldn’t have made it without this !
Precise help for my trimmer. Good Job
Very useful thanks ! Repaired for 5 euros,the price of the battery replacement. The hardest part is to open the trimmer. Finally I achieved it with a sharp knife. Once inside, 90 degrees rotation and it was done


