Einleitung

Teilweise habe ich die Anleitung von diesen Seiten benutzt, aber die Anleitung bei iFixit vollständig neu verfasst:

http://www.brunwinkel.de/2011/09/wasserk... (deutsch)

http://forum.electronicwerkstatt.de/phpB... (deutsch)

https://www.rojtberg.net/645/repairing-p... (englisch)

  1. LFsQkQsQXWONKWjB
    LFsQkQsQXWONKWjB
    qZ6gOI1cLjAn1W5Q
    bX1kBCEiENUXxYZX
    • Entferne den Deckel.

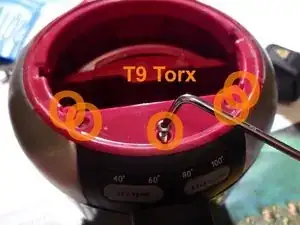
    • Entferne fünf Torx T8 Schrauben.

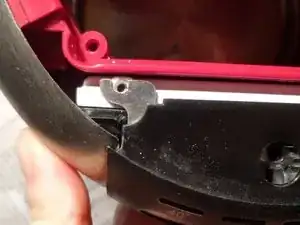
    • Entferne die rote Abdeckung.

    • Merke dir die Position der Metallhalterung.

    This named is “Philips HD 4686” in Europe.

    Ivan Perepelkin -

    Es handelt sich beim HD 4685 um 5 x T10 Schrauben.

    Andreas -

  2. Vn6dBXTWibCMOxbs
    Vn6dBXTWibCMOxbs
    kUFGiDYbMajyZCy4
    qDfcOfJ2YRUIRFOd
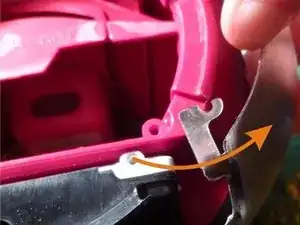
    • Entferne behutsam den Metallstreifen.

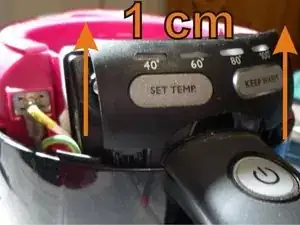
    • Hebe die ganze schwarze Elektronikeinheit etwa 1 cm nach oben.

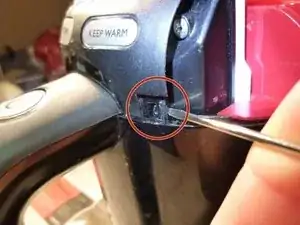
    • Löse die Raste an der schwarzen Frontabdeckung und entferne sie.

    Om the one I have the front cover is gray. But the proses works so no worries.

    Erlend Husdal Landrø -

  3. l3w2yOZfkNN3FfBp
    l3w2yOZfkNN3FfBp
    iLtPJdOi3hW3dnkE
    jBywEdYDeOprndKB
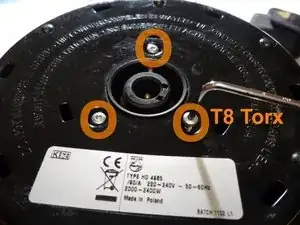
    • Drehe die drei Torx T8 Schrauben am Boden des Wasserkochers heraus.

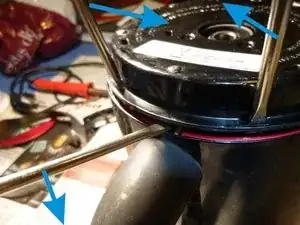
    • Raste die Bodenabdeckung aus, indem du mit drei größeren Flachschraubendrehern vorsichtig in drei (von sechs) Öffnungen zur Mitte hineindrückst.

    • Setze gleichzeitig einen weiteren Schraubendreher in den entstehenden Spalt an der Seite ein und hebe die Abdeckung hoch.

    • Die Bodenabdeckung sollte sich mit etwas Kraft entfernen lassen.

    Bottom cover was removed without any problem

    Visumservice Russia -

    My one have 11 holes. That made it difficult. Ended up using 6 screwdrivers to gett the jobb done. After getting the cover off. I observed that only half of them hade a hock that needed me to use a screwdriver. The two closest to the handle have hocks. Then it's every other.

    Erlend Husdal Landrø -

  4. ZQje16ZtoAqd13UU
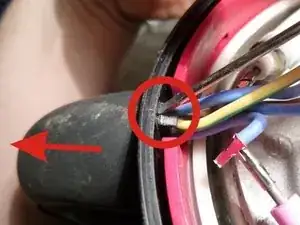
    • Löse die kleine Raste, um eine Hälfte des Griffs zu entfernen.

    • Löse behutsam die Hälfte des Griffs oben ab und entferne sie.

    • Beschädige nicht die Kabel im Inneren des Griffs.

  5. GPRGSKEAldOeFAak
    GPRGSKEAldOeFAak
    FmpSJFBbOSEWbCFi
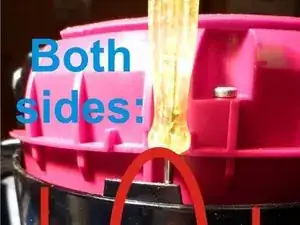
    • Nimm einen kleinen Schraubendreher.

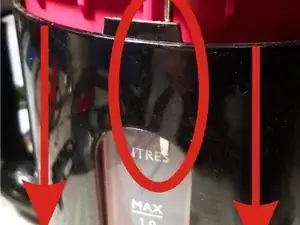
    • Drücke die schwarze Abdeckung um den Wasserkocher über die durchsichtige Literskala.

    • Führe das auf beiden Seiten des Wasserkochers durch.

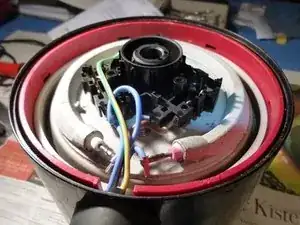
    • Ziehe die schwarze Abdeckung behutsam zum Boden des Wasserkochers hin.

    • Höre damit auf, wenn die ganze Elektronikeinheit sichtbar ist (siehe auch den nächsten Schritt).

  6. Q45WoT2vLnVxtLDw
    Q45WoT2vLnVxtLDw
    i6LLibCHFEu2V314
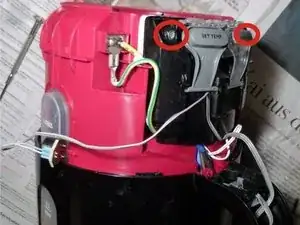
    • Drehe die beiden Torx T8 Schrauben heraus und öffne die Elektronikeinheit halb.

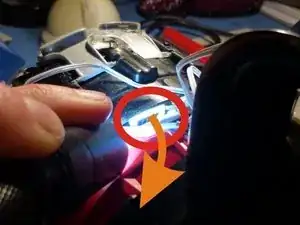
    • Entsichere vorsichtig die weiße rechteckige Raste und löse die schwarze Abdeckung ganz ab.

    It was really hard to find this rectagular grip. It is right in the middle. But I took off the black cover without unlocking it anyway, used some force, but better dont do it.

    Visumservice Russia -

    Same for me. Ended up using force. Wasn't a problem. But better not if you can help it.

    Erlend Husdal Landrø -

  7. rX3eZbfP4hQBDUjx
    rX3eZbfP4hQBDUjx
    LpqFJKvpAryENZZH
    • Hebe die Leiterplatte heraus.

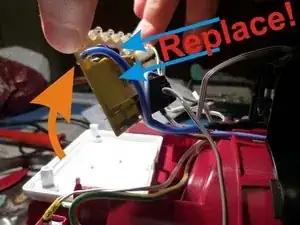
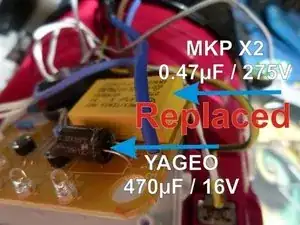
    • Tausche die beiden markierten Kondensatoren aus. Du musst dazu einen Lötkolben benutzen.

    • Der gelbe ist ein 'MKP X2 0.47μF / 275V'

    • Der schwarze ist ein '470μF / 16V' Elektrolytkondensator. Hier musst du auf die Polarität aufpassen: der Minuspol ist markiert und muss an der Seite des gelben Kondensators liegen.

  8. QkoDB4HQwbxnITYh
    • Baue deinen Wasserkocher wieder zusammen. Du darfst keine Teile mehr übrig behalten.

    • Freue dich an deinem wieder funktionierenden Wasserkocher.

    • Er sollte nun wieder 100°C heiß werden und am Ende wieder einen Signalton geben.

    My "Keep warm" button did not work, but this mostly to poor assembly :) anyway it is not used usually.

    Visumservice Russia -

Abschluss

Um das Gerät wieder zusammen zu setzen, folge den Anweisung in umgekehrter Reihenfolge.

Robert

Mitglied seit: 16/01/14

884 Reputation

14 Kommentare

0,75 €, 20 minutes - It work´s! Thank you!

peterlpj -

Thanks for your feedback. 20 minutes was quite fast - great!

My one is now working for more than one year after repair without any problems. We will see, how long until next repair ;-)

Robert -

Great guide, I'm going to try this out soon, as our kettle quits at 80 degrees and just powers down completely. Might be helpful to list the symptoms that these faulty capacitors leads to somewhere early on. If not in the header, then at least at the top of the page.

steigre -

Dear RG! You made me hero in the eyes of my wife and saved lots of money as I will never buy ordinary kettle without a temperature choice. THANKS FOR THE FANTASTIC GIUDE!
Visumservice Russia -

Two notes: (1) It should be mentioned that the MKP X2 0.47μF / 275V capacitor is usually the faulty one. The posts on the German site to which you linked reported that it looses capacity until the power is no longer enough to power the 80 degree LED when it comes on. In my case, similar to the reports from the German site, the remaining capacity had been lower than 0.14μF---clearly not enough. (2) One apparently does not have to use the 26.5 x 8.5 x 17 mm version that was part of the kettle initially, I had an old X2 capacitor from a broken power supply with the same parameters but with a size of 18 x 10 x 16 mm and that worked just fine after I had extended the short connecting wires.

tobiasisenberg -

A third note: this kettle is also known to leak after a while due to the deposits that collect from repeatedly heating up hard water (lots of minerals). Follow steps 1--4 of this guide, then push the heat plate out by gently pushing from the inside out, remove and clean the sealing ring, also clean the inside of the kettle, then put the seal back to where it came from, and push the whole heat plate assembly back into the device (orient it such that the cables on the bottom are in the right position). Then reassemble. This information is also from the linked German sites, and it worked like a charm!

tobiasisenberg -

Dream come true, kettle works again. Thanks

Marek Tyc -

Thank you for this great guide

Fisk_dk -

It works again properly, thank you for sharing!

t-una -

Did the capacitor change year ago. Today it started leaking after first proper descaling (ever). Desassembled it, there is a seal between the metallic base plate and the round plastic sides. Could be that the seal has lost some of the flexibility during the years, but also cleaning might have done the trick. I had bought a new one already, but I’m sure this coud have been repaired still, either cleaning the seal or changing it. After disassembly I can say that this was a well engineered product.

Juhana -

Great. I fixed it. The 'MKP X2 0.47μF / 275V was demaged.

Torsten Moche -

Meanwhile I had to throw away my kettle (at least donated some parts of it) thanks to another broken part - the transparent side plastic was cracked, it was very porous and had a hole. It was definitively the material itself, either because of the temperature or maybe some UV aging through the window? I dont know - but it could not be fixed unfortunately :-( Bad by design, Mr. Philips?!

Robert -

I have a problem with the kettle. I already replaced the MKP X2 0.47μF / 275V capacitor but the problem remains. The kettle keeps shutting down and I must turn it on repeatedly until it reaches 60°C. After reaching that temperature, it works normally. Need help.

My e-mail is audacesfortunajuvat101@gmail.com

Thanks

audaces_fortuna_juvat_101 -

And what is about replacing the 470μF / 16V as well as stated in the instructions? (Placing your e-mail here would probably only results in spam…)

Robert -