Einleitung

Hier wird gezeigt, wie das Philips wake up light HF3485 geöffnet und der Lampenschirm für weitere Reparaturen ausgebaut werden kann.

  1. cxQcnMjqbWFpgDXg
    • Warnung: Ziehe unbedingt den Netzstecker, damit du bei der Reparatur keinen Stromschlag bekommst.

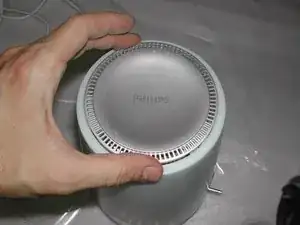
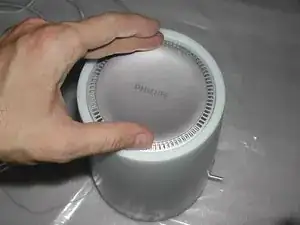
    • Stelle die Lampe aufrecht auf die Arbeitsfläche und drücke leicht auf den grauen Deckel auf der Oberseite.

  2. o4CBwWjnOUUBjxjG
    • Drehe den Deckel gegen den Uhrzeigersinn.

    • Der Deckel kann nun leicht abgehoben werden.

  3. 4jifsUJPUR212v2k
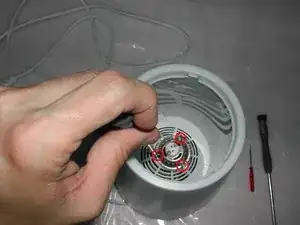
    • Ziehe das Leuchtmittel aus der Fassung heraus.

    • Entferne die drei Kreuzschlitzschrauben, mit denen die GU5.3 Fassung befestigt ist.

  4. Zut1h1kRQtF4Wv1R
    • Lege die Lampe auf die Seite.

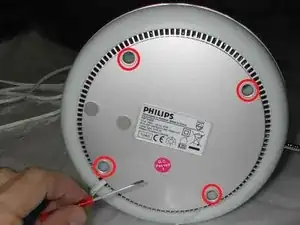
    • Löse die vier Gummifüße an der Bodenplatte mit einem Flachschraubendreher ab. Darunter werden Schrauben sichtbar.

  5. NSoAPtWUWZDI2Nwc
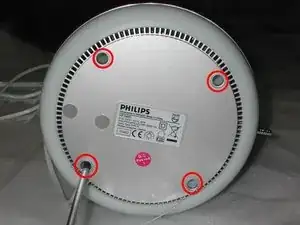
    • Entferne die vier Kreuzschlitzschrauben. Sie befinden sich in tiefen Löchern und du benötigst einen langen Schraubendreher.

  6. XN1LThoVLykveEvu
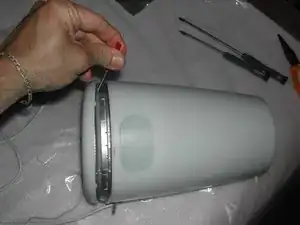
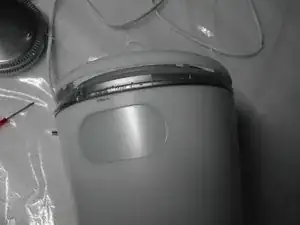
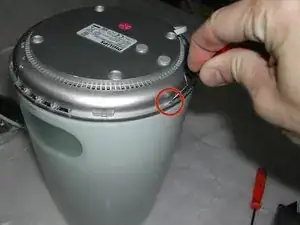
    • Heble die Rasten an der unteren Abdeckleiste mit einem kleinen Flachschraubendreher vorsichtig hoch, bis sie sich vom Gerät löst.

  7. EpFKpTMlm333C4GR
    • Entferne behutsam die untere Abdeckleiste. .

  8. GED2mvwHuLTWTlCZ
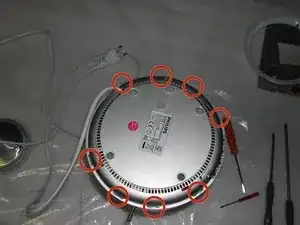
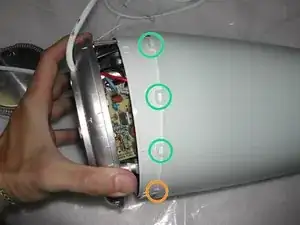
    • An diesen Stellen sind acht Kunstoffrasten, , mit denen die Bodenplatte am Gerät befestigt ist.

    • Diese Rasten halten die Bodenplatte und den Lampenschirm sehr fest zusammen. Eventuell musst du sogar eine oder zwei davon wegschneiden, um die anderen zu öffnen.

  9. kEe3NuRsktnWvUNK
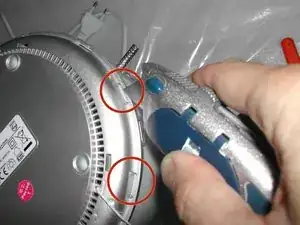
    • Schneide eine oder zwei der Rasten mit einem Cutter weg.

    • Dadurch können die anderen Rasten ohne Beschädigungen geöffnet werden. Phillips hat das Gerät so gebaut, dass es nicht repariert werden soll.

  10. xDmiDw5uKZuoYHjL
    • Drücke mit einem kleinen Flachschraubendreher gleichzeitig auf die restlichen sechs Rasten und ziehe den Lampenschirm von der Bodenplatte ab.

  11. bTWHHCAb42Svvx6c
    • Ziehe behutsam die Hauptplatine vom Lampenschirm weg.

    • Auf dem Foto sind die abgeschnittenen Rasten orange markiert, die ganz gebliebenen grün.

  12. 4POKMBbi1ARbBQWP
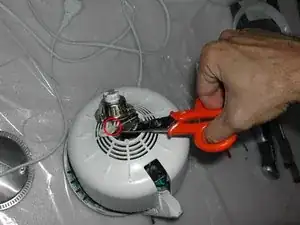
    • Schneide den Kunstoffclip, der die beiden Kabel der Lampenfassung zusammenhält, mit einem geeigneten Werkzeug auf.

    • Dieser Schritt ist nötig, damit die Hauptplatine frei wird.

  13. sEULstE4yjMMOThH
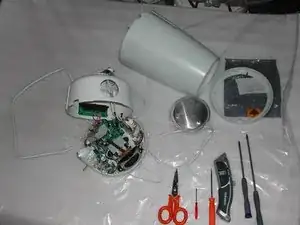
    • Die Hauptplatine ist frei und kann weiter repariert werden.

Abschluss

Um dein Gerät wieder zusammenzubauen, folge den Schritten in umgekehrter Reihenfolge.

David

Mitglied seit: 23/05/14

1415 Reputation

12 Kommentare

I would suggest following the steps in a different order:

remove bottom trim

remove diffuser

then remove the bulb & socket, and the 4 screws from the bottom which will allow access to the main board.

Alex -

Hi,

The guide was very helpful as I just received such lamp for checking from one friend.

I would make only make one correction: you do not have to cut the plastic snap-ins, none of them.

If you use an IPhone opening toll kit, with those plastic levers as here:

[verlinktes Produkt fehlt oder ist deaktiviert: IF145-000-1]

then you can open it easy, without any scratches.

Victor -

Excellent guide. I did, however, not have to cut off any off the plastic snap-ins from step 9. Used a bigger screwdriver and gently used a bit of force, and one-by-one they came off.

kostermw -
im wondering whether its possible to overwrite the wake sounds...

Chris Mair -

Thank you so much for this guide. Was just about to give up on my lamp and buy and inferior led version when I found this.

These steps also work for the 3740 but the tabs holding the shade on (steps 8-10) are a different style. More like the ones on the bottom trim piece. Had to really work them and muscle that part off.

My ceramic bulb holder is severely corroded to the point where the light will only turn on if you jiggle the bulb. A little sad to see that the wires going to it are permanently attached on both ends. Now that the whole thing is apart. I'm going to see if I can source a new bulb holder and splice it onto the top...

Griffin -

Hello, I have the main fuse on the PCB card "Sparrow Power" out of service, I search one wiring diagram of this PCB, or spare part....

Seb -

Hello,

Thanks for this "opening guide". I have too the main fuse on the "Sparrow Power PCB" out of service. Well, I think I have 2 fuses out of service : the first in square plastic has reference "T1.25AL 250V" so I can find new one, but the second was a blue disk on PCB with "FU1" label. Anyone know the value for this FU1 component (fuse I suppose)? Thank in advance for your help!

didix -

It seems the second component (blue disk) is a varistor with reference '07 K 250' and I found a varistor from Epcos with this reference.

If it can help anyone.

didix -

to disassmble the diffuser you can stick 8 wooden clothes pegs in the snaps to hold them open simutaneously. then you can easily pull the diffuser of without damage. therefore it ist better to lose the three bottom srews afterwards, so that the inner part sticks as one peace together.

Thank you very much for this guide!!

heinz111 -

Tow of the buttons on my Wake up light are not working / got mixed up in their function: 1) Light up is only changing the clock upwards 2) select + button is selecting the menu, just like the menu instead of changing the clock (instead thats what the light button is doing). …I dismantled everything but can’t find out what is causing this mixed up buttons problem. (not an expert at all in electronics). Any suggestions on what to do?

Kimsn -

Hi,

Unfortunately, this guide does not work for the philips HF 3465. The diffuser cannot be removed because the diffuser does not have snap-ins which can be loosened. The diffuser is assembled irreversibly with the grey ring. So you have to destroy the grey ring at several points to have a chance to disassemble the diffuser.

Bad design really. Not environment friendly either.

Is there someone who has disassembled a HF3465?

goeie -

I have this clock, and it was working fine except the controls (the buttons) don't do anything anymore.

So I'm no longer able to change the time. Any idea how to fix this?

Rob Smeets -