Einleitung

Anhand dieser Anleitung kannst du das obere Gehäuse abnehmen.

  1. sbUCUYRWF5u33DHo
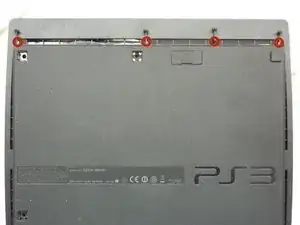
    • Drehe die PS3 um und lege sie sorgfältig ab.

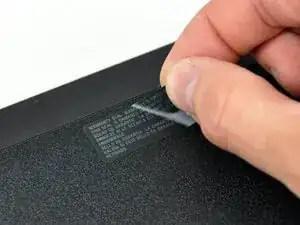
    • Ziehe vorsichtig den Garantieaufkleber vom unteren Gehäuse ab, um an die darunter verborgene Schraube zu gelangen.

    • Um zu verhindern, dass beim Aufkleber die Schrift *VOID*, also "ungültig" erscheint, den Aufkleber vorher vorsichtig erwärmen. So kann man ihn sauber entfernen und wieder aufkleben.

    Don’t even need to bother with the sticker anymore since SONY does not care what you do with them anymore.

    Travis Wheeler -

  2. fktNXIVQYKIbefHS
    fktNXIVQYKIbefHS
    Z2lGLuRFjeG6aFvV
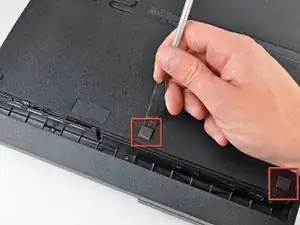
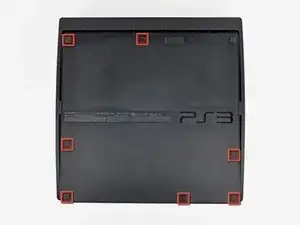
    • Benutze die flache Seite eines Metallspatels, um die sieben Schraubenkappen an den Kanten des unteren Gehäuses herauszuhebeln.

  3. u6tkxEEWjBggtSMy
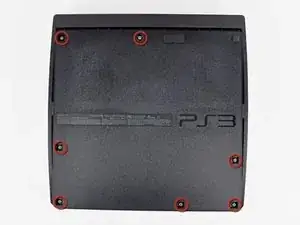
    • Schraube die sieben 37 mm langen Kreuzschlitzschrauben aus dem unteren Gehäuse heraus.

  4. BuJcUHDpFwOwPFDL
    • Schraube die vier 13,3 mm langen T8 Torx Sicherheits-Schrauben unter der Öffnung des BD Laufwerkes heraus. (Einige Modelle haben nur drei Schrauben)

    Its 4 screws beneath the blu-ray

    Manuel -

    Remove the four 13.3 mm T8 security Torx screws beneath the Blu-ray drive opening.

    Daniel Tlapa -

    Can we edit this to say 4 screws?

    revanantwraith -

    I made the change from three to four screws, but you're able to edit the guides as well. If you want to edit something, you can click the Edit link on the right side of any guide step, or the Edit link at the top right of the page (sandwiched in-between View and History).

    Taylor Arnicar -

    Do you guys have a guide for the PS3 Slim Model 3001A. The fan is different than this model.

    emknight04 -

    3001a is basically same motherboard but cheaper plastic bd drive other than that its exactly the same until you get to the new slim line

    Robert -

    Anyone know an online retailer with a competitive price for the replacement fan?

    Jared -

    My PS3 had only three Torx screws. Having four in the diagram was initially confusing. Obviously they made a mid-stream change at some point (mine is several years old now).

    corygbooker -

    I've accidentally removed the ribbon cable from the blu-Ray drive and can not seem to figure out how to reconnect it. Can anyone help?

    OneIfByLand -

    Take the top off the drive, connect the ribbon to the motherboard then replace the drive sliding the ribbon through the slot on the bottom of the drive and reconnect to the laser.

    KcXbox Repair -

    pls help i have to tear down my ps3 slim but the 4 srews are very hard to take it out because there is a needle in the middle pls hep

    Vincent Brabandt -

    If the screw has a pin in the center, that means it is a security Torx meant to prevent tampering. To remove this screw, follow the guide I have linked below...

    http://www.instructables.com/id/Removing...

    Telpack -

    How do u buy the screw driver for these screws

    mistergalacta hoggy -

    Online at the usual suspects?

    Or some hobby stores or places that sell tools will sometimes carry these.

    revanantwraith -

    Anyone else's screws for this step need the T7 bit instead of T8?

    Michael J Cotton -

    What is the name of this screwdriver

    Mohammad Shawa -

  5. LvQrCIDkbymnDdoa
    LvQrCIDkbymnDdoa
    QhXCIUkPgeFEM2N3
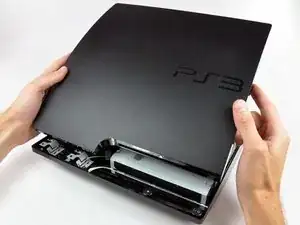
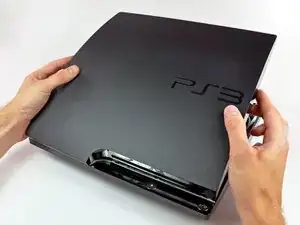
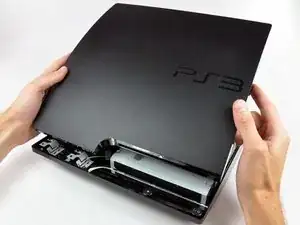
    • Hebe den Deckel zuerst an der hinteren Kante an und klappe ihn nach vorne.

    • Hebe jetzt den Deckel der PS3 vollständig ab.

    I just want to open the top cover to clean the fan. Do I need to unscrew the four security screws?

    Aryan -

Abschluss

Arbeite die Schritte in umgekehrter Reihenfolge ab, um dein Gerät wieder zusammenzubauen.

Andrew Bookholt

578335 Reputation

2 Kommentare

No good mine a Sony.

james register -

Thank you this helped me so much!!!!
Megan Davis -