Einleitung

Hier wird der Austausch des Blu-ray Laufwerks gezeigt. Das Laufwerk ist speziell von Sony für die PS 3.

  1. sbUCUYRWF5u33DHo
    • Drehe die PS3 um und lege sie sorgfältig ab.

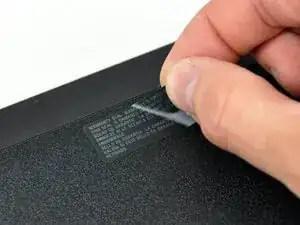
    • Ziehe vorsichtig den Garantieaufkleber vom unteren Gehäuse ab, um an die darunter verborgene Schraube zu gelangen.

    • Um zu verhindern, dass beim Aufkleber die Schrift *VOID*, also "ungültig" erscheint, den Aufkleber vorher vorsichtig erwärmen. So kann man ihn sauber entfernen und wieder aufkleben.

    Don’t even need to bother with the sticker anymore since SONY does not care what you do with them anymore.

    Travis Wheeler -

  2. fktNXIVQYKIbefHS
    fktNXIVQYKIbefHS
    Z2lGLuRFjeG6aFvV
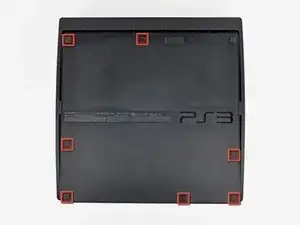
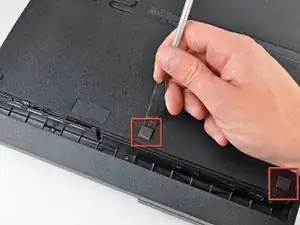
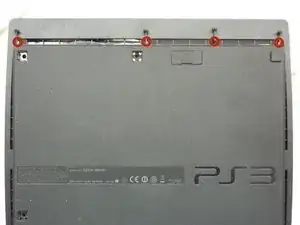
    • Benutze die flache Seite eines Metallspatels, um die sieben Schraubenkappen an den Kanten des unteren Gehäuses herauszuhebeln.

  3. u6tkxEEWjBggtSMy
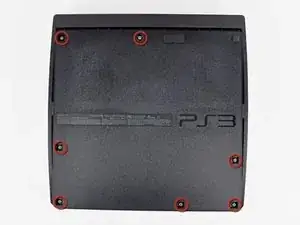
    • Schraube die sieben 37 mm langen Kreuzschlitzschrauben aus dem unteren Gehäuse heraus.

  4. BuJcUHDpFwOwPFDL
    • Schraube die vier 13,3 mm langen T8 Torx Sicherheits-Schrauben unter der Öffnung des BD Laufwerkes heraus. (Einige Modelle haben nur drei Schrauben)

    Its 4 screws beneath the blu-ray

    Manuel -

    Remove the four 13.3 mm T8 security Torx screws beneath the Blu-ray drive opening.

    Daniel Tlapa -

    Can we edit this to say 4 screws?

    revanantwraith -

    I made the change from three to four screws, but you're able to edit the guides as well. If you want to edit something, you can click the Edit link on the right side of any guide step, or the Edit link at the top right of the page (sandwiched in-between View and History).

    Taylor Arnicar -

    Do you guys have a guide for the PS3 Slim Model 3001A. The fan is different than this model.

    emknight04 -

    3001a is basically same motherboard but cheaper plastic bd drive other than that its exactly the same until you get to the new slim line

    Robert -

    Anyone know an online retailer with a competitive price for the replacement fan?

    Jared -

    My PS3 had only three Torx screws. Having four in the diagram was initially confusing. Obviously they made a mid-stream change at some point (mine is several years old now).

    corygbooker -

    I've accidentally removed the ribbon cable from the blu-Ray drive and can not seem to figure out how to reconnect it. Can anyone help?

    OneIfByLand -

    Take the top off the drive, connect the ribbon to the motherboard then replace the drive sliding the ribbon through the slot on the bottom of the drive and reconnect to the laser.

    KcXbox Repair -

    pls help i have to tear down my ps3 slim but the 4 srews are very hard to take it out because there is a needle in the middle pls hep

    Vincent Brabandt -

    If the screw has a pin in the center, that means it is a security Torx meant to prevent tampering. To remove this screw, follow the guide I have linked below...

    http://www.instructables.com/id/Removing...

    Telpack -

    How do u buy the screw driver for these screws

    mistergalacta hoggy -

    Online at the usual suspects?

    Or some hobby stores or places that sell tools will sometimes carry these.

    revanantwraith -

    Anyone else's screws for this step need the T7 bit instead of T8?

    Michael J Cotton -

    What is the name of this screwdriver

    Mohammad Shawa -

  5. LvQrCIDkbymnDdoa
    LvQrCIDkbymnDdoa
    QhXCIUkPgeFEM2N3
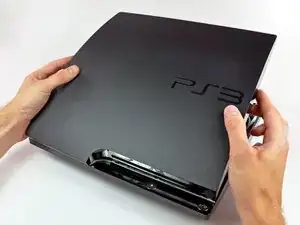
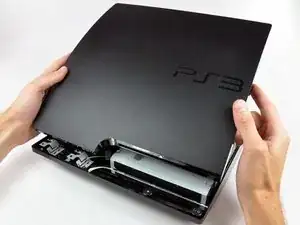
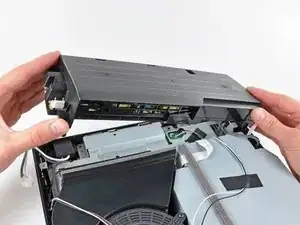
    • Hebe den Deckel zuerst an der hinteren Kante an und klappe ihn nach vorne.

    • Hebe jetzt den Deckel der PS3 vollständig ab.

    I just want to open the top cover to clean the fan. Do I need to unscrew the four security screws?

    Aryan -

  6. Yh3ZVhhNtHFXftVY
    Yh3ZVhhNtHFXftVY
    UVGVKsylF1blF4VE
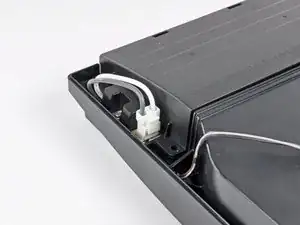
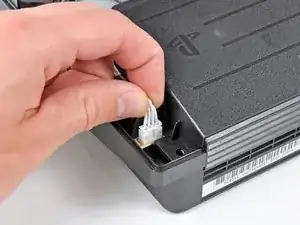
    • Drücke die Rasten an der Netzeingangsbuchse und ziehe sie gerade vom Netzteil hoch.

  7. sFKIG3UmBojsntvO
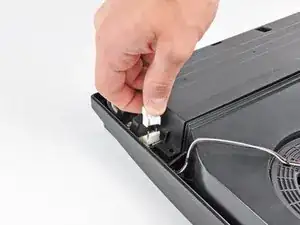
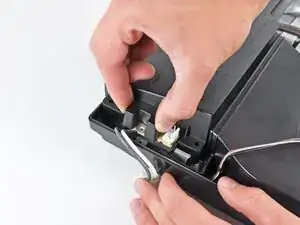
    • Ziehe den Stecker der Gleichstromversorgung an den Kabeln gerade hoch und aus dem Sockel am Netzteil.

    Those two screws are tight down there what do you recommend I use?

    Megan bronner -

  8. WMrUrCWouVH5QEoM
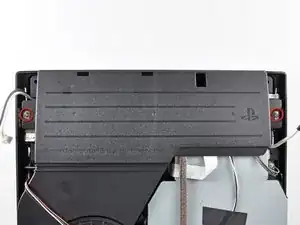
    • Das Netzteil ist mit zwei 7,6 mm Kreuzschlitzschrauben am unteren Gehäuse befestigt. Drehe sie heraus.

    Question: if a screw doesn't come out, what do you recommend, without potentially damaging the system, inside and out?

    kramiz2488 -

    It seems these can be quite tight, but they did come loose with someextra force in my case. They did that thing where it makes cracking sounds, but nothing really breaks. They're just really tight in there. - I just wouldn't recommend taking these out too often.

    Michael Hendriks -

    The screwdrivers on the guide didn't work mine just don't come out any tips model is slim CECH 2001A

    Step 8

    Jose Arrieta -

    These screws work as a ground pass through between the motherboard shields and the power supply. My cousin took his PS3 to a repair shop to replace the power supply, they didn’t put the screws back in after that and the PS was shutting down suddenly (no light green or red), put a couple of new screws and it’s being working fine since

    Mauricio González -

    Sometime ago i took apart my PS3 out of curiosity, When puting it back together, i messed it up, I stripped one of the PSU screws. Now, i can't take it apart for a paste replacement. Any ideas?

    Franco Iván Bello Rojas -

    The screws don't come out how do I fix this without breaking anything

    Suck dick -

    I had the same problem with very tight screws on PS3 power supply. I solved it by purchasing a Screw removal / extractor gripping pliers long nose style , with unique non-slip jaws for quickly extracting damaged / stuck screws. ENGINEER PZ-60 Neji-Saurus,Silver. ( bought mine on Amazon)

    These pliers have special grips on tapered end to hold and turn stripped or rusty screws. It took a lot of effort, but screws finally came out using these pliers. A bit of sewing machine oil and prising under the washers with a flat screwdrvers helps too. Failing that, take it to repair shop as they are VERY TIGHT screws on some models of PS3.

    hubert hanks -

  9. MZMRRdaoxxXMhCEZ
    • Hebe das Netzteil an der - von vorn gesehenen - linken Kante hoch.

  10. saRFnt5prhQI5NFF
    saRFnt5prhQI5NFF
    Djh4A4Iqy2Zw3Joh
    • Hebe das Netzteil weiter an der linken Kante hoch, bis sie sich von den Metallstützen löst, so wie im zweiten Bild zu sehen.

    • Entferne das Netzteil von der PS 3, achte darauf, dass sich keine Kabel verfangen.

    It seems it kind of ends for me here. I can only lift the left side about an inch and then the right side stays down like it’s stuck to something underneath. It feels like I’m bending something. Could something have melted underneath?… It's really stuck, I can't get it to come loose. And I can't see much shining a light into it either. - Any tips?…

    Michael Hendriks -

    Did you undo the screws?

    Phoenix Jameson -

    I had the same issue but was able to get it off. The right side (as per the above picture) has two long column like sections that actually goes into the machine. Took me a bit of wiggling and some brute force.

    Ivan Amaro -

    You just lift the whole power supply up. There’s no need to start from the left? Is it possible to bend the two metal posts if lifting from the left?

    Ken -

    Needs medium flat screw driver as wedge to help to lift the power supply in the right side or exert more force in your right arm provided the front of PS3 is at your front.

    Dasol -

    Um, I translated the guide from French to English and the name of the guide was “Food” and the description said “This guide shows you how to replace your diet” The translation is incorrect just to let you know!

    Liam Kandell -

    Hi! Thanks for you attention! But no worries, the French word “alimentation” means power, food or diet depending the context.

    Claire Miesch -

    Alright, thanks!

    Liam Kandell -

  11. SjTZsMGJ4DG1Ijyn
    SjTZsMGJ4DG1Ijyn
    JWNrZHOwKMxsbxSE
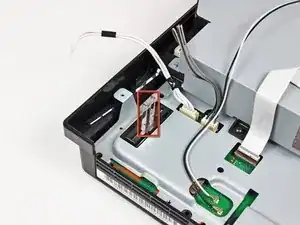
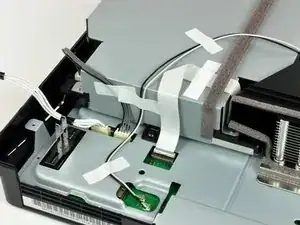
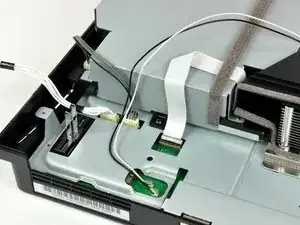
    • Wenn vorhanden, musst du die Klebestreifen, welche die Kabel auf dem Laufwerk festhalten, abziehen.

    What does the white and black cable?

    Robert Brown -

  12. eqAyKhYjtWqUhqTJ
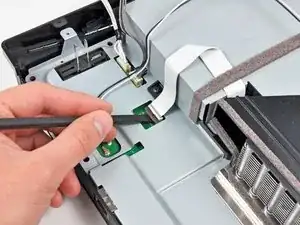
    • Klappe den Sicherungsbügel am Verbinder des Blu-ray Flachbandkabels mit dem flachen Ende des Spudgers oder dem Fingernagel hoch.

    • Achte darauf, dass du nur am Sicherungsbügel hebelst, nicht am Sockel selbst.

  13. lLTEEDyNQhUkXKsI
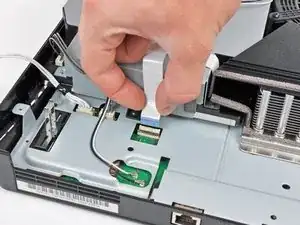
    • Ziehe das Blu-ray Kabel gerade hoch und aus seinem Sockel.

  14. Wpqs1UUFQoUqnvIW
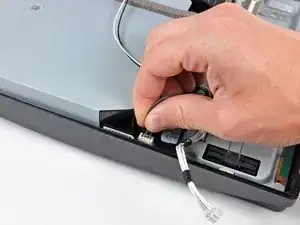
    • Ziehe das Stromkabel des Blu-ray Laufwerks gerade aus seinem Sockel am Laufwerk.

  15. FNNWVwaMWMQB2Wu4
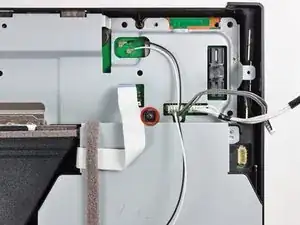
    • Das Blu-ray Laufwerk ist mit einer 9,5 mm Kreuzschlitzschraube am Gehäuse befestigt. Drehe sie heraus.

  16. rIJHTp3K2knmtHuc
    rIJHTp3K2knmtHuc
    uZnZAu15OX3iRnEQ
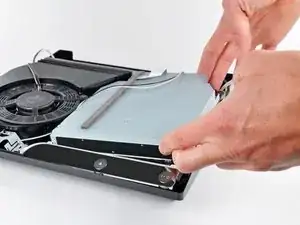
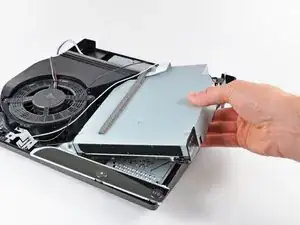
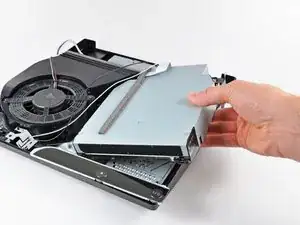
    • Hebe das Blu-ray Laufwerk leicht an der rechten Kante an und löse so die Steuerplatine aus ihrem Sitz.

    • Entferne das Blu-ray Laufwerk von der PS 3.

    • Beim Zusammenbau musst du darauf achten, dass die Steuerplatine wieder richtig in ihren Sitz im unteren Gehäuse passt.

    • Wenn du das Laufwerk durch ein neues ersetzt, musst du die Steuerplatine vom alten auf das neue Laufwerk umbauen.

    my cd drive has 3 cables, two by the fan, one right under, i believe i damaged the one on the bottom because it is very difficult to put back in hence the repair. But the photos here dont show the 3 cables, not sure if you have one for this model?

    Eduardo Cutino -

    I followed the steps and I successfully removed my disc drive the guide was helpful but I had issues and the ribbon cables on my replacement disc drive were too short after a soddering attempt failed I now need to rebut a disc drive can someone direct me to a proper replacement with the correct size I need it's a ps3 slim 120G please help

    Nick -

    I popped a friends apart to see if I could put in mine, which won't stay online for more than 1minute 10 seconds. Plays DVDs fine. Anyway, his had 3 cables and mine only has 1. How do I know which DVD player to order?

    ntdoc -

    Completely different drive in my slim. 3 ribbon cables on the back that pull straight up out of their connectors. And one wide ribbon hidden underneath and almost impossible to get to. After disconnecting the 3 visible cables lift the back of the drive about 3/4" and use a plastic spudger to release the clip on the cable before lifting off the drive. Reinstalling is a nightmare. The cable has a black line to indicate how far to insert into the connector. Get it in there somehow then use the spudger to push the clip down. If it's not level release it and try again and again and again until you get it right. Sony must use some awfully small fingers when they build these ;-)

    jurquijo -

    I had the same issue with the ribon feeding beneath the blu ray player. This video provided a much better solution. It requires dissassembling the blu ray: https://youtu.be/Upy2bTev3M0

    Rebel Seven -

    My disk drive needs to be replaced. Your step by step is straight forward and are very helpful. At the end you mentioned “If replacing the Blu-ray drive with a new drive, swap the circuit board from your old drive into the new drive”.

    Which circuit board? Can your please add a picture of the circuit board you are referring to?

    Henry -

    @hh168 There’s now a link in the text of that step, which will take you to a video with detailed instructions for swapping the board.

    Jeff Suovanen -

    First I replaced the drive and it would load a disc and see that it was either a game and which game or a BluRay or DVD and which, but I got error codes when trying to play them.

    The codes seemed to be tamper coding, and swapping the board seemed to be a good idea.

    It went smoothly, but now discs will not feed into the drive.

    Please help.

    Zachary Mannes -

Abschluss

Um dein Gerät wieder zusammenzusetzen, folge den Schritten in umgekehrter Reihenfolge.

Andrew Bookholt

578335 Reputation

22 Kommentare

great work guys and ladies.......haha went without a snag!

Jesse Waterhouse -

I have a question I have followed your guide properly and removed my drive and found that the laser and disc loader are both need replaced. My question is when I go online and look for the replacement it sometimes shows just the laser then others shows the driver. I want the entire component as seen in this guide above. Do these come intact with everything in it when I buy it online. Can you please help.

Thank you,

Thomas Martinez

Tomlvgmartinez@yahoo.com
Thomas Martinez -

Ive been able to remove the drive and I think it's fixed. To get it back together how do you get that ribbon underneath to go back into the slot? Is there a trick? I can get it lined up, but it won't go in.

Thanks for the help

ken -

Ken,

Don' t know if this helps you now after all this time, but maybe it will help others with the same issue.

a) On the slot where the ribbon is to be inserted, is a lock clip. You pull up on that (gently).

b) Slide the ribbon in now with the clip lifted.

c) While securing the ribbon down in the slot, push the clip down, it will lock the ribbon in the slot.

Hopefully this helps, I didn't realize the clip could be lifted. While it's down, it is impossible to set the ribbon in.

ShuriKen

ShuriKen -

“If replacing the Blu-ray drive with a new drive, swap the circuit board from your old drive into the new drive.” Where can I find that instruction?

Thanks

lttexan -

There’s now a link in the text of that step, which will take you to a video with detailed instructions for swapping the board.

Jeff Suovanen -

Great video linked at the end to help with swapping out the circuit board, as well as the rest of the steps. Repair worked great, now we’re back in business for Blurays!

Joey Maxfield -

Thank you, thank you , thank you!!! Can get back to playing the original Dark Souls after snagging it for a 10 bucks :P

final__boss -

Sadly the replacement drive is typically $99… which is close to what a complete used system would cost if you bought it from someone :(

Mark H -

Checking in from 2021, I found a “Sony Refurbished” Blu-Ray Drive on Ebay for $45. Might be worth trying now?

Evan Laing -

i do need to replace the circuit board?

Thomas Gallagher -

Great guide, I would highly recommend. Don't forget to do the swap of the circuit in the video or it will not work.

james.septak -

I am about to purchase a new drive. But the drive that looks exactly like mine is this one: https://www.amazon.com/gp/product/B00GVN... and this drive for sale doesn’t seem to have the “PCB”. I opened the PS3 and removed the drive; the one in this link I included. Doesn’t seem to have this large PCB, or is this one much smaller and also need replacement? I am ready to purchase, but I need clarification. Are there differences in technology between the PS3 Slim versions? The drive in your page here is the same shape, but not the same internals. The link I post here is just like mine. Please advise. Thx!

ejbytes -

From the research I did on my PS3 Slim - CECH-25xx, YES it looks like different revisions have different disk drives. I would advise looking for one that specifically lists the “CECH-XXXX” number with the listing. That’s how I found my replacement drive on ebay. Best of luck!

Evan Laing -

Hello my ps3 blu ray drive was giving some probs in which i decided i wanted to buy a new drive to put in and when i did so i realized it wasn't working so i look on this web and saw that i had to switch the circuit board from the old one to the new and i still didn't a response can you help solve this problem???

Gev -

I followed you instructions, which were great by the way, and when I turned the PS3 on and inserted a disc, it would not accept the disc. If I power off the machine and then try to insert the disc half way the console turns itself on but still will not pull in the disc. I bought this drive from eBay as a new item and says it is guaranteed to work and I did swap out the circuit boards. I also rechecked everything to make sure that all of the connections were tight and in as should be but still the drive is not pulling in the disc. ANY suggestions as to what is going on? Thank you

Tanya Doll -

PlayStation 3 Troubleshooting

I would follow this troubleshooting guide above. This will help further identify the specific issue with your disk-drive. It may be that a sub-board component of the disk drive has failed - like the disk sensor.

Evan Laing -

I hope someone sees this lol. I did this and unfortunately pressed a little too hard on this orange looking cable. When I look it up to replace I can’t find it AT ALL. I even just looked up a ps3 diagram only to find nothing still. If anyone just knows what this stupid cable is called would be great. It’s orange, connects to the Blu-ray/disc drive, and seems to effect the whole cd thing, like it won’t even take the disc now. If anyone knows anything please email me at jamsinewood419@gmail.com

Jasmine Wood -

PS3 Slim - CECH 25xx - replacement Blu-Ray drive was listed as “Sony Refurbished” on Ebay. Worth the $45 and did NOT require controller board swap.

Evan Laing -

We lost the top screw to the PS3 optical drive do you need the screw?

Michael Thornhill -

Meu PS3, não está puxando o cd,devo trocar a unidade blu-ray?

joseamarildof54 -