Einleitung

This guide shows the hidden screws you must remove when replacing the keyboard.

  1. YgsRrYAFBtYrRivQ
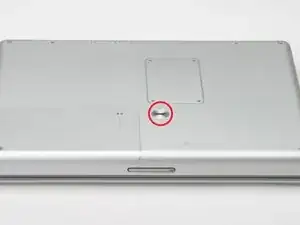
    • Use a coin to turn the battery locking screw 90 degrees to the right.

    • Lift the battery out of the computer.

    What can I say?

    It is certainly do able. I just completed it. Took me 2 hours. The most important tool you'll need is patience - bag full of patience!!

    Gopal -

    Took 3 1/2 to 4 hours for someone who is handy but has never opened a computer before. Not so bad and it was a fun learning experience.

    Nomad Toes -

    Zitat von Nomad Toes:

    Took 3 1/2 to 4 hours for someone who is handy but has never opened a computer before. Not so bad and it was a fun learning experience.

    Weird. I posted this on Step 1 of replacing the optical drive, but it showed up on the RAM page since Step 1 is the same. Replacing the RAM takes 10 minutes.

    Nomad Toes -

    I also see this on “replacing the battery” :-)

    atarixle -

    I guess, the hardest thing is to find a trustfully shop to buy a new one. You should create a manual how to disassemle the body of the battery and replace the standard round cells inside it.

    atarixle -

  2. R4N3tPJXuHZ3jeoi
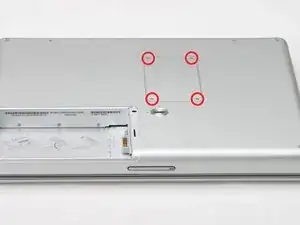
    • Remove the four Phillips screws from the memory door.

    • Slide the memory door away from the memory compartment.

  3. BKmiFChnaJgREW6s
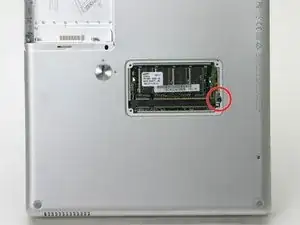
    • Remove the long black Phillips screw next to the memory card.

    • Remove the small EMI finger beneath the black screw.

    What is an EMI Finger???

    zdavatz -

    Zitat von zdavatz:

    What is an EMI Finger???

    yeah, good question. I just blew that off - everything else worked just fine - thanks to ifixit for such a great step-by-step!

    springboard -

    Zitat von zdavatz:

    What is an EMI Finger???

    That black screw needs to come out because it goes all the way through the computer into the back of the keyboard. However, I didn't see any EMI finger, unless that's the purpose of the metal directly underneath it. EMI fingers are those little tin foil like things you'll see along the ports inside the computer. They provide shielding from what I presume stand for electro-magnetic interference.

    aratuk -

    Zitat von zdavatz:

    What is an EMI Finger???

    I think the EMI Finger is probably the silver clip that is under the head of the black screw that step 3 tells us to remove.

    Derek Roff -

    EMI stands for electro-magnetic inteference. An EMI finger is a piece of metal that connects two pieces of a metal case together, preventing EMI ("radio waves") from passing in or out. In this case, yes it is the "clip".

    jerrykrinock -

    The black phillips screw is completely stuck on my compulter, and in my frustration, I managed to stripp the screw.. Noe I am concidering drilling it out, this will most likely destroy both the screw and the "EMI finger". Is this a problem? I guess the screw is no problem, but the EMI finger? Or anybody have any ideas to what I could do, I wanted to change my harddrive.. Thanks!

    powerbookg4hdd -

    Dear powerbookg4hdd. This is a very long screw and you could not drill it out. First, try to turn it with needle-nose pliers. If that is too difficult, use a larger drill bit and try to drill the head completely off instead. You're in a very difficult situation. Of course, remove the RAM card to give yourself some working space.

    jerrykrinock -

    Dear jerrkrinock! Thank you for your quick reply. Taking your recommendation, I did not try to drill it out, and after considering several approaches, I used a cutter and changed the "star" screw into a "straight" one. This was successful, and I was able to change the drive. I did not find anything that could be an EMI finger, though.. Anyways, thanks ifixit.som for great guides!

    powerbookg4hdd -

    I believe the clip is referring to the ribbon of grounding material that the plate sits on. You need to move it over to take the long screw out without tearing it. And then you need to lift it and hold it out of the way when you replace the the long screw to avoid pinching it under the head of the screw. TR

    tredding -

    powerbookg4hdd: or anyone else -- i'm in a similar situation. what kind of cutter did you use to re-notch the screw? or is there another way to get this screw out if it is stripped?

    afb -

    To be clear on this step you don't need to remove the long black screw (in fact it doesn't appear possible to remove it completely) just make sure it's been unscrewed as much as possible and then leave alone

    mancunianlad -

    This is correct. The long black screw screws into the keyboard so it does need to be unscrewed, but can be left in place. It may fall out while the laptop is bottom down but if you are working on a towel you'll find it easily.

    Zitat von mancunianlad:

    To be clear on this step you don't need to remove the long black screw (in fact it doesn't appear possible to remove it completely) just make sure it's been unscrewed as much as possible and then leave alone

    emanmb -

    I don't see anything that looks like a clip under this screw. It came out just fine (although it wanted to pull up the padding directly above it when I I pulled it out), but all that's under it is the metal plate it's screwed into, which looks like it is also held down by another screw. Is this what I'm supposed to remove? It certainly doesn't seem to want to come up.

    Calion -

    Should this step specify that the memory door is now to be replaced? At Step 9 the photos show it back in place and yet I didn't see where it was to be screwed back on.

    FWIW, my PB did not have an EMI Finger (assume some earlier repair removed it and did not put it back). Is that a concern?

    kah -

  4. SDuXICZxmojYuKGx
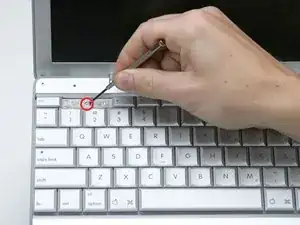
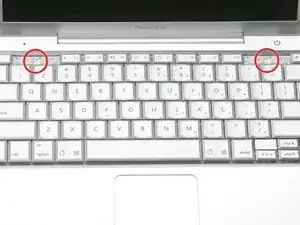
    • On the keyboard, remove the F1, F2, F11, and F12 keys.

    • This is scary - take a deep breath before continuing. Place your index finger under the upper left corner of the key and lift up until you hear a click. Then, transfer your finger to the left edge of the key and lift up to pull the key off.

    • You're freeing the two tabs on the left of the key from the two small holes in the plastic scissors mechanism.

    • When replacing the keys in the keyboard, place the key directly over the slot where it will go and press down until you hear the key click into place.

    once you have removed the little gray stickers, you actually can remove the little screws without popping out the F1/ F2 and F11 and F12 keys. Just pull up the keys a little bit and slip the screw between the keys, a magnetic screwdriver helps.

    Jamba -

  5. PSrwUQPXIOE1ELPG
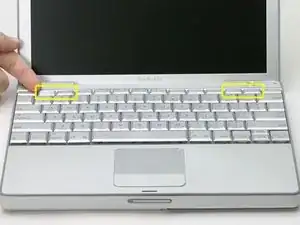
    • Use your fingernail or a small flathead screwdriver to peel up the gray stickers covering each of the screws.

  6. sjCtHVAPx1MjOCmQ
    • Remove the two short Phillips screws.

    Wish I had bought the magnetic pickup tool, it would really help with getting the very small screws out in step 6!

    reginad -

  7. fmaOywbfBwU2MVcK
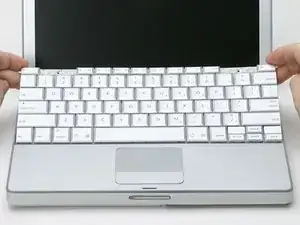
    • Lift the keyboard by the 'esc' and 'eject' keys and gently lift up until the keyboard is vertical.

    There's some kind of extension to the keyboard in the upper left which slots into the area underneath. Mine was stuckfast and had to be pried loose with a screwdriver. That bent the keyboard, but I manage to get it straightened out somewhat. Any tips for dislodging this piece should it get stuck like mine?

    Paul -

  8. t5hlCOsUSCGenNic
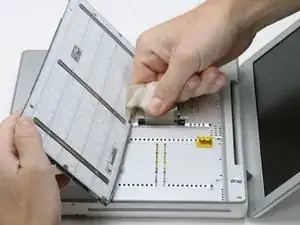
    • Grasp the keyboard connector ribbon near the connector and disconnect it from the logic board.

    I would not pull up on the ribbon as is being done in the picture. Note that the black pastic base that you see is the connector part that is permanently attached to the ribbon cable. Use a small screwdriver or spudger alternately on each end of the black plastic base to pry and rock it upwards.

    jerrykrinock -

    I agree. I was able to use a needle nose pliers to gently grab the black connector and wiggle the connector from the motherboard.

    Zitat von jerrykrinock:

    I would not pull up on the ribbon as is being done in the picture. Note that the black pastic base that you see is the connector part that is permanently attached to the ribbon cable. Use a small screwdriver or spudger alternately on each end of the black plastic base to pry and rock it upwards.

    emanmb -

Abschluss

To reassemble your device, follow these instructions in reverse order.
iRobot

Mitglied seit: 25/09/09

0 Reputation

0 Kommentare