Einleitung

Diese Anleitung zeigt, wie der Joystick im Razer Kishi ausgetauscht werden kann.

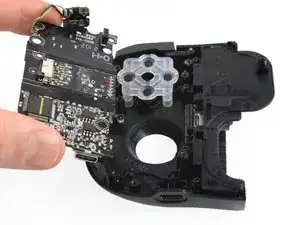
Beide Seiten des Controller sind ähnlich konstruiert, der Prozess des Öffnens wird daher nur auf der rechten Seite des Controllers gezeigt, kann aber auch für die linke Seite angewendet werden.

  1. ZsQTaZjqv6qyxclm
    • Der Prozess ist auf beiden Seiten identisch, um es einfach und kurz zu halten wird hier nur der Prozess für die rechte Seite gezeigt. Du kannst aber auch mit Hilfe dieser Anleitung die andere Seite öffnen.

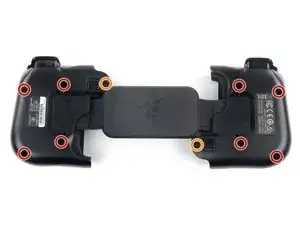
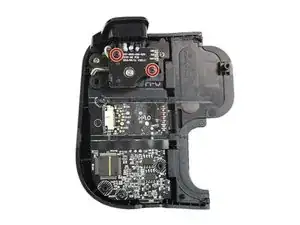
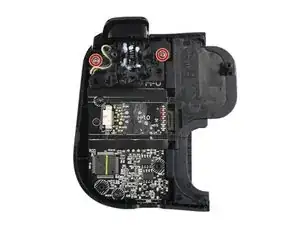
    • Entferne die fünf Y0 Schrauben, welche die rechte Seite des Controllers zusammenhalten.

    • Vier 9,2 mm Schrauben

    • Eine 7,2 mm Schraube

    • Wenn du die linke Seite ebenfalls öffnen willst, musst du einfach die obengenannten Schritte auf der linken Seite wiederholen.

    • Vier 9,2 mm Schrauben

    • Eine 7,2 mm Schraube

  2. GBYT3l1JQI1klrJF
    GBYT3l1JQI1klrJF
    ABTZOrHBxBJQODSx
    5tBZLnQyNfh5Ryad
    • Beide Gehäuse sind mit Kunststoffrasten gesichert.

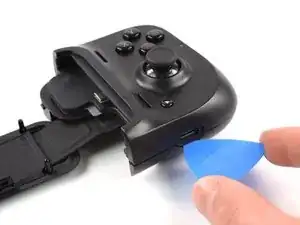
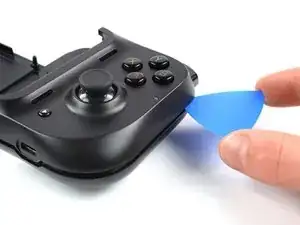
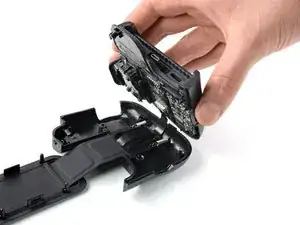
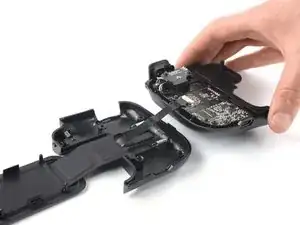
    • Setze ein Plektrum in die Naht in der unteren linken Ecke zwischen oberem Gehäuse und unterem Gehäuse ein.

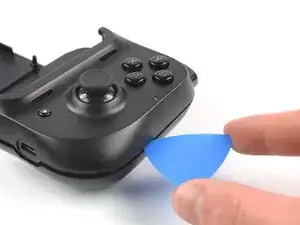
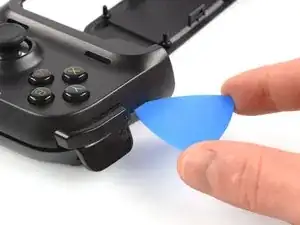
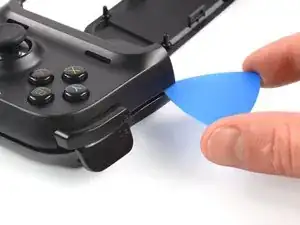
    • Schiebe das Plektrum zum Lösen der Rasten zur rechten unteren Ecke in der Naht an der Unterkante entlang.

  3. 4eVLGWoQLpMt5mOy
    4eVLGWoQLpMt5mOy
    ChPKLarayLVEACmg
    • Schiebe das Plektrum zum Öffnen der Rasten an der rechten Seitenkante entlang.

  4. lLInivpTrkn6Q6Q6
    lLInivpTrkn6Q6Q6
    266AxEQXlBUIHFcU
    • Führe das Plektrum an der Oberkante entlang, um die verbliebenen Rasten zu lösen.

    • Achtung! Versuche nicht das obere Gehäuse zu trennen, es ist noch mit der Leiterplatte verbunden.

  5. DpyMIvfffLhtnj6j
    DpyMIvfffLhtnj6j
    lPis15eO3pD5JKUh
    PlswYISvGHE1BtJ3
    • Hebe das obere Gehäuse vorsichtig an und klappe es nach rechts wie ein Buch auf.

  6. gPHMigOchnXaqynE
    gPHMigOchnXaqynE
    vWZ5QoSsBGMIacE5
    KvZaXgvL5W3Bjs4m
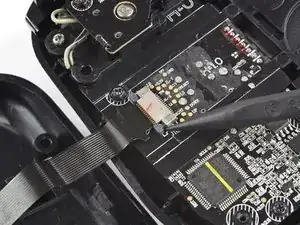
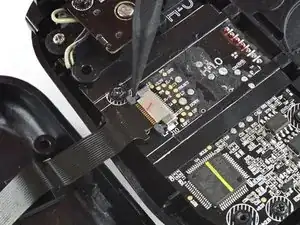
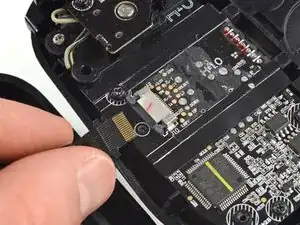
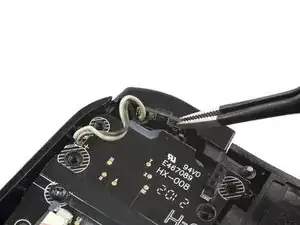
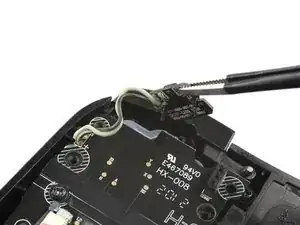
    • Drücke die grauen Laschen am Anschluss des Verbindungskabels mit der Spudgerspitze parallel zum Kabel vom Anschluss weg und trenne es ab.

    • Ziehe das Kabel aus dem Anschluss heraus.

  7. Z6Y3RS5pjXnYPLlS
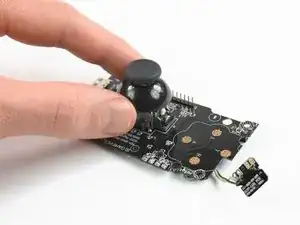
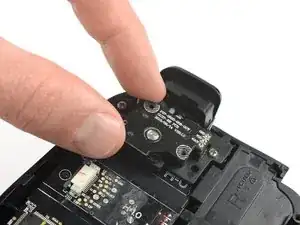
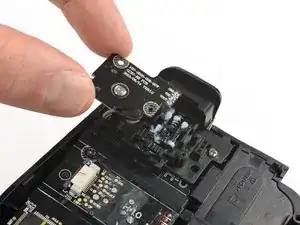
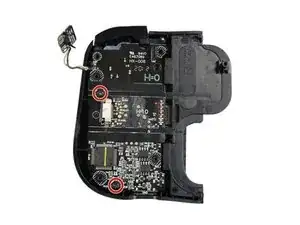
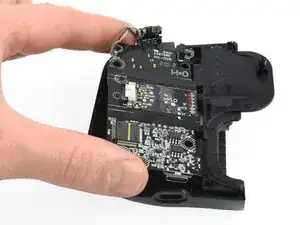
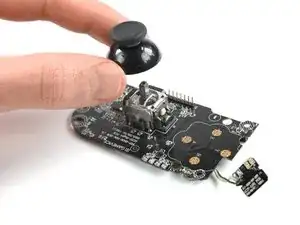
    • Entferne die beiden 4,4 mm langen Kreuzschlitzschrauben #0, mit denen die Triggerplatine befestigt ist.

    Phillips #00 on mine.
    Model no. RZ06-0290

    also listed: GV190

    Stephen Marshall -

    This step is not essential and risks misaligning the rotary knobs from their tracks as well as losing or contaminating the lubricant. You can leave the breakout board attached to the trigger and remove them together. When the trigger screws are out, lift the whole assembly together, being very careful to lift it straight out to avoid bending the jumper pins.

    Stephen Marshall -

  8. nyCJQtxgXe1abwUu
    nyCJQtxgXe1abwUu
    iBH5uaM25xQHkDJ1
    vAlYNZgnwsE6ffis
    • Die Breakout-Platine ist nur eingesteckt. Beim Entfernen ist es wichtig, sie gerade herauszuziehen, damit die Anschlüsse nicht verbogen werden.

    • Hebe die Platine gerade nach oben vom Controller weg und entferne sie.

    When reassembling this piece, ensure that the breakout board's rotating peg is aligned with the neutral position of the joystick. To do this on the left trigger:
    1. Flip the breakout board over so that the rotating peg is facing you and position it such that the 3 jumper pins are in the top right (and the text is right-side-up.

    2. Carefully rotate the peg until it faces North-East, at just about a 45 degree angle from the horizontal. Move it in whatever direction requires the shortest travel to arrive at this point. Be wary of the lubricant which coats this part and try not to remove much.

    On the right trigger, this process is the same but mirrored. Align with pins in top left and point peg to the North-West at 45 degrees.

    Stephen Marshall -

  9. QJtOBeEycsUgh1XX
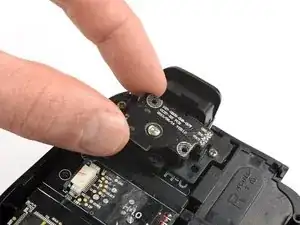
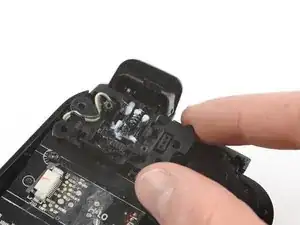
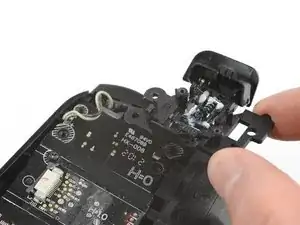
    • Entferne die beiden 7 mm langen Kreuzschlitzschrauben #0, mit denen der Trigger befestigt ist.

    These are #00 screws on mine

    JM Palacios -

    These screws have a very shallow angle for the inner Phillips drive, making them feel very easy to strip. For these, a Phillips #1 actually provided the most positive fit. Test a few tips just to be sure.

    Stephen Marshall -

  10. XUOOHSJRrtCoPIIv
    XUOOHSJRrtCoPIIv
    HPAqiPYkiZ1VBygg
    • Entferne den Trigger.

  11. dcVOGAveYWDwSFZJ
    dcVOGAveYWDwSFZJ
    DAoekp65OGByC1M6
    • Hebe die Platine der Schultertaste mit einer stumpfen Pinzette hoch.

    This step is difficult as the board is in very tightly, but it can be skipped. The cord allows enough flexibility to just remove the board in the next step to get to the screws for the phone bracket and the USB connector.

    JM Palacios -

  12. mkCQ4oCuRjvnvP35
    • Entferne die beiden 5,9 mm langen Kreuzschlitzschrauben #0.

  13. gT3cWmL4JRdQBRMR
    gT3cWmL4JRdQBRMR
    kjBdcksYJTPQnGMf
    • Entferne die Hauptplatine.

  14. LGxKlO5BqGasfQpD
    LGxKlO5BqGasfQpD
    2LUtsNbTENYJGGd1
    • Ziehe den Joystick von der Platine weg und entferne ihn.

Abschluss

Um dein Gerät wieder zusammenzubauen, folge den Schritten dieser Anleitung in umgekehrter Reihenfolge.

Entsorge deinen Elektromüll fachgerecht.

Lief die Reparatur nicht wie geplant? Probiere zunächst einige grundsätzliche Lösungen oder frage in unserem Forum nach Hilfe bei der Fehlersuche.

Adriana Zwink

Mitglied seit: 18/12/19

38806 Reputation

6 Kommentare

Could anyone provide the link to buy that thumbstick?

Terry -

I second the previous comment. Where can you buy these thumbsticks?

Matthew Miller -

Has anyone had any luck buying the thumbstick for this

Kurt Kedroe -

tbh, the replacement is pretty straightforward if you've ever done anything like this. The problem is (like everybody above me said) it's hard to find the appropriate replacement thumbstick, as regular thumbsticks don't work! I've tried ps4, Xbox one, 360, original Xbox, switch pro... And to be clear, a lot of these will fit onto the metal rod, but once you close it up there isn't enough clearance for the joystick to move. Kishi's thumbstick is a unique profile that may as well be proprietary.

Regardless, if I find a solution, I will share it with ya'll :)

Derek Wing -

Have you ever find a solution for that? I'm having the same problem.

gustavo_eliseu -

sorry for my english, you could shorten or cut the stick that fits into the cap....adapt those of ps4 or xbox

Francesco Tortorici -