Einleitung

Wenn deine Sonicare schwach ist, könnte der elektromagnetische Antrieb z.B. nach einem Sturz verrutscht sein. Philips hat das bewusst so konstruiert und du musst die Zahnbürste öffnen und den Antrieb wieder neu ausrichten.

Vorsicht: Öffne deine Sonicare nur, wenn die Garantiezeit schon abgelaufen ist. Wenn noch Garantie drauf ist, dann bringe sie zu Philips zur Reparatur.

  1. cBadywXZhadRlcwC
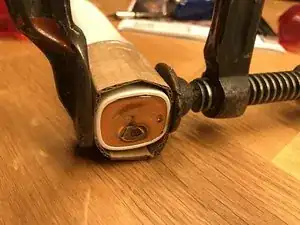
    • Zuerst musst du die Zahnbürste öffnen. Dazu musst du Druck auf das untere Ende ausüben und den Stopfen am Boden herausholen.

    • Schütze unbedingt das Gehäuse der Zahnbürste vor Beschädigungen durch das Werkzeug, z.B. indem du einen Kartonstreifen dazwischen legst.

    The goal here is to produce a gap between the white case and the chromed plastic cap so that a tool can be inserted between the two parts. Once a gap is formed, move on to Step 2 to pry the cap from the case.

    nickmalmquist -

    I found a much better method - add a big blob of hot glue to the bottom cap, wait for it to cool down, then use it to pull the cap out.

    Tereza -

  2. I would recommend against using a metal tool to remove the cap from the case. I used a small flat head screwdriver and ended up marring both plastic parts. A spudger would have caused less (albeit cosmetic) damage. The cap contains a recessed o-ring, and this o-ring is fairly robust, i.e. I did not damage the o-ring when prying the cap off with a metal flat head screwdriver. Nonetheless, be careful not to damage the o-ring, which provides a water-tight seal at the bottom of the toothbrush.

    A good technique for removing the cap from the case is to work a spudger into the gap formed in Step 1, between the outer plastic part of the cap and the o-ring, work the spudger around in order to pull the cap out to expose the o-ring, then work the spudger under the plastic part of the cap below the o-ring and work around to completely remove the plastic cap.

    Following the battery replacement guide to remove the insides from the case, I found iFixit precision tweezers to be very helpful in releasing the restraining tabs.

    nickmalmquist -

  3. r4AudRQaFHbTocNd
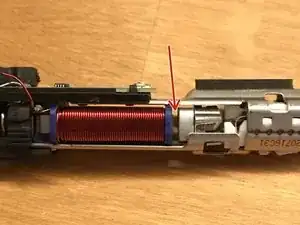
    • Wenn das Innenteil frei ist, dann schaue auf die angezeigten Stellen.

    • Das rotglänzende Teil ist der zweifache Magnet und zwischen Magneten und dem silberfarbenen Antriebsstück muss ein Spalt sein.

    • Wenn die Magnete bei dir den Antrieb berühren, oder sehr nahe bei ihm sind, dann fahre mit dem nächsten Schritt fort.

  4. cSMuDPvHiWFRqcN2
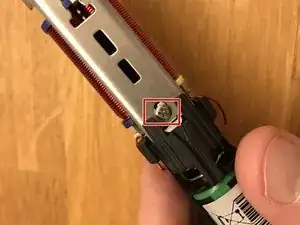
    • Die Magnete sind mit zwei Schrauben befestigt. Eine von ihnen befindet sich auf der Rückseite der Zahnbürste.

    • Du kannst sehen, dass sich die Schraube in einem Langloch hin und her bewegen kann. Wenn die Schraube zu weit in Richtung der Magnete verrutscht ist, dann kann sich der Antrieb nicht mehr gut bewegen und die Leistung der Zahnbürste wird deutlich schwächer.

    • Löse die Schraube auf dieser Seite.

  5. BQSVLmIvWswJtGnO
    • Drücke die Leiterplatte nach unten und löse sie ab, so dass du an die andere Schraube auf der Vorderseite herankommen kannst.

    • Wenn sich diese auch bewegt hat, dann löse sie und verschiebe die Magnete so, dass ein Spalt zwischen ihnen und dem Antrieb entsteht. Ziehe die Schrauben dann wieder an.

    Fantastic write up. I would only add that at this point, to easily pull the logic board away from the battery side of the unit, pull the upper portion directly away from the battery portion first (much like pulling up a radio antenna), before pulling the logic board away in the photo. The above photo shows two “T” slot holes that must be lined up with the notches before pulling away.

    Rick Palmer -

    Did not have to pull down, just pull backwards until the black plastic came off

    Marti -

    Just put a thin screw driver between the plastic and the metal part und then pull upwards

    jannik.sohn -

    None of these comments helped me! I somehow popped the thing off, but I think I came close to breaking it.

    Brad B -

    This was the trickiest part for me too. I could neither pry the black plastic part away from the metal part nor slide it up to align plastic tabs with the wide part of the T slot. The key (literally!) was the two holes in the metal part that are seen in the picture on both sides of the lower T slot. There are two plastic tabs on the black part that engage those two holes and keep metal part from sliding up and disengaging T slots. To disengage the tabs slide a piece of plastic like a credit card down (from the shaft/head side) as close to the middle as possible *on each side*. Two cards or two pieces, or even one card with a slot in it would all work. Then, with card(s) in place, slide metal part up and away from black plastic. Be careful not to pull too hard on the wires and try not to bend them too much — they look like a hassle to repair if they do break. The rest is easy!

    Yuliy Gerchikov -

    This was tricky. It was so tight that when it finally came off the wires also came off. I had to solder them back to the board. The trick is to push the black plastic against the metal when you slide it until it stops.

    reggabsungam -

    got electrocuted

    Thora Mann -

    When I took mine apart, the upper magnet was loose. So if I move the red piece, the upper magnet just moves with it. It looks like it should be attached to something at the top, but I’m not sure to what. Can anybody confirm, or provide a close-up picture of theirs? Thanks

    Ken Wolf -

    Pretty sure it's been too long to be of any help to you, but I had the same problem and couldn't for the life of me figure out why. Turns out that there's a thin piece of metal that holds the magnet up and transfers the vibrations from the magnet to the head. Unfortunately for mine, that thin piece of metal sheared off and it looks like I'd need. To replace it to fix mine. I'm sure Ken here has a similar problem.

    Tl;dr: if your magnet and magneto are stuck together, there's likely a broken part :(

    Kevin Riedl -

    Danke für die Anleitung. Ich hatte Schwierigkeiten bei Schritt 5. Die Spuleneinheit ist über zwei Kunststoffhalter mit der Platineneinheit verbunden. Zwischen den halten befinden sich zwei Stopper die verhindern, dass die Halter zu Öffnung geschoben werden können. Am besten schiebt man zwischen Kunststoff und Metall, beidseitig Schraubenzieher oder ähnliches rein um die Stopper anzuheben.

    Kilian Müller -

    I followed these instructions but my silver magnet moves and just sticks on to the red magnet no matter where I adjust the red magnet position. Any suggestions on how to fix this silver magnet so it stops moving would be greatly appreciated. Thanks.

    Roy Silverberg -

    Loosen the two phillips screws, pry a gap between the electomagnet and the silver magnet and wedge something in the gap to hold it open while you re-tigheten the two screws

    kcknuckey -

    Rick Palmers comment above saved the day for me!

    Alistair Cockburn -

    Saved me buying a new toothbrush at least twice already - excellent guide

    kcknuckey -

    This is a reasonably simple repair once you get the courage to pry off the bottom cap and manage to release the tabs holding the insides in the outer case. In addition to my comments above, I found that pulling the upper part of the mechanism apart from the lower part in order to expose the second screw was best done by simply pulling them in opposite directions (like a radio antenna, as mentioned above). Just don’t pull so hard that you pull the wires apart. Prying the mechanism from the magnet using a spudger was effective in separating the two.

    All in all, great guide!

    nickmalmquist -

    Works great and reduced the noice as well. The issue is that I may have gapped it too far as the power is still weak. Is there an optimal distance. Say an emory board?

    Vince Kowaleski -

    Just used your instructions and saved myself having to buy a new toothbrush! Thank you so much. I will say, I think I got lucky with removing the insides from the casing as it popped out quite easily using two small flathead scewdrivers.

    chris.perrotta -

    I took mine apart, hoping to get more vibration out of it, and found that the guts of mine were potted and could not be adjusted. Mine is a low-end model with a wider base, HX3220B. If you have one of these, forget it.

    rick s -

    I know this is a fixing-things-101 problem, but I can’t get the first screw loose. I tried a touch of WD40 and it’s still not budging. Help?

    Joan -

    great instructions . In step five in order to get to the other screw, one must pull the unit apart i.e in th eopposite direction as shown in the diagram. You’ll notice that compressing it they way shown in step 5 only make both part sspring together, pulling in th eoppsite direction unclips both ends allowing access to the screw.

    easy steve -

    Gute Anleitung, danke. Ich habe aber nach einem Akkutausch das Problem, dass die Zahnbürste nur sehr, sehr schwach vibriert. Nur nach den 30 Sekunden oder nach Reset habe ich ganz kurz “volle" Vibrationsleistung. Hat jemand eine Idee woran das liege könnte?

    Bastian Franze -

    For anyone struggling to pull apart both pieces: Take out the spring, get a flathead screwdriver, (i used one that's 0.5cm wide), stick it between the metal part next to the coil (touching it with the shaft of the screwdriver) and the plastic piece that used to hold the rubber part of the spring (with the tip). It's easier to use the wide side of the screwdriver, basically parallel to the screws you need to remove later. Now just use the leverage of the screwdriver to pull them apart

    Paul Budden -

    Think I just did my 4th or 5th adjustment on my second motor assembly, the leads on the assembly broke of enough times to not longer be fixable. I set the gap to 0.5 mm and it feels strong now. Tried 0.75 and 1.0 but that didn't feel as strong on the bench before assembly. If someone explores further it be glad to if I find it here the next time I adjust.

    rutberg -

    The magnet part just slaps straight back down onto the red section. The red coil bit isn't moving, it's the other part that is loose, but I can't work out how to secure/tighten it as it's inside the welded metal cage

    Mark Brewster -

Abschluss

Arbeite die Schritte in umgekehrter Reihenfolge ab, um dein Gerät wieder zusammenzubauen.

moritz

Mitglied seit: 11/01/17

1782 Reputation

61 Kommentare

Hi there, this was my problem combined with the loose actuator screw. Mine works great now. I used a credit card as a spacer between the magnets and windings, do you know if more space is necessary for the best performance?

Clys -

Saved me ~$100! Awesome!

chip -

Good manual, I could fix the gap between the magnets. However, that was not the problem in my toothbrush. After pressing the power button the light for the selected program flashes once and after that all flash on and the toothbrush shuts down. It refises to start anything, it's almost as of there is a counter for the maximum amount of charges.
Jan Huijsmans -

saved me from buying a new toothbrush, thanks!

Diederik Knaapen -

Have the same question as Clys.Wish I could know the correct gap measurement.I also used a credit card,which measured .9mm.Maybe 1mm is the correct gap.I know that if I contact Philips the chances of reaching anyone knowing anything would likely be impossible.If I bought a new brush,took it apart,that would be a way of finding out.

jrj90620 -

I have a new brush and the opening is almost as wide as a credit card, i’d say about .8mm - i dont think a gap wider than a credit card will help.

Ruby Joye -

Yup - worked for me too!

kcknuckey -

Just worked with my toothbrush, saved me a purchase, thanks muchly.

Carl Wilson -

Thanks!! Saved me a lot of time and money! Keep up the great work!

Bernhard Wehinger -

Great guide. In step 5 I needed to pull the motor from the battery piece to open, not apply pressure.

Then I tried both credit card space and maximum space between motor and magnets, and vibrations with maximum space seem stronger.

Tomas Pavelek -

Definitely a design flaw. Or maybe even intentional… who knows.

Just replaced the screw of the head and fastened that and fixed the magnet spacing. It does seem to work again, but I don’t know for how long. THanks

Mattijs Spierings -

What is step 6?

Christian Breiding -

Great guide. Thanks :))

Michal Walewski -

What is the reaseon in step 6?

Mirko Ehrhardt -

Perfect solution. Thank you!!!

sprakash1 -

What is the reaseon in step 6?

hristov.hd -

Top! Funktioniert alles wieder.

André Stein -

Can somebody give me some tips about step 5 please? I’m scared I will break the logic board if I apply too much pressure. How is it support to open?

anja.steinlechner -

Took a little doing but my magnet was totally tight to the electromagnets. Loosened the screws and put the gap back. I used Permatex threadlocker blue on the screws and put it back together. Works perfect now. Thank you so much for the help!!!!

David Mattern -

Great! My brush was out of warranty so no help from Phillips, though they admitted that “in almost all cases where people had any issue with their brush, this exact description of technical problem matched their issue “. The problem I described was precisely that described above.

With the help of this guide my brush is working again ! ! !

Christian Jeppsson -

I loosened the two screws and moved the magnet down, but there is still on gap. I don’t understand how to move the top magnet/driver up to create a gap. They are still touching.

Z A -

definitely saved me some bucks :) Thanks a lot! Great solution.

Markus Liechti -

Fixed my problem with my toothbrush and saved me a lot of money. Thank you!!

theodorejohnprice -

@Z A The silver magnet and the red electromagnet can be separated with fingernails. The permanent silver magnet will tend to hold them together, but once separated the corner of a credit card can be used to keep the correct amount of distance until the two screws are tightened.

Aurosutru -

@Anja The logic board in pegged to the metal chassis by two small pegs on the underside of the black plastic holder underneath the logic board. They fit in a tee slot and shifting the board downward, when the brush is in the usual upright position, will free them. Check the comments at step 5.

Aurosutru -

This repair procedure fixed my Sonicare, which had stopped brushing and wasn’t making a vibrating sound when pressure was applied to the brush head in certain directions. Most videos on YouTube show how to tighten what appears to be the Philips screw near the brush head shown in the black oval in Step 6, but that was OK in my unit. Like the OP I’m not sure why the electromagnet had shifted - the unit had not been dropped and the screws were fairly tight. Maybe the vibration gradually shifted the electromagnet.

For me the hardest part was getting the end cap out. It took a fair amount of patience and persistence, using both the pliers and a small flat blade screwdriver.

Thanks for the helpful tutorial.

Aurosutru -

I’m at step 4 but my screw won’t get loose? Any help?

Sera -

My brush has been weak ever since I bought it. So it either came from the factory like this or maybe was dropped or roughly handled during shipping. Following these instructions fixed it. The force to pull the magnets together was quite strong so I used a toothpick as a spacer to hold them apart. Kind of a poor design to let the magnets ever get close enough to touch if you ask me.

shadowym -

This fixed one of my kid’s brushes, though step 5 was by far the hardest part, even after reading the comments. I’m still not sure how I finally got the metal part off the black plastic part without breaking something. I used the maximum gap for the magnet portion and it matched a new one I had just bought, strength-wise.

Brad B -

I have few sonicare toothbrushes and all was broken by water got inside. I replace batteries and now all they works, but they are less powerfull then toothbrush with new motor. I try many gaps beetwen magnet and coil, but ewen if magnet vibrate strong, the head is moving weak. The triangle shaft inside is not broken, but it looks like it loosing power some where there. Any ideas? All of this had water inside and have some corision, maybe this is the reason? I also deasambly mechanism which connets magnet and head and its looks like it shouldnt be frilage to water. So i have no idea why it loose power and doesnt work.

bartlomiejoleszczukto -

Thanks. You saved my toothbrush. After accidently dropind it, the coil moved to close to the magnet.

Leszek Pudykiewicz -

Thanks a lot! All works fine now!

Ja Bra -

Spot on — fixed my Sonicare right up — many thanks!

If step 5 is confusing or difficult (as it was for me), please check the comment that I left for that step (above, next to the step description — click on the number of comments to see them. Once I figured how to disconnect the black plastic part from the metal part, everything else was easy.

Yuliy Gerchikov -

top battery terminal can be corroded as well, but the bottom of the battery is soldered on, so pull the top away and clean the top of the battery and the contact if you can. fixed mine which was just still stuttering when i pressed the power button even with the right gap.

Brian Kunkel -

In Step 5, the logic board felt like it was going to break if I applied pressure. So, I didn’t open that part and ignored the second screw. Instead I followed the advice from another site and used a little flat head and pried in between the magnet and the electromagnet and gently twisted it to give a gap, while holding apart i used my other hand to tighten the screw again.  Works fine now.

Don Rutherford -

This fixed the problem. Great guide.

shrikedoa -

Thanks for this. Worked a charm… and not what I was expecting!

I do think step 5 could be updated to be clearly about “push back”… although, having managed, I appreciate the arrow is correct…

hay ho.

LE Sacks -

Nice one, thank you. These toothbrushes seem so sensitive to being dropped, even only maybe 1 foot/ 30cm into the bathroom sink, and then they lose full power transfer to the brush head and make horrible noise! Now that I re-opened the gap, it sounds quiet and works as it should! :-)

Peter JZ -

Thank you very much for this!!! Yes I agree with others that for step 5, there are two plastic tabs that prevent the plastic part from sliding too far. Prying from two sides with a flathead screwdriver to undo the taps will make sliding the plastic part from metal frame a lot easier. I tired both max spacing and one credit card method, I couldn’t feel a significant difference. However I feel like it does vibrate stronger after I’ve fixed it.

terry -

Die Beschreibung in der Anleitung ist hervorragend. Reparatur war ein voller Erfolg —> fehlender Abstand zwischen Magnet und Antriebsteil war das Problem.

Klaus-Peter Sieber -

I knew it was something fixable because it wasn’t a charging issue or brush head. One day it didn’t turn on when I pushed the button and had to push it a couple of times. When it did it was really weak like I had it on the lowest setting even though it wasn’t. Hated to think about throwing it out because I have a Flexcare Platinum with the stand and UV sanitizer, not a cheaper model by any means. THANK YOU!! Can’t say that enough. All I did was pull up and outwards gently and it pulled away from the circuit board. DON’T pull hard otherwise you might rip off one or both of the red wires that attach it to the board. The wires are flexible enough to bend forward so you can get at that final screw to loosen the magnet enough to slide it down away from the upper portion and put the correct gap in.

Jeff -

In my case, I found that setting the air gap to 0.010” (0.25 mm) gave the best result.

Setting the magnets too far apart reduces the performance of the vibrating motor.

Frank P. -

I loosed the two screws and used a pocket knife to make more room between the megnets and now it’s working fine. Thanks

cptjack44 -

the screw tightening doesn’t hold it apart, my magnets spring back down with force. maybe there is a spring broken above :/

hejkandi -

Thank you, worked on the 5630 as well!

Ryan H -

I noticed that in your first step u pressure the brush housing from different sides, than the guide which u recommend later does. I tried both and i figured it is much easier to pressure it 90 degrees rotated. With yout method it took some time, but with the other it popped right out.

The guide is pretty well written and safed me from buying a new brush.

MalteWoi -

Thank You so much! I fixed my Sonicare HX8910 HealthyWhite+ Magnets touched the metal part. If I can tell you it is easier to remove the rubber part with the spring just behind the magnets, it can be done relatively easily, and thanks to that it is a lot easier to remove the magnets - I am a woman and I did not have the strength to pull it so I looked for something easier :)

Aleksandra Alex -

Great guide, fixed my Sonicare after it had been dropped the vibration wasn’t quite right. The 2 magnets were hard up against each other. Step 5 was the trickiest, click into the comments and read Rick Palmers note about how to separate the plastic and metal bits. The other tricky bit was separating the 2 magnets, they were pretty firmly stuck but there was a definite click when they did separate (used a finger nail on either side). Left a credit cards width between them and it fixed the problem.

Alistair Cockburn -

I did this and it worked great! A couple suggestions:

—Use a credit card to create the right amount of space between the permanent and electro magnets. When I opened the toothbrush, my magnets were stuck together. The first time I repositioned them to the maximum distance. The result was a much stronger vibration than when they were stuck together, but after reading the comments, I redid it with a credit card and now it feels like brand new.

—In Step 5, you need to separate the metal part that holds the electromagnet from the plastic part that holds the circuit board. This is tricky. I suggest removing the spring located just below the parts first, then move the metal part up and down until it releases.

—After putting it back together, I’m not sure the seal at the bottom is water tight anymore. Not sure how to correct that other than trying not to let it get too wet — avoid leaving it in standing water.

Greg -

The same opening principle applies to the HX992B model. The cap will not pop out because it is help in place by a rubber ring. But with the pressure applied as above and prying with small flathead screwdrivers i was able to get it out. Thanks.

Christian Schilling -

Thank you so much for this guide. I followed this to fix my Diamond Clean HX9340 after I dropped it, saving me $200. Taking the cap off was the most difficult for me, once that was out, wiggling and pushing down while using one screwdriver to loosen the plastic base on one side made it easy to get the assembly out. I used a screwdriver to pry the magnet from the metal and stuck a toothpick in between before tightening the screws.

Justin -

This saved me from buying a new one. Thank you so much.

Milo Lucero -

Did anyone of you have trouble sealing the bottom cover back on the toothbrush after you were done with the repair? I am concerned that I will end with a gap where water could seep in.

Sa chin -

Vielen Dank. Hat wunderbar funktioniert. Danke.

Widmer Roger -

Worked for me, awesome. Not sure how long it will last.

Victor Leung -

Thank you!! Works like a charm now. One thing that happened, when I separated the circuit board, a little black silicon triangle fell out and I still have no idea where it belongs…. Oh well!

Didi Bui-Macdonald -

I couldn’t get the insides to come out after getting the cap off, there wasn’t a step for it so I’m assuming that it shouldn’t be difficult, any tips there?

Nate Hammond -

2 small screwdrivers or similar (somebody used some pocket knife blades) and patiently lever the inside out off the handle.

oldturkey03 -

Less gap more power in the brush. I think .5mm should be sufficient.

Konrad Ritter -

I am the original author of this guide. 6 years later - I am still using that exact same toothbrush :-) Thank you for all the comments!

Moritz Aemisegger -

Isn't it awesome to know that your guide had 115,872 views. Think about how many people saved their toothbrush because of it. Great Guide!!!!!

oldturkey03 -