Einleitung
Hier wird gezeigt, wie zwei häufige Leckstellen am Dolce Gusto Genio abgedichtet werden können.
Es wird gezeigt, wie das Gerät geöffnet wird und wie man die Teile reinigen/austauschen kann.
Krups verkauft keine Ersatzteile mehr, sie sind deswegen nicht so ganz leicht zu erhalten. Ersatzteil Direct verkauft viele der notwendigen Teile.
Werkzeuge
Ersatzteile
-
-
Ziehe vor der Reparatur unbedingt den Netzstecker.
-
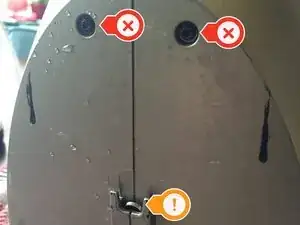
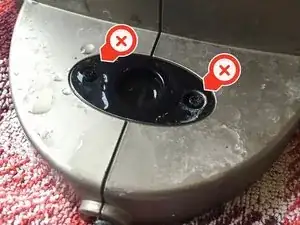
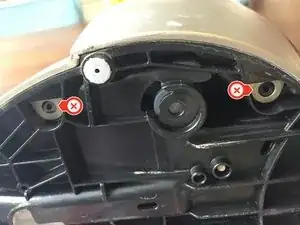
Entferne den Wassertank. Drehe dann die beiden Torx T10 Schrauben heraus. (mit roten Pfeilen markiert)
-
Entferne vorsichtig die Klammer aus ihrer Halterung. (orangener Pfeil)
-
-
-
Drehe die Rückseite zu dir und beginne am linken Seitenteil.
-
Es ist mit unten mit sechs Rasten befestigt und weiteren oben.
-
Löse zuerst die Rasten unten. (mit roten Pfeilen markiert)
-
Dann löse die Raste in der Nähe des Netzkabels.
-
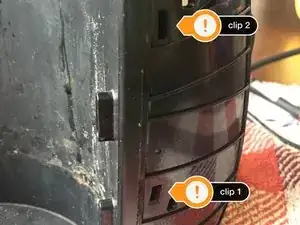
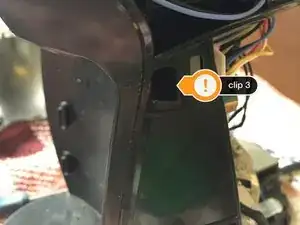
Löse dann die drei seitlichen Rasten. (orange markiert). Laschen greifen in die Öffnungen der Rasten 1 und 2 ein. Sie geben die Rasten frei, wenn sie direkt nach außen gehoben werden. Direkt neben den Laschen befinden sich Führungsstifte, die aber keine Hindernis beim Öffnen sind.
-
-
-
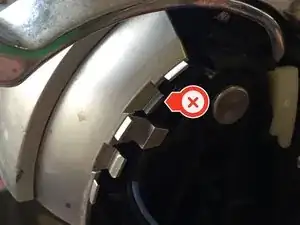
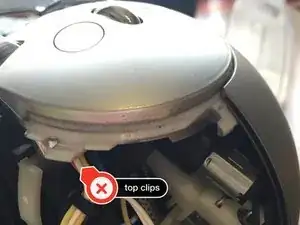
Weiter gehts mit dem oberen Teil. Es ist an zwei Stellen befestigt, mit einer Menge von Rasten und Haltern. Du musst schon etwas Kraft anwenden, um sie zu lösen.
-
Nimm zuerst die untere Reihe von Rasten in Angriff. (Roter Pfeil)
-
Heble dann die obere Reihe auf. (Der andere rote Pfeil)
-
Jetzt kannst du das linke Seitenteil abnehmen und zur Seite legen.
-
-
-
Entferne auf gleiche Weise das rechte Seitenteil. Wenn das rechte Seitenteil ganz gelöst ist, kannst du die Einschalttaste herausnehmen. Sie wird von zwei kleinen Rasten festgehalten, die leicht mit einem kleinen Flachschraubendreher oder Spudger gelöst werden können.
-
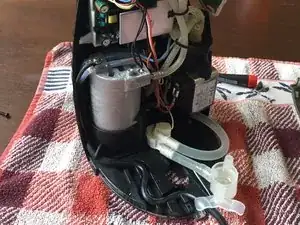
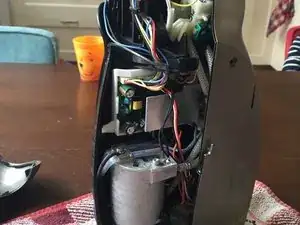
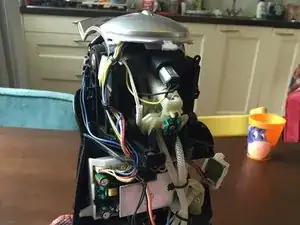
Jetzt hast du freien Zugang zum Innenleben des Pinguins.
-
-
-
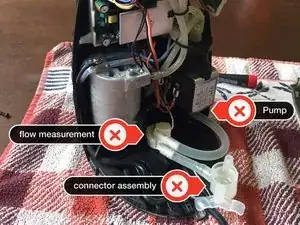
Es gibt drei Stellen, an denen das Leck normalerweise auftritt: am Flowmeter, an der Wasserdankdichtung oder an der Pumpe.
-
Schaue einfach nach, wo es feucht ist. Normalerweise müssen alle Verbindungsstellen trocken sein.
-
Die meisten dieser Undichtigkeiten stammen von Verkalkungen an Dichtstellen. Durch die Standardentkalkung (mit den Entkalkerbeuteln) werden diese Stellen nicht erreicht. Sie verstopfen und werden undicht.
-
Wenn eine der Verbindungen undicht ist, oder das Flowmeter defekt ist, dann solltest du zuerst diese Teile austauschen.
-
-
-
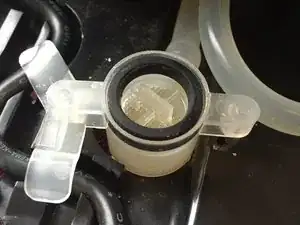
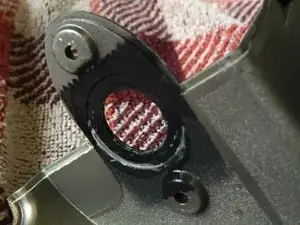
Löse den Tankanschluss ab. Er ist nicht geklebt oder geklammert, du kannst ihn leicht wackelnd herausholen.
-
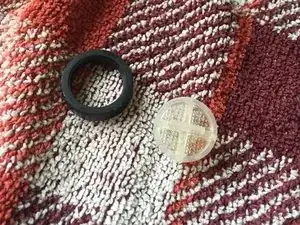
Ziehe das Dichtgummi und den Filter heraus.
-
Reinige die Halterung, die Dichtung und den Filter sorgfältig aber gründlich von allen Kalkresten. Tausche wenn möglich die Dichtung aus.
-
Befreie auch die Unterseite der Halterung von Kalk, wo sie am Gehäuse befestigt ist.
-
Um dein Gerät wieder zusammenzusetzen, folge den Schritten in umgekehrter Reihenfolge.
24 Kommentare
Hi Joost
Thanks for the great guide. helped to quickly get into the Coffee Maker yesterday after it stopped working. Result: A Capacitor and a Resistor kicked the bucket. Replacing the ElCO is no problem as it is a fairly standard one and (more important): the values are printed on it :)
But i am not able to decipher the value of the resistor, as most of the color bands have faded away and the parts that are still visible are not clear enough to recognize the value... and since it is broken, i can't measure its value.
so i wonder: maybe you took some close ups of the PCB when doing this guide where the resistor R105 (one onnly two NON-smd resistors on the board near the inductor coil L100 (both located on the lower right side of the PCB). From what i can see form the Picture of Step 5 and 6, both our Coffee Makers use the same revision of the PCB. If so, i would kindly ask you to share them with me... a snapshot of that resistor with all it's bands visible would be enough :-)
Hi Daniel, Glad the guide was able to help you. I did take clear pictures of the pcb luckily, but i suck at decoding resistor values. Luckily the pcb is also available as a spare part, and the supplier has really clear pictures of it, so you should be able to decipher it yourself :)
Since i can't upload images to a comment as far as i can tell, please take look here: https://res.cloudinary.com/dtk4ybaqk/ima...
Hi! Do you know if i could order the needle from somwhere? Main got broken... And also how to Change it? Thank you!
Relika
Rell -
Hi, it depends on the exact model, but a good place to start would be erzatsteil. A quick search gives you that there are only three models available, so just find the right one for your model number at: (https://ersatzteildirect.de/advanced_sea...). The injector plates are sold seperately, and should cost you less than 12 euros (without shipping).
Luckily, replacing it is very easy. Take a look at this guide, it will tell you how: Undichtigkeit seitlich der Kapseln reparieren
Hi Joost, very clear instructions, thanks. One small problem: the bolts in my machine look like Torx bolts, except that they have a little pin in the centre. That means that you need a Torx screwdriver with a hollowed out centre and I have no idea how I can get hold of those ...
As an afterthought: if scale on the connector assy is the most frequently occurring problem, I think that I'll just soak a handkerchief in a vinegar/water solution, put it on the connector and leave it overnight. See if that works.
The “Spring” is actually the tool for cleaning obstructions from the spike that punctures the pods.
Andrew White -
où trouver le tourniveis
André-Louis GUIDROUX -