Einleitung

Mit dieser Einleitung entfernst du die Displayeinheit. Danach kann eine neue Displayeinheit montiert oder weitere Reparaturen durchgeführt werden.

  1. Jxa3MdiOnXyiTACJ
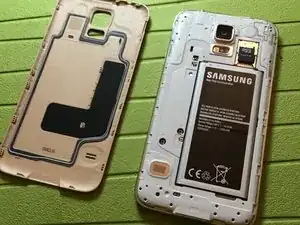
    • Entferne den Rückdeckel.

  2. WEYna4NUPwyqEvQY
    WEYna4NUPwyqEvQY
    RJGQXHWYslvu6EDA
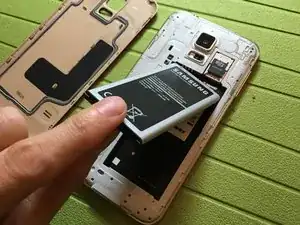
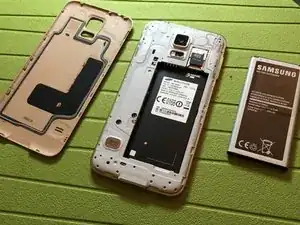
    • Entferne die Batterie.

    • Entferne die SIM- sowie die SD-Karte.

  3. KbEsOiVgxQRfsSUM
    KbEsOiVgxQRfsSUM
    DVxLEvXfNTJSHDhP
    KT4FNXQLBKeQl5Sl
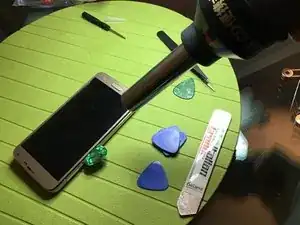
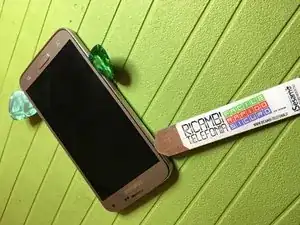
    • Erhitze vorsichtig den Rahmen des Displays von oben, nicht mehr als 80 Grad Celsius. Achtung – Nicht zu heiß werden lassen, nur erwärmen.

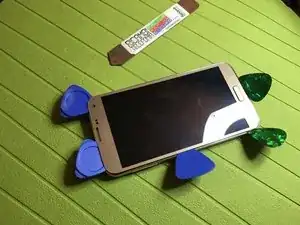
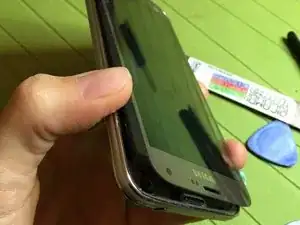
    • Beginne mit einem flachen Gegenstand (Kreditkarte, Plektrum o.ä.) von der oberen Ecke aus, unter das Display-Glas zu kommen. Umfahre so das ganze Display. Achtung: nicht zu tief in das Gerät eindringen, außerdem so flach wie möglich. Wenn das Lösen schwer geht, nochmals vorsichtig erwärmen.

    • Füge ggf. ein Plektrum ein Stück weit ein, damit der Kleber nicht wieder fest wird.

    Note: the screen is also attached in the middle with an "L" shaped and "i" shaped strong glue. Make sure u heat that up too. Its explained in the next step! Beware...

    Jurgen van Duijvenbode -

    Has been specified in step 4, the L-shaped pink strip must be warm and carefully detached

    Smilzo -

    1) NB: se il display lcd funziona è difficilissimo distaccarlo senza danneggiarlo, salvo che si usi una piastra separatrice. 2) Detto il punto 1, si può usare l’hair gun ad una distanza di 15-20 cm dal display. Riscaldarlo ad una temp tra 80° e 110° (non >120° per non danneggiare la MB) per circa 3'-5'. Riscaldare senza fermarsi troppo su un punto, facendo movimenti oscillatori. Per controllare la temp usate un rilevatore (a contatto e/o ad infrarossi). 3) Durante la fase del distacco attenzione a non recidere i 2 cavi flat del display (ma se quest'ultimo fosse rotto non importa se vi capitasse di troncarli): uno nella zona dello spigolo in alto a destra e uno nella zona vicino al tasto di spegnimento 4) Molta attenzione a non recidere i soft key che sono sotto il display ai lati sin e ds del tasto Home'. Inoltre, se questi risultino incollati al display, separarli con cura senza danneggiarli. PS) Se durante la fase del distacco qualche parte risulta ancora tenace, riscaldare di nuovo quella zona per ~ 20".

    Nicola -

  4. udOM22EDIuBCjoNW
    udOM22EDIuBCjoNW
    THrcGTEkgVYJxbvp
    • ACHTUNG! Nicht zu tief in das Gerät eindringen und keine Kabel/andere Komponenten dabei beschädigen. Wenn das Display ein wenig gelöst ist, kannst du seitlich in das Telefon schauen und sehen, an welchen Stellen der Kleber noch gelöst werden muss.

    • Die Display-Einheit besteht aus 2 Teilen – dem Touch Screen und dem darunter liegenden LCD.

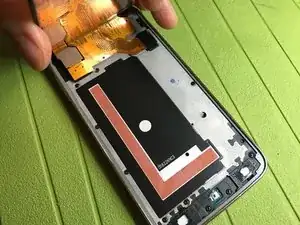
    • Das Display ist außer am Rand auch in der Mitte verklebt (auf dem Bild etwa auf den rosa farbigen Flächen), auch hier musst du den Kleber lösen. Erwärme die Fläche ggf. vorsichtig von der Rückseite.

    • Klappe das Display nach oben, aber Vorsicht, dass du das Flachbandkabel nicht abreißt.

    Dopo aver ben riscaldato cercate di far passare, solo centralmente, da parte a parte, un oggetto sottile, per es° una carta da gioco o una tessera. In questo modo avrete un maggior spazio di manovra, specie verso il basso, stando però attenti a non recidere i soft key, che si trovano nella parte inferiore del telefono, se questi risultano ancora incollati al display.

    Nicola -

  5. FfEUCta45hnDREI3
    FfEUCta45hnDREI3
    k1V1kfosg4kDuXLE
    hO3LQ4Det6miBkHK
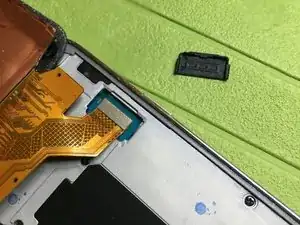
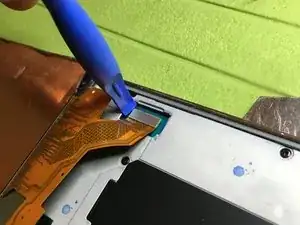
    • Löse die kleine schwarze Klammer, die das Flachbandkabel zusätzlich festhält.

    • Hebel vorsichtig den Anschluss vom Board, dieser ist von oben aufgesteckt.

  6. MQPaEu3NI1G5cPQw
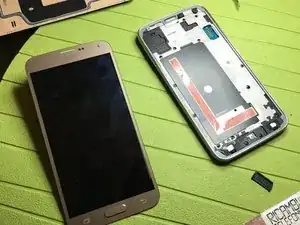
    • Nun sind Displayeinheit und Telefon voneinander getrennt und bereit für ein Ersatzdisplay oder weitere Reparaturen.

    • Reinige die umlaufende Kante sorgfältig, damit die Klebeflächen des neuen Displays gut haften.

    Prima di montare il nuovo display lcd occorre testarlo. Togliere sempre la batteria quando colleghi o scolleghi il cavo flat del display alla MB per non danneggiarlo. Durante il montaggio non piegare troppo (>90°) il cavo flat, altrimenti puoi danneggiare il display. Detto ciò, collega il cavo flat del nuovo display alla MB. Se si accende, provalo in tutte le sue funzioni (es° il tasto Home, quelli laterali, ecc). Poi digitare sulla tastiera, come per comporre un numero di telefono, il codice *#0*# e fare queste verifiche: 1) attivare come sottofondo i vari colori (red, green, blue) e vedere che non ci siano dei pixel neri (morti); 2) premere sul pulsante “Touch” e poi scorri il dito in tutte le direzioni per verificare che il touch screen risponda in ogni suo punto (per uscire premere il tasto volume up). Finito, uscire spegnendo il telefono. Adesso si può installare il nuovo display, dopo aver pulito bene i bordi della scocca (es° con alcohol) e applicato del nuovo biadesivo centrale dello stesso spessore.

    Nicola -

Abschluss

Arbeite die Schritte in umgekehrter Reihenfolge ab, um dein Gerät wieder zusammenzubauen.

Smilzo

Mitglied seit: 09/11/13

10799 Reputation

16 Kommentare

slt le problem que j ait un sm- g800f copy

c est pas originale et j arive pas a trouver l aficheur qui ce convien a lui

j besoin de votre aide pour avoir un aficheur pour tlphon portable sm-g800f fcc id:a3lsmg800f made korea by samsung

DJAMEL -

essayer d'expliquer avec des mots corrects, parce que le traducteur ne comprend pas ce que vous dites

Smilzo -

Not sure, but it sounds like he's looking for a display to fit a Samsung Galaxy S5 Mini (sm- g800f) that may or may not be a fake? There are a lot of shorthand and typos in there though...

Sam Goldheart -

Je suis désolé, je ne comprends pas

Smilzo -

There are typos, I personally buy spare parts on eBay

Smilzo -
Hi!

I have a broken glasfront and would like to repair it,

I have found spare parts on amazon but from the tutorials I have the feeling I cant change the glas front alone or can I?

My display has no damage whatsoever.

Just wanted to make sure its possible before buying the spare part

sightless.seepra -

my advice is to buy all the assembled display because being able to separate the broken glass from the display is very complicated and having run machined on purpose mil outcome is not guaranteed

Smilzo -

Does a Samsung Galaxy S5 LCD + Digitizer work as a replacement for the S5 Neo? Everything looks the same, but I'm trying to connect the ribbon cable and it's not snapping in easily. I fear forcing it could damage it. Any idea?

Stacy Moffat -

S5 and S5 Neo have different plug size. You cannot swap between.

Tomasz Bielawski -

Where can I buy new display in 2018? I can spent max 75$.

edit: I’m searching for S5 Neo obviously. Sending parts from Europe would be great.

WojtekM -

Hi! Good guide very usefull, only confusing thing i found is the way the pictures are displayed at step 4. The way the phone opens from the top on the first one and then from the bottom on the second lead me to think it was from the top both times. Beside that very helpfull.

Philippe Raymond -

hello, I tried to open it a bit 'from all sides, starting from the top and then laterally and below, because of the parts glued in the center I did not understand how to move, finally opening the outline you can lift it from below to not damage the cables of display. Now that you know how it's done, you can move as you see fit to remove the display without breaking down

Smilzo -

Is it possible to remove a perfectly good screen off of an already functional phone without damaging the ribbons/LCD and glass to use on another Galaxy 5 neo? Both being the exact same models of phones, of coarse!

Jason Ducharme -

certainly paying close attention

Smilzo -

Is it possible to replace an s5 neo screen with a s5 screen?

Jesse -

I'm sorry I don't know for sure, but you can ask the seller

Smilzo -