Einleitung

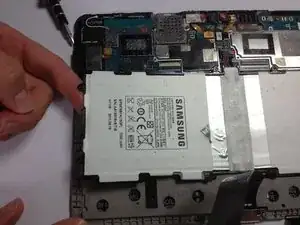
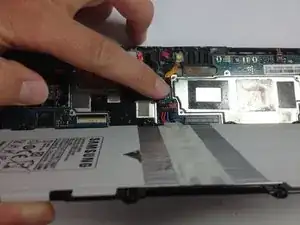
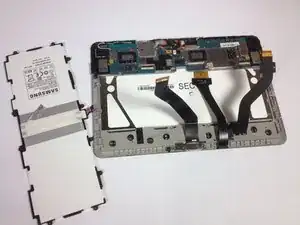
In dieser Anleitung erfährst du, wie du den Akku in deinem Samsung Galaxy Tab 10.1 austauschen kannst. Ein defekter oder schlechter Akku kann schnell frustrierend werden! Bevor es losgeht, müssen wir noch ein paar Vorbereitungen erledigen.

  1. 1TEJKvOTkxnILlw3
    1TEJKvOTkxnILlw3
    PnyQXPOityjS6kwL
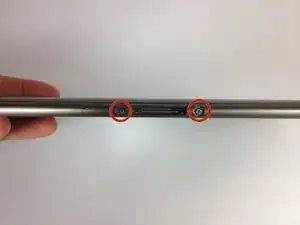
    • Drehe die Unterseite nach oben.

    • Drehe die zwei 4,1 mm Schrauben bei der Ladebuchse mit einem Tri-Wing Schrauber heraus.

    Access denied! The screws near the port are covered by buttons. I wedged a pointed screw and hammered "gently" until they popped out. Problem solved!

    Daniella -

    My model doesn't have any screws!

    Barry -

    What can I do if my model DOESN'T HAVE ANY SCREWS? It has a loose LCD cable so SOME of my colours are all mixed up. This is really frustrating so please help

    Janine Coetzee -

    I have SG Tab Pro 10.1

    There are no screws..... now what?

    iloveto travel -

    Great instructions! Easy to follow.

    skritzberger -

    My model has no screws.

    Faith Odutola -

    My model has no screws and doesn't look like the one pictured here. It's a model SM-T580.

    Elsa Kramer -

    Be careful removing the two screw plugs by the 30 pin connector. They are easy to scratch. I couldn’t get the plugs out with my tool kit and finally removed them with the point of an exacto knife.

    Behind the two plugs are sticky pads that will need to be handled carefully and saved for reassembly.

    If you order a tool kit online, be sure it has a Y1 tri-wing screwdriver. The one in my kit was not Y1 and would not remove the screws.

    I had to order a new screwdriver.

    George Tomlinson -

    I don't see any screws I have a galaxy tab 4

    Tammylynn Gmarter -

    if your model doesn’t have these screws, it’s probably ok to just skip this step. at least that’s what i did on model gt-p7500, and that repair was successful (battery replacement). Janine, a friend asked me to fix his Tab where that had happened when he tried to replace the battery himself… i just took out the 3 big cables over the battery, and re-inserted them, and that fixed the problem. you should try that if you haven’t already..

    divinity76 -

    Mine doesn't have screws so what do I do now?

    katrinawisner -

  2. EekVAXaTVsTukxdH
    EekVAXaTVsTukxdH
    g1GPRWHXNbQ4lPRJ
    vMXDVckygUD11jl3
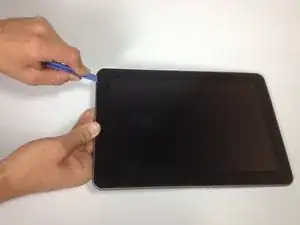
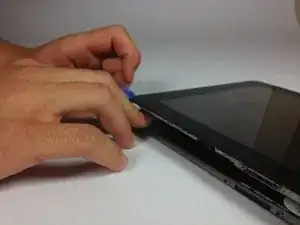
    • Beginne in der Mitte der linken Seite und führe ein Plastiköffnungswerkzeug zwischen die Rückwand und die Front Panel Einheit ein.

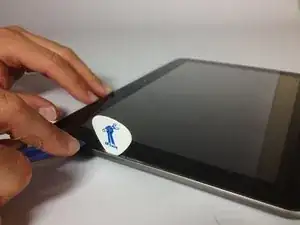
    • Fahre das Plastiköffnungswerkzeug vorsichtig entlang der linken und oberen Kante, um die Rückwand vom Rest des Gerätes zu trennen .

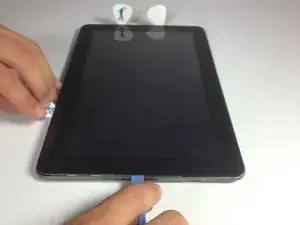
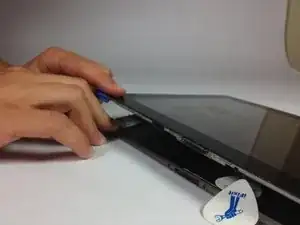
    • Platziere Opening Picks in die seitlichen Öffnungen, die du bereits geöffnet hast, um die Rückwand vom Rest des Gerätes zu lösen.

    • Achte darauf, sorgfältig zu arbeiten, da du sonst den Bildschirm beschädigen kannst.

  3. Z2s5Xq6SFLPBWVvr
    Z2s5Xq6SFLPBWVvr
    fUFPxExcdjQSZSYW
    MDI1uaQtwfQxUQGG
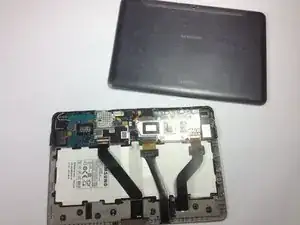
    • Fahre fort mit dem Plastiköffner sorgfältig an der rechten und unteren Kante entlang zu fahren. Hebe dann dann die Scheibe von der Rückseite ab.

  4. JXc3pWkis1B3kK3C
    JXc3pWkis1B3kK3C
    xYREsMqZY6lhxWon
    sVbEVuTuhbEdMF5L
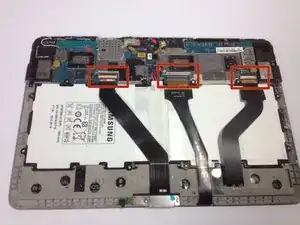
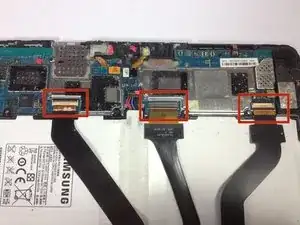
    • Öffne die Befestigungen der ZIF-Stecker, die die drei großen Flachbandkabel sichern.

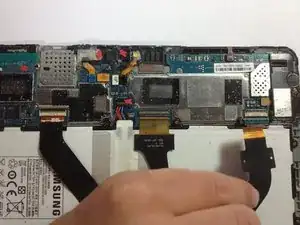
    • Nun ziehe vorsichtig die drei Flachbandkabel von ihren Anschlüssen am Motherboard.

    Looking at the ZIF connectors in step 4....mine isn't charging. I suspect the problem lies in the jack for the USB/power cable. Would I be correct in thinking it's a matter of following to this point, then replacing the internal cable?

    gzapiec -

    I took the cable all the way off and can't get on what to

    Tammylynn Gmarter -

    I have sound but no pictures/screen what did I do wrong what should I check?

    Rodney perini -

    If you don't have a picture on the screen, it could be caused by an issue with the electrical connectivity on one or other of the power/ data cables. Carefully unplug, clean and re-seat each of the cables, ensure if you use cotton buds, that you use a high powered magnifying glass to check for any flecks left behind….

    Re-seat the. Cables and try again.

    I hope this works for you Rod…

    By the way, to confirm a backlight issue, get a high power torch, or your mobile phone torch will do. Now shine this closely at an angle to the screen. You might see a faint non-illuminated screen!

    Phillip Gamble -

  5. maOEGeJMS2Dh6wTN
    maOEGeJMS2Dh6wTN
    NyWBP4uyYUxfLRp5
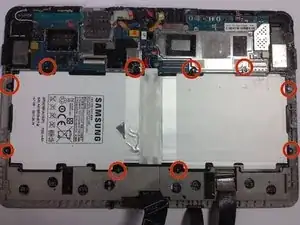
    • Entferne nun die zehn 3 mm Kreuzschlitz #00 Schrauben, die den Akku rundherum befestigen.

  6. IIfBnYJGUL3JKXWe
    IIfBnYJGUL3JKXWe
    EjfBpalwTCNPxHXK
    iaFtMYLRxXmkx6bS
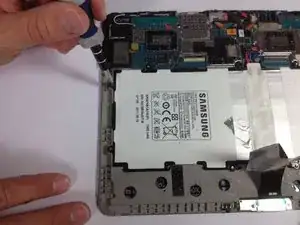
    • Hebe nun die Kante des Akkus mit deinem Finger oder einem Spudger an.

    • Löse den Akku, indem du das Motherboard unten hältst, während du vorsichtig den Akku anhebst.

    Very simple, clever and effective presentation of opening rear cover.Thanks very much for simplicity. The way presented is user friendly.

    Video presentation is mostly in dark ambient, it is useless. Once moore thank you very much.

    Ljubo Baricevic -

    The battery connector lifts up, not back. A plastic tool lifting under the five wires from the battery right at the base of the connector helps.

    Peter Mui -

    then what where do you buy a battery

    Janie montemayor -

    ok after its all apart where do i buy the battery

    Janie montemayor -

    @janiemontemayor Sorry about that—the link for the replacement battery was out of date. It's fixed now! Try the link at the top of this guide.

    Jeff Suovanen -

    Welches Tablet hast du denn da? Mein 10.1 hat keine Schrauben an der Ladebuchse

    Anja Mickenbecker -

Abschluss

Um dein Gerät wieder zusammenzubauen, befolgst du die Schritte einfach in umgekehrter Reihenfolge.

Jess McCafferty

Mitglied seit: 30/09/13

1695 Reputation

18 Kommentare

Those 3 plastic bands with connectors at the end are a really poor design and a drag to put back on correctly : there's a little white line drawn on each one that needs to be aligned with a line drawn on the socket itself. This means you really have to push them back in (with a little platic tool for example). If not you can have a non functioning screen or no touch detection.

zen -

What if your stupid aunt is trying to open it and you can open it but she said that you broke it? What can I do about it. Ppl. HM

Isabella -

What would be the correct battery that is suitable for the Tab proT520? I can't find any reference to this particular models battery..
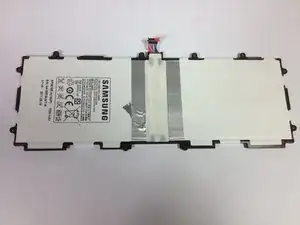
Tomjonkins -

Nice tutorials, thank you! I want to ask you about exactly battery. Where is it better to order it/ I mean, if i order it online? I live in Europe and know some stores of hardware, such as hardware.nu and so on but also i know such stores as Amazon and eBay also Aliexpress..Tell me where is quaity is the best?

Scott Waschlerner -

I have a tab 10.1 but there are no screws on the outside.

Ultra Fox -

Is it possible to swap the original battery for one with more capacity? I love my Tab 4 10.1, but since I'm using it with a bluetooth keyboard the battery is draining too fast...

Rob -

I was told that the cost of a replacement battery would equal the cost of a new tablet. Apparently not. Frustrating is a very accurate description as to my feelings towrd this issue. Fully charged to dead in under an hour.Overrheatted chargers, the unit just stopping. Many things.. I'll be in touch after the New Year.

billjkays1954 -

I was told the same thing at Best Buy. Would be as expensive as a new one. Guess they are not well versed on actual practical matters of the Galaxy tab 10. Orrrrr. They just want to sell you a new one!

gregandgeribo -

I have a Tab A 10.1 but my back panel doesn't look like the one in the tutorial. Are there any alternative tutorials/panels? Mine only has one black ribbon and a skinny white one next to it. ???

yvettemichele -

Same man. My problem is the tablet is 100000% working but the screen is PLAIN black. Like all black. I was being a dumb arse by getting mad at a game and smashed my head at the tab. After that it paused for a split sec and then the screen just when black. I am too young to order any plastic prying tools online. I even managed to open youtube and play a random video. I also get notifs from my subs. The edges on the tab are different from most tabs. Can anyone tell me some house hold items i can use to pry open the edges? Thank you.

random guy -

I also have a 10.1 and there are not screws , just smooth round silver end caps of some sort.

Sue McFeron -

You have to remove the caps, then remove the stickers underneath the caps. I used an exacto knife to remove them. Be careful though.

Christopher Rodriguez -

guitar picks work great

Lisa Lingo -

très bien fait un peu rapide sur les actions délicates '“ enlever les nappes “ et pas d info sur la recharge apres changement

cordialement

pascal

Pascal Guiguet -

there are no caps on mine. I have looked and felt all the way around the tablet. Now what?

omenmoon -

replaced battery as directed. Plugged in to charger but nothing is happening. Should It start chargeing right away??

rita fairbairn -

I have a question. The flaps on the ZIF connector from the cable from the sockets on the motherboard has fallen off can it be replaceable?

Jennifer Durham -