Einleitung

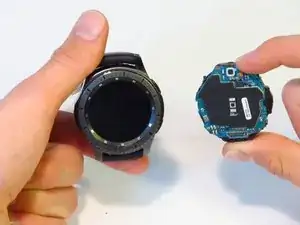
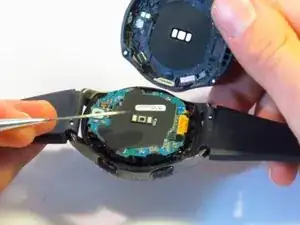
Diese Anleitung zeigt dir, wie du eine zerbrochene oder defekte Displayeinheit austauschen kannst. Du musst die ganze Displayeinheit austauschen, da das Display alleine nicht ersetzbar ist.

  1. dkjcaDiNdnHRlBNK
    • Lege die Uhr mit dem Zifferblatt nach unten, um an die Rückseite heranzukommen.

  2. GGkylvHNgSn44Pgd
    GGkylvHNgSn44Pgd
    UnZkByNqSWRHiYTW
    • Entferne die vier 4,2 mm Y00 Schrauben.

    Y0 passte bei mir deutlich besser als Y00

    Alex Fi -

    Did you use iFixit tools? I just checked and I believe Y00 is correct. Y0 slips too easily. My test was with the Y bits from the Pro Tech Toolkit.

    Nicholas Dudde -

    I too had to use an Y0 screwdriver (from Ifixit 64 bit driver kit....). Y00 just don't grip, may be some batches of the watch used different screws??

    regislefeuvre -

    One screw just doesn't want to move, any suggestions/tips how to remove it?

    Slartibartfast -

    Problem solved: after 2 times of careful WD40 application and blunting the Y00 a bit it came of with a lot of patience.

    Slartibartfast -

    I also had a problem with one of the screws and flipping to Y0 worked for that one.

    Jeff Lambert -

    Yo use Y 0.6 y anduvo perfecto!!

    Gustavo Zarate -

    Yo use Y 0.6 y anduvo perfecto!!!

    Gustavo Zarate -

    The tool kit that came with my battery was a Y1.5 and worked perfectly

    jnewsom22 -

  3. SoEQC43VSGULT5ZW
    SoEQC43VSGULT5ZW
    HQQY6ay24yOxZFJc
    mKVCBwkWvxLUNqoj
    • Bei diesem Schritt wird die wasserfeste Dichtung unbrauchbar.

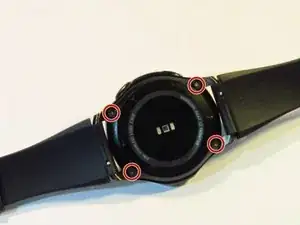
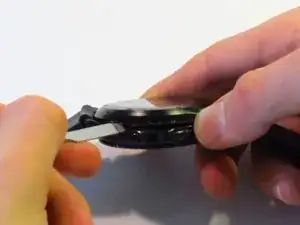
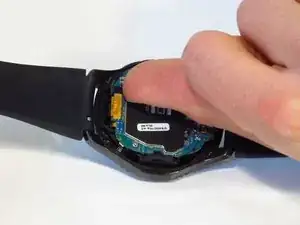
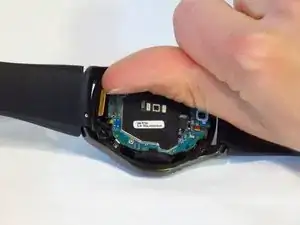
    • Zwänge einen Metallspatel entlang der Naht zwischen Rückabdeckung und Rahmen.

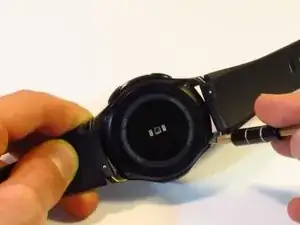
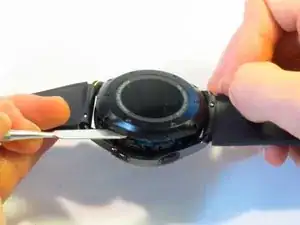
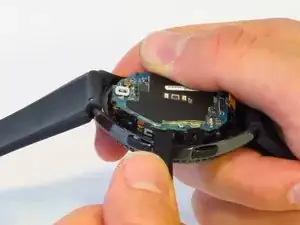
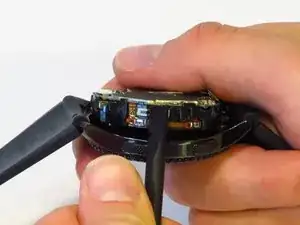
    • Heble kräftig die Rückabdeckung vom Rahmen der Uhr ab.

    • Du brauchst für diesen Schritt ziemlich viel Kraft. Du kannst anstelle eines Metallspatels auch einen Jimmy nehmen, damit geht es leichter.

    Il est plus facile et moins domageable pour le joint de commencer par ouvrir le cache de connexion situé à coté de l’axe du bracelet long. On peut alors glisser la broche sans détériorer le joint, qui est plus éloigné du bord à cet endroit.

    Yann Richet -

    I’m pretty sure the seal is equally far away from the edge on all sides.

    Nicholas Dudde -

    This was the hardest part. I did use thin flat head screw to dismantle it. Using the metal spudger felt like impossible due to its thickness.

    Mariusz -

    Did using the screwdriver damage the case in any way? I’d recommend being careful using a tool with smaller surface area as that will apply more pressure at the point of entry. As the guide states, a Jimmy may also be used instead of the spudger.

    Nicholas Dudde -

    Anyone know where to buy the replacement gasket after breaking the seal between back cover and watch? Thanks.

    Jyon -

    Not sure if it's a gasket or some sort of sealant paste/gel. Just took my case off, and the gasket seems intact (fused to back cover of the watch. Quick search for waterproof sealant yielded lots of possibilities - don't know which one to choose. Can anyone with experience provide advice?

    Alan Lawee -

    Ma questa guarnizione impermeabile si puo sostituire ? Come controllare se si è danneggiata? Come evitare che entri acqua dopo averlo aperto ?

    ant.beneduce -

    La photo montre une ouverture coté bouton mais pire coté car l'ouverture abime quand même le couvercle en plastique sur la face la plus visible : essayer plutôt sur les autres cotés

    stoufbook -

  4. P4yRmQMdEi3qS5ll
    P4yRmQMdEi3qS5ll
    DUqw1YGV3hdissjv
    u5YIEsZxZBKXmKyV
    • Trenne die drei Stecker mit den Fingern von der Hauptplatine ab.

    • Die Stecker lösen sich sehr leicht mit minimalem Kraftaufwand ab.

  5. hkprJoZEkEp12nS6
    hkprJoZEkEp12nS6
    EFKCNYDYZ1gxf44i
    gSdIOCiEwy1UVTD2
    • Trenne die Displayeinheit mit einem Spudger von der Hauptplatine ab.

    Oui tuto bien clair. Opération réussi !

    Bien qu’adroit de mes mains, et après avoir découvert la “bête à coeur ouvert”, je ne sais pas si je me serais lancé... C’est tout l’interêt de ce Tuto qui invite à le faire (car pas trop de détails), et qui suivit pas à pas permet de s’en sortir. Bravo

    Merci Dan.S

    Dan.S -

    Better replace the 2 bolts from next step first.

    Gabriel Pinho -

    The guide has you remove the screws second because it makes it possible to remove the whole assembly without snapping any cables.

    Nicholas Dudde -

Abschluss

Um dein Gerät wieder zusammenbauen, folge den Schritten in umgekehrter Reihenfolge.

Jimmy Algeo

Mitglied seit: 08/10/18

791 Reputation

6 Kommentare

can you tell me where can i buy the whole front screen  ?

Ahmad Hariki -

can you tell me where can i buy the whole front screen

Jerzy Jerzyk -

Same question, I am having great difficulty in locating the PARTS to complete these repairs. Can someone please list where we can actually purchase the replacement parts that are shown in these guides??

ArcadeDude44 -

Can anyone please tell, where to get the parts?

Sunny Tate -

can you tell me where can i buy the whole front screen

Eleazar Lagundino -

Bonjour, ma montre Samsung Galaxy Gear S3 frontier ne fonctionne plus correctement à l'issue d'une exposition prolongée dans la piscine. d'abord elle était bloquée sur "rebooting" puis a fini par s'éteindre. Une semaine après, je l'ia rechargée et rallumée... elle a fonctionné normalement pendant quelques heures puis l'écran s'est mis à scintiller avec un voile coloré... Que faut-il faire pour la réparer ?

paulobonzom -