Einleitung

This guide will walk you through how to replace the roller brush.

  1. WLfsRQG1JInn1QyL
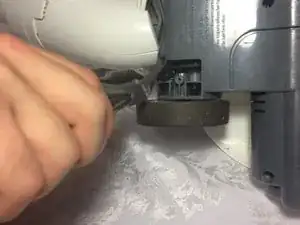
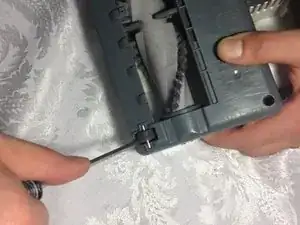
    • Pop out the two small wheels located on the front end of the bottom of the roller brush compartment.

    No power in brush roller bar.

    Allan Kircher -

  2. nSJnLXIsEQSBtohm
    nSJnLXIsEQSBtohm
    TaBJ2MVpseFiUWD3
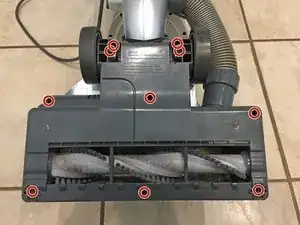
    • Remove the 10 Phillips screws located on the bottom of the roller brush compartment. (Two of these screws are located under the wheels from the previous step.)

    • The screws have varying lengths, so keep track of where each one goes for reassembly.

    Screws under the wheels? Seriously? Who does that? Is Shark trying to make their vacuum like the cars are today? Working on cars together with their Dad was something guys (or girls) used to do when I was growing up. It was about bonding and learning about how things worked and also kept the car running. Kids don't get to do that anymore. Sadly appliances are apparently going the same way. It's unfortunate.

    itzjusme2 -

    Mine only had 8 screws. Shark Navigator NV22L 31.

    Jaynee -

    All this just to take the roller brush off; -(

    Victoria Henry -

    Y'all need an raiser way to take the roller brush off , this is REDICULIOUS.

    Victoria Henry -

    Two of those screws just hold the large back wheels on, they don’t need to be removed.

    Joe Evans -

    To clean it and I actually just did mine wasn’t necessary to take it apart. Took me less than 10 minutes to do. I separated the bottom part and flipped it over. While holding it i took a sharp razor blade and made small repeated strokes cutting hair and debris. It did one section at a time then pinched it out with my hands. Vacuum is now spotless and didn’t have to go through the hassle of removing all those screws unless you need to replace the roller that is

    Debbie L -

    Changing brush roller is the worst process I've seen…brain surgery would be easier. I'm cannot believe you ruined a great vacuum cleaner. You get one star fot that.

    JULIA OATES ALLBRIGHT -

    My screws have little bumps in the center so how on he'll do you get a pointed Phillips head in there to turn the screw?

    Sue Bourne -

    same issue here… must be on the later models.. looks like you need a special tool to get these screws out… look like hexagonal screw heads…

    steveo6666 -

    after some digging around this is what I found:

    It should be noted that on some models you will need a T-20 security head (star-bit) driver to access the brush assembly. Of more importance, you will need at least a 3 inch bit, or single driver with a 3-inch stem, but do NOT try to use a 1/4 inch hex bit extender as the connector shank will be too wide to fit down the narrow screw wells.

    This comment was provided in the comment section of this video:

    https://www.youtube.com/watch?v=zkDeWuXb...

    steveo6666 -

    I just did mine. The original post is no longer correct, nor is the last post. The screws are all Security Torx, size T15. I hight suggest getting three inch (skinny shank) bits. Normal size bits will NOT work because the screws are too recessed. Some thing like this should do…

    Tonsiki 11 Pieces 1/4 Inch Hex Shank T6-T40 3 Inch Length S2 Steel Torx Security Head Screwdriver Drill Set Bits https://www.amazon.com/dp/B01MFGRZIA/ref...

    Jeremy Burrage -

    Thank you for posting this, I was able to get the cover off and and everything cleaned. Your directions were clear and perfect!

    tek4kids -

    Thank you for showing where ALL the screws are that need to be removed. SHARK, terribly bad design just to get to roller. AND, I have spent two days trying to get the right tool-two screw are phillips head and the rest require a security T15 torx bit and the two Under The Phillips head screws have to have a longer bit than the rest! Most difficult brand I’ve ever used!

    expressions2u -

  3. T46I11TciDXRQAqK
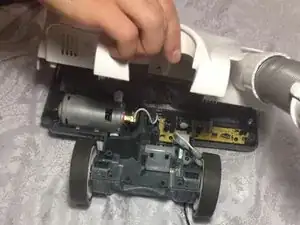
    • Remove the white plastic cover to expose the roller compartment underneath.

    I removed all 10 screws, but the roller brush compartment still didn’t open. Mine is the Shark Navigator Lift Away, is it too different of a model?

    Loreall Pooler -

    I also have the Rotator Lift Away. You have to unlock the red piece in hte bottom center then pull it down to expose the last screw. As soon as that is loose the white cover will come off.

    bmcc49er -

    Some models require you to have 6 pointed star bits with a hole in the middle. Two sizes. Small and smaller. Just as an FYI for those with newer models.

    maierster -

    Thank you so so much!!! This is amazing!!! It took a total of 10 min probably. The hardest part of getting the screws out due to all the gunk. Super simple!!! I’m so glad I came here I had no idea how much a difference it was going to make!!

    Ske -

  4. ftIKsH1xwPEbIIdO
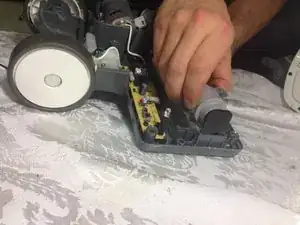
    • Lift the roller brush out of its holders.

    Thanks guy! :) (and friggin TEN SCREWS!?! Hmphhh... )

    Victoria Bee -

    I could not find all 10 screws . A better diagram would be very helpful.

    grayghost267 -

    Although the vacuum model shown in your video is different than mine, it revealed those strangely placed screws #9 & 10 I was unable to locate. After disassembling & a thorough cleaning I feel like a have a brand new vacuum again! I'm so thankful for folks like you who take the time to share your knowledge!

    Donna DeLaVega -

    I agree 100% with this comment I’m so greatful that I found this I almost thought I had to buy a new vacuum because I couldnt figure out how to clean the roller brush. I have dogs and really long hair…. I put that roller brush thru !&&*.

    Amy Sheeran -

Abschluss

To reassemble your device, follow these instructions in reverse order.

Jeremiah Shyne

Mitglied seit: 27/03/15

1370 Reputation

35 Kommentare

Instructions where so easy to follow & right on the money. It took me 11 min from start to finish. PERFECT!!!

Cole bohn -

Very helpful and easy. Thank you.

Kristi cox -

Thank you. The owner's manual doesn't take into account needing to disassemble to clean the brush, for those of us with super long hair. Your instructions pointed out the screws under the wheels that we were missing.
birdofpyre -

Ive uscrewed everything and this white piece seems to be stuck toward the rear. I even took the back whells off.

falynkinsey -

Thank you so much. After having had to send in vac due to recall could not bare to part with it again to fix the belt. Your instructions for very clear and easy to follow. Thank you June

interhome1 -

NEED HELP!! Anyone still answering questions????

Cassie -

Did you ever get an answer? I have been working on this for at least 6 hrs and still can't get it to line up. The rolloer has notched things on the ends of the roller and then that heavy white thing with the spleen on it doesn't line up right. Any help available?

js707077 -

I've done battle with this for too long. Thanks for telling me about the wheels & ten screws. Crazy isn't it: 10 screws....

beachgal 59 -

Any suggestions on where to buy a replacement brush roller for the Navigator NV22? My bearings are bad and Shark does not sell the roller.

Paul -

A very simple and easy to follow guide - Thank You.

st1100flyer -

Very helpful. My model was the UV410 but the instructions were very similar. Two of the screws were different than the others so be sure to put them back in the correct order. Also there were two magnets at the front of the sweeper that can fall out while disassembled. Magnets do not affect performance, but are presumably designed to catch metal objects before they get sucked into the vacuum. In my case the motor was faulty so I figured it was time for a new machine.

Lester Walters -

Only needed to remove 8 Screws for the NV42. The two that attach the larger, back wheels can stay on. But otherwise spot on with the guide, and helped me remove all the hair wrapped around the roller. I was banging my head against the wall until I read this and saw the bit about removing the small wheels.

Jamie -

Me too. Those darn wheels. This was a very helpful post for sure.

Victoria Crisp -

Thank you so much! Almost had it apart myself, but it was the screws under the wheels that got me. Why whould they do that?!?!

Cindy -

Thanks so much for the important tip about the screws hiding under the little front wheels! Who knew?? I never in my life would have guessed they were there. I had what I thought were all the screws removed, and I still couldn't get the plate loose. So glad I found your helpful post -- Thanks again!

Claudia Rispante -

Brilliant! Thank You! I had a funny feeling that there were more screws and the instructions to pop the little wheels were spot on! Very easy to follow instructions! I really appreciate it!

jerseygirlintn -

Thanks for providing this. Shark's video doesn't cover all of the screw that you have to take out nor did the video mention taking out the small wheels. This video was a lifesaver. The left and right screws right below the top left and right screws are the smallest, so anyone doing this should remember this.

Tom Nguyen -

My experiences doing this...I have the Navigator Professional lift away model. I use this in an area w/ a bunch of sewing thread on the floor. I try to get most of that up with a shop vac as the thread really does a number on the roller. After i removed the roller and cleaned it I gave the little black tabs on each end a spin and they seemed to spin easily enough but I figured I'd throw a few drops of sewing machine oil on each side. It went from spinning easily enough to giving it a spin with my finger and watching spin for about 30 seconds so a lot less friction. Hopefully the oil won't eat any of the plastic in there but as this vacuum is only about a week old I'll just return it if it does.

Also of note. When installing the little front roller wheels it is possible to push them in too far and they won't roll. I bottomed both mine out and then pried them back up just a smidge until they rolled freely.

jusjoe842 -

Hi, I'm having problems finding a replacemtn rotator brush. Could anyone point me in the right direction or send me a link.

Thanks

Frazier

William Frazier -

need a brush for - navigator swivel upright NV 2626. Is it available anywhere?

hwiloch -

mY SHARK NV550 ROLLER BRUSH WONT TURN WHEN i TRY TO VACUME MY CARPET. ANY IDEAS WHAT THIS MIGHT BE aNYONE

MB ANDERSON -

this worked perfectly! thank you so much for the guide.

Janet B -

Thanks, I would never have figured out that there were screws underneath the wheels.

D Sammy -

So the brush won't turn and after disassembly, the belt is intact…the vacuum turns on and off…yes the power button is pushed to the II position, so I am stumped as to why the brush won't turn. Any ideas???

Tony B. -

I wish I had googled b efore hubby took it apart…wheels are off front view window lol. But thanks I will be able to do this without his help next time

Barb Ferraro -

Excellent instructions- thank you!!!!!

Deborah Mosca -

I'm need to know where to buy a replacement roller for my NV100 navigator light i broke mine today sadly:/and can't seem to find it on theyre website?

Nikki Tompkins -

When I took the vacuum apart the middle row has a longer screw and I don't remember where it goes. Anybody know which one it goes in?

Jon carter -

Hi everyone! I have the Shark Navigator Light NV 105. I put in 11 screws back on but have 2 left over and can’t figure out for the life of me where they belong. I already put the two screws underneath the two wheels. Any one have any idea?

Karen -

I got a wire stuck in the roller should i take out the 10 screws?

melaniebercutt -

Yes, thanks. No one in the world would expect TEN screws plust two hidden under the wheel. But this actually makes one wonder why it’s designed this way. Especially when other brands have a simple lock, unlock system on the roller cover. Wouldn’t be surprised if some owners just said “screw” it I’ll buy a new one,

If you work carefully you can pull the hair off as I did without removing the roller, An hour to remove the cover is not a good design, especially if you are picking up lots of pet hair as well. It will mean a huge procedure every other week. Sorry, Shark, you need to do better,

Ira Cohen -

My shark seems to have some septigon 6 sides, shaped screw neither a flat head or a phillips head work

mustacheech -

I have a Shark Model 48026 - tried to find it BUT this came up - 40675 - Looks like the 48026 but it has a little different picture ??

Is their a file with the Model 48026 in it ?

the_dog_baron -

2 metal plates fell when I opened mine, where do the go?

Marilyn -

There is another guide on Ifixit.com, but it does not show the secondary screws near the wheels. With you guide I was able to finish the project. I will be adding a link from the other guide to this guide. Thanks

Michael Maxson -