Einleitung

How to replace the Tweeter in a Sonos Play 5 speaker

  1. gPXCbtYRX6jtLsDD
    • Disconnect any power to the speaker and wait a few minutes for the capacitors to fully discharge.

    • Flip the speaker upside down.

    • There may be a rubber foot covering the bottom screws (not included in picture). Remove this by pulling up from one of the corners using a spudger.

    By the time you actually reached the motherboard the capacitors will already be discharged sufficiently to a safe level, so just go ahead there's no need to wait in this step.

    That said, be careful once you have the motherboard out and decide to test it on your table. The two large capacitors are directly behind the full bridge rectifier that's connected to the mains, so without load they carry the peak voltage. In Europe with 230V that means 325V, in 110V countries that means 156V (see https://en.wikipedia.org/wiki/Alternatin... for more information about RMS and peak voltages).

    Erik Mouw -

  2. ssEZ5tToZG3Moihr
    ssEZ5tToZG3Moihr
    jZqJUyInUQGmxQuJ
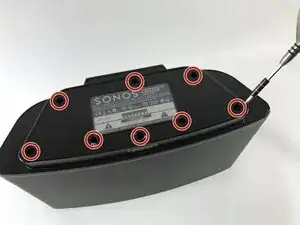
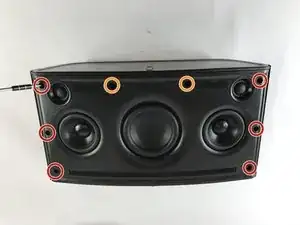
    • Remove eight 10mm Phillips #2 screws

    • Remove the bottom panel by pulling upwards.

    • Be very gentle with the ends of the three antennas. They are very fragile.

    NB: in the photograph, two antennas of the three soldered on the antenna PCBs are broken: You can see one standing upside down towards the center-right of the photograph

    Toni -

    On my model, only 6 of the 8 screws hold the bottom panel. Looking at the picture above, where the screws are circles, the bottom row of 5 screws, the second and fourth screw are threaded for nuts, as opposed to the other six, which are threaded for plastics. These two screws can be removed once the bottom panel has been removed.

    Toni -

    Like the previous poster said: in this step it is sufficient to remove the second and fourth screw cause these hold the front panel. Removing the front panel takes a bit of force and it is better to have the fragile WiFi antennas protected by the bottom panel.

    The remaining six screws can be removed just before step 13 (which also misses a step, see my comments over there).

    Erik Mouw -

  3. STWtAoFNiinNbhup
    STWtAoFNiinNbhup
    tX1HXstZLJtGl1On
    rbFRqxBkFDbVaZnN
    • Flip the device so that the grille is facing up.

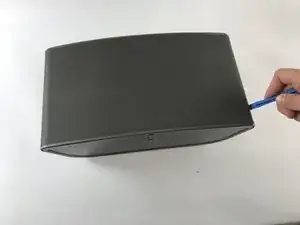
    • Locate the line on the right side of the speaker where the grill and the plastic meet, and place your plastic opening tool in the gap.

    • Run the spudger along the gap, loosening the grille from the plastic. Repeat this process on the left side as well.

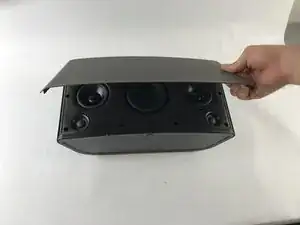
    • Gently pull up on the grille, removing it from the front panel.

    might be worth mentioning there are two strips of industrial velcro running along near the top and bottom that simply have to be pulled apart

    Adam Tibbalds -

    Run the plastic opening tool under the grille to remove to pull the velcro apart. In that way you avoid bending the grille. Be careful with the speaker cones, though.

    Erik Mouw -

  4. KUcjokm6wtXCLifZ
    • Remove the six 8mm Phillips #2 screws.

    • Remove the two 10mm Phillips #2 screws.

    In my unit the top two screws marked in red had a rubber plug in the hole as well. I had to remove them by sticking a knife in and carefully pulling them out.

    Adam Tibbalds -

    I had the same issue but no problem getting them out.

    clarkal2000 -

    I pulled them out using the corkscrew method: I drove a screw about 10mm deep into the rubber plug, then pulled up the screw. This method created way less damage than other methods i have tried.

    Toni -

  5. cLVG4SfPrbcrXUjo
    cLVG4SfPrbcrXUjo
    JnIQdCgHvKhtcOVd
    • Locate the line on the right side where the front panel and back panel meet. Place a plastic opening tool in the gap, and run it along the gap. Repeat this on the left side.

    • Use the opening tool to lift the front plate. If a plastic tool is not providing enough leverage, use a metal opening tool.

    • Gently pull up on the face plate to ensure it has been detached from the enclosure.

    • When pulling on the face plate be cautious because it is still connected by wires on the back of the plate.

  6. GMOtKHefETYH4XLC
    GMOtKHefETYH4XLC
    pUJgkNe2yMRKO6TY
    fZbdDKnQrUrLDVmH
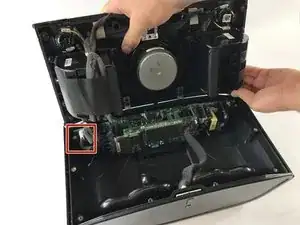
    • Lift up the front panel, forming a 90 degree angle with the back panel. Locate the locate ten pin connector shown. This is the wire that connects the front panel to back panel.

    • Press down on the small tab located on the connector. With the tab firmly pressed down, pull the connector out from its socket.

    • The faceplate assembly is now fully detached from the rest of the speaker.

    my unit didn’t have the tab in the middle of the connector. It simply had to be prised apart (I used a plastic spudger to separate the two parts of the connector) and then reconnected carefully (I used the plastic spudger again between the pcb and the case to support the pcb as it was flexing)

    Adam Tibbalds -

    My unit has a white gasket between the front and back panel. It was stuck to the front panel when I opened the unit. When rebuilding the unit it was easier to remove the gasket and put it in the small ridge of the back panel.

    Erik Mouw -

  7. 1ehhhKmMRKWDmFNI
    1ehhhKmMRKWDmFNI
    knlrjFfpAKoSVVpA
    GOXXXFiDtZKhL1wQ
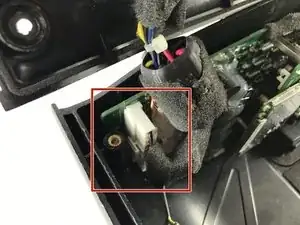
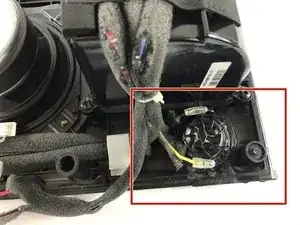
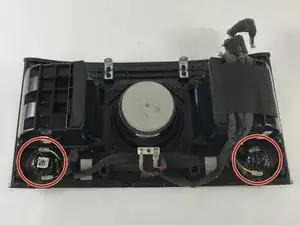
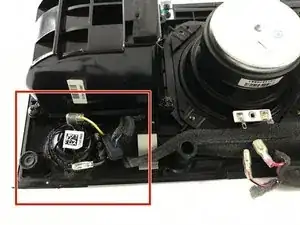
    • Locate the Tweeters on the back of the front panel assembly.

  8. VYGDLlRF6KpUSnoh
    VYGDLlRF6KpUSnoh
    UaleuJflxfQMgrXH
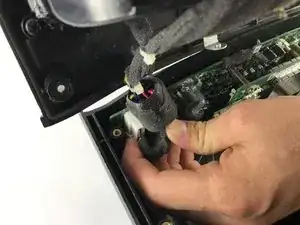
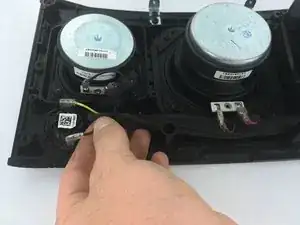
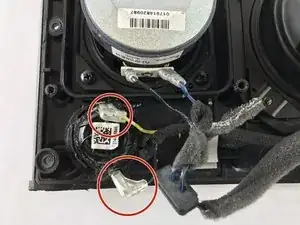
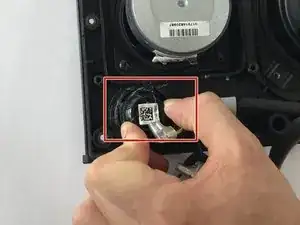
    • Remove wires connected to the Tweeter.

  9. aYNWqQhQBdM2nbet
    aYNWqQhQBdM2nbet
    JmdDmdbjNs4jtJvo
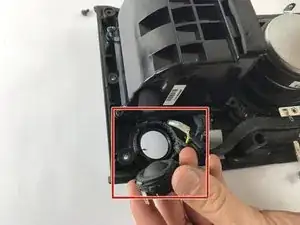
    • Lightly push down on the tweeter and then twist it out gently counterclockwise.

    • Gently lift the tweeter out.

Abschluss

To reassemble your device, follow these instructions in reverse order.
Warren Girouard

Mitglied seit: 20/02/17

309 Reputation

0 Kommentare