Einleitung

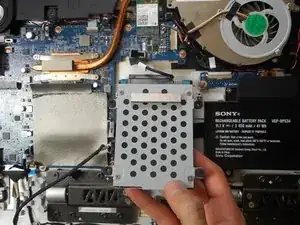
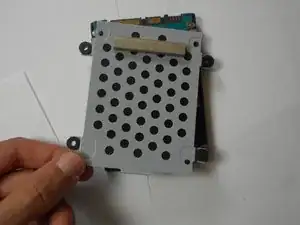
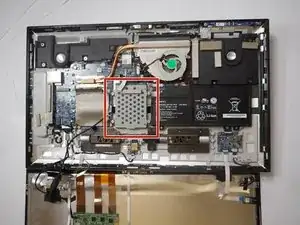
Use this guide to replace the hard drive on a Sony Vaio Tap 21 all-in-one. The hard drive is covered by a circle pattern metal grill. It is located in between the battery and the motherboard.

  1. kUppeeVZxEwcnGsO
    • Locate the hard drive.

  2. VSFPJsTINZJt3DUZ
    VSFPJsTINZJt3DUZ
    q1HSmY51JuhJdTOp
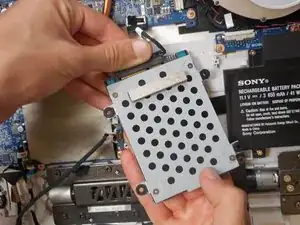
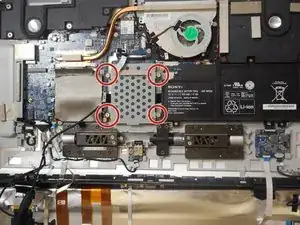
    • Locate the 13mm screws for the hard drive and use the JIS 0 screwdriver to unscrew.

  3. wQUbVyXVOMTnFLk2
    wQUbVyXVOMTnFLk2
    qDuVUKdNrQPegyad
    pQQYt1jTmUN4IVBx
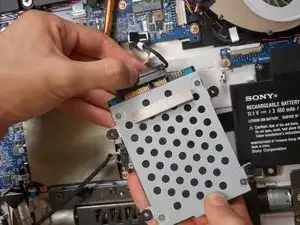
    • Gently lift the hard drive upwards.

    • Ensure you have a gentle hold on the hard drive cable.

    • Gently pull the cable from the base where the cable header meets the hard drive.

    • To ensure no damage is done on the cable header, pull the header gently from both sides at the same time or gently from the center.

  4. FXMqKKNwJH6GvneQ
    FXMqKKNwJH6GvneQ
    XiwVoKo4PSvGkllu
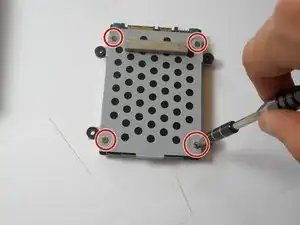
    • Locate the screws.

    • Using the JIS 0 screwdriver, unscrew the 4mm screws.

    • Gently lift the frame after screws have been taken out.

Abschluss

To reassemble your device, follow these instructions in reverse order.

Mauricio Retana

Mitglied seit: 02/10/17

721 Reputation

12 Kommentare

Is that a M.2 SSD Slot on the motherboard?

tedsoldier -

Nope, that’s an mPCIE/mSATA slot, not an m.2 slot. Look at the retention screw position: m.2 uses a centre screw, mPCIE/mSATA uses a corner screw.

Spencer Martin Navarra Chew -

Yes, there is an M.2 SSD slot on the left side of the motherboard. I’ve installed a 256GB SSD in the slot on my VT21

Bill Scharf -

No, it’s clearly an mPCIE/mSATA slot, not m.2. The pin/notch configuration and retention screw position make it easy to identify.

You must be using a mPCIE or mSATA SSD.

Spencer Martin Navarra Chew -

Spencer Martin Navarra Chew is correct about this slot. My mistake.

Bill Scharf -

Excuse the ignorance, but what would be the benefit (what does it do) of installing a M.2 SSD into that slot, pertaining to the Sony Tap 21’s (I have a SVT21225CXB).  Already thinking about replacing the actual hardrive with an SSD for speed (and larger capacity).

Shawn -

Shawn,

It’s not actually an m,2 slot, it’s a mPCIE (or possibly an mSATA) slot - I can’t tell which from the picture. Regardless, the advantage of installing a SSD in the slot is that it leaves the drive bay free for a large capacity HDD to store all your media, while still benefiting from having a fast SSD.
Spencer Martin Navarra Chew -

I’ve replaced the hard drive (thanks for guide). It now boots with the no operating system found message, which is to be expected. I just can’t figure out how to get into the bios to change boot options. Articles online refer to holding the assist button (found near the power button at top of screen, but this also doesn’t work. Any help appreciated

Nickc -

Resolved issue it’s pressing and holding assist only when machine is powered off, not a combination of power button and assist.

Nickc -

I think first should be how to remove the back cover.

henry langston -

It's not removal that's the tough part... it's removing it without cracking the glass. I'm pretty competent myself, and still cracked it - starting at top left, going diagonally across the screen. It felt like I wasn't "forcing" anything when it cracked...I don't say this to try to discourage anyone from DIY'ing on these...but I definitely have got to urge anyone, no matter how experienced you may be, BE AS ABSOLUTELY CAREFUL AS POSSIBLE WHEN REMOVING THE SCREEN ON A TAP 21!!!! However careful you think you need to be...be twice as careful as that. Take your freaking time on this, or you'll be sitting here like me with a cracked screen, wishing I would've.

Good Luck!

M B -

How do you even open the back? If I can open the back I can change anything I want.

Faki Fon -