Einleitung

Wenn du innere Komponente des Sony Xperia ersetzen, möchtest, entferne zuallererst den Akku. Diese Anleitung zeigt dir, wie du dein Mobiltelefon öffnen und den Akku entfernen kannst.

  1. DIPQ3DZEVDJBTZve
    DIPQ3DZEVDJBTZve
    rVxvm2KgTWNhtGd2
    TfpFlEMHKG2TrEIr
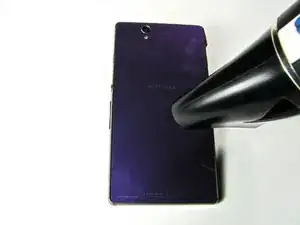
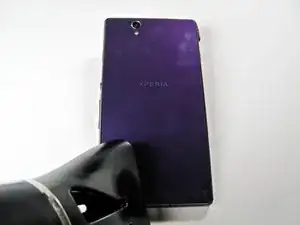
    • Stelle den Fön auf mittlerer Stufe ein.

    • Bewege den Fön vorsichtig entlang der Kante auf der Rückseite des Mobiltelefons. Halte den Fön immer auf ein paar Zentimeter Abstand zu dem Gehäuse.

    • Lasse den Fön eine Minute lang laufen, um den Kleber, der das Mobiltelefon zusammenhält, aufzuweichen.

  2. GZW1DJdtowJGALyc
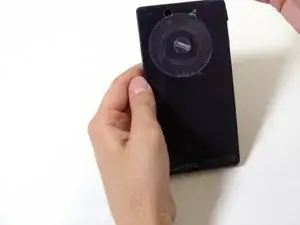
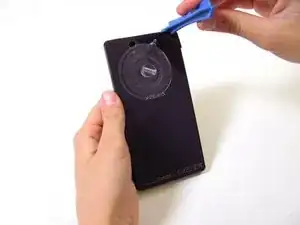
    • Sobald der Kleber weich ist, bringe einen Saufnapf oben in die Mitte auf der Rückseite des Mobiltelefons an und ziehe daran.

    • Ziehe gerade weit genug daran, um eine kleine Lücke zu erzeugen.

  3. mFOLHfZIfhASQRh1
    mFOLHfZIfhASQRh1
    LtytCfD4mfnTpI3X
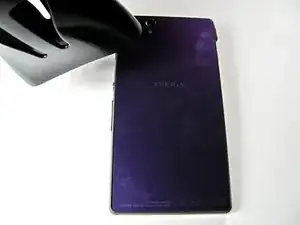
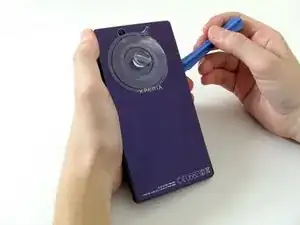
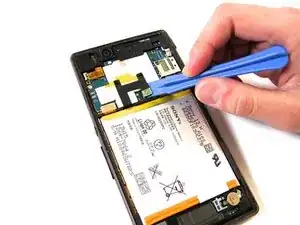
    • Sobald eine kleine Lücke entstanden ist, fahre mit dem Plastic Opening Tool in die Spalte.

    • Bewege das Werkzeug entlang der Spalte, um den Kleber zu lösen.

  4. FKBtHohYhddEygfe
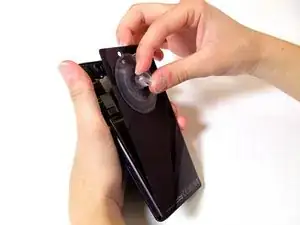
    • Vorsicht: Wenn du zu kraftvoll oder zu schnell am Saugnapf ziehst, kann das Rückteil des Mobiltelefons abbrechen.

    • Sobald der Kleber weit genug gelöst ist, ziehe den Saugnapf vorsichtig zurück, um das Rückpanel des Mobiltelefons zu entfernen.

    • Der restliche Kleber sollte stark genug sein, um das Mobiltelefon bis zum Wiederzusammenbau zusammenzuhalten. Sobald es jedoch einmal geöffnet wurde, ist der Wasserschutz des Mobiltelefons beeinträchtigt.

  5. nSwGMeOwjWBq2qrr
    nSwGMeOwjWBq2qrr
    GVmYwArhvNfFcJb5
    jbNnPwtrNsdP1hLW
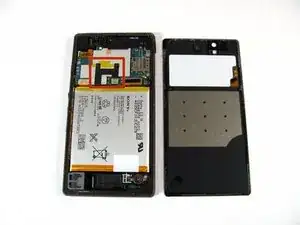
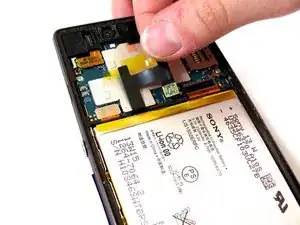
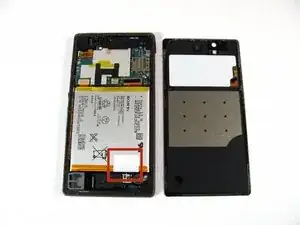
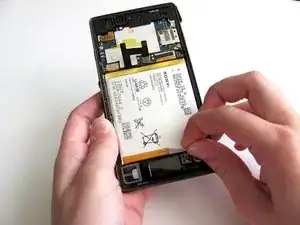
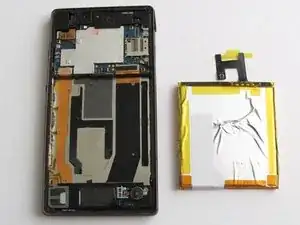
    • Jetzt, wo das Rückteil entfernt ist, ist der Akku sichtbar. Du hast nun Zugang zum Akku und seinen Verbindungsteilen.

    • Entferne den Anschluss mit einem Plastic Opening Tool vorsichtig vom Motherboard.

    • Löse von Hand den restlichen Kleber von dem Mobiltelefon.

  6. rXOFpS1HKTbu4npi
    rXOFpS1HKTbu4npi
    OKlJC3YtHt2NmQwP
    gATtOfPSMVFm2xjq
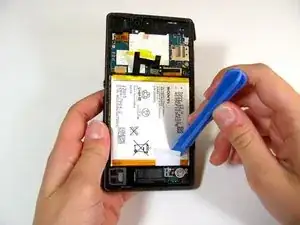
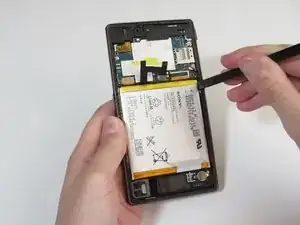
    • Löse den weißen Klebestreifen vorsichtig mit einem Plastic Opening Tool unten vom Akku.

    • Löse von Hand den Rest vom Klebestreifen vom Akku.

    I found this white adhesive tape just wrapped around the battery, so didn’t need to be removed

    sarah -

  7. 1Oikigi6MHZTUFlB
    1Oikigi6MHZTUFlB
    DTgpMOqTVgUmF6Bk
    KvXYUVy1MnkpYKep
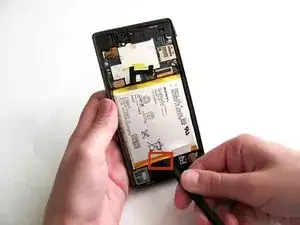
    • Fahre mit dem Spudger vorsichtig entlang der rechten Seite des Akkus und löse so den Kleber zwischen Gehäuse und Akku.

    • Unter dem Akku verlaufen vertikal Flexkabel, die leicht beschädigt werden können. Verwende deshalb ausschließlich den Spudger in diesem Bereich.

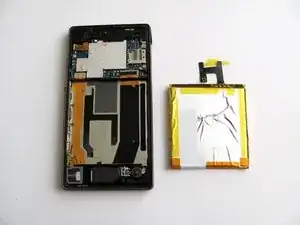
    • Führe den Spudger unten in der Mitte ein, um den Kleber weiter zu lösen. Trenne den Akku vorsichtig vom Mobiltelefon, indem du den Spudger vertikal unter dem Akku ansetzt und nach oben hebelst. Dies kann etwas Zeit und Arbeit in Anspruch nehmen, da der Kleber sehr stark ist.

    it would be better to show in overlay red the two vertical cables that should not be touched; i damaged by 1 mm at the bottom one of the cable and the display is no longer working, even if can hear touch feedbacks and sound and now if if it charges well :o((

    cagnes06 -

    if you do what is shown on the picture at step 7 (i did) you can still damage the cable right, because it deviates at the bottom towards the left !

    cagnes06 -

    Why not start the instructions by saying "This battery replacement operation is too difficult unless you are highly experienced. You are very likely to damage the phone beyond repair. Sony prefer you to buy a new phone every 2 years when the battery fails"

    Roy Banks -

    I agree that it would be better to overlay red the two vertical cables. Other than that, this step is rather time consuming, than complicated. Obviously you should be attentive to not damage the cables, but if you put moderate force during 3-4 minutes, the battery will finally separate from the case.

    Wondering if it’s safe to use hair dryer at this step.

    strixaluco -

Abschluss

Arbeite die Schritte in umgekehrter Reihenfolge ab, um dein Gerät wieder zusammenzubauen.

Nicolas Avila

Mitglied seit: 03/02/14

989 Reputation

32 Kommentare

Does battery replacement ruin the waterproof quality?

mitralal shrestha -

get reeplacing adheessment from part store.

ooboogah dirti -

Aft er replacing 2 (so called) waterproof phones due to water damage; I kept my Xperia phone away from water. Sony's claim the phone is weatherproof is a joke.

Kevin Ledbetter -

I found that a heavy plastic guitar pick (1.0mm or thicker) worked well as a replacement for the plastic opening tools

ryandrake182 -

Me too... I agree.

remjok -

Do you have to use the heat blower also in second and third time you wish to replace battery. (If not would be great because it would be simpler to replace battery on the go).

Tomer -
For Z1 C6903, it may seem that the steps are applicable, but with a slight twist: After removing the cover, you need to use T4 screwdriver and remove the screws holding another "layer" (black plastic). I have to use the guitar pick and remove the black plastic "cover". Then only you can remove the battery (the C6903 battery has plastic frame with screw holes (x 4). Other than this, steps above are applicable, but I can't get the adhesive material to align properly. Remember not to dump the phone into water.

Allen -

Hi,

Than for da guide,My xperia z doesn't register Network,when ever I insert any working SIM, some symbols of a sim with a mark of a red X sign attached to it and even where Bars indicating the signal strength remains empty with same X mark in red attached to it, is there any I dear to fix this?

Helps can reach me faster via my email(olanya26@gmail.com)

Than.

Amos.

Olanya Kay Amos -

my xperiz Z phone's battery drains so soon. can i replace it's battery to more power ( mah) battery ?

Anita Singh -

Ja, das ist wirklich nicht leicht, weil der Akku extrem gut hält. Vielleicht hilft es zu wissen, dass im letzten Schritt, letztes Bild (Blick auf das Handy ohne Akku) in der unteren Hälfte die dunkle Struktur, die wie ein Sessel aussieht, hier ist der Kleber aufgetragen...

Jedenfalls hat es geklappt - vielen Dank an den Autor und auch den Übersetzer!

christofwaas -

Please anybody can help me that where is Sony Z 1 compact battery is availble available in ksa riyadh??? I couldn't found:(

Miss Afridi -

I could not remove the battery. LCD is broken. :(((((((

Mu Ba -

I change the battery any broken the Display, too. But but I know how to open that phone

cepehh -

If I replace the battery will I lose all data held on the phone?

Natalie Rendell -

No if u don't touch any other part

Christopher Veletchy -

Where can i buy battery for xperia z3plus/z4 worldwide shipping?

kim hae joon -

I am not too sure what my problem is. My phone sows like it is charging but i cannot switch it on for the past 20 days. Does this mean the problem is with the battery? If so, where can I find a replacement battery for xperia Z? I live in Kisumu, Kenya

Annette Opondo -

My xperia just suddenly stopped working on me. It was working just fine, then once the battery was low, I needed to charge it, plugged it in the wall charger, and now it suddenly isn't working anymore. What should I do?

Cari Jedlicki -

Hey guys. I replaced the battery and when booting it up the whole screen is just plain white. I took the whole thing apart again and made sure that all connectors were seated properly - re-seated them just in case etc.

Can this be some hardware damage I did while taking the old battery out? The glue was so strong, I did have to yank on it pretty hard to get it to loosen up.

Thanks,

Ben

Benedek Frank -

My phone experia z when the charger is insert the phone will and if remove the charger the phone will turn off plus help

william limoco -

I have changed the battery as mentioned above, but my phone doesn't turned on

There is only a red light indicator and nothing more

I've charged it, tried to boot it as bootloader & ...

Could it be becuz of broken new battery?! And if yeas what should I do with it?

zeus.7reza -

My xpera z s battery drains so quick what do I do

Chukwudi Leonard -

If after replacing with new battery then your smartphone (mine is sony experia Z1) can not turn on and if charged, only showing blinking red light 3 times and nothing happens, it means that the smartphone’s system gets no power at all, and definetely means that the new battery is defective…. If not defective but only flat / drained new battery then it can be back alive / start charging after around 30 minutes initial charging… I experienced the same and after asking for replacement new battery from the store, I now have a like-new-Z1.

amankuat2 -

Where does the flat copper connector fit onto ,,phone details; aSony Xpedia. E4 model e2105.

Andy Fortune -

Having same problem light flashing on screen, and red light flashing , unable to charge phone

Andy Fortune -

Very nice and helpful.

Ghulam Hyder -

Have successfully changed the motherboard on my xperia Z. Then recently the phone would only charge from a dead battery and if I interrupted the charging (ie unplugged and replugged the power supply) it wouldn’t continue to charge. Have just changed the battery from my spare phone now and I plug the power in, the red light comes on for about 10 seconds and then goes off. It’s not charging. Opened it up again and rechecked everything was ok, but still not charging. The old battery back in the spare phone is charging well and continues to charge when power turned off and on again. Was it not a defective/worn battery in the first place? What else could it be?

FYI I am using the same USB plug and cable for both.

sarah -

PART 1:

Lots of good questions, not enough answers…

I have an Xperia Z3V (Verizon version—try to find info on THAT). The battery, while still chargeable, got all puffy. I purchased a replacement. (Sold to me as off-brand-not-Sony, but arrived looking nearly identical, “Sony” printed on it and everything (the numbers are not precisely the same, though): these are either clues, or a red herrings.) I got the old batt out and the new one in. (Another clue or red herring: The ONLY way to install it was face down, unlike every photo of any Sony battery ever. I’m pretty sure the original was placed that way, too. The connectors definitely connect only if the battery is in face down.)

The new battery charges right up to green! With the peeled-off-the-original-battery Qi coil stuck onto the new battery it even charges on a Qi charger! So THAT’S good. But the phoned won’t fire up. THAT’S bad.

To be continued…

lisabdot@aol.com -

PART 2:

I’ve tried a whole bunch of found-online last-ditch efforts to get it to turn on (press the battery restart button 10 times, press the down sound button while plugging in the charger at the same time you press the start button while drinking a glass of water from the wrong side…) to no avail.

One other thing: In the first photo of step 5, just to the right of the red-boxed battery connector—what is that plugged in horizontal bar thing? I may or may not have tugged on it a little bit just because it happens to be in the very same location as the battery tabs described in several disassembly instructions found online. (On MY phone, that bar is to the left of the battery connector.) (I am hoping this would be a red herring, not a clue, because if it is a clue it likely is a clue leading to the conclusion that my phone is toast.)

Anybody have any bright ideas???

lisabdot@aol.com -

Done. I use hairdryer as replacement for heat blower :lol:

qu8il -

Thank you for this wonderful guide

Sayf -