Einleitung

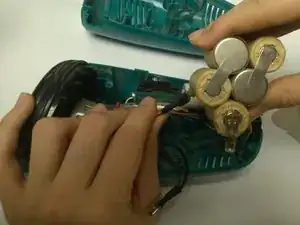
This guide will show you where to unscrew, how to split the device apart, and then how to disconnect a failing battery from the rest of the interior electronics.

  1. UcUgfhOVoMikEyZZ
    UcUgfhOVoMikEyZZ
    FgyfFDLCGQJXRJhm
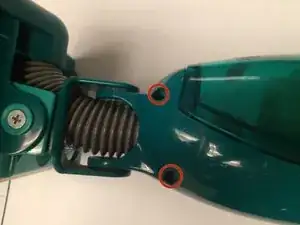
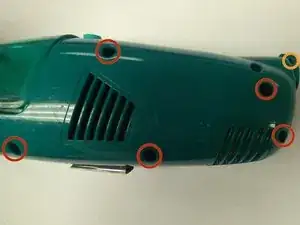
    • Unscrew seven 17.95 mm screws on the side of the device.

    • Unscrew the 13.87 mm screw.

  2. S5r2YYNTnSXakBJI
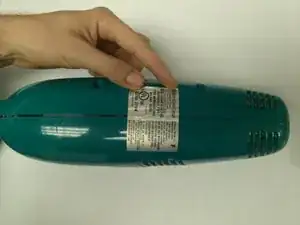
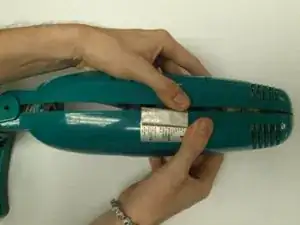
    • Find the sticker on the back of the device. It may have already been removed.

    • If there is a sticker, peel it back from either half of the device.

    Remove the dirt-catcher compartment before attempting to separate the halves of the sweeper body.

    Ralph Begleiter -

  3. GOtFXdEHDUtRsyIN
    GOtFXdEHDUtRsyIN
    DVBbR34UZO4VMqQR
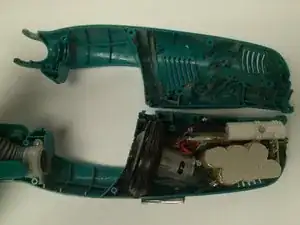
    • Firmly, but carefully grip each half of the case and split it open.

    1. Looks like you removed the handle. It is not budging for me after I took the 13.87 mm scrww out.

    2. I tryed to pry the halves apart, but something is stopping me. I took the dirt trap off and that didn’t help. Maybe the release button is stopping me from getting the halves apart?.

    Carol Ann S -

  4. PlEN6s2bRrni45H4
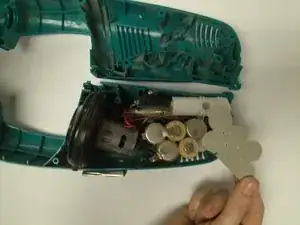
    • Remove the silver-colored battery cap from the top of the battery.

    Newer models have the silver battery cap only on the bottom. The top is a white, molded plastic case.

    Ralph Begleiter -

  5. mapK3WwgexXaKKsJ
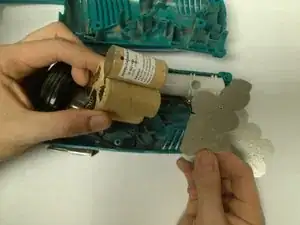
    • Lift the attached battery from the device and place it on the surface.

    • Remove the second silver-colored battery cap from the bottom of the interior of the device.

    On newer models with the white molded plastic battery case, lift the batteries together with the case carefully out of the sweeper. Be careful to clear the red and black wires from small channels in the white plastic battery case before lifting the battery assembly out.

    Ralph Begleiter -

  6. yWViaji3FloGai2E
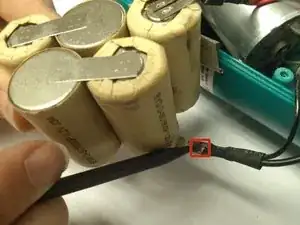
    • Using the spudger, apply pressure to the lock on the black wire attachment.

    • While pressure is being applied to the lock, pull the black wire away from the battery.

    On newer models with the white plastic battery case, apply thumb pressure to the batteries at the top of the case to nudge them out of the case. Once free, the white plastic case will slip off the battery pack easily. When reassembling, insert your new battery pack into the white plastic case before attaching the battery wires, and before replacing the battery assembly into the sweeper.

    Ralph Begleiter -

  7. oCckWVvQ1TSEYjum
    oCckWVvQ1TSEYjum
    PJa5hKiiaDTeSoic
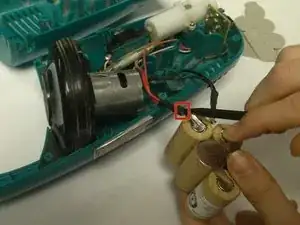
    • Using the spudger, apply pressure to the lock on the red wire attachment.

    • While pressure is being applied to the lock, pull the red wire away from the battery.

    • When installing the new battery, you do not need to press down on the locks. Simply plug the wires into the appropriate sockets on the new battery.

Abschluss

To reassemble your device, follow these instructions in reverse order.

Alexander Boesenberg

Mitglied seit: 22/09/14

682 Reputation

10 Kommentare

This seems very easy. Will try amd make an update

eli3danimator -

This was helpful but my swiffer vacuum had a plastic chassis for the battery and I had to remove the circuit board as well to route the wires on my replacement battery as they were not is the same places as the factory battery.

lillysilbert -

Where do you purchase the batteries
deniseward640 -

Where do you purchase the batteries?

deniseward640 -

One place you can get the battery pack as shown is here; https://sweeperbattery.com/. The latest model (easier to install) battery in a case (6 cell - 7.2 volt) is also available from amazon.

Dwight Cooper -

There is a 13 minute “How To” video on YouTube. Just search replacing swifter vacuum battery.

It is for the “newer version” of the vacuum , the one with the 6 cell NiCad battery.

Easy to follow and yes, the batteries (I have 2) came quickly from Sweeperbattery.com. Yay, I’m back in business- love the swifter vac. Just could not understand why swifter charges so much for the vacuum when the battery lasted barely 2 years!

Lorrie -

I replaced my batteries as shown above. The SwifferVac runs for 1 minute and stops. If I turn it off and wait 5 minutes, it will run for 1 more minute. Wait 5 minutes and it will run 30 seconds. Then I have to recharge. Bummer.

Is there a way to convert to an AC power source? How do we connect it electrically so the switch still works. I would rather pull a cord around then rely on ineffective and expensive NiNH batteries.

Do you offer a Lithium ion battery?

The concept of the vacuum picking up dust, dirt, and debris followed by actual cloth contact is great. Just a swifter cloth won't cut it. The vac is particularly good for hair pickup. I have a built-in sweater and thermal long John's from the DARWIN Collection. No dust bunnies, just Dust Gorillas following air currents, multiplying in the eddies.

If I can't go AC on Swiffer Vac I might buy a corded Shark Apex Duo Clean with Zero-M No Hair Wrap Stick Vacuum, as an option for getting up stuck on dust and eating up the Dust Gorillas!

Charles B Oliver -

All sounds so easy and it is until you get to the point of getting the RELEASE button back in place. How do I do that?

wgluck -

There is also a newer model, the L4000, that is about $10 more expensive that has a Lithium-Ion 2-cell battery. You can differentiate this model by its color, green and silver. It has a slightly larger capacity of 2200 mAh.

David Bergum -

Units too expensive for batteries not to last longer.

S Hall -