Einleitung
My rear hub on my electrified S2 broke a while back. It constantly felt like I was in too low of a gear. Unfortunately Vanmoof was not particularly helpful in identifying the problem via the help chat and it ended up being faster to just post a video on r/vanmoofbicycle. From what I’ve seen lurking on the sub, this is a common problem with vanmoofs. I didn’t want it to happen again so I figured I would upgrade the hub to something better. I thought I’d share my experience since a reference like this is something I wish I had had during the process.
I had changed the inner tube on my old bike a few times but other than that, I basically had zero experience going into this project. There were a lot of terms and measurements I had to learn to order the right parts. Throughout the article when those things come up, I’ll try to link to definitions. If I miss something, sheldonbrown.com is a great resource!
Werkzeuge
Ersatzteile
-
-
135mm OLD (overlocknut distance)
-
-
6 bolt disc brake compatible
-
36 spoke holes if you want to reuse the same rim (Some pro wheel builders won't reuse the rim but from what I've read online its okay. Do it at your own risk though. I'm no expert)
-
-
-
Vanmoof has a great video guide to help with this. Ignore the e-shifter stuff for the S2/X2
-
-
-
First follow this video about changing the inner tube but stop once the tire is off.
-
Remove the yellow rim tape. You can do this nondestructively by getting underneath it and sliding it off the edge of the rim. I was able to reuse the rim tape when putting the wheel back together but if its too stretched or you had to cut it off, new rim tape is not too expensive.
-
-
-
Use the Torx wrench to remove the 6 bolts holding the disc brake and kick lock plate in place. Save these for later. They will be reused with the new hub
-
Remove all the spokes by loosening the nipples with the spoke wrench. Depending on how you are looking at the rim, it may seem like you turn right to loosen. If you view the rim from the outside, the lefty loosy rule should work.
-
After you complete this step, you should have a rim, your old hub and a bunch of spokes and nipples.
-
-
-
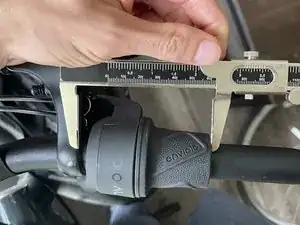
To do this, you will need to determine the ERD (effective rim diameter) of your rim. From what I can tell, Vanmoof uses custom rims meaning this measurement needs to be taken manually. I used a few different methods to measure it and then averaged my results.
-
This park tool article gives one way of measuring ERD and this Sheldon Brown article gives 2 more ways.
-
You will also need the dimensions of your hub. You can typically find these in the technical manual. I found the technical manual by googling around. If you are using an enviolo hub this is the manual for all of their hubs
-
The last thing you will need is what cross pattern is appropriate for your hub given the rim size. For the enviolo hub it is 2 cross. I found this in the hub's manual as well.
-
After you have your ERD you can enter it into this website along with the dimensions of your hub and the cross pattern you intend to use. It will calculate what length spokes you need.
-
-
-
The way the kick lock works is just by pushing a metal pin into a metal plate that has valleys and ridges. That metal plate is screwed into the same spot as the disc brake
-
The original hub has markings on the top of the hub that indicate where a valley in that plate is. You can add these markings in with a white paint pen.
-
Lightly screw in the metal plate into the new hub for reference
-
Try to replicate the lines on the original hub by placing the lines on the new hub lined up with the center of each valley in the plate.
-
-
-
If you can find the manual for your hub online, there is typically a recommended lacing pattern given a specific size rim.
-
For my hub, the recommended lacing pattern was 2 cross. (basically just means the spokes cross two times)
-
I didn't know anything about lacing but this park tool video is extremely helpful. In the video they do a 3 cross pattern so I also cross referenced this video to check what modifications I needed to make for a 2 cross.
-
-
-
Your wheel is built but if you put it into the dropouts now and spin it, it should wobble.
-
The wheel needs to be trued and dished. Park tool has some helpful videos about this but instead of using an expensive truing stand, many people just use zip ties.
-
For dishing the wheel, I just used my caliper to make sure it was centered in the frame. If not follow the steps in the park tool video above
-
-
-
Follow your hub manufacturer's instructions for installing the sprocket. Here are the instructions for the enviolo hub that I used.
-
Place the disc brake discs and then the kick lock plate over the holes in the hub and screw them in. Make sure not to flip the disc to the wrong side. It should look like the one on your front wheel
-
-
-
If you are using a manual shifting hub, you will need to install everything in order to control shifting. I'll provide the links to the videos for the hub that I used but this won't be universal to every hub.
-
-
-
To install the shifter on the handle bars, just wiggle and pull the grips off. I then had to loosen (there is a hex bolt on the under side of the brake lever, behind a wire coming out of the boost button) the brake lever and move that a bit further in. I still wasn't able to fit my 90mm grip on so I think I'll need to cut it down to size.
-
You will also need to install the shifter cable housing. I was able to use regular wire cutting pliers to cut the cable housing but it was very difficult. The designated pliers might be worth it if you don't already have wire cutting pliers.
-
-
-
slide the rim tape back on the bike or apply the new rim tape
-
put the inner tube and tire back like how vanmoof shows you in their video about changing a flat
-
Put the back wheel back on as show in the vanmoof video. If you are using the same hub as me, the chain guard likely won't fit. I just left it off. I plant to eventually take the entire chain guard off
-
If you chose a different size sprocket than 18T, you might need to resize the chain. I chose a 16 tooth sprocket. This has 2 less teeth so I needed to remove 1 full link which is an inner and outer plate. From my understanding, you remove/add 1 link for every 2 teeth. If you only added or subtracted 1 tooth, you don't adjust at all.
-
Here is a video on how to shorten your chain.
-
The steps for other vanmoof bikes should be similar. For an X2, I see no issue. You definitely areg going to want to check all of my measurements to make sure it uses the same dropout spacing. I think it should but I’d double check. Also your ERD is gonna be different so you will need to measure that on your own but if you can do that, it should be a similar process.
The S3 and X3, I’m not as sure of. I think it should be possible as long as vanmoof allows you to just leave the e-shifter unplugged as this redditor pointed out. Someone might want to test this though. Maybe just unplug the shifter and ride around for a bit and see if it complains.
If you end up doing the project, please let me know how it goes. Let me know if its possible with an S3/X3 and send me the ERD you get so I can update the article with measurements for all the bikes