Einleitung

Das Entfernen einer externen Festplatte beinhaltet die Demontage des externen Gehäuses und den Ausbau der Festplatte im Inneren. Dann kannst du das Laufwerk in deinem Heimserver, NAS oder PC verwenden. Dieses Verfahren zeigt dir, wie du die Festplatte entfernen kannst, während das Gehäuse intakt bleibt.

Das Entfernen einer externen Festplatten ist eine gute Möglichkeit, viel Speicherplatz zu einem besseren Preis zu erhalten. Viele externe Laufwerke nutzen Festplatten auf Serverniveau, die fast doppelt so viel kosten, wenn man sie einzeln ohne das externe Gehäuse kaufen würde.

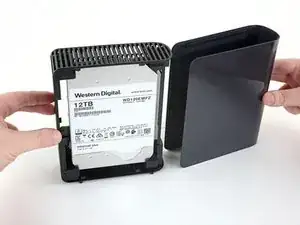
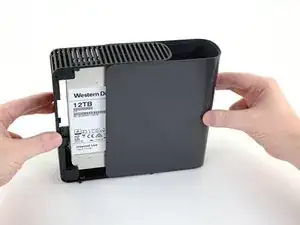
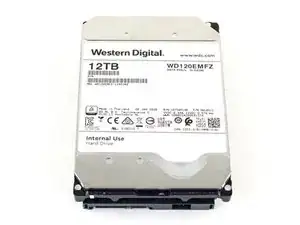
In dieser Anleitung wird das Entfernen einer externen 12-TB-Festplatte WD Elements von Western Digital, Modell WDBWLG0120HBK-NESN, demonstriert. Das Verfahren kann jedoch auf jedes externe 3,5-Zoll-Laufwerk von WD Elements angewendet werden.

Hinweis: Stelle sicher, dass du vor dem Entfernen die externe Festplatte hochfährst und mit einem Programm wie HD Tune Pro oder Stablebit Scanner einen Deepscan auf fehlerhafte Sektoren durchführst. Wenn Fehler festgestellt werden, gib das Laufwerk an den Einzelhändler oder Hersteller zurück.

  1. YrxXV6hrVY3NbfNY
    YrxXV6hrVY3NbfNY
    2Zk1HKj1PJ3LhvQn
    • Stelle sicher, dass du vor der Demontage das Gerät ausschaltest und das Laufwerk ausgesteckt ist.

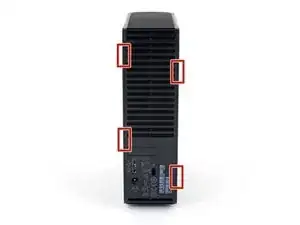
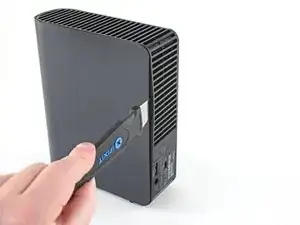
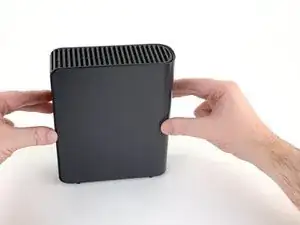
    • Der äußere Gehäusedeckel ist am belüfteten Rahmen von innen her mit vier Plastikclips befestigt. Finde die Stellen, bevor du mit dem nächsten Schritt weitermachst.

  2. XNKSEYTExp5XnfI4
    XNKSEYTExp5XnfI4
    5Irfmtguvipr2cbl
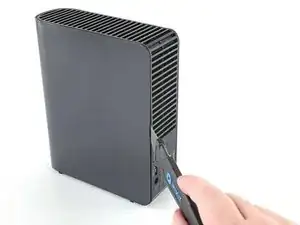
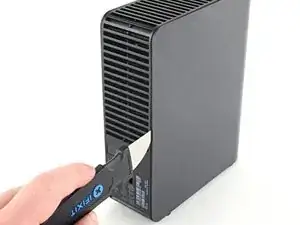
    • Setze einen Jimmy in die Nut zwischen dem Rahmen und dem Gehäusedeckel auf einer Seite der Festplatte, etwa auf halber Höhe.

    • Es kann sein, dass du den Jimmy etwas hin- und her bewegen musst, um ihn die Nut einsetzen zu können.

  3. QAUcT6YUWybpSxAS
    QAUcT6YUWybpSxAS
    BG2HdhGENnsUuFPY
    BwydJS56cD3NvEkY
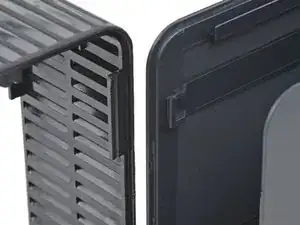
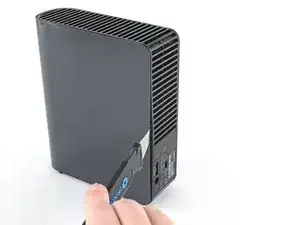
    • Nachdem der Jimmy in die Nut zwischen Gehäuse und Rahmen eingesetzt ist, kannst du das Gehäuse nach außen hebeln, um den Clip zu lösen.

    • Sei vorsichtig, dass du nicht zu viel Kraft anwendest, das könnte das Gehäuse beschädigen.

    • Wenn du Schwierigkeiten hast, den Clip zu lösen, schiebe den Jimmy näher an den Clip heran und versuche es erneut.

  4. PJwhe5weXBrDcETd
    PJwhe5weXBrDcETd
    v3FFK2UyKmrSSZCv
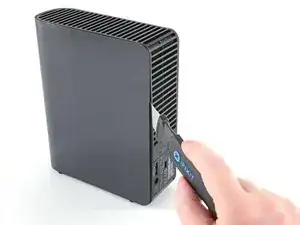
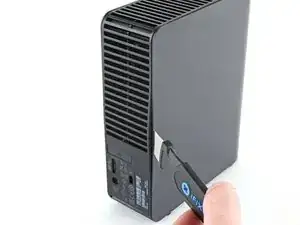
    • Schiebe den Jimmy in der Nut nach oben und hebele das Gehäuse nach außen, um den oberen Kunststoffclip zu lösen.

  5. 2TZAYMAoU4QDwbOp
    2TZAYMAoU4QDwbOp
    4ePUfxtTZ4ETkw3f
    • Wiederhole die Schritte 2 bis 4 auf der anderen Seite.

    • Sei vorsichtig, dass du nicht zu viel Kraft anwendest, das könnte das Gehäuse beschädigen.

    • Wenn du Schwierigkeiten hast, den Clip zu lösen, schiebe den Jimmy näher an den Clip heran und versuche es erneut.

  6. fEw4BujQrPI6oKyN
    fEw4BujQrPI6oKyN
    GC46HPATxHFcI3jU
    pEnxLDsJQWs5jNbg
    • Schiebe den Gehäusedeckel gerade vom Gehäuse ab, um ihn zu entfernen.

  7. 4XpDcqUbSuP1CYk5
    4XpDcqUbSuP1CYk5
    pgplwFMPjGqWvtwY
    • Ziehe die LED-Lichtbrücke aus dem LED-Schacht auf der Kontroll-Platine der Festplatte.

  8. xQGjBPWmjLC1iWZH
    xQGjBPWmjLC1iWZH
    lSYuotIADANJx3qa
    jGW5WyP4x4FqNxkF
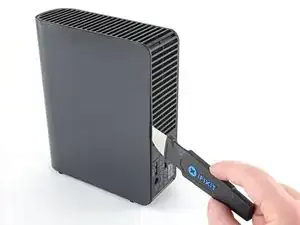
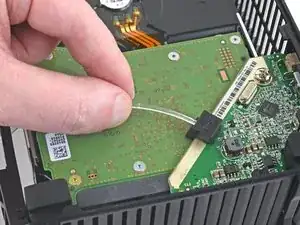
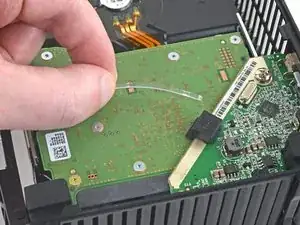
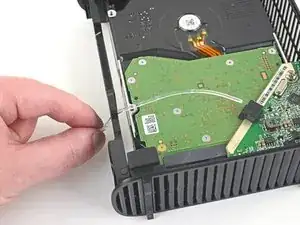
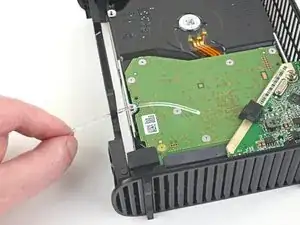
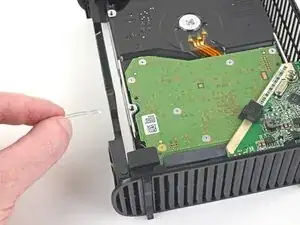
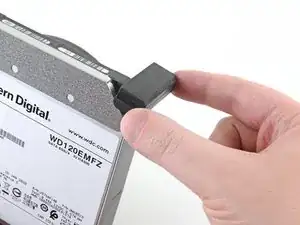
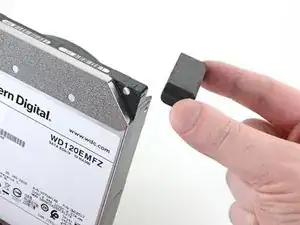
    • Nimm das Ende der LED Lichtbrücke und ziehe es komplett aus dem Gehäuse, um es zu entfernen.

  9. sVTZcBPHK2UAkbEf
    sVTZcBPHK2UAkbEf
    W2wpLR1gfhgiZsWa
    TQjxEu3ZL6Q3uDpO
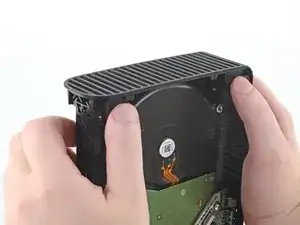
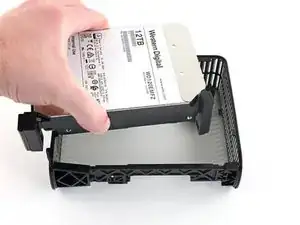
    • Drücke mit den Fingern auf die vier Gummiteile in den Ecken, um die Festplatte aus dem Rahmen zu lösen.

    • Drücke ein oder zwei Gummiteile langsam und gleichzeitig, bis die Festplatte komplett aus dem Rahmen gelöst ist.

    Wtf. How? This doesn’t work.

    Feddy Friender -

    Ok, got it, but these directions are terrible. You don’t want to push the blocks out, like the illustration and directions say, because they literally can’t be pushed out. They need to be lifted up while the plastic shell is manipulated until the drive is loosened.

    Feddy Friender -

    Thanks, Feddy!

    Mike Rosenberg -

  10. pxfYbJi6UUSSnuHr
    pxfYbJi6UUSSnuHr
    4kZ6AL4J2MfPcgCa
    • Entferne die Festplatte aus dem Rahmen.

  11. brKaRAnfhVHMsQWP
    brKaRAnfhVHMsQWP
    SXYPYFK5xZavWfNd
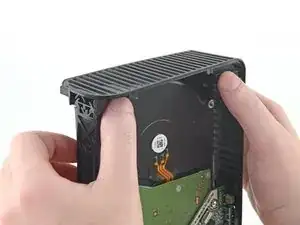
    • Entferne die Gummiteile von der Festplatte, wenn sie noch daran befestigt sind - manche könnten bereits beim Entfernen der Festplatte abgefallen sein.

  12. dckiCGADPZ46o3Wm
    dckiCGADPZ46o3Wm
    iDQ2bprwuu3KyCDV
    keP21ltrHWHqJSSX
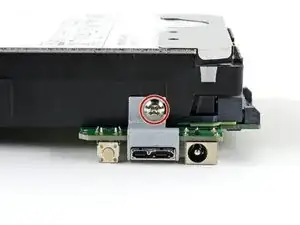
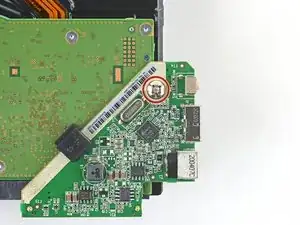
    • Benutze einen Kreuzschlitzschraubendreher (PH), um die 8,8 mm lange Schraube zu entfernen, die die kleine Metallklammer der Platine mit der Festplatte verbindet.

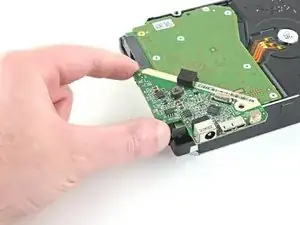
    • Entferne die Metallklammer.

  13. C3dmb2DlDF5KYaKK
    C3dmb2DlDF5KYaKK
    YSjxJDvScqYV4ipD
    Dx5jIFpWWHBnSxAX
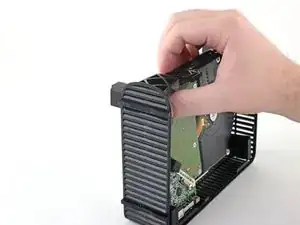
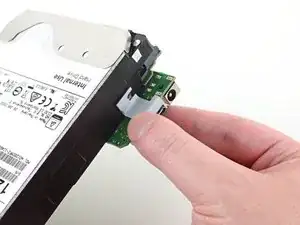
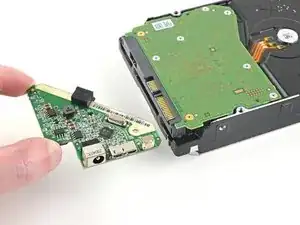
    • Benutze einen Kreuzschlitzschraubendreher (PH) um die 8,5mm lange Schraube zu lösen, die die Kontroll-Platine mit der Festplatte verbindet.

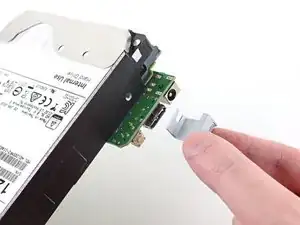
    • Schiebe die Kontroll-Platine gerade in Richtung Rückseite der Festplatte heraus, um sie zu entfernen.

    • Da die Platine mit den SATA- und Stromanschlüssen der Festplatte verbunden ist, wirst du beim Ausbau ein wenig Kraft aufwenden müssen.

  14. kGf6bjfZQhHAKvdf
    kGf6bjfZQhHAKvdf
    JjLLn5aZXVxaSTHU
Abschluss

Bewahre das Gehäuse - sowie alle Teile und Schrauben, die ihm beiliegen - bis zum Ablauf der Garantie auf. Entsorge sie danach [E-Waste|fachgerecht|new_window=true]. Du kannst sie auch den Leuten auf r/DataHoarder zur Wiederverwendung anbieten.

Um das Laufwerk und das Gehäuse wieder zusammenzubauen, befolge diese Anweisungen in umgekehrter Reihenfolge.

Craig Lloyd

Mitglied seit: 10/02/16

30062 Reputation

13 Kommentare

Can you recommend a Mac program for running a deep scan to check for bad sectors?

This article only gives two recommendations and they’re both for Windows :(

Martin -

I have a question. Is it possible to take a similar drive but smaller capacity like this about and turn it into a portable drive from it having to have a power supply?

Louis Wilson -

It is not possible. The problem is that a 3.5” disk drive (as used in the Elements drive) needs 12 V as well as 5 V, and they need more power than a USB socket can typically deliver. 2.5” disk drives operate from just a 5 V supply, and, having smaller disks inside, they use less power to start up, so they can be run completely through USB.

Andrew Morton -

Hi Craig! My PC sees it as Local Disc (E:) and wants to format it. Can’t do that! Is there a workaround? This was due to a power surge and I think it was just the adaptor power supply that got damaged. Running W10Home21H1 on Lenovo DESKTOP-699CIMO. Intel(R) Core(TM) i7-4790 CPU @ 3.60GHz 3.60 GHz 16,0GB 64bits Any ideas would be greatly appreciated! Cheers, Marco

Marco66 -

On Step 14, you see there are no screws to take the HDD cover off. How do you take the cover off the HDD to get inside?

Nathan -

lol + other characters to allow comment

Jerry Attric -

I have a WD element 4T and it will not power up. New cable and power adapter. It was stabilized in one spot for over a year, powered up just to store my movies. Plug it up after two weeks of none use and would not power up, no light inside. What can be done? My other storage drives work fine. By the way, you have the best directions on the web.

Tim Newton -

I just wrote you about WD Element, it is a 5.0TB Sata/64MB Cache, WD50EZRZ

WDBlue PC Hard Drive. It will not power up. I wonder if I can get a new USB controller board for it? I am only interested in getting information off of the hard drive. Can an "WEme USB 3.0 to SATA Converter Adapter for 2.5 3.5 Inch Hard Drive Disk SSD HDD" work to power it up to retrieve the Data?

Tim Newton -

Hey Tim, yeah so if you already tried a new power adapter, then it could be a bad controller board. If the drive is already shucked (or you don't mind shucking it), then you can get a SATA to USB adapter to see if the drive will boot up. That will at least rule out the USB controller board.

Craig Lloyd -

Very informative explenation wih clear pictures that show EXACLY in which direction to move the tool to safely detach the casing from the clips without breaking them, much better than most YouTube video's.

Only, I've used two old bank cards. That is i.m.o. much safer than using a metal knife or "Jimmy". With two plastic credit- or bank cards or two guitar picks it's almost impossible to damage the case.

Ruud Wilschut -

Thank you for the guide!

I found that I had a 3 TB Toshiba hdd lying around which I put in one of WD Elements enclosures I was about to recycle. Now I have a fully stacked NAS as well as an external hdd :)

And I'm keeping a controller board + wall wart to be used as simple usb-to-sata device.

Frida Mattias -

Hi.

Is possible on this box, change the HDD. For example. I have WD Elements to 4Tb and have another ( Seagate ) 12Tb and I thinking to change the HDD 4Tb for 12Tb using the same case.

Is possible?

Thanks a lot

Victor Santos -

Did it successfully with fairly limited experience of taking electronics apart (other than joycons a few times), didn't even break any clips. Worked fine for me installing it in a PC without taping over anything.

Jack Bailey -