Einleitung

Hast du vor Zorn deinen Xbox 360 Controller gegen deinen TV geworfen und nun ist die untere Gehäuseabdeckung kaputt? Diese Anleitung zeigt dir, wie du sie austauschen kannst.

  1. 2n5cabIuJELBKtCp
    2n5cabIuJELBKtCp
    BUPm4PuhYuAFY2QW
    • Drücke den Knopf am Batteriefach oben am Controller.

    • Entferne das Batteriefach vom Controller.

    • In der normalen Konfiguration verfügt der Xbox 360 Wireless-Controller über AA-Batterien. Eine aufladbare Batterie ist separat erhältlich, aber beide Optionen werden in der gleichen Weise vom Controller entfernt.

  2. pimpfi2dSiLdSctG
    • Benutze eine Pinzette, um den Barcode-Aufkleber aus dem Batteriefach abzulösen.

  3. 2oj6VAsZhlhMMnCo
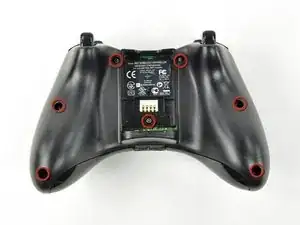
    • Entferne die sieben 9,3 mm T8 Security Torx Schrauben, welche das rückwärtige Gehäuse an das vordere befestigen.

    Any recommendation on which set of Security Torx tools to use? I've already purchased 2 kits, one of those being sold as "Xbox controller tools" but the diameter of the head does not fit the hole on the controller and that's critical for the 2 screws on the bottom. The tools must obviously be thinner in diameter and long enough to get there.

    Arnie -

    How to open an XBOX 360 controller without a special screwdriver. http://www.instructables.com/id/How-to-o... Works perfectly.

    Louis -

    A lot of thanks for your comment. It's very usefull

    Echedey -

    I picked up a handy torx key set from Auto Zone. Was about $10, no lose driver bits. has both sizes you need to repair the controller and the console. Here's the link:

    http://www.autozone.com/autozone/accesso...

    FierDancr -

    It doesn't really matter which set of bits you by or what brand makes them, Torx bits (and the security versions of them) are generic & come in standardized sizes. You do not need a special "xbox" tool kit, you just need a size 8 torx security bit, no matter what brand makes the bit/kit. Those types of "specialty kits" are usually just collections of generic bits that you can buy at a hardware store in a regular bit set. The difference is that a general bit set will have bits for screws that a specific item doesn't have in it, whereas a specialty kit will only include bits for the types & sizes of fasteners used in the specified item.

    BTW, with the smaller sizes of torx security bits you can try breaking off the little post in the middle with needlenose pliers or something else that can fit in the there. Even if the post doesn't break off cleanly, it's usually short enough to fit a regular (non security) torx bit in the slot.

    Nerfbomb -

  4. 5xJkNxt3DoRVp311
    5xJkNxt3DoRVp311
    fvxUv5tSWmCC3oiH
    • Führe einen Spudger zwischen rückwärtigem und vorderem Gehäuseteil entlang der linken Kante des Controllers ein.

    • Drehe den Spudger in Richtung der Vorderseite des Controllers, um die beiden Gehäuseteile voneinander zu trennen.

  5. Hjf1LBWjF1OCx4jr
    Hjf1LBWjF1OCx4jr
    IUQrUiO6ZuHAHYjg
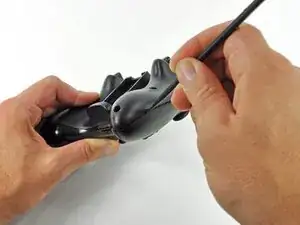
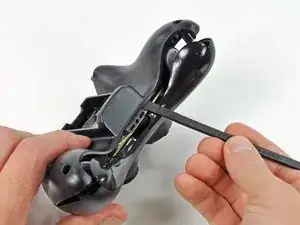
    • Führe einen weiteren Spudger zwischen das rückwärtige und das vordere Gehäuse, nahe des Kopfhöreranschlusses, ein.

    • Drehe den Spudger in Richtung der Vorderseite des Controllers, um die beiden Gehäuseteile voneinander zu trennen.

  6. Oxa5mcnVgNQhStdu
    Oxa5mcnVgNQhStdu
    tB2epfsiXDTCQR4Q
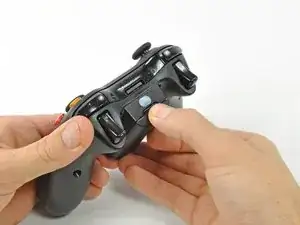
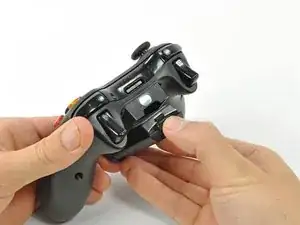
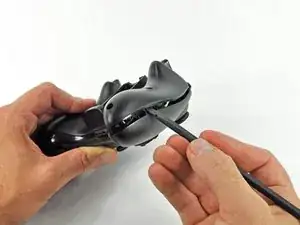
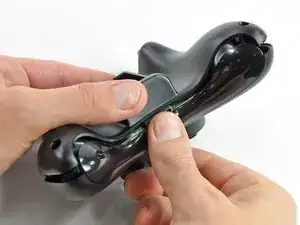
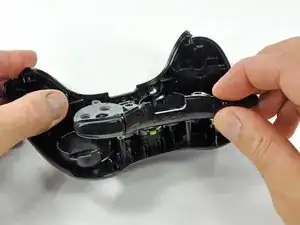
    • Halte den Controller am Batteriefach und am Kopfhöreranschluss.

    • Hebe das Batteriefach weg vom Kopfhöreranschluss und trenne so das rückwärtige Gehäuse vom vorderen Gehäuse sowie dem Logic Board.

    • Die Federn, welche den Kontakt zu den Batterien herstellen, werden durch Slots im Batteriefach an ihrem Platz gehalten. Gehe sicher, dass du diese beim Zusammenbau wieder richtig zusammensteckst!

    The RB / LB bar will fall away easily as you handle the upper case and logic board; just be prepared for it.

    knoxco -

  7. M2UEQAZJeM5rOiCR
    M2UEQAZJeM5rOiCR
    qaiKdyJ3vSKCYkTc
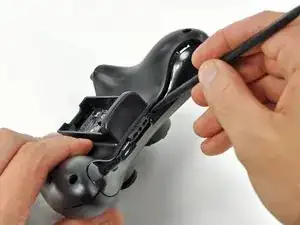
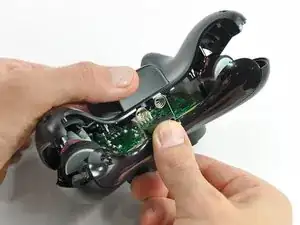
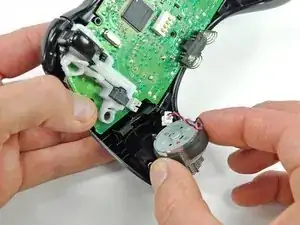
    • Hebe das Kabel des Vibrationsmotors mit dem flachen Ende eines Spudger aus dem Anschluss auf dem Logic Board nach oben und trenne es ab.

    • Hebe den Vibrationsmotor aus dem vorderen Gehäuse heraus.

  8. DwvbBJCujyqTVqaw
    DwvbBJCujyqTVqaw
    xyJQNWVVyfPRslva
    • Entferne auf gleiche Weise den Vibrationsmotor von der anderen Seite des Controllers.

    • Der rechte Motor hat deutlich mehr Schwungmasse als der linke.

    The opposite was true for the controller I just opened. It was the left motor counterweight (as you hold the controller normally) which had more weight. Perhaps it doesn't matter which goes where?

    Bob S -

    For anyone reading this in the future, it does matter. The way you had them originally is the correct way.

    Yado Nada -

  9. VBiVykaL6Mge6Qlf
    VBiVykaL6Mge6Qlf
    cmQQUXvmDOTRL1wK
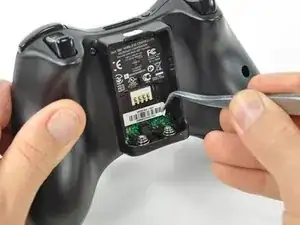
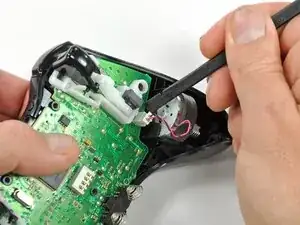
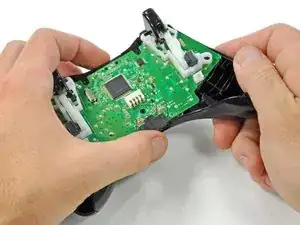
    • Fasse das Logic Board an der Kopfhörerbuchse und Versorgungsbuchse an, hebe es hoch und entferne es vom vorderen Gehäuse.

    What if you're having difficulty taking the logic board out?

    Xander Uchida -

    In my experience with my controller, the logic board lifts out very easily, there are no tabs or fasteners holding it in.

    So, if you're having difficulty taking the logic board out, call a friend with average hand dexterity & motor skills to do it for you.

    Nerfbomb -

    If the controller is a bit old, the center plastic screw holder might have swollen and will need a little stenght to release the logic board.

    RoFixedIt -

  10. sT5WwHWC1VjwKrek
    sT5WwHWC1VjwKrek
    FPwGi1Vt1ZtNxcOP
    • Hebe das Bumper-Panel aus dem vorderen Gehäuse heraus.

  11. lvNgY2Q1OwJGqGia
    • Entferne die Gummimatte von der Rückseite des Steuerkreuzes (D-Pad).

  12. XdWFcHsh6LeoRTrc
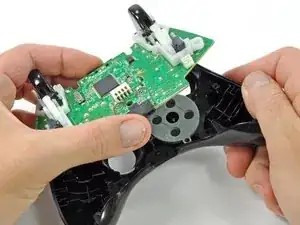
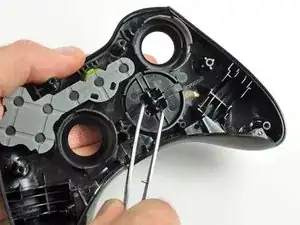
    • Entferne die beiden silberfarbenen 7 mm Kreuzschlitzschrauben von der Rückseite des Steuerkreuzes (D-Pad).

  13. PTyQBcfGAQWcLS4H
    PTyQBcfGAQWcLS4H
    ITP2S3q3WvxDwjZf
    • Das Steuerkreuz (D-Pad) ist an seiner Abdeckung mit zwei diagonal angebrachten Rasten befestig, hier rot markiert.

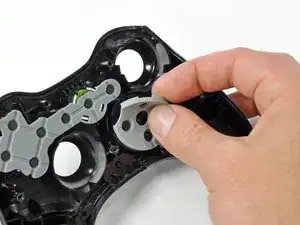
    • Drücke die beiden Rasten mit einer Pinzette zusammen und löse das Steuerkreuz von seiner Abdeckung ab.

  14. 5DxWF4RZ6TtGWiQU
    5DxWF4RZ6TtGWiQU
    QwKc5KdH3XRFqtCs
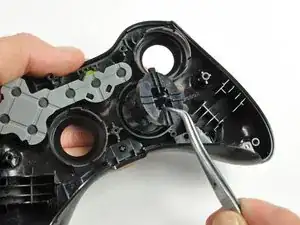
    • Hebe die Abdeckung des Steuerkreuzes (D-Pad) aus seinem Fach im vorderen Gehäuse heraus.

    • Das Steuerkreuz bleibt unter dem vorderen Gehäuse liegen.

    • Das Steuerkreuz fällt heraus, wenn du die Abdeckung entfernst. Unterstütze es deswegen, wenn du die Abdeckung herausholt.

    • Die Abdeckung ist in Schlitzen im Fach geführt, so dass es immer korrekt ausgerichtet bleibt.

  15. p3OxTGCHZVXaemTy
    • Entferne die Gummimatte von der Rückseite der Eingabetasten.

  16. xkrdsBLXvqvEVNmY
    xkrdsBLXvqvEVNmY
    NwWFfis3ZnmRVHxG
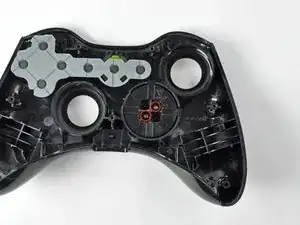
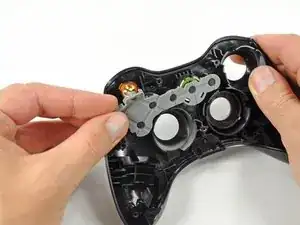
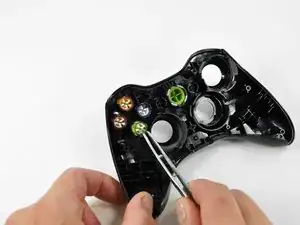
    • Entferne folgende Tasten mit einer Pinzette vom vorderen Gehäuse:

    • A-Taste

    • B-Taste

    • X-Taste

    • Y-Taste

    • Starttaste

    • Auswahltaste

    • Guide-Taste

  17. iGbIIv12iUZVHshq
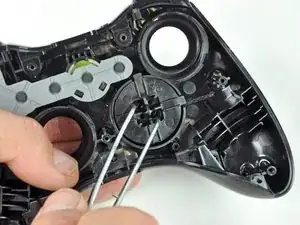
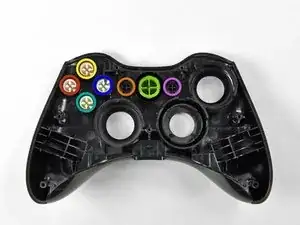
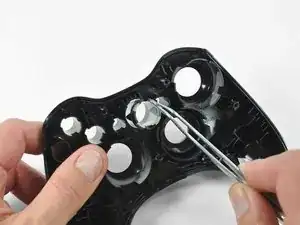
    • Hebe den LED Ring des Home Buttons mit einer Pinzette aus dem vorderen Gehäuse des Controllers heraus.

  18. QIfJvnQSpCoVOQTZ
    QIfJvnQSpCoVOQTZ
    1rIKKSJm2JVTdHbs
    PPcYbDXx3CSsaoI3
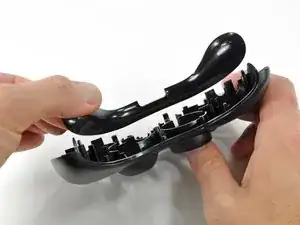
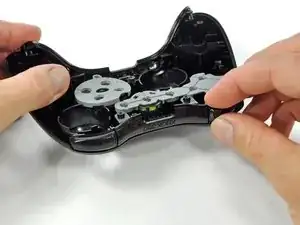
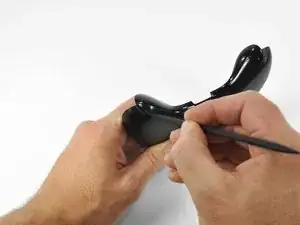
    • Setze einen Spudger zwischen dem oberen und unteren Gehäuseteil ein.

    • Schiebe den Spudger im Spalt zwischen den beiden Gehäusteilen um das Gehäuse herum.

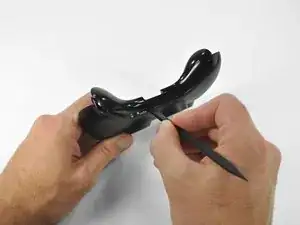
    • Hebe das untere Gehäuse vom vorderen Gehäuse ab.

Abschluss

Um dein Gerät wieder zusammenbauen, folge den Schritten in umgekehrter Reihenfolge.

Brett Hartt

Mitglied seit: 13/04/10

125814 Reputation

Ein Kommentar

I have 2 remote controllers of X box one which is not working.

ravi.gopalakrishnan -