Einleitung

'''Diese Anleitung zeigt nur, wie du das optische Laufwerk entfernen kannst.

'''

Die XBox 360 ist so entwickelt worden, dass sie nur mit dem im Werk eingebauten DVD Laufwerk arbeitet. Wenn du das DVD Laufwerk durch ein anderes ersetzt, wird dieses nicht funktionieren, da das Ersatzlaufwerk einen anderen DVD Schlüssel hat, den die Spielkonsole nicht annehmen wird.

  1. yMUJPMnCJJuiSO6X
    yMUJPMnCJJuiSO6X
    14IrWYZVEVr1aEfS
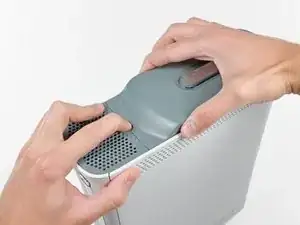
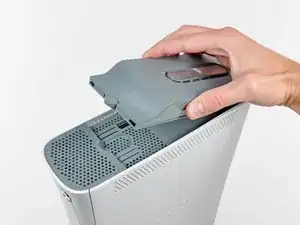
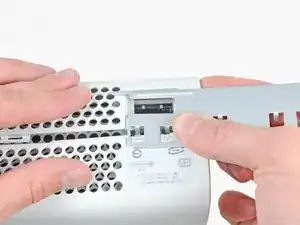
    • Greife die Festplatteneinheit mit einer Hand und drücke mit der anderen den kleinen Hebel, während du die Festplatteneinheit nach oben hebst.

    • Nimm die Festplatteneinheit von der Konsole.

    WARNING: Just replacing the drive will not make it work correctly. Microsoft has married the drives to the motherboard. Hence, in order to get full operation out of the drive you'll have to perform more steps not listed here. Search in the FAQ on this specific topic for more details. Otherwise, before buying a new drive, try cleaning the inside of the old one and/or replace the belt involved in opening and closing the drive door.

    - Good Luck

    Eric -

    Thanks..helped!

    joseph zulu -

    bress the button and lift with the same hand! i thought mine was stuck because of this pic!!!

    Maths with Luigi -

  2. J6CIpEaLOoYAQHxb
    • Stelle die Konsole auf den Kopf, sodass die Unterseite nach oben zeigt.

    • Während der folgenden Anweisungen kann auch ein Xbox 360 Opening Tool anstelle des Spudgers verwendet werden.

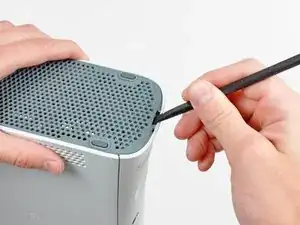
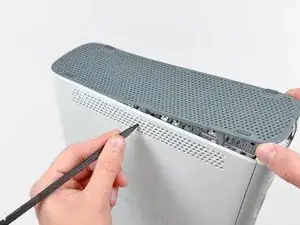
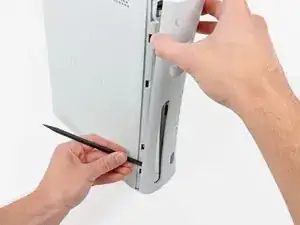
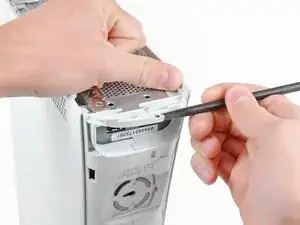
    • Führe das flache Ende eines Spudgers oder die Kante eines Xbox 360 opening tools in den kleinen Schlitz an der Seite des Front Pannels in der Unterseite.

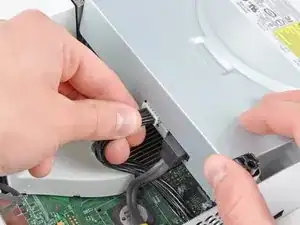
    • Hebel die vordere Kante des Lüfters weg von der Frontplatte.

    You can avoid this step by pulling the front cover off. Just make sure you don't break the springs for the USB bay area.

    Repair Doctor -

    Hello, thank you ifix for this guide, I followed this guide, I got stuck at some point but I resolved it. Also I want to share this resource: Step by Step guide to fix Xbox 360 errors it helped me go through all the things associated with Xbox 360 and the troubleshooting of errors. Hope this can also help you all.

    Christopher Sage -

  3. ELe3ImNHnfjH5CMS
    ELe3ImNHnfjH5CMS
    XlYWdcnwtOrB1W3S
    NJBPRBLSExTr3Den
    • In den nächsten Schritten, nutze die Spitze eines Spudgers oder den Stift eines Xbox 360 opening tools um die Klammern entlang der Abdeckung zu lösen. Ihre Positionen sind rot markiert.

    • Führe das Werkzeug in die Löcher der weißen Plastik-Seitenabdeckung ein.

  4. MacUdYZ1EwkBWQmW
    MacUdYZ1EwkBWQmW
    kL3iWK2V1YIMoyBX
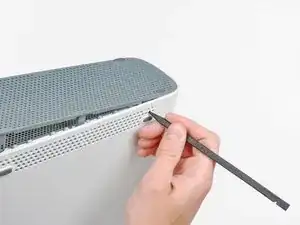
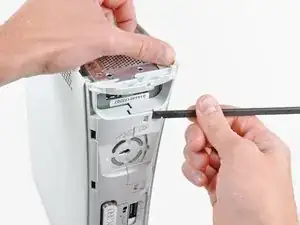
    • Um die Klammern zu lösen, arbeite dich von der Vorder- zur Hinterseite der Lüftereinheit entlang.

    • Während du die Bodenabdeckung leicht anhebst, nutze die Spitze eines Spudgers um die Klammern zu lösen.

  5. vPypAIcA45sMw4Y4
    vPypAIcA45sMw4Y4
    o6vXGPFRiS5OhrXC
    • Wiederhole den selben Schritt mit den mittleren Klammern.

  6. HS2EJegmA2DGOAE1
    HS2EJegmA2DGOAE1
    3VgWioIEgIExHeDa
    • Nun fehlen nur noch die hinteren zwei Klammern um den Lüfter herauszunehmen.

  7. IIcCSDqQGMSuBFJW
    • Hebe den Lüfter aus dem Gehäuse.

  8. K34QYfxVrrftatym
    K34QYfxVrrftatym
    ytuwV2efqMfxRndW
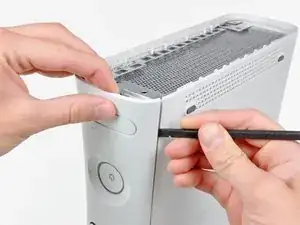
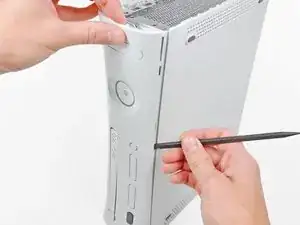
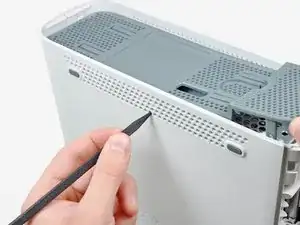
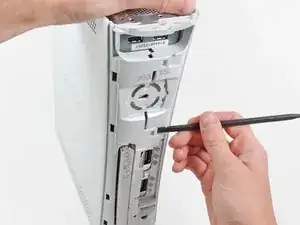
    • Führe die flache Seite eines Spudgers zwischen der Frontabdeckung und der Außenhülle, nahe des An/Aus-Schalters, ein.

    • Führe den Spudger entlang der Kante der Frontabdeckung um die Klammern zu lösen, die sie an der Konsole halten.

    • Dieser Schritt ist auch mit einem Xbox 360 Opening Tool möglich, zerkratzt allerdings evtl. die Plastikabdeckung.

    • Alternativ kannst du auch deine Hände verwenden.

    The faceplate just pulls off, using a tool is completely unneccessary. https://beta.support.xbox.com/help/xbox-...

    Erik Tomlinson -

  9. xM4CxhxJnIT4eHCA
    • Wiederhole den selben Ablauf an der anderen Seite der Frontabdeckung.

  10. uqjqI2HkmxeYCGNH
    • Entferne die Frontabdeckung.

  11. HMMFtOmkPd6YTvo4
    HMMFtOmkPd6YTvo4
    CM3dOusgANm2syl1
    • Stelle die Konsole aufrecht hin mit der Oberseite nach oben.

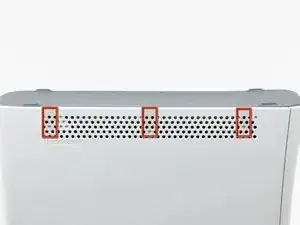
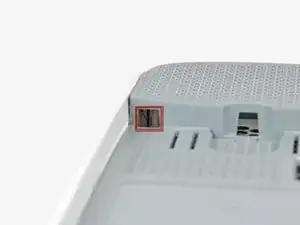
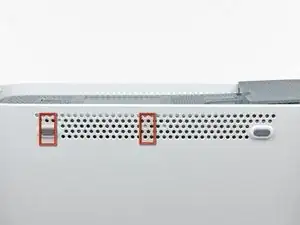
    • Die obere Lüftereinheit wird mit Klammern in der Konsole gehalten. Die ersten zwei sind hier rot markiert.

  12. hLQONPwYWw5wwuku
    hLQONPwYWw5wwuku
    vG3S2NKpGQNSJi2m
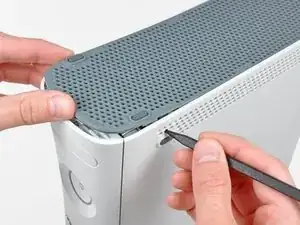
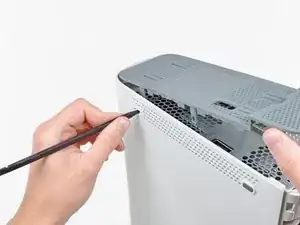
    • Führe das flache Ende eines Spudgers in die kleine, bereits erwähnte, Öffnung ein um die Klammern zu lösen.

    • Dieser Schritt lässt sich auch mit dem Stift eines Xbox 360 Opening tools durchführen.

    I found it easier to open these clips using the pointy end of the spudger rather than the flat end. Just slide it in against the side of the case and the clip will pop off.

    dave -

  13. Jcd3cuuefWPTrKGO
    Jcd3cuuefWPTrKGO
    ESFwEvEAkCyE1Y51
    GHihpIrQVQUlSBCN
    • In den nächsten Schritten, verwende die Spitze eines Spudgers oder den Stift eines Xbox 360 opening tools, um die Klammern an der Oberseite der Seitenabdeckungen zu lösen.

  14. cLODuehWcnPCYpHx
    cLODuehWcnPCYpHx
    ZNDntxLmkPnmgeDd
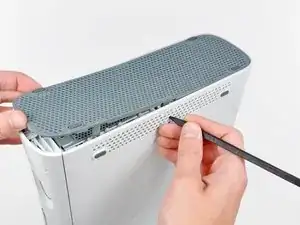
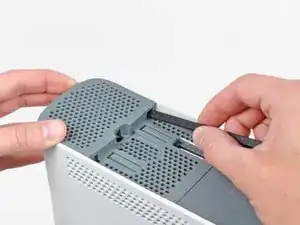
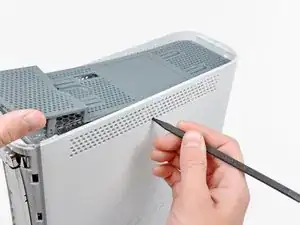
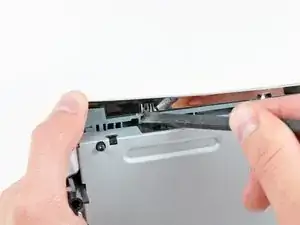
    • Um die Klammern zu lösen, beginne in der Mitte der oberen Lüftereinheit.

    • Während du leicht die Kante der Lüftereinheit anhebst, nutze die Spitze eines Spudgers um die Klammern in der oberen Mitte der Seitenabdeckung hineinzudrücken um sie zu lösen.

  15. 3NS6J5nJKAOQxDdZ
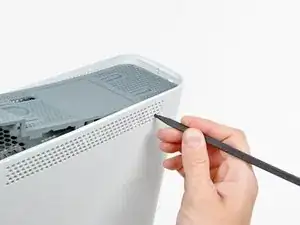
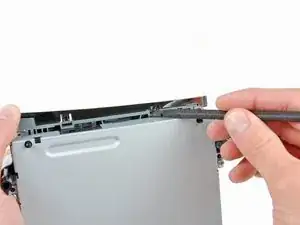
    • Nutze die Spitze eines Spudgers um die Klammern an der hinteren Seite der oberen Lüftereinheit zu lösen.

  16. satartHPCh3cCoKK
    satartHPCh3cCoKK
    pfYZbHEZFGAGpkAw
    • Die letzte Klammer ist unter dem Gummifuß am hinteren Teil der Konsole versteckt.

    • Nutze die Spitze deines Spudgers um die Klammer an der hinteren Seite der oberen Lüftereinheit zu lösen.

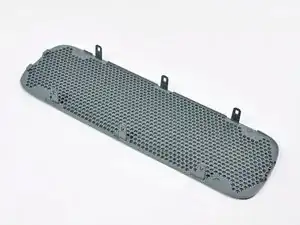
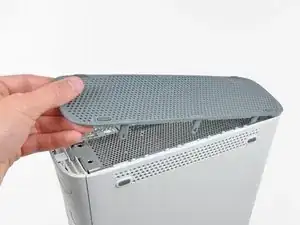
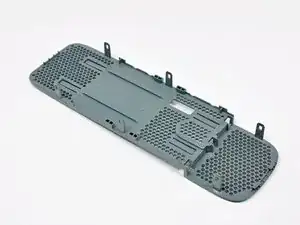
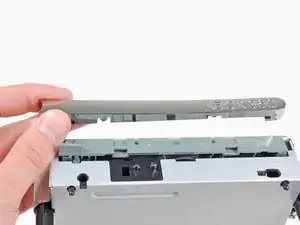
    • Entferne die obere Lüftereinheit.

  17. IyFVa2YVF16dYNPr
    • Um fortzufahren, musst du den Garantiesticker von der Konsole abziehen. Dadurch erlischt die Garantie der Konsole. Fortfahren auf eigene Gefahr.

    • Siehe vorsichtig den Sticker von der Konsole ab.

    There is an alternate to breaking the seal. If you open the back first starting with the opposite side of the sticker you can get the rear to "Clam Open" retaining the seal.

    Eric -

    LOL “Romove the warenty seal”

    Alexander Wiand -

  18. bfLLW2eb1mul2OvC
    bfLLW2eb1mul2OvC
    nGyMgcPrm6q5alKf
    PatF4YGqcIFHXTGM
    • Die obere und untere Abdeckung der Konsole sind mit mehreren Verriegelungen befestigt. Diese Verriegelungen müssen gelöst werden um die obere und untere Abdeckung von der Konsole zu nehmen.

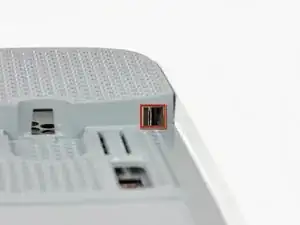
    • Nutze das flache Ende eines Spudgers um die folgenden Verriegelungen zu lösen:

    • Über dem Front-USB Port

    • Unter dem Front-USB Port

    • Über den Speicherkarten-Schlitzen.

  19. 3xXd6DhVwt4ibPIW
    • Führe das flache Ende eines Spudgers in der Verriegelung über der Eject-Taste ein und hebel nach oben um die letzte Verriegelung zu lösen.

  20. G54PXDV62XGnhhuV
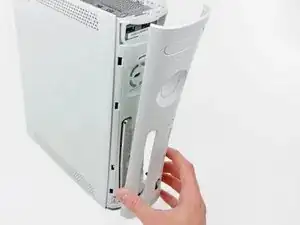
    • Hebe vorsichtig die vordere Kante der Seitenabdeckung an, um sicherzustellen, dass die Verriegelungen an der Vorderseite komplett gelöst sind.

  21. xCaY2FIFFFI4Isfv
    xCaY2FIFFFI4Isfv
    RSrCtVYWkTQCbQaq
    • Die obere und untere Seite der Hülle werden zusammengehalten von 7 weiteren Verriegelungen auf der Rückseite der Konsole. Ihre Positionen sind rot markiert.

  22. Yujni1lYPGpADBlS
    Yujni1lYPGpADBlS
    kOdJT5HjlrWoW44h
    FaKq6NRVtQOZjelM
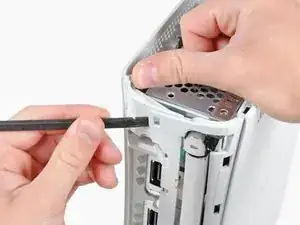
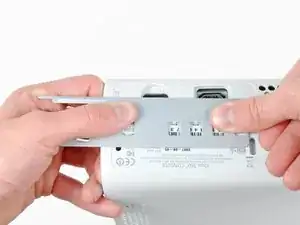
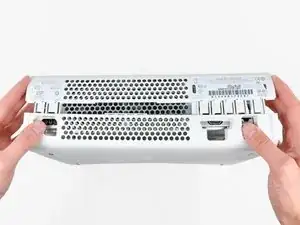
    • Drücke das Xbox 360 Opening Tool in die Schlitze für die Klammern, die Ober- und Unterseite verbinden in der Nähe der I/O Ports.

    • Während du das Opening Tool in die Xbox drückst, drücke die obere und untere Hülle auseinander um die Klammern zu lösen.

    I didn't have an XBox tool, so I followed instructions in this video for this step (https://www.youtube.com/watch?v=qaxIB6cX...) to pry it open with your fingers and a screwdriver.

    Nick Karnik -

    The small (metal) women's hair clip is best for un-latching the tabs. The screw drivers just make the holes bigger.

    Denny Ross -

    You can also use the pointed end of a plastic spudger to push each clip free while you separate the case with your free hand.

    Michael Carson -

  23. IAAAOka4GMbPLtIU
    IAAAOka4GMbPLtIU
    r1n4vHDX1G6iMJg5
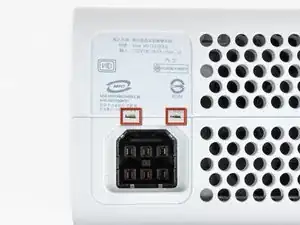
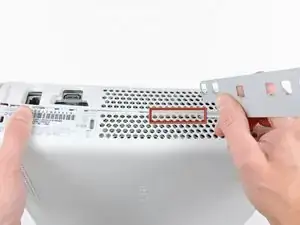
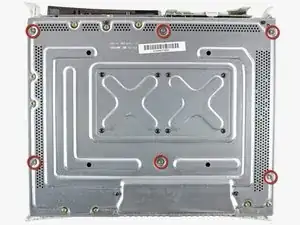
    • Während du die obere und untere Hülle auseinander drückst, nutze die Spitze eines Spudgers oder den Stift eines Xbox 360 Opening Tools um die lange Klammer (rot markiert) in das Gehäuse zu drücken.

    • Die Klammer löst sich und hinterlässt die Klammern in der Nähe des Stromanschlusses als einzige Klammern zurück, die die Gehäuseteile verbinden.

  24. ONLOcaEGdYN5F5XJ
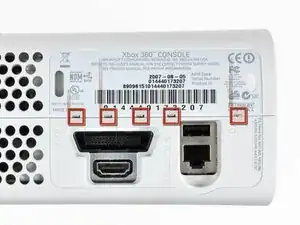
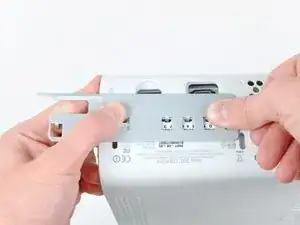
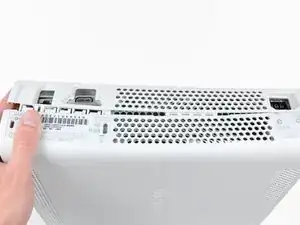
    • Drück das Xbox 360 Opening Tool unten in die zwei verbleibenden Schlitze um die Klammern in der Nähe der Stromverbindung zu trennen.

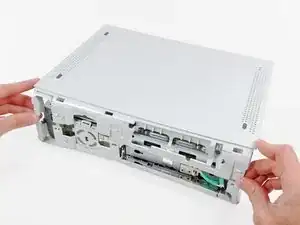
    • Drücke die beiden Gehäuseteile auseinander um sie komplett voneinander zu trennen.

  25. jrKfppdCFKeYeJTs
    • Positioniere die Konsole so, dass die Frontseite nach unten zeigt.

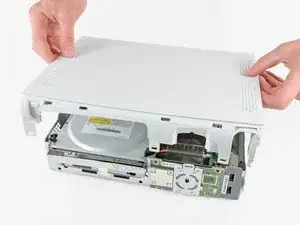
    • Greife den hinteren Teil der Rückseite und hebe ihn an um ihn von der Konsole zu trennen.

    • Sei vorsichtig, die untere Gehäuseabdeckung nicht zu weit zu biegen. Sie kann leicht brechen.

  26. vKpq2mTLPKe6FEdf
    vKpq2mTLPKe6FEdf
    hPMYNsCmxTPh1auj
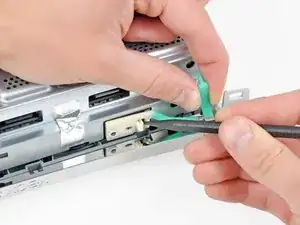
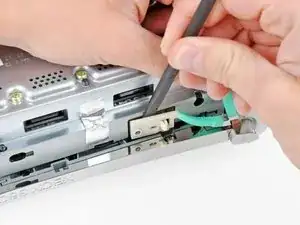
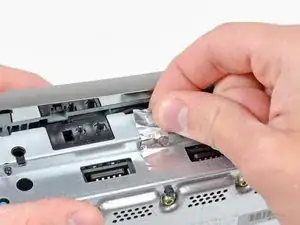
    • Verwende die Spitze eines Spudgers um die Klemme, die den Auswurfknopf festhält, aus dem Metallgehäuse zu lösen.

    • Führe die Flache Seite des Spudgers zwischen die Auswurftaste und das optische Laufwerk ein.

    • Hebel die Auswurftaste aus ihren letzten Verankerungen und nimm sie heraus.

    • Alle Schritte lassen sich auch mit einem Xbox 360 Opening Tool anstelle des Spudgers durchführen.

  27. xWrVtTRiATabXKR5
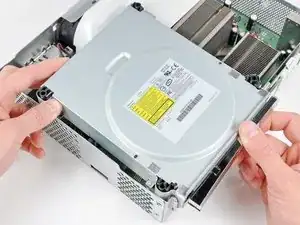
    • Drehe die 6 silbernen 64 mm T10 Torx Schrauben heraus, die die obere Abdeckung am Metallgehäuse halten.

  28. xK4P5MWDdRargYm4
    • Drehe die Konsole so, dass die obere Abdeckung nach oben zeigt.

    • Hebe die obere Abdeckung nach oben um sie von der Konsole zu trennen.

  29. MZPUUJVPxxANUeoT
    • Zieh die silbrige Klebefolie ab, die das optische Laufwerk am Gehäuse festhält.

    Does anyone know if the Silver Tape is Lead Tape?

    Sean -

  30. ZtSZCTiWnI1mFySC
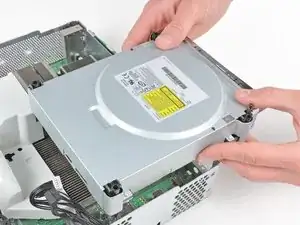
    • Hebe das optische Laufwerk leicht nach oben um an das SATA Kabel und das Stromkabel des Laufwerks heranzukommen. Die Kabel befinden sich auf der Rückseite des optischen Laufwerks.

    • Versuche nicht, das Laufwerk jetzt schon herauszunehmen. Es ist noch durch zwei weiter Kabel mit dem Motherboard verbunden.

  31. aP5BgixloKHsaQOB
    aP5BgixloKHsaQOB
    bFYsJNjL6UUJtumE
    • Greife das Stromkabel kurz hinter seinem Stecker und zieh es gerade aus dem optischen Laufwerk heraus.

    • Greife das SATA-Kabel am Stecker und ziehe es gerade aus dem optischen Laufwerk heraus.

    I found the power cable to be very tough to get out, at least it is the first time doing this.

    Nick Flacco -

  32. NlR5YgLZKUOY6y2G
    • Hebe das optische Laufwerk aus dem Metallgehäuse heraus.

    Be careful not to lose or break the two teeny metal clips securing the optical drive assembly snugly to the metal casing on either side of the drive's front face. I used a spudger to press in the topmost tines on these clips because they were catching on the drive and bending up. The clips should stay on the metal housing, not come off with the drive.

    Vaughn Baker -

  33. cQCjShViScyHMfJf
    cQCjShViScyHMfJf
    sLNNFLmrJAXxqRSK
    • Drücke die Abdeckung des optischen Laufwerks zur Oberseite des Laufwerks hin und löse gleichzeitig mit dem flachen Ende des Spudgers die beiden Rasten an der Unterseite der Abdeckung.

    Ignore this step.

    Wade -

  34. MDY1gUIs1fcEEWLx
    • Entferne die Abdeckung des optischen Laufwerks.

    • Das optische Laufwerk bleibt zurück.

    Ignore this step.

    Wade -

Abschluss

Um dein Gerät wieder zusammenzusetzen, folge den Schritten in umgekehrter Reihenfolge.

Walter Galan

685540 Reputation

23 Kommentare

who knows xbox360 can use desktop drives?We have all kinds of drives,but i am not sure if it is fit for xbox360.

Thanks

Rex Yang -

That has nothing to do with this guide. If you have any question regarding this equipment, go to the answer section.

oldturkey03 -

General comment, you make no mention of removing the PCB from the DVD drive if it's being replaced. Any particular reason for that?

Pete B -

Very easy to follow, got my drive fixed...thanks!

Brian Davis -

" Replacing a defective optical drive with a replacement optical drive does not work. The replacement will have a different DVD drive key, which the game console will not accept."

Not entirely accurate, that statement.

Having fixed a PS3 blu-ray drive by following the excellent guide on here, tried the same technique.

I had a bad drive in my xbox, and I replaced it with a new drive (of the same type). I took the daughter-board from the faulty drive and transplanted it to the good drive. It involved stripping down both drives, disconnecting 2 ribbon cables and unsoldering about 8 wires, transplanting the daughter-board - and resoldering the wires. Then reassembling. It worked for me, anyway.

Dave -

Sounds like an extremely patience depleting process.

brandonowlgarden -

I did this once on one of the newer 360s that are more basic, with help from someone , using scissors.

brandonowlgarden -

I am getting the famed red ring of death now...it there any troubleshooting I can do to fix this? I followed all steps and made sure that each wire mirrored the old unit.

Dereck Reeves -

you actually can swap the drives out pretty easy. you just rip the key off of the old drive and flash it on the new one. you have to make sure you purchase the same drive model and the use jungle flasher. would they allow an extraction and flashing guide on here? and while you are at it, you can mod them pretty easy as well ;)

daniel sawyer -

How come you do not have the instruction for replacing the laser?

CesarHEB -

How come Ifit it does not have intructions for replacing the XBOX360 LASER?

CesarHEB -

Because, You cannot replace the laser without replacing the drive. It is not possible to replace the laser.

brandonowlgarden -

No instructions on how to replace the PCB or what kind of drives there are?

xChrisS41x -

Great instrucitons

Thomas -

So easy a GIRL can do it! Thanks!

Lynn Sailor -

This guide is incomplete thus the pictured console wont work upon drive replacement. Please finish the steps for flashing for they are a very required step in replacing the drive at all.

Wayne Urban -

Author just ended the repair when there were more steps needed lol. I have done so many of these repairs and it shouldn’t be in the difficult section. If the PCB is ok, just swap it into a different drive deck you know that works. If your PCB is broken , you will need an X360 USB Pro and 3rd part software to extract the key and flash it and original firmware to the new PCB. I should update this tutorial for it is pretty weak.

toreskey -

What kept you from fulfilling your proclamation?

Kai und der Andere -

I realize my 360 is old but I cannot afford to replace it with the one. I replaced the dvd drive and same wont read problem, so I swapped the old board with the new and verified it is the board that is bad, not the drive itself.  Now what do I do? Give up and scrap it? How expensive is the fix to replace the board? Are the parts still available? Im not concerned with the technical difficulty.

Kevin InFlorida -

This guide sucks. He says you cant swap the disc drives without the logic board or it wont work. Then proceeds to swap the drive but doesnt actually show anything about swapping boards too lol

So people will follow this guide and miss a huge key part, thus ending with a nonworking disc drive lol

Crap guide.

gameskeet -

It's right there in the header section. It literally says that this guide is ONLY about taking out (and in reverse order putting back in) the optical drive and that, for a new drive to work, it wont work without extra steps. So only very inattentive people will end with a nonworking drive.

But instead of contributing and adding a corresponding guide on how to exchange the logic board in the drive you chose to nag and have a whinge.

Crap comment.

Kai und der Andere -

Thank you so much. I was able to fix my Xbox 360

Kimberly StClair -

You will have to transfer the daughterboard.

PRAM Colfax -