Einleitung
Diese Anleitung kann als Grundlage für die Reparatur oder den Austausch von Teilen auf dem Elite Series 2 Controller verwendet werden.
Werkzeuge
-
-
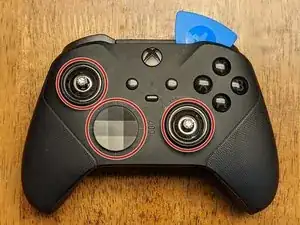
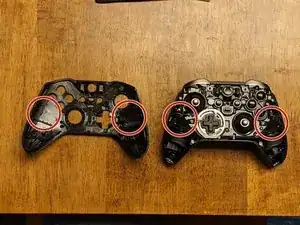
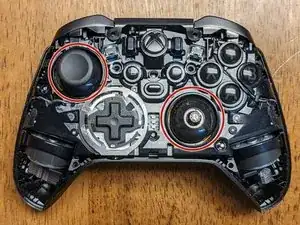
Anders als bei dem Vorgängermodell muss die Frontplatte zuerst entfernt werden. Entferne zunächst die Joystickkappen und die D-Pad-Abdeckung.
-
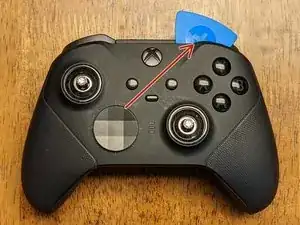
Sobald diese entfernt sind, kannst du anfangen, dich mit einem Öffnungswerkzeug und Plektren rund um die Frontplatte zu arbeiten. Beginne oben links oder oben rechts.
-
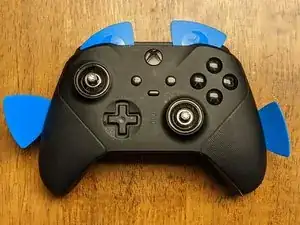
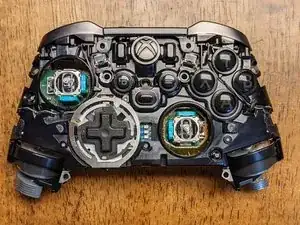
Arbeite dich langsam um die Frontplatte herum, um die Clips zu lösen. Verwende vor allem Kunststoff-Öffnungswerkzeuge, um Beschädigungen der Frontplatte und der Innenteile zu vermeiden.
-
-
-
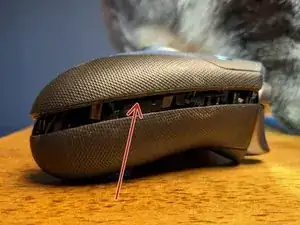
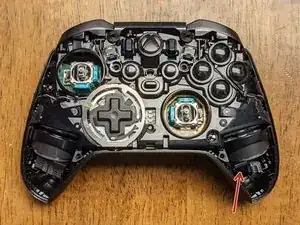
Das Frontpanel ist das einzige Teil, zu dessen Ausbau ich einen Metallwerkzeug zum Hebeln empfehlen würde, da der Kleber ein kräftiges Werkzeug erfordert.
-
Setze das Werkzeug an der angezeigten Stelle ein, aber nur so tief, wie zum Hebeln nötig ist. Arbeite sorgfältig und langsam, damit nichts beschädigt wird.
-
Der Kleber befindet sich in zwei Bereichen. Da er für die IP68 Klassifizierung nicht notwendig ist, braucht er nicht ersetzt zu werden.
-
-
-
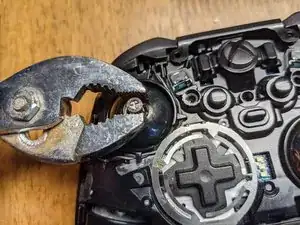
Die Joysticks sind unten an den Potentiometern festgeschraubt und sind nicht ganz leicht zu entfernen. Sie müssen gegen den Uhrzeigersinn mit einer der beiden folgenden Methoden ausgebaut werden:
-
Methode 1, mit Hilfe der Kappe: - Versuche es auf jeden Fall erst so, die Gefahr einer Beschädigung ist geringer. Setze die Kappe des Joysticks auf und drehe ihn mit der Hand. Wenn er zu fest sitzt, Versuche es mit der nächsten Methode.
-
Methode 2, mit der Zange: - drücke den Joystick ganz unten gerade so fest zusammen, dass die Zange nicht abrutscht. Setze an der Abschrägung an, damit du die Zange so flach wie möglich halten kannst. Wenn der Joystick lose ist, fahre mit Methode 1 fort.
-
-
-
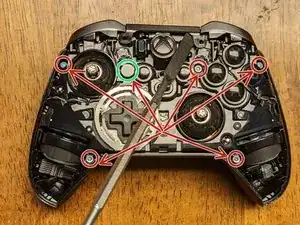
Entferne die sechs T-8 Sicherheitsschrauben, die die Vorder- und Rückseite des Controllers zusammenhalten. Hinweis: Eine Schraube (grün markiert) ist mit einer weissen Paste/Aufkleber bedeckt, die beim Entfernen bröckelt; so kannst du wissen, ob jemand dein Gerät zuvor zerlegt hat.
-
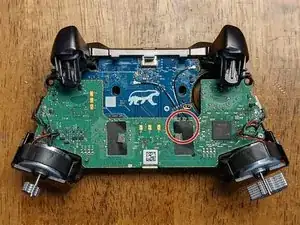
Sobald die Schrauben entfernt sind, kannst du einen Spudger unter einem Vibrationsmotor einsetzen, um durch die Hebelwirkung die Vorderseite von der Rückseite des Gerätes zu trennen.
-
Das dritte Bild zeigt die Vorderseite, die von der Rückseite abgenommen wurde.
-
-
-
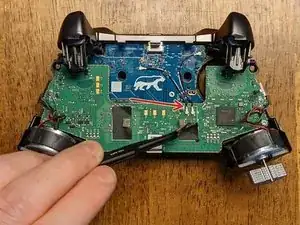
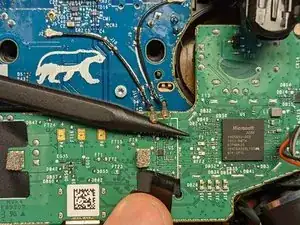
Beginne, indem du das Klebeband , das die Verbindung auf der grünen PCB abdeckt, abziehst (eine Pinzette könnte helfen).
-
Während du das Klebeband hältst, schiebe den spitzen Plastikspudger unter die Anschlüsse. Dies sollte ausreichen, um sie von der Platine zu lösen.
-
-
-
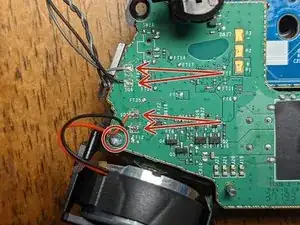
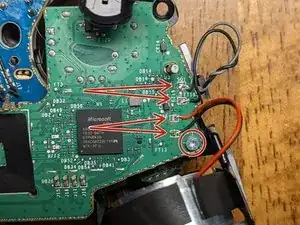
Die Drähte müssen von der Platine entlötet werden und werden später zur Wiedermontage ausgetauscht.
-
Hinweis: Bei jedem Kabelpaar ist das schwarze Kabel an die unteren Verbindung gelötet; merke dir dies dies für den Wiederzusammenbau, falls die Bilder aus dieser Anleitung nicht griffbereit sind.
-
Ein Teil des Löts in diesem Controller braucht eine sehr hohe Temperatur, um es zu lösen. Ich hatte mein Löteisen auf 450 C eingestellt, aber du kannst es vielleicht bei einer niedrigeren Temperatur entfernen.
-
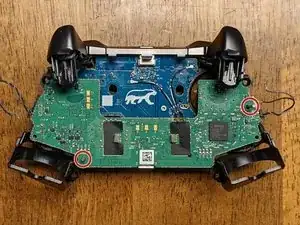
Entferne die beiden T-6 Schrauben von der Platine in der Nähe der Vibrationsmotoren.
-
-
-
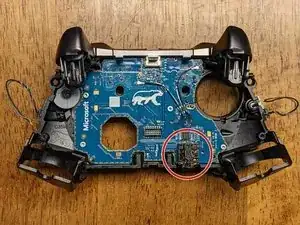
Beginne mit dem Ausbau der Hauptplatine, indem du sie entlang der Pins nach oben schiebst (wie im Bild gezeigt). Die linke Seite muss vom Stift abgehoben und das Board in einem leichten Winkel gegen den Uhrzeigersinn gedreht werden, bevor es vom rechten (längeren) Stift entfernt werden kann.
-
Die Trigger werden sich ein bisschen nach oben biegen, was etwas mehr Spielraum für das Board bietet. Sei, wie bei allem anderen bei dieser Demontage, vorsichtig und geduldig, um Schäden an einer der Komponenten zu vermeiden.
-
Sobald das Mainboard entfernt wurde, hast du vielleicht schon bemerkt, dass sich die Kopfhörerbuchse bewegt oder abgefallen ist, sofern sie nicht schon vorher entfernt wurde.
-
-
-
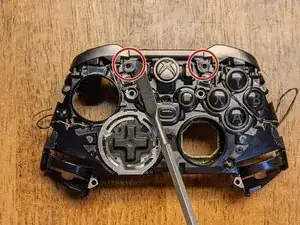
Es gibt zwei Laschen, die die Halterung für die Leiste halten. Löse diese mit einem Spudger sanft zu dir hin ab und sie rutschen dann durch ihrer eigenen Spannung nach oben. Hinweis: Die Halterung bleibt wahrscheinlich an dem Bumper-Aufbau befestigt, muss aber vor dem nächsten Schritt aus dem Controller entfernt werden.
-
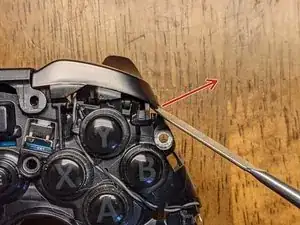
Sobald die Halterung gelöst wurde, benutze erneut den Spudger, um die Buttons vorsichtig nach außen und nach oben (in Richtung des Pfeils im Bild) zu ziehen, um sie von einem anderen Clip zu lösen. Wiederhole dies für beide Seiten.
-
-
-
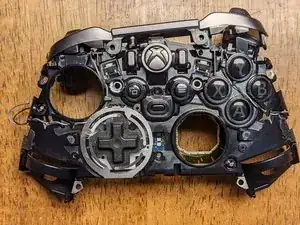
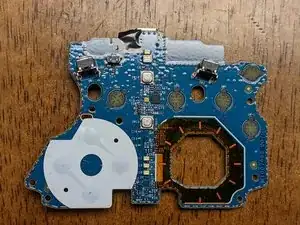
Entferne die vier T-6 Schrauben, die das Tochterboard im Rahmen des Controllers halten. Beachte, dass das PCB alle verbliebenen Tasten im Rahmen hält, pass also auf, dass diese beim Entfernen nicht verloren gehen.
-
Bemerkung: Alle Knöpfe haben Clips, die ein falsches Installieren verhindern; presse diese beim Wiederzusammenbauen daher nicht mit Gewalt in ihre Positionen.
-
Allgemein sollten beim Zusammenbau keine Teile mit übermäßiger Kraft installiert werden, da ein "Nichtpassen" eine falsche Installation aufzeigt.
-
Das war's! Hoffentlich hat diese Anleitung jegliche Reparatur ermöglicht, die vorgenommen werden sollte.
-
Um dein Gerät wieder zusammenzubauen, befolge diese Anweisungen in umgekehrter Reihenfolge.
8 Kommentare
Hi Wayne,
thank you for the guide.
I have an issue with my controller and I can’t find the answer anywhere so here’s hoping maybe you could help me.
In shortest trigger movement setting (hair triggers) I can press LT and the movement is restricted as it should but software doesn’t registered the button as fully pressed. In Xbox Accessories I can see that the controller thinks I’ve pressed the button at around 30%.
I assume this is a hardware issue but I’m not sure which part I should be looking at. I’m a beginner tinkerer :)
Off-hand, I don't know how the controller is doing this unless it's using 3 different potentiometers per trigger. I'd be willing to bet the problem is with software though because I've had the same problem in the past, but never really looked into it. I just checked mine now and it shows the hair-triggers to be working as expected in all positions; I checked these in both the Xbox Accessories app and Windows controller settings. Instead of tearing down the controller as a first step, I'd try checking for updates with everything: Xbox Accessories, Windows, the controller firmware, and the Windows driver for the controller specifically. If any of those have an update, restart your computer (after any single update) and then re-check all of them for updates again. If that doesn't work, let me know and I can try checking into my controller components to see what all compose the trigger assembly since I need to replace a couple of buttons that are wearing out anyway!
I have tried updating firmware of the gamepad but 5.11 and beyond does not really work well on Win10 and Bluetooth (Xbox Elite 2 is recognized as standard Xbox controller and paddles don't work). However, I did verify that I encounter this issue on 4.8 (bluetooth and cable) and 5.13 (cable).
I have reverted the firmware back to 4.8. I have deleted and reinstalled Xbox peripherals drivers as well as uninstalled most Human Interface Devices drivers & restarted my PC. Didn't help.
I took screenshots hoping this would clarify my issue:
https://ibb.co/8jK5bMS - RT is in hair-trigger (shortest movement), RT is registered as fully pressed
https://ibb.co/gTcWgWG - LT is also in hair-trigger, here I'm pressing LT as hard as I can but it's registered as ~35% pressed
https://ibb.co/9wfzDMR - gamepad tester tells me that the button is not pressed fully
It'll be a few days before I can tear my controller down, but just to confirm, your right trigger is working fine and it's just the left trigger not registering the hair-trigger switch?
Yes, RT is working fine. LT works correctly in a sense that I cannot press it fully due to hair trigger lock but the press doesn’t fully register. Are there any sensors there responsible for analyzing strength of the press? The button is analog so maybe there’s something…
It’s worth adding that this has started happening after I gave the controller to 3rd party retail for LB/RB exchange. I cannot establish if they really did change the bumpers or just opened the gamepad and removed these white plastics (but I don’t see the plastics anymore).
Sorry for the late reply! Alright, I just had a chance to break down my controller again and on the back panel where the aforementioned trigger switches are, there are two daughterboards; one for each hair-trigger assembly. I'm not seeing one easily with a quick google search, but if you can find a donor to test it against, you can compare and see if that board is the problem. None of those components require soldering, but you'll need a T3 Torx to remove them. If you have a friend with the same controller, you could try asking them if you could borrow it to test the components (assuming theirs is working correctly!). Alternatively, you could try finding a "parts only" sale on eBay as a donor that might be just as cheap as buying the board, but it might be a gamble as to whether or not it will have good parts.
Regardless, as a first step, I'd just pull the controller apart and see if there is any obvious damage or loose connections; good luck!
Oh, as a side note: those white plastics aren't 100% necessary for the bumpers to function. If I were to guess, I'd say they are probably to prevent excess friction/damage to either the bumpers or switches, but as easy as they are to replace (in general), I wouldn't worry about it.
Is there anything in the guts that identifies what kind of plastic the controller is made of? Like a sticker or something molded into the inside that isn't visible in the photos? I don't see anything listed in the manual but I could have missed it.
Particularly the faceplate; I just want to pop it off to paint it, but I'm having difficulty finding information about what kind of plastic they used.
Edit: I know the center part looks like it has ABS stamped on it, but I'm not sure if the same plastic was used for the front and back pieces as well.
Crimm -


Starting center to sides from top, then center to sides from bottom worked for me.
Robert Cole -