Einleitung

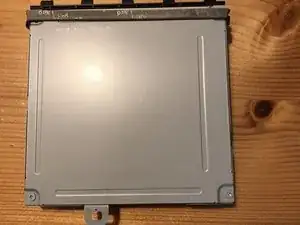
Wenn du die Hauptplatine austauschen willst, musst du auch die Platine im BluRay-Laufwerk tauschen.

  1. xruA2bUGMuUupq2b
    xruA2bUGMuUupq2b
    urCBAOcV216t4qDY
    niXqAdGU1SWnnEWc
    • Entferne zunächst die Aufkleber/das Klebeband auf der Rückseite, damit zwei Schrauben sichtbar werden. Mit etwas Kraft lassen sie sich mit den Fingern abziehen.

  2. 5WHJgPrf4TyGyfWF
    5WHJgPrf4TyGyfWF
    eNhFw2VgyFH43nMQ
    W2PSYwxFSUuB1yAb
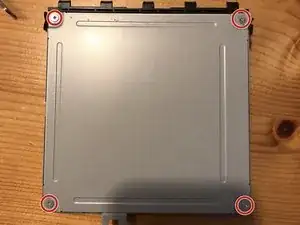
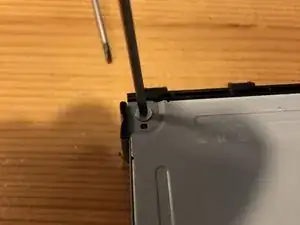
    • Entferne die vier Kreuzschlitzschrauben #1.

    • Hebe die Rückseite hoch und entferne sie. Sie sollte sich leicht abheben lassen. Ich habe sie an der linken Seite angehoben.

  3. 2JwVvvwO6UBK6F2w
    2JwVvvwO6UBK6F2w
    EUvltLSdsUHDsG3G
    pgG3JCddPikselmA
    • Entferne die Flachbandkabel noch NICHT, du musst zuerst die ZIF-Verbinder öffnen. Wenn du das nicht tust, kann die Platine beschädigt werden.

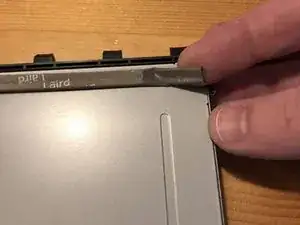
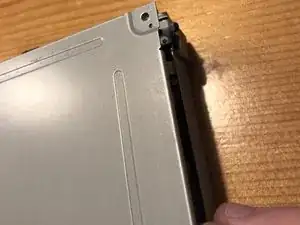
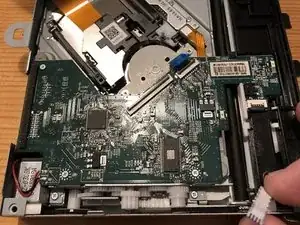
    • Öffne behutsam die drei ZIF-Verbinder mit dem Fingernagel oder einem Öffnungswerkzeug.

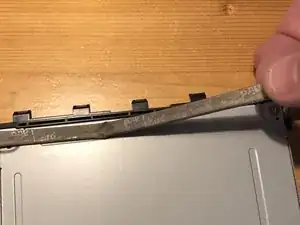
    • Ziehe dann die drei Flachbandkabel aus ihren Anschlüssen heraus.

  4. jOYlNypWcos4Zhix
    jOYlNypWcos4Zhix
    wPJ62F4TTaMmcQCU
    pUEdL2xLyD4J2tLe
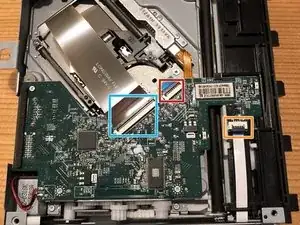
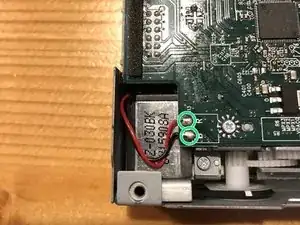
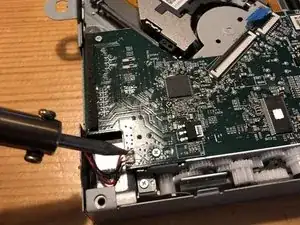
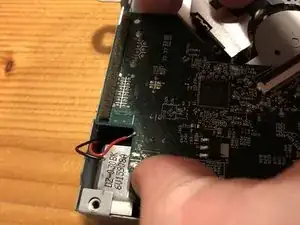
    • An der Hauptplatine ist ein rotes und ein schwarzes Kabel angelötet.

    • Nimm einen Lötkolben und entlöte diese beiden Kabel. Bringe das Lötzinn mit dem Lötkolben zum Schmelzen und halte in der anderen Hand eine Pinzette. Wenn das Lötzinn flüssig ist, dann ziehe die Kabel mit der Pinzette heraus.

    • Es ist empfehlenswert, Entlötlitze zu verwenden. Dadurch kannst du leichter neues Lötzinn auf die Lötaugen aufbringen. Unbedingt notwendig ist es aber nicht.

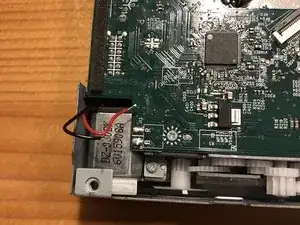
    • Es sollte dann wie im letzten Foto aussehen.

    You can also slide the drive out of the bottom half of the metal case and then unscrew the motor and bring it with the PCB to the new drive (assuming the motor is good).

    Andy Reddin -

    That is correct! You can transfer the motor to the new drive if the motor is OK. I created this guide if you need to replace the motherboard. But yes this is an option if you replace the drive only :).

    koppie007 -

  5. nEv1OELYtKIdkl3X
    • Entferne drei sehr kleine Kreuzschlitzschrauben #1 von der Platine.

  6. ZOyLhsa4u5k4CKuF
    ZOyLhsa4u5k4CKuF
    M6RZNtctaAoJQrSD
    rhDARosVS6RQAOZf
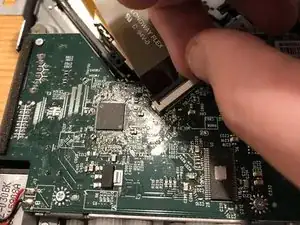
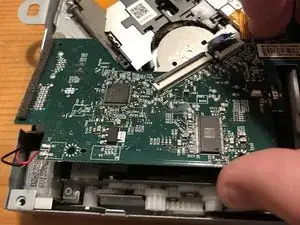
    • Halte die Platine fest und hebe sie hoch. Sie sollte sich vom Laufwerk ablösen.

    • Halte sie dann in der Mitte und bewege sie dann etwas nach oben und zu dir. Du wirst bemerken, dass das etwas schwer geht (besonders rechts, da sie von einer Raste festgehalten wird), sich aber dann doch leicht löst.

    • Das war's schon, die Platine ist draußen!

  7. hqwl4iptmUpfMxLA
    hqwl4iptmUpfMxLA
    c6Yyx5K3JdHT1Xnc
    • Achte beim Einbau auf die im ersten Bild mit roten Kreisen markierten Stellen. Wenn du die Schrauben so wie in Foto 1 anziehst, wirst du die Platine beschädigen. Also nicht wie in Foto 1 arbeiten.

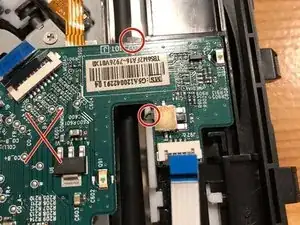
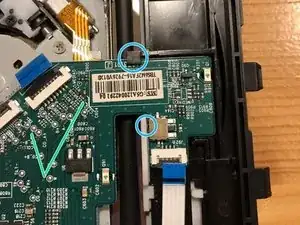
    • An den blauen Markierungen in Foto 2 kannst du sehen, wie die Platine richtig eingesetzt werden muss.

Abschluss

Um dein Gerät nach hoffentlich erfolgreicher Reparatur wieder zusammenbauen, folge den Schritten in umgekehrter Reihenfolge.

koppie007

Mitglied seit: 22/08/13

10176 Reputation

16 Kommentare

I got a refurbished disc drive for Xbox one console and later learned logic board had to be switched. What's that?

jjackparts -

Hi!

Yes, you need to use your old PCB. If you do not transfer your (original) PCB from your drive, you’ll not be able to play games..

koppie007 -

PS: Merry Xmas everyone!

koppie007 -

I also did not know you needed to replace the PCB with the optical drive. However, the new one will not even suck in a disc, just like the old one did not. Does this mean the new drive is bad as well, or just needs PCB? Would not replacing PCB make the thing not even receive a disc?

ndwig -

Hi there!

You are required to swap the PCB to play games. With an non-married PCB to your current motherboard, should still accept discs! You’ll be able to watch movies only. Are you sure that everything is dust free? Perhaps you got another faulty drive… The issue you describe is common.

koppie007 -

I just did this with a new disc drive and it still will not read discs. It sucks the disc in and will eject but will not read discs. When I insert a disc into the new drive it makes a strange noise like my previous disc drive was doing. Is my new disc drive bad?

Chad B -

Hi Chad!

That is possible yes. Strange noise could refer to the worm motor. Try to trade in the new disc drive and try again!

koppie007 -

Finally found out why my drive was making an ejecting noise on start from these photos.

It was because the white plastic part shown under the red circle was off to the right and wasnt pushing that button/ in.

Craig Donnelly -

Alright! Glad that you were able to fix it :)!

koppie007 -

Let's say I got the PCB out, can I attach to different blue ray drive, from PC or laptop?

Or does it have to specific model. Any mods available?

robert -

No, it needs to be the specific blu-ray drive. If it's the exact same model as from the Xbox one, you can swap it. Not sure if there are any mods available.

koppie007 -

i broke the zif clip, black piece, on the smallest ribbon, can i get a new zif connector and put it on the PCB ribbon connector? if so any ideas on where i can get a zif connector from?

greg Knight -

Hi Greg! Yes you can. Here you can buy a lot of different ZIF connectors: https://www.csconn.com/products.aspx

Please make sure that you have the right one. It's not easy to replace it as you need to solder to get it fixed.

koppie007 -

Thank You!!!!!!!!!

greg Knight -

I am replacing my disk drive, is this the only part I need to transfer or are other parts paired to my motherboard? T.

Theo -

So what errors do you see if you use the wrong board? Will games not install? Will Blu ray still play? Would it not do anything? I recently swapped out a disc drive and I'm 90 percent sure I used the right disc drive board but it won't install any games. Just don't want to tear it all apart for that not to be the case.

Andrew gamble -