Einleitung

Tripped over your power cord? Hey, At least you don't have to replace the entire logic board.

  1. ZKHHYbytUpRyM6lK
    ZKHHYbytUpRyM6lK
    Ov6b6WHurmmNqL2m
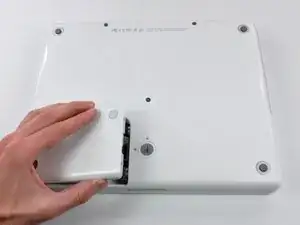
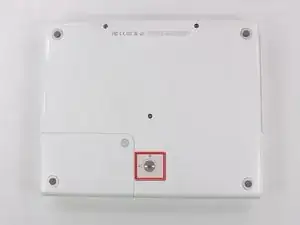
    • Lay your iBook upside down on a flat surface.

    • Use a coin to rotate the battery locking screw 90 degrees clockwise.

    • Lift the battery out of the computer.

  2. xcPQcEJWVJXS6B3x
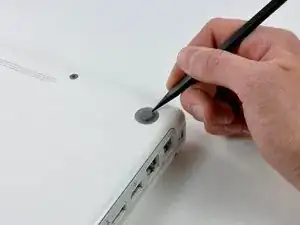
    • Use a spudger or small flathead screwdriver to remove the three rubber feet from the lower case.

    "Close the display and flip the computer over." ...Seems like this instruction ought to be at the beginning of step 1 rather than step 2. In step one, the display is already closed and the computer flipped over. In step 2, you just keep it in this position and proceed from taking the battery out to removing the rubber feet.

    margaretmiz -

    Don't use a screwdriver! I broke out one of them...

    Creditcard, FIngernails would be fine.

    hugobass -

    Well, if you've had an iBook G4 this long, odds are the little rubber feet are falling off just from being looked at. Except the battery mounted one. That sucker is the Devils' Tower of little rubber feet.

    john pellino -

  3. VxoWAP5uLbisnNLQ
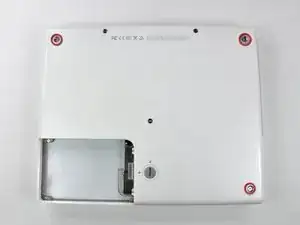
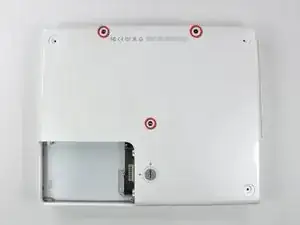
    • Remove the three newly-revealed Phillips screws.

  4. Vtn2pSRVdGQnZBNS
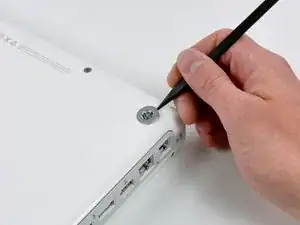
    • Use a spudger or small flathead screwdriver to pry up the three metal rings that housed the rubber bumpers.

    I bought & used the tool kit that you sell for this repair. The 3 rings came off when the screws came out--maybe because the screw bit holder is magnetized.

    syl57 -

  5. pZ2fcuma6eNoR1SH
    • Remove the three Torx screws using a T8 Torx screwdriver.

    • The shorter screw is in the center of the computer.

    I found T9's rather than T8's.

    gdavids57 -

    I found 2mm allen screws in this location

    rneumann -

    it seems a little bit weird to be using a Torx Screwdriver (T8 or T9 as the case may be) to remove hex screws. My machine has Torx screws in these locations.

    Kostas Kritsilas -

  6. NDjTpkl6TsjAHJ3E
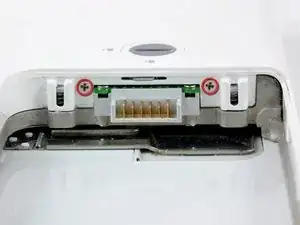
    • Remove the two 4.5 mm Phillips screws on either sides of the battery contacts.

  7. PXufY63IupGMNqVZ
    • Breathe deeply. Trying times are ahead, but we promise the lower case does come off.

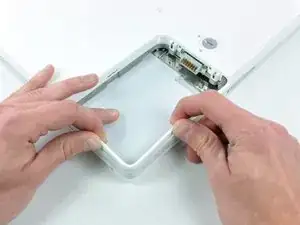
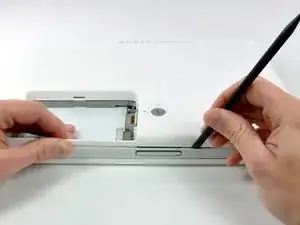
    • Push the thin rims of the lower case surrounding the battery compartment in, bending them past the tabs, and then lift up to free that corner of the lower case.

    When I did this, it helped to start around the disc drive

    kleitscs -

    I find that a stiff nylon guitar pick will work if you don't have a spudger.

    discodamon -

    I didn't find this step difficult at all. I have very short nails. I imagine a woman with long nails might have a problem grasping the rim and pulling up.

    syl57 -

    Definitely read the rest of the instructions now. I struggled at first... I was using my ipad with the step by step instructions and didnt scroll down past this photo, so I didnt see the sequence of how to loosen the tabs. in fact I didn't know where the tabs might be... Only discovered that part when I reassembled it. The spudger didn't work for me. Too soft, I used mostly a thin very small screwdriver.

    manyanelson -

  8. olEnPRDoh1K2onyU
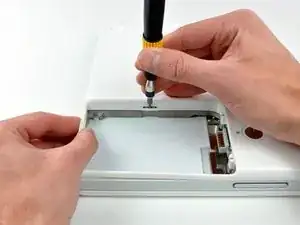
    • There is a slot on the wall of the battery compartment that locks the lower case in place. Use a small flathead screwdriver to pry out the slot's lower rim and pull up on the lower case to free the slot from the tabs holding it.

  9. lQTWRyAjSpaL1wCt
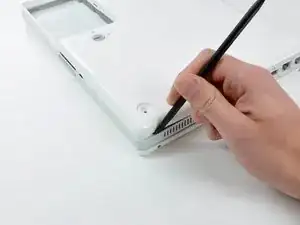
    • Run a spudger along the seam between the lower case and upper case on the front of the computer to free the tabs locking the lower case. Pull up on the lower case and continue to use the spudger as necessary until you hear three distinct clicks.

    Steps 7-9 were effortless for me.

    syl57 -

  10. feKwLpOlE12lDufX
    • Continue to run the spudger around the front right corner. There are two tabs on the port side of the computer, one near the front corner and one near the sound-out port.

  11. AfyPg1l26auOw3ZP
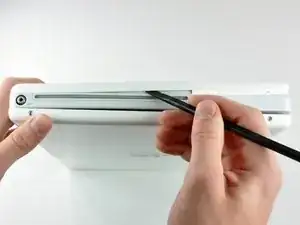
    • There are three tabs over the optical drive that must be released before the lower case can come off. Slide the spudger into the lower case above the optical drive and run it toward the back of the computer until you hear three distinct clicks.

    try using the spudger at the back near the vents. To be specific, on the left side of the hinge when faced upside-down. It's easier this way and it's described on Apple's official repair manual.

    Jinhan Liu -

    then put a library card or something between the outer enclosure and the optical drive enclosure then pull from the other side to free the casing

    Jinhan Liu -

  12. oRkCxOWHgXOZNvU4
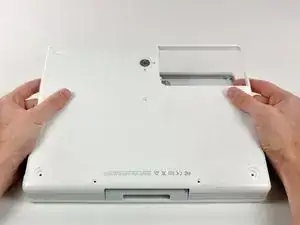
    • The front and sides of the lower case are now free.

    • Turn the computer so that the back is facing you and pull the lower case up and toward you until the back tabs pop free.

    • It may be helpful to jiggle the case up and down.

    Steps 10-12 were just as easy. I bought & used the Spudger, too.

    syl57 -

    this required a little more force than I felt comfortable with at first.

    Dave -

    Removing the back cover at this final step was had for me; I had to use a flathead screwdriver to separate the back edge of the cover away…I was not able to separate the lower case all the way by pulling the lower case up and toward me as shown in the photo.

    Jean S Barto -

  13. dyv22rN2KFGMIYDb
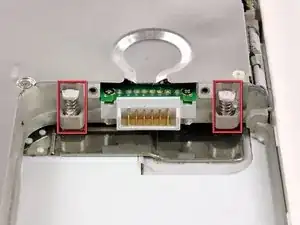
    • Remove the small greasy springs with white plastic caps from either side of the battery contacts.

    • Have patience and follow the directions, the end result is up to you. In my case it worked. But I was a Technician TRW Automotive. and worked on Air Bag modules that was returned from customer's that needed them analyzed. I just retired after 26 years.

  14. KhpDSfTRIT12bTEr
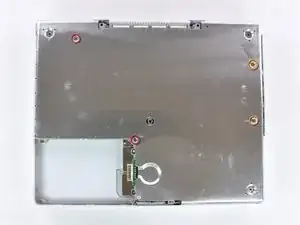
    • Remove the following 4 screws from the bottom shield:

    • Two 3 mm Phillips.

    • Two 7.5 mm Phillips.

    This is where things got interesting for me. I had 4 missing screws! I don't know if it came from Apple like that (highly doubtful) or if it was returned to me without the screws from the Apple Store repair I had done to replace the Latch (more likely, huh?).

    syl57 -

  15. TPlNEnHrJIHGsl6Q
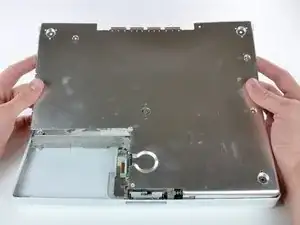
    • Lift the bottom shield off.

  16. pqalqi4Fddg2m5on
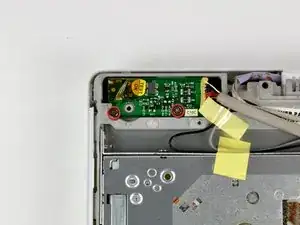
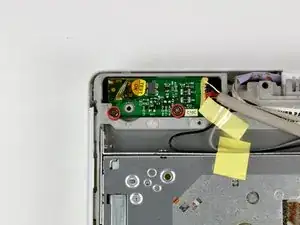
    • Remove the two Phillips screws securing the DC-In board, removing tape as necessary.

    Be careful here as the actual DC silver connector is raised from the chipboard so once you remove the screws use the spudger to gently lift out the DC IN board itself. There's some rubber casing around the silver connector too which got caught on the plastic casing of the laptop which required a bit of gentle poking to get free...

    loughlin -

    Again, I was missing a screw here--the left one! The process of removing this part was not a problem.

    syl57 -

    Is it necessary to remove DC cable?

    rickyzhang -

    @rickyzhang Yes, in order to remove the top case, this is required.

    CL Johnson -

    8 Bit Guy clearly bypassed that step somehow. https://www.youtube.com/watch?v=52-nCu2w...

    Adam Panák -

  17. vIVEYqnKAfYXvBPC
    vIVEYqnKAfYXvBPC
    Es1ALUxKcMTMOF1T
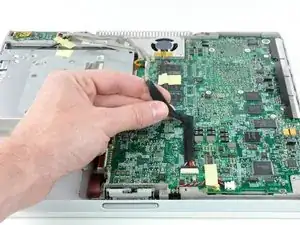
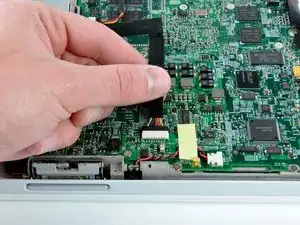
    • Deroute the cable from around the optical drive, removing tape as necessary.

    • Disconnect the DC-In cable from the logic board and angle the DC-In board out of its compartment.

    Also, once I removed it, I thought there was more to do. It happened so quickly and effortlessly! I kept wondering when the difficult and trying part was coming. I was kind of disappointed by the lack of the challenge, but that's OK! The difficult part came from reversing the directions and getting the shield back in place. A cable covering on the back edge under the shield slipped out and prevented the metal tabs from seating correctly. Once I figured that out, it was smooth sailing!

    syl57 -

    Why? It‘s not necessary

    Benjamin Grunmaurer -

Abschluss

To reassemble your device, follow these instructions in reverse order.

Walter Galan

685540 Reputation

2 Kommentare

A HUGE thank you! I took my old iBook G4 into the Apple store a couple years ago to ask about getting my computer fixed - the pin/needle to the charger broke off inside and I could not remove it - and they told me I could try a toothpick and superglue and try to remove the pin, otherwise they couldn't fix it. But after researching for a few hours and because of this website, I was able to purchase a new DC-in Board AND replace it myself! I'm no handy-woman whatsoever and this was very easy. A little intimidating as soon as you pull of the bottom shield, but actually replacing the DC-in Board was definitely the easiest part. Thank you so much for your step by step manual with photos. I can not thank you enough.

alicia -

I did this procedure twice on 9 June 2019; to remove a working DC-In Card from a “hanger queen” 12”iBook, and install it into an operational G4 iBook with a bad DC-In Card. I lack mechanical expertise as well as strength in my hands, but wanted to try doing this because having someone else fix my iBook would cost 3 or 4 times as much as the iBook is currently worth! Anyway, after researching the take-apart steps here and on YouTube, I first bought a toolset and spudgers from my local Micro Center before attempting the DC-In Card removal and replacement. My “hangar queen” iBook was easier to take apart since it had been worked on previously before being declared “dead.” I really had trouble separating the back cover from the working iBook because it had not been opened for a very long time. I kept at it, and was finally able to separate the back cover, remove the metal interior cover, install the “good” DC-in Card back into my working iBook, and put it back together. My iBook is now charging as it should.
Jean S Barto -