Einleitung

Gib dem iMac wieder den Klang zurück, indem du die Audiokarte austauschst.

  1. eZ2mmfZFNXICRO5o
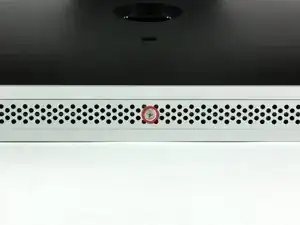
    • Lege den iMac mit der Vorderseite nach unten auf einen Tisch, so dass die Unterkante zu dir zeigt.

    • Löse die einzelne Kreuzschlitzschraube in der Mitte der Abdeckung.

    • Diese Schraube bleibt in der Abdeckung hängen.

    • Entferne die Abdeckung vom iMac.

    The grid won't fall off by itself. You'll have to help it. Use the smallest screwdriver you have; the Torx 6 worked fine for me. It should enter in one of the many holes composing the grid. Use it as a lever to ploy the grid a little bit. You may catch it with your fingers and that's it.

    Be carefull not to damage the hole by a too strong leverage.

    Laurent -

    much more safer to use duct tape, instead of torx 6. (glue it along the length of the grid and pull). it will loose instantly and smooth;)

    Hofmann78rus -

    Anyone know a guide to replace the plastic piece this screw connects to? I accidentally forgot this step - went to remove the front bezel and bent the plastic piece the access door connects to.

    Jason Augustin -

  2. p6KIDV5hIdqMQvBL
    p6KIDV5hIdqMQvBL
    TZmRFeiLyRrvNDne
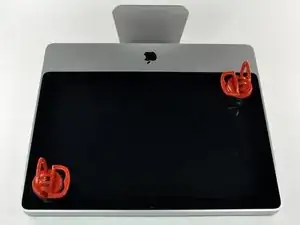
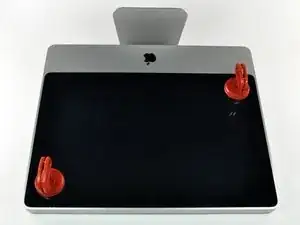
    • Die Glasscheibe ist mit vierzehn Magneten an der Frontblende rings um den Rand befestigt.

    • Befestige zwei Saugnäpfe in gegenüberliegenden Ecken der Scheibe.

    • Damit du den Saugnapf, den wir verkaufen, befestigen kannst, musst du ihn erst mit dem beweglichen Griff parallel zur Oberfläche aufsetzen. Dann drückst du den Saugnapf leicht gegen das Glas und legst den beweglichen Griff nach oben um, so dass er parallel zum anderen verläuft.

    • Wenn der Saugnapf nicht halten will, dann reinige ihn und die Oberfläche des Glases mit einem milden Reinigungsmittel.

    A good alternative to the two heavy duty suction cups is a regular household plunger.

    Russell Knight -

    Also, 2" wide packing tape. Maybe a 6 or 8" piece, folded in the middle to give you say, a 1-2" "handle". Make a pair of these. They look like a capital T but with a short vertical part (the handle), and a wide top I the sticky wings). Get the good 3M tape, it's strong, and it peels off clean without leaving any glue from the screen.

    Barry Coyle -

    for me one household plunger did the trick!

    Ronald Huygen -

  3. 3RAYpU3kCCqrGrBr
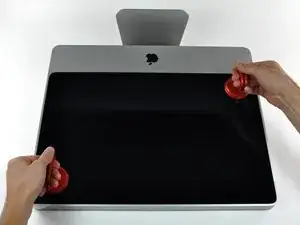
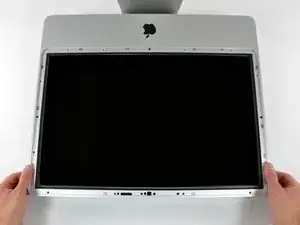
    • Hebe die Glasscheibe vorsichtig gerade weg vom iMac.

    • Die Glasscheibe hat verschiedene Stifte um den Rand herum, um sie richtig zu positionieren. Vermeide es, diese abzuscheren und ziehe die Scheibe nur direkt nach oben.

    • Sei akribisch genau beim Reinigen der Innenseite der Glasscheibe und des LCD, bevor du sie wieder einbaust. Jeder Fingerabdruck und jedes Staubkorn im Inneren sind störend sichtbar, wenn der Bildschirm an ist.

    • Achte beim Zusammenbau darauf, dass sich nichts zwischen Glasscheibe und Rahmen befindet. Lose Kabel könnten beschädigt werden oder die Scheibe zerbrechen.

    Another approach that worked for us was to get 4 small plastic wedges (the kind used in iphone screen replacements). Working one corner at a time you can use a cheap suction cup to pry just that corner up enough to slide the wedge in. Then proceed to the next then next, etc. Once all 4 have the wedges under them the glass should be away from the body all the way around, then just carefully lift it the rest of the way up.

    A___K -

  4. aY5eEd5cGTLMJxqX
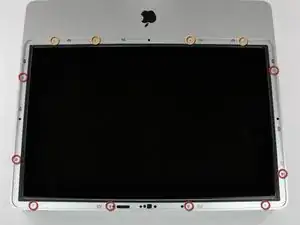
    • Entferne folgende zwölf Torx Schrauben, welche die Frontblende am Rückgehäuse befestigen:

    • Acht 13 mm T8 Schrauben

    • Vier 25 mm T8 Schrauben

    • Am 24" iMac Intel Modell A1225 sind die unteren mittleren Schrauben lang, (26mm), die vier an den Seiten (zwei links, zwei rechts) sind mittellang (18 mm) und die restlichen 6 (vier am oberen Rand, zwei in den unteren Ecken) sind kurz (14 mm).

    I would strongly suggest taping the screws down on a piece of paper towel or cloth in the same order you take them out, as there are different lengths in no particular order and they don't all fit into just any hole. Unless you keep track of which hole each screw belongs, there is no other way of knowing. I stress taping because I didn't tape mine down and after bumping the table I was working on they scattered, leaving me to guess.

    Len -

    Even better, use an ice cube tray to keep the screws from each step together.

    maccentric -

    how about using the magnets near the screws to keep their positions?

    Andy -

    I use an 18 count egg carton (or two) and label each egg slot with a Sharpie. Works great.

    airira -

    As a rule with iFixit repairs, for years I've been printing the guides, applying scotch magic tape near each picture (which allows me to reutilise the paper prints in the future), neatly putting the appropriate screw next to their picture and taping them down with scotch magic tape.

    Even if I have to wait for spare parts, this allows me to neatly file the guide + screws in a copy safe and a binder (or in a cardboard filing box together with the rest of the parts) for later reassembly. Hardly any mistake possible...

    Bart Van Dessel -

    I think the caption on the picture is wrong here for 24" iMacs - it says: "On the 24" iMac Intel Model A1225, the bottom center two screws are long (26mm), four on sides (two left, two right) are medium (18mm), and the remaining 6 (four top, two bottom corners) are short (14mm)." I think actually bottom centre two are long, then all the rest are medium apart from the two either side of the CD/DVD drive

    HBloomfield -

    I print out the steps. Get a roll of scotch tape ready. Every screw, or set of screws I remove, I lay on some tape, and then tape them to the number on the directions. Then you have each screw labeled, with direction, and in order, or reassembly. Just working backwards in the directions.

    Barry Coyle -

    I agree with @HBloomfield’s comment overall, but to add to that comment, mine was a little different.

    (2) Long: bottom center

    (4) Medium: bottom left and right; on either side of the CD/DVD drive

    (6) Short: everything else

    Jake Thornberry -

  5. DeBo1wxAFCN1aO1m
    DeBo1wxAFCN1aO1m
    Z5GW1SNRpnXJLsaa
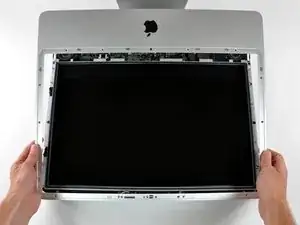
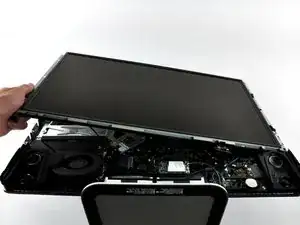
    • Die Frontblende ist immer noch mit dem iMac über das Mikrofonkabel verbunden.

    • Hebe die Frontblende vorsichtig vom oberen Rand her aus dem Gehäuse.

    • Wenn der obere Rand frei ist, kannst du die Frontblende zum Fuß hin kippen und aus dem Gehäuse heben.

    • Drehe die Frobtblende weg vom restlichen Gerät und lege sie über die Oberkante des iMac.

    • Beim Zusammenbau musst du die Frontblende erst an der Unterkante einsetzen, so dass sie bündig mit dem Rückgehäuse ist, bevor du die Oberkante auf den iMac setzt.

    Contrary to the pictures, to lift the front bezel off, start at top of the computer screen lifting up while apply a little bit of pressure to the foam in the upper corners of the screen. This will give you the leverage needed to get the bezel to lift up. Be careful to not pull to fast, as the camera cable is still attached.

    armand -

    you'll need to add this step in all the other tutorials about iMac 20" EMC 2210, where it is missing ; they all jump from step 5 to step 6, which is a little annoying...

    Armel h -

    Easy way to remove bezel, insert the longest screws a quarter turn into the two top most edge screw slots. Use the screws as anchors to press against as you pull the bezel toward you. Then a simple twist to remove the screws, and the rest of the bezel comes off easy.

    armand -

  6. kUpsfj2YCtMpZeBC
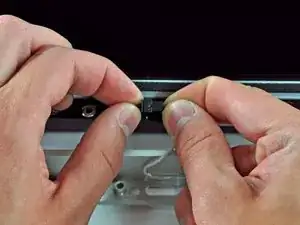
    • Löse den Stecker am Mikrofonkabel, entferne das Klebeband, wenn nötig.

    • Damit die Frontblende gut sitzt, musst du das Mikrofonkabel und den Stecker in die Leerstelle in der Nähe der Kameraplatine hineinstecken.

    During reinstallation of the LCD panel, be sure that the iSight microphone cable does not become trapped behind the panel.

    Ocean Yamaha -

    I actually didn't have to remove the cable. With the iMac laying on its back, just rotate the front bezel (bottom edge rotating around top edge) so that it's laying upside down, above the iMac. When reassembling, just rotate back into place.

    Brian Tsai -

  7. gXYcS5ooIKOBVFBL
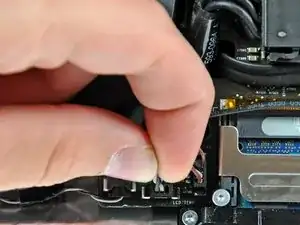
    • Ziehe den Stecker vom LCD Thermosensor gerade aus seinem Sockel auf dem Logic Board.

    • (am 24" Modell befindet er sich oben am Logic Board)

  8. CISigvqLckRjg4uE
    CISigvqLckRjg4uE
    LmFCVJ2L1OmxrWuf
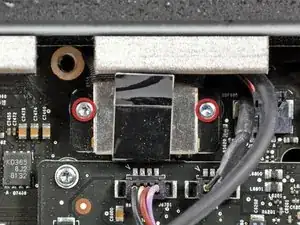
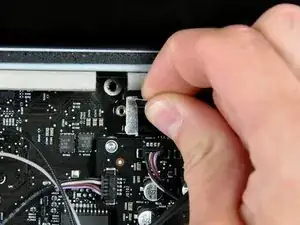
    • Entferne die beiden Torx T6 Schrauben, welche das Displaydatenkabel am Logic Board befestigen.

    • Ziehe den Verbinder des Displaydatenkabels an der schwarzen Lasche gerade weg vom Logic Board.

    I found this to be the most frustrating thing to remove out of everything under the hood. I had to have my wife use her skinny, smaller fingers to jimmy it up, but the tape kept pulling up and separating from the connector. I was worried that I was pulling in the wrong direction (what do I know about logic boards?) and that the tab was going to come off as it is slick tape. She eventually got it, but she did have to use some force. If you don't have a set of skinny fingers, just be patient and use a little force. I think the instructions should tell you to pull straight UP on the black tab, rather than 'away from the logic board', for those of us that don't really understand the technical components/guts of a computer. Honestly, my wife knows less than I do, but she could have done this as easily as me.

    Len -

  9. hfybBhtq621MUBJb
    hfybBhtq621MUBJb
    mUAONtBRZmMyrr3k
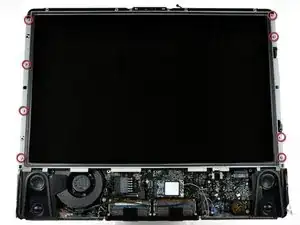
    • Entferne die acht Torx T8 Schrauben, welche das Display am Gehäuse befestigen.

    • Hebe das Display an der linken Kante an und drehe es zur rechten Kante des iMac.

    Some extra tools I found to be invaluable in this whole process was canned air (used for keyboards and office dust), a microfiber cloth (preferably the one that came with your iMac if you still have it, but you can get these almost anywhere these days)and one of those soft foam monitor covers to put over the monitor while your friend is holding it up (a soft sheet or towel might work too). If your computer is a few years old like mine, there will be a considerable amount of dust that you will want to clear out (and will fly everywhere anyway). Once you cleared that out and replace the hard drive, wait until you've got the bezel and screws back on before using the canned air and microfiber cloth to make sure all dust and lint is clear of the monitor. This is where the second person will come in handy again. They can wipe while you spray. Get your glass top with suction cups still attached ready and wipe that with the cloth and air as well. While your friend does one last wipe of the glass and then the monitor, put the glass on as soon as possible so no more lint or dust falls onto the monitor. I did this and the monitor looks as beautiful and clear as the day I bought the iMac. It is truly a brilliant and beautiful design by Apple and LG.

    Len -

    In this step, as I lifted the display, there was also a small cord in the front, near the fan, that was connected from the display to the inside panel. As I lifted, it unplugged. Anyone know what this is and where it goes when I put it all back together? Pic of the cord I'm referring to: http://i68.tinypic.com/keubkg.jpg

    shauhncy -

  10. ONTICxoAKE1rdFwI
    ONTICxoAKE1rdFwI
    PEYEvciLkC4PkeJX
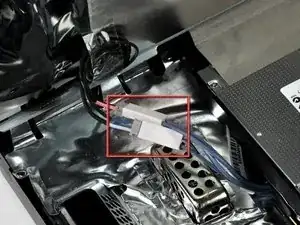
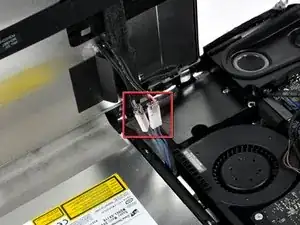
    • Während das Display immer noch angehoben ist, kannst du die vier Inverterkabel lösen.

    • Beim Zusammenbau musst du diese vier Inverterkabel so in Leerräume zwischen den Bauteilen an der Rückwand einsetzen, dass das Display bündig zu den Kanten des Rückgehäuses sitzen kann.

    • (beim 24" Modell sind sie in einem einzigen Stecker verbunden)

    I did a HD replacement on my 24 inch iMac. It's mostly the same, but it does not have disconnectable inverter cables. Instead, there's a single cable that can't be disconnected. It sits too tight to rotate the display to the degree that you can lean it against something, so the only way to get the job done was to call in an extra set of hands to hold the display while I took out the hard drive.

    Marijn -

    I'm almost sure by HD you meant HDD (Hard disc drive).

    Charles Hess -

    As Marijn said, there are no disconnectable inverter cables on the 24" iMac, just a single thick cable in the middle of the back that is heavily taped with black electrical tape. I imagine you could remove that and retape, but it seems like it would be more trouble than it's worth. There is definitely enough clearance for someone else to hold the monitor up and away from the hard drive. For this reason, I would not attempt to replace the hard drive on a 24" without another person to help. The monitor is not heavy, and it doesn't take a ton of time to remove the old hard drive. It would also help if one of you has skinny fingers ;-).

    Len -

    Mark them before unplugging so you can reconnect them the right way when reinstalling!

    Dirk Simons -

    On the 24" iMac, the single inverter cable can be easily disconnected from the back of the LCD panel after peeling back some of the thin black plastic film. It is not necessary to disconnect the panel if you have four hands, but sure makes the job easier.

    Geoff Shepherd -

    sh******t I didn't mark the connectors and now I don't know how to plug them back. I'm doomed ! any trick to identify them ?

    cheers

    Julien Waroux -

    Same here. What did you do? Try them both ways?

    Leon Wagner -

    hold the led with my head lmao

    b12amyh -

    You have to mark the Cables so you can reassembly them in the right order.

    If you don't (like me) and go with trial and error you probably have a purple screen.

    If so, you might also have been close to a heartattack… do a PRAM Reset by pressing command-Option-P-R at restart.

    My iMac works fine now.

    Pascal -

    OMG, Thank you for this comment. I didn't initially label the inverter cables either. I did a fan replacement and RAM upgrade on a friends 20" iMac and had staticy, purplish screen. I thought I'd damaged the LCD. The PRAM reset fixed the display issue. Thank you so much for this!!!

    gwarren -

    I have the purple screen. :( I tried the pram reset. Do I switch the inverter cable connectors first?

    jaredrod -

    I didn't mark the cables either, and now have a gray screen. I´m doing trial and error but can't get it to work. Any tips on finding the right cables?

    Marcus Svensson -

    There should be a “star” at the beginning of this step to mark the wires as they are not color coded. Wish I read these comments first. Hope it works when I turn it on,

    John Rosati -

    Of course I mismatched a pair and colors were distorted. After a trial by error switch of cables it worked perfect. MAKE SURE YOU LABEL THE CABLES AS NOT TO MIX THEM UP.

    John Rosati -

  11. ZuaO5eLPrBBU45pT
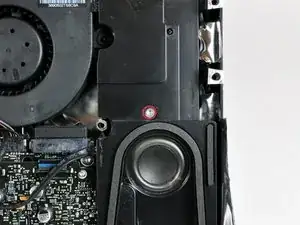
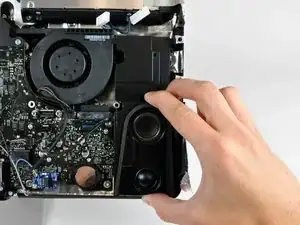
    • Entferne die einzelne Torx T10 Schraube, welche den rechten Lautsprecher am Gehäuse befestigt.

  12. nVNGlmMAA5X6NG6j
    • Löse den Stecker am Kabel zum rechten Lautsprecher von der Audioplatine, indem du ihn gerade aus seinem Sockel ziehst.

  13. oGCHMJC46Jd1vona
    • Hebe den rechten Lautsprecher vorsichtig aus dem Gehäuse heraus.

    When you're finished with changing the components, take care of placing the cable exactly in the empty space next to the cooling fan, otherwise your Mac will make an awful noise like a submachine gun, when restarting.

    Alain Brose -

  14. qLYdntwxOiHXjjXa
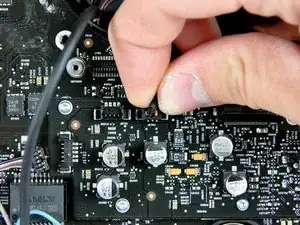
    • Löse den Stecker am Kabel zum linken Lautsprecher von der Audioplatine, indem du ihn gerade aus seinem Sockel heraus ziehst.

    • Ziehe den Stecker parallel zur Oberfläche der Audioplatine heraus.

  15. MnYMLDKtemsAJ3EV
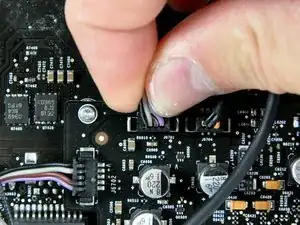
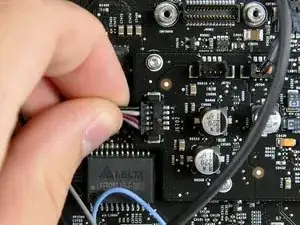
    • Löse den Stecker des Mikrofonkabels von der Audioplatine, indem du ihn gerade aus seinem Sockel heraus ziehst.

  16. IWLgMvSe1ECmavoK
    IWLgMvSe1ECmavoK
    lq3ZPfWaHS3qWUOo
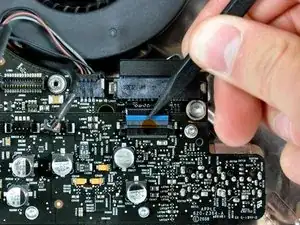
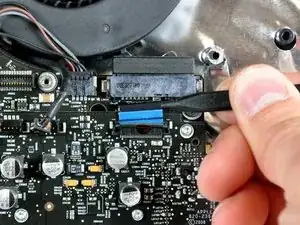
    • Klappe den Sicherungsbügel am Flachbandkabel zwischen Logic Board und Audioplatine mit der Spudgerspitze hoch. (in Richtung Unterkante des iMac)

    • Ziehe das Flachbandkabel zwischen Logic Board und Audioplatine gerade aus seinem Sockel.

  17. EkFXQ6D4bvVmHWof
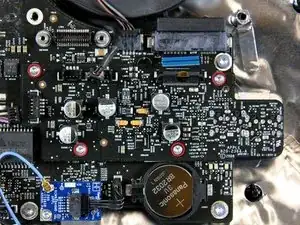
    • Entferne die vier Torx T6 Schrauben, welche die Audioplatine am Logic Board befestigen.

  18. rLCnqNObK2DMiSUG
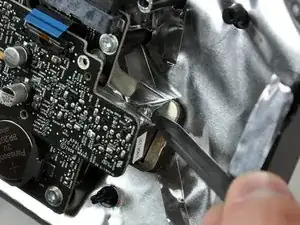
    • Entferne mit dem scharfen Ende des Spudgers das EMI Aluminiumband , welches die Kopfhörerbuchse/ Mikrofonbuchse bedeckt.

  19. QvOCwJplmuBF3ufX
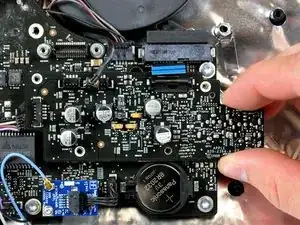
    • Hebe die Audioplatine vorsichtig aus dem iMac.

Abschluss

Um dein Gerät wieder zusammenzusetzen, folge den Schritten in umgekehrter Reihenfolge.
Walter Galan

685540 Reputation

0 Kommentare