Einleitung

Hier wird der Ausbau der Festplatte gezeigt.

Werkzeuge

  1. 4KJ4FtBECZbmPfKA
    4KJ4FtBECZbmPfKA
    q12uCnlDfFKWS5vJ
    1D6lj1KAOKjQatxg
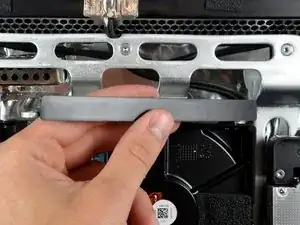
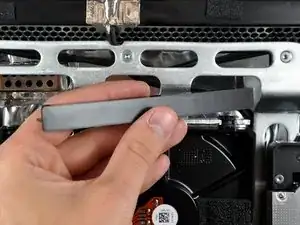
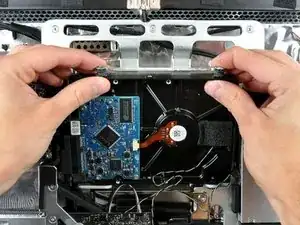
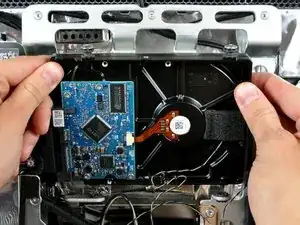
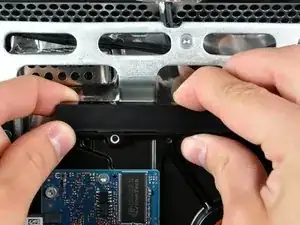
    • Um die Halterung der Festplatte zu entfernen, musst du das Mittelteil gegen die Seite der Festplatte drücken und gleichzeitig die obere linke Kante zu dir drehen.

    • Wenn die linke Kante frei ist, musst du die Halterung zur rechten Kante der Festplatte hindrehen.

    • Hebe die Halterung der Festplatte gerade aus dem Gestell heraus.

    Prying the plastic bar that locks the HDD into place was probably the most difficult part of the operation, for me. It just didn't want to let go, and until you've actually removed one, it's not exactly clear how it's holding on. The left side basically has a thin wedge on the back that wedges in between the rubber grommet and the mounting bracket

    modsolok -

    Thank you for this tutorial. I tried and tried and could not get the drive out. Found this tutorial and this comment too and it was a tremendous help! My iMac 24 (March 2009) hard drive was quite stubborn to remove but I finally got it!

    TAPTRONIC -

    Actually this step is quite easy, provided you follow exactly the instructions presented here. :)

    Marius Zota -

  2. MrIcaklQFEuMs2tS
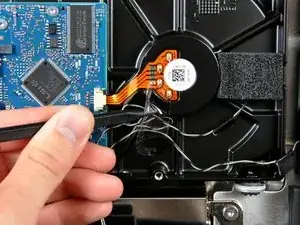
    • Entferne, falls vorhanden, das kleine Stückchen Klebeband, welches die Kabel zu den Thermosensoren der Festplatte und des optischen Laufwerks bedeckt.

    If there is some clear tape holding the excess play in the HDD thermal sensor wire, against the body back, peel it up to free the wire and give yourself as much free play as possible. When reassembling, tape back to the body.

    Brian Tsai -

    Mine was completely different. There was some black foam with the sensor underneath, held in with a plastic bracket that is attached (glued?) to the hard drive.

    Joey Johnston -

  3. 6KrilUcO2rhPpS1b
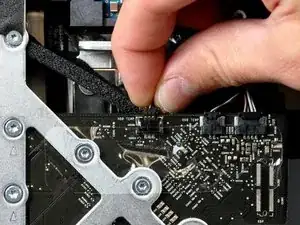
    • Ziehe das Kabel zum Thermosensor der Festplatte gerade aus seinem Sockel auf dem Logic Board.

    • Beim Lösen dieses Steckers ist es hilfreich, wenn du die Nasen auf jeder Seite des Steckers mit den Daumennägeln zur Oberkante des iMac hin drückst.

    I found it was not necessary to do this step if you do step 20 first - i.e disconnect the temperature sensor cable from the hard drive, but not the logic board

    HBloomfield -

    As HBloomfield said, you do NOT have to remove the sensor from the iMac body. Instead, remove the sensor from the HDD while it is still connected to the body.

    If the sensor is covered with a 4mm black foam square, use your index fingernail to scrape off one of the corners where there is adhesive. If you pull on just the foam part, it will tear the foam.

    Brian Tsai -

  4. LBmclNZSDhqMi12u
    LBmclNZSDhqMi12u
    oMNU4YQKGNhqrlHF
    • Drehe die Oberkante des Laufwerks zu dir , hebe dann die Festplatte gerade aus den unteren Stiften.

    • Die Festplatte ist noch über das SATA Kabel angeschlossen.

    • Achte beim Zusammenbau darauf, dass du die Gummitüllen nicht mit den unteren Stiften an der Festplatte durch die Öffnungen im Gestell durchschiebst. Um sie wieder herauszuholen, müsstest du unter Umständen das Logic Board ausbauen.

  5. NEcJgSdqgsKfeN5b
    NEcJgSdqgsKfeN5b
    AeQ3qiZnE4qm4MhM
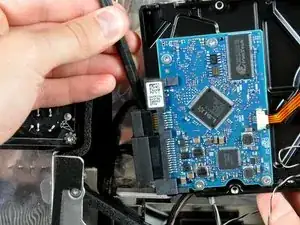
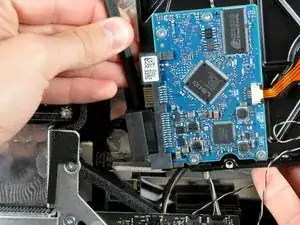
    • Setze das flache Ende des Spudgers zwischen SATA Datenkabel und der Kante der Festplatte.

    • Verdrehe den Spudger, um das SATA Datenkabel von der Festplatte zu trennen.

    • Löse das SATA Datenkabel von der Festplatte.

    • Wiederhole das Verfahren für das SATA Stromversorgungskabel.

    • Hebe die Festplatte aus dem iMac heraus. Achte dabei darauf, dass sich das Kabel zum Thermosensor nicht verfängt.

    I honestly didn't find the spudger to be necessary for most of this replacement. It is a nice little tool that makes one or two steps easier, but it is far from necessary. I imagine an old stylus you may have laying around would do just as good a job. I would definitely suggest putting the iMac on it's stand straight up to remove the hard drive bracket from it's post, as it sits very tightly in there. I found it popped out a LOT easier on it's stand than laying down, which was next to impossible. You do have to do some careful manuevering with your partner in order to accomplish this, but it's worth it. Take it slow.

    Len -

    When replacing, the SATA data cable did not extend to the new drive.

    Nathan Suri -

    THIS. A hundred times THIS. I wanted to put in an SSD, and was miffed to see that the SSD was to be placed in the middle of the 2.5" to 3.5" adapter. Unfortunately, that means that the SATA cable did not reach. I tried three different adapters, all the same. I even tried to BUILD an adapter myself from flat pieces of metal (I wouldn't recommend it). In the end, I got a SATA extension cable and simply taped the SSD into the case where the HDD used to be. We'll see if any problems crop up. Since it's very light though and doesn't produce much heat I don't think there should be a problem.

    Wolf Dapp -

    You will need a dock that puts the connectors in the same place if you want to use an SSD. I've had decent luck with the Icy Dock.

    maccentric -

    I have stopped using brackets for most SSD replacements. I bought some circular hook and loop dots with strong adhesive and merely velcro the drive to the case. The cables are long enough to allow the drive to sit flat against the case if you turn the drive upside down after attaching it. Otherwise, the data cable is too short. SSDs are so light that there is no reason for over-engineering the attachment. Most tape is not strong enough but two velcro dots work great.

    Greg Worrel -

Abschluss

Um dein Gerät wieder zusammenzusetzen, folge den Schritten in umgekehrter Reihenfolge.
Walter Galan

685540 Reputation

0 Kommentare