Einleitung

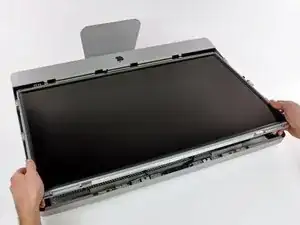
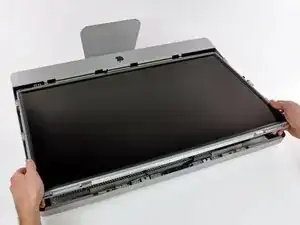
Hier wird der Austausch des LCD Displays gezeigt.

  1. S6gQ2HIHlQuHu5Sy
    S6gQ2HIHlQuHu5Sy
    EucNhvfCJRsBRgOY
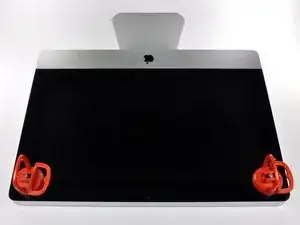
    • Ziehe den Stecker, bevor du anfängst. Lege den iMac auf eine weiche Oberfläche, so wie gezeigt.

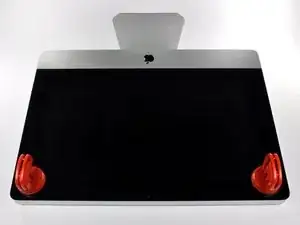
    • Befestige einen Saugnapf in jeder der oberen Ecken der Scheibe.

    • Um die Saugnäpfe, die wir verkaufen, anzubringen, musst du erst den Saugnapf mit dem beweglichen Griff parallel zur Scheibe aufsetzen. Halte den Saugnapf gegen die Scheibe und klappe den Griff hoch, bis er parallel mit dem anderen ist.

    • Wenn der Saugnapf sich nicht festsaugt, dann versuche die Scheibe und den Saugnapf mit einem milden Reinigungsmittel zu säubern.

    Very easy to lift the glass out. Don't jerk too hard.

    kctipton -

    Another comment on DATA & LCD Temp. Sensor cables: I had to remove the vertical sync, and the backlight cable, however, if you have an assistant or/can carefully rotate the screen clockwise/and then have it held up about 5" to 6" at a slight angle, you do not need to remove LCD data cable or LCD thermal cable, however - IMPORTANT: you must have a second pair of hands/or way to securely prop up the LCD. Also, don't rotate too much, since then you will pull out LCD data cable, and it renders the whole exercise moot, or can damage the cable or connector.

    MaximBorzov -

    You don't need suction cups. The screen, held by magnets, can simply be pried off using a very thin blade such as a screw driver and fingers.

    Deepsurvival -

    That's a bad idea. using a metal tool to pry off glass is likely to end with an expensive broken front glass.

    Suction cups are common. Find a couple and do it the safe way. I use some cheap ones that came with iPhone repair kit.

    max damage -

    No need for suction cups, I just stuck my nails (short like guys usually have) between the top part of the screen and body, and it came off easily. I've never done it before, so it seems to be very easy.

    Nikolas Lintulaakso -

    Nails worked for me too

    Rob Dale -

    Just completed the replacement of the optical drive with an SSD using an OWC Data Doubler kit. Attempted to remove the optical drive without disconnecting any cables but found it a bit fiddly to orient the screen for good access. I bit the bullet and disconnected them and found the process less daunting than I imagined. Reconnecting them was similarly straightforward if you're careful.

    Tip: you can skip the step for removing the optical drive thermal sensor connector from the motherboard. Still need to remove the sensor from the optical drive but you can leave that hanging and reattach it to the SSD later.

    osienna -

    I use Garmin GPS suction cup. Work very well

    jc3Dcx -

    I’ve just successfully installed a 1TB SSD in place of my optical drive thanks to the information here- thank you to everyone who has contributed!

    3 comments- the procedure described here seems to vary between HD replacement and dual HD/optical drive replacement. This can be confusing at times.

    Expect there to be minor differences between the layout described and what you find when you open up your iMac. There are also, surprisingly, differences between the HD enclosure description, and the article provided by ifixit.

    I was able to replace the DVD/HD enclosure single-handedly without fully removing the LCD, or deconnecting any of the cables (steps 5-11). It’s a bit cramped, and fiddly, but I was not happy removing any of the cables despite watching videos, etc., since they all seemed to involve applying more force than I was comfortable with. A more detailed description of how to release them might have helped, but even here, there may be minor variations even within the 2389 model.

    Good luck!

    ivan birks -

    I did it several times with one suction cup at the end of a kitchen brush. Once with the blade of a swiss army knive, also ok. And i’m pretty sure it works with fingernails too

    Tai -

    Fingernails are all you need to free the glass from its magnetic hold. If you don’t have them, slip something thin and plastic, like a spudger, at a top corner.

    Max Powers -

    Minha dúvida é a seguinte: após o técnico trocar o HD do meu iMac de 21,5 polegadas, a câmera parou de funcionar. Seria por causa da troca do HD? Tem solução?

    Claudio -

    Creio que o cabo da camera não foi plugado ou deu mau contato… ou até danificado.

    glecyo@gmail.com

    glecyo medeiros -

    I can’t get my glass to budge. I’m replacing a cracked one and now it’s about to shatter.

    jamboxmitchell -

    I know that I'm replying really late but I advise to use clear tape over any cracks so the cracks don't get bigger

    Jace Holmes -

    Check for chips in the glass BEFORE you do this step. If there is a chip when you pull up with the suction cups you will wind up with a jagged mess. If you do have a chip I would advise covering the screen near the chip with clear tape of some kind before lifting out. Mine shattered right at the chip and the resulting glass dust cloud got all over. My solution was buying a new glass screen.

    BCam -

  2. dEfYFtAGakgNBgPI
    dEfYFtAGakgNBgPI
    TRYClBF1GnTXMyiU
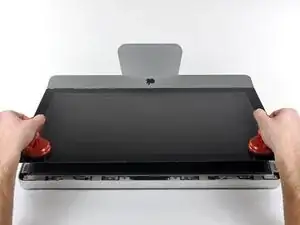
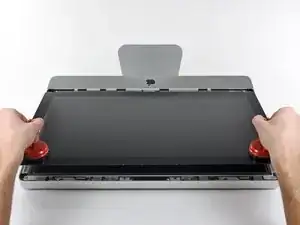
    • Hebe die Scheibe vorsichtig senkrecht zum LCD an, gerade soweit um die Metallstifte, die oben an der Unterseite der Scheibe angebracht sind zu befreien.

    • Ziehe die Scheibe von der Unterkante des iMac weg und lege sie sorgfältig zur Seite.

    • Achte beim Zusammenbau darauf, die Innenseite der Scheibe und das LCD peinlich genau zu reinigen. Jeglicher Staub und Fingerabdrücke werden sichtbar, sobald die Maschine eingeschaltet ist.

    What's the best product to clean the face of the LCD?

    Steve Speirs -

    Microfiber Cloth

    Leonardo Fournier -

    Try your best not touch it in the first place

    Brian -

    Wearing Nitrile or regular surgical gloves helps prevent finger prints if you accidentally touch the glass.

    amiller770 -

  3. FsUjQtJgaeqcNgE1
    FsUjQtJgaeqcNgE1
    txKZRpCYCaCgrtPs
    IZhsMLKJnWRLXJNs
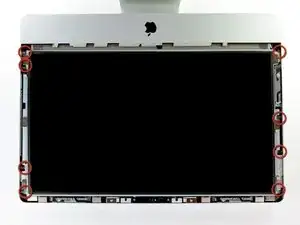
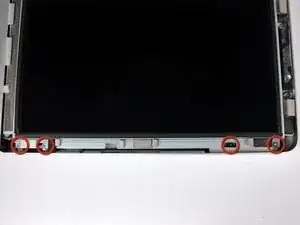
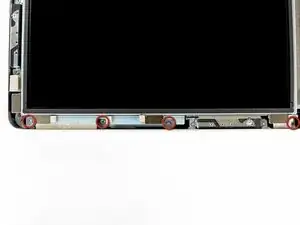
    • Entferne die acht 8 mm Torx T10 Schrauben, die das Display am Gehäuse befestigen.

    • Die letzten beiden Bilder sind Detailansichten jeder Seite des Displays.

    Replacing the screws , especially the two uppermost ones , is awkward due to the magnets attracting the screws off the Torx driver

    Anoop Sahal -

    I’ve done an HDD replacement on an A1174 (and I’m about to do this model), which is nightmarish, but by far the best solution I found was to use a bit of Blu Tack or the equivalent on the driver.

    Boris -

    I’ve just replaced the screws by making a little tube from paper and wrapping it round each screw to keep it contained. A cut-down straw would be perfect for job.

    Guy Whittaker -

    I second this but use a tube of cardboard instead, then its quite easy.

    jeank75 -

  4. JJrCWMp1gZN1UT4k
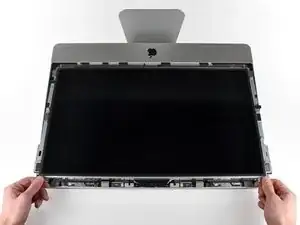
    • Hebe die Oberkante des Displays leicht aus dem Gehäuse.

    • Hebe es nicht zu weit heraus. Es ist noch mit verschiedenen Kabeln mit der Hauptplatine verbunden.

    After sliding the display slightly towards the top edge, enough for the bottom edge to clear the retainers, an alternative is to raise the bottom edge out. Then unplug the LED backlight power cable (this step + 2), unplug the LCD thermal sensor cable (this step + 4), unplug the display data cable (this step + 3), and the display may be rotated over the top edge while leaving the vertical sync cable attached (this step + 1).

    Jerry -

  5. snjtGbXS21FTSBMO
    snjtGbXS21FTSBMO
    xdAUxEVSgd5dQSHy
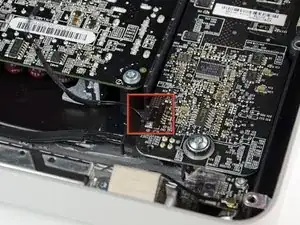
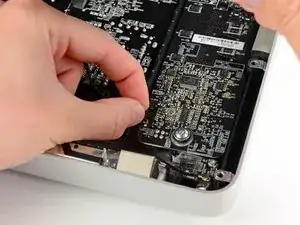
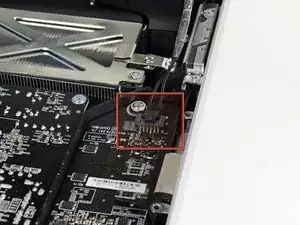
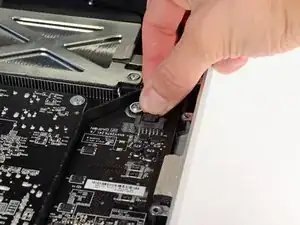
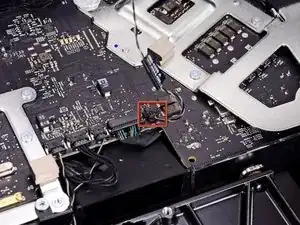
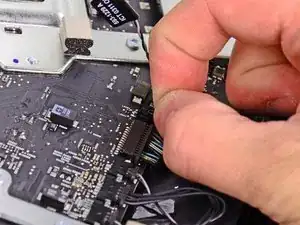
    • Ziehe den Verbinder am Kabel der Vertikalsynchronisation aus seinem Sockel auf der Platine der LED Versorgung in der Nähe der oberen linken Ecke des iMac.

    Do not try to pull the plug off the circuit board as it's soldered. Pull the cable sideways out of the socket.

    Alex Campbell -

    Skipped step 5-10. I used two 5-6" chopsticks to prop up the display, this gave me more than enough room to complete the rest of the steps. I only had to disconnect the 3 cables are directly connected to the hard drive. Replacing the Seagate hard drive with another Seagate hard drive eliminated any cable issues. Now I have 2TB SSDH

    jaime martinez -

    I was also able to skip steps 5 thru 10, which meant no messing with any cables except for the two for the HD (steps 13+14). Used a credit card to start the removal of glass panel (step 2) - much easier than I imagined. After removing display screws (step 3) I simply had a friend hold up the display's bottom edge as far as the cables would allow (careful not to stress at connection to logic board) and this provided enough room to remove the HD bracket screws (step 11), detach the HD cables, and remove the HD. Was replacing a failed 1TB Seagate with a 3TB Seagate so no problems with compatibility when reattaching the HD cables and everything worked fine when I restored the OS and data to the new HD. No fan issues. I did take great care to not get fingerprints on the inside of the glass panel and to blow off any dust specks before reinstalling it. It was a bit tricky to get the new HD back in without letting the magnets get a hold of it, so thanks for the warning posted here about that!

    Chuckles McBunny -

    On my mid 2010 Imac I found it was not necessary to disconnect any cables (except of course those attached to the drive). Simply angle the monitor away from the case to a safe distance without stressing any cables and secure with tape. With a stubby screw driver it was easy to access and remove the drive.

    Michael Husselbee -

    Skipped steps 6-10; did step 5 so could lift top of display higher, then propped up. A photo of whole interior here would help (hard disk is top center). Used pliers holding T10 bit at right angle to unscrew hard disk holder. SSD installed loose (macOS and fan control app already loaded).

    David Menges -

  6. iMBFDuJiaisDPeFC
    iMBFDuJiaisDPeFC
    5yr44v46WOxDbGkx
    • Drehe das Display soweit aus dem Gehäuse heraus, dass du das Versorgungskabel der LED Rückbeleuchtung von der LED Versorgungsplatine lösen kannst.

    • Um das Kabel zu lösen, musst du gleichzeitig die Sicherung am Stecker drücken und den Stecker weg vom Sockel ziehen. ( In Richtung Unterkante des iMac.)

    This is real tricky it is fragile and you have to pull it along the logic board.

    John -

    First push down on the edge of the connector closest to bottom edge of the iMac. This unlatches the locking mechanism at the top edge of the connector. Then gently wiggle the connector away from its socket.

    Oshoma Momoh -

  7. v1k3LXRGKXpV6j6l
    v1k3LXRGKXpV6j6l
    dcjmwaavKSaIn1pO
    • Das Displaydatenkabel hat einen Verschlussbügel aus Draht. Entriegele den Verschluss, indem du die Plastiklasche nach oben drehst. (Es ist keine Zuglasche)

    • Ziehe das Displaydatenkabel gerade aus dem Sockel auf dem Logic Board.

    • Der Sockel ist sehr empfindlich, ziehe das Kabel nicht nach oben. Ziehe parallel zur Oberfläche des Logic Boards.

    This cable is very short, I would remove it before any of the others. First time I did this, I didn't realize this and this cable just popped out of it's socket. Luckily, the board wasn't damaged.

    maccentric -

    i damaged my (step7) cable, and my iMac screen won't work, how to fix this?

    Ersan Rasubala -

    I did the same thing. The pins are VERY easy to bend. I replaced it with a new cable from this company.

    http://www.macpalace.com/922-9497-cable-...

    Waiting for it to arrive.

    Michael -

    I wish this step was listed as a warning before lifting the monitor and as the first cable to undo. I broke it as it popped up and out, had to trash my Mac and I am stuck with a new hard drive.

    Frank1701a -

    I followed the directions to a T and everything worked going back together. That cable in step 7 is delicate so one must be very careful.

    dustynnelson -

    Same problem for me. I damaged this cable and am ordering one now.

    This is a tough step so I would also suggest removing this cable first.

    lyleberman -

    Yes, damaged mine too. It is better to take it out of the LCD and install it carefully on the logic board, then install it to the LCD.

    asle -

    Ok finally got the cable and was able to successfully finish the project.

    That video cable is ROUGH to install.

    lyleberman -

    The same thing happened for me. That cable was by far the shortest and a slight pull of the display up caused the connector to come free. Luckily it wasn't damaged by this. It was pretty unclear to me how that connector fit in as well. It slides in and out parallel to the surface of the mother board, up towards the top of the iMac to unplug and down towards the bottom to plug in. I agree, if I were to do this repair again that is the first interior cable I would disconnect. Maybe a closeup of the cable plugged in and unplugged to show exactly how it engages and disengages would be good as well.

    danieljseta -

    It is fine to remove the cable from the logic board when when you remove the screen. But when when assembling back together I found it better to take the LVDS cable out of the LCD and install it carefully on the logic board. Then connect it to the top of the LCD. Also the connector to the LCD is much more solid and not so easy to bend.

    asle -

    This is by far the best way round to do this as trying to refit the cable to the logic board is a complete nightmare.

    Russ -

    I agree with asle, manipulating the display end of the cable would be easier - at least it cannot be any harder then manipulating the motherboard end.

    Jerry -

    well I did all t these steps and now the iMac won't turn on at all. I guess the big cable is not connected to the board as it used to... Mac is out of warranty so it's going out the door. RIP

    Gilbert Palau -

    this thing is super fragile. i had to order a new one. i'd recommend removing the other end at the top of the display.

    m Burm -

    this part is not complicated if you understand at first how the lock works.. remove the lock is easy, reassemble the cable and connect it is very problematic because the space to work is very tiny, but if you are carefully, it should be not a problem . try to see some videos from youtube first!

    Cristian Pizarro -

    This totally blows.. If you want to do this correctly and not destroy your computer over this step, - OWC’s video will show you EXACTLy what to do with the display cable ..

    https://www.youtube.com/watch?annotation...

    Luis Garcia -

    Don’t raise the display more than 3-4 inches. Pull the tape off the back of the display and unhook the cable from the display, instead of trying to remove it from the motherboard. As soon as I raised the display, the cable snapped loose. Ordered a new cable from Amazon. Am waiting to see if works ok.

    john -

    The worst thing about the whole tear-down procedure, was the display data ribbon cable in this step. As others have noted, It popped out of its socket on the mother board while disconnecting the lcd. I didn’t get a chance to see exactly how it connected on to the moboard . I damaged the dainty and minute ribbon end while trying to re-connect it to the wrong side of the receptacle. Duh! I feel so stupid. :(

    I had to order a new ribbon cable ($14) . Luckily, i was able to plug new ribbon into the fragile moboard connector adequately, and then the lcd end, during re-assembly. This re-assembly step is made for a very small person with extremely small hands and big eyes (like someone out of Gulliver’s travels).

    Dan Packard -

    2010 iMac SSD kit from OWC. Their video does not adequately explain the difficulty of re-installing the display port ribbon cable into the logic board. The best procedure would be to follow asle (see prior comment 8/11/15). The problem is exasperated by the fact that the plug into the LCD is covered in tape.

    Devere -

    Why is this not step 5? By the time I lifted display, the cable had already come out. I think it damaged it.

    Greg Cox -

    Got VERY lucky with my SSD replacement. Just leaning the display back popped the cable off the logic board, and I had a very difficult time reinstalling the screen. It might be that the wire bail wasn’t secured in the first place, or the machine has been opened up prior to my obtaining it. I eventually used a parts box to rest the LCD high enough to reinstall the cable. Agree that this should be the first cable to be disconnected and last to be reconnected. Perhaps disconnecting it from the LCD should be considered as a first step?

    phantom -

  8. BTiYLEbf35GsJli1
    BTiYLEbf35GsJli1
    TfFCJGU561MPwbxJ
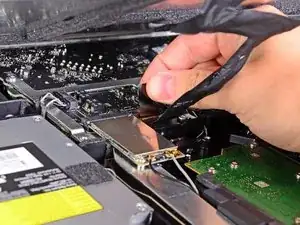
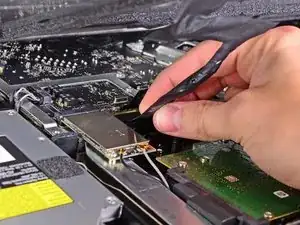
    • Löse den Verbinder des Thermosensorkabels zum LCD aus seinem Sockel auf dem Logic Board.

    • Wenn der Ventilator nach dem Zusammenbau auf Höchstdrehzahl arbeitet, musst du die Orientierung an diesem Verbinder oder am Thermosensorkabel der Festplatte prüfen.

    Be very careful - this connector very difficult to disconnect, and you have a high risk of pulling the cable pins out of the connect. If you have disconnected the 3 other cables, you can have a helper rotate the screen out of the way while you remove the hard drive.

    Brian Tsai -

    I found this connector impossible to remove

    Anoop Sahal -

    I also found this extremely difficult to remove. Tiny cable with a death grip. I tried using two spudgers, my fingernails, and walking it out. In the end, I used two spudgers and pried it up, using leverage from the clip to the right.

    Also, i recommend setting the iMac upright for this. I rested the screen on my chest while I dual wielded my spudgers.

    Alex Grayson -

    eer ist zerbrochen! hoffe krieg ihn dann trotzdem wieder rein

    Peter Pawlowicz -

    This was connector was impossible to remove. Like a previous commenter, I did this with the machine upright and with the LCD Panel resting on my upper chest. Ultimately, the pins pulled out of the socket! Once they were out, it was relatively easy to remove the socket. I completed the drive replacement, (installed a 1 TB SSD) and then replaced the pins in the socket and reassembled the machine. One mental error I made was I couldn’t remember the correct orientation for the Black and White wires in the socket. In looking at the photos here on iFixIt, it looks like I reversed their orientation. However, the machine seems to be running fine. I installed macos High Sierra and migrated my data from my old HD and the machine has been running for two days now. I would hate to have to go back in and remove the socket and reverse the wire orientation. Anyone have advise on this?

    jmaher -

    In followup to my previous post, I launched TechTool Pro 9.6.1 and ran the Sensors Test. All Sensors tests were passed. These included:

    LCD Proximity, LCD Thermal Compensation 2, LCD Proximity, Thermal Compensation. Machine seems to be running fine.

    jmaher -

  9. QcxFhTVxIJaFC3PF
    • Ziehe das Display vorsichtig in Richtung Oberkante des iMac und hebe es aus dem Gehäuse. Achte darauf, dass sich keine Kabel verfangen.

Abschluss

Um dein Gerät wieder zusammenzusetzen, folge den Schritten in umgekehrter Reihenfolge.

Andrew Bookholt

578335 Reputation

6 Kommentare

I damaged the lcd frame (with magnets) and I don't know where to find it. Can you guys help?

It's just the frame with magnets that attaches the lcd screen...

fredericoconchinha -

hey thanks for this.... i had to swap LCDs due to well known streak/screen fault.

after over 2 years using external display for work, i saw this blog and thought i might try.

the stakes were extremely high (my wife's iMac and no cash to get OOW apple repair, but your help got me through it. super cheers.

NB. i found this other thread most helpful re: the side strips that screw to the LCD panel and the iMac chassis.

iMac LCD Reinigung

rob -

Hey

where can I buy the LED backlight power cable from step 6

thanks

Swiss -
I'd like to buy IMAC LCD Model: ME086ZP/A. Where can I buy this item?

Ellen Laserna -

Hi, is that possible to replace the LCD diaplay by a 4k display?

J.J. JIANG -

Hey,

Is that possible to replace the LCD display by a 4K display?

J.J. JIANG -