Einleitung

Die Hauptplatinen der 24" iMacs aus 2007 und 2008 besitzen vier LED zur Diagnose. Sie können gut bei der Fehlersuche helfen. Du musst den Computer ein wenig auseinanderbauen um die LEDs zu finden und abzulesen. Diese Anleitung beruht auf Informationen aus dem Apple Werkstatthandbuch.

**Die Interpretation der LEDs gilt auch für die iMacs Intel 20" EMC 2133 und 2210**

  1. kKHOYvEWyQqv2ikT
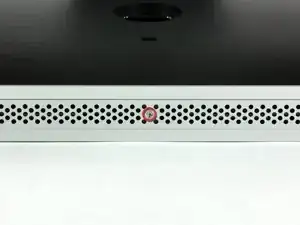
    • Löse die einzelne Kreuzschlitzschraube in der Mitte der Zugangsklappe.

    • Diese unverlierbare Schraube verbleibt an der Zugangsklappe.

    • Entferne die Zugangsklappe von deinem iMac.

    PH2 head necessary to remove screw.

    airshack -

  2. LnOEmYPxI5PBIQJY
    LnOEmYPxI5PBIQJY
    HqUOYlGhDnRbRBOu
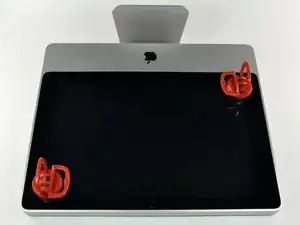
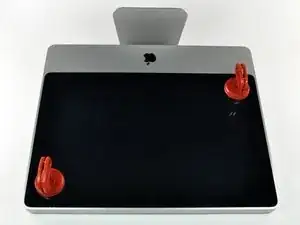
    • Die Glasscheibe ist mit vierzehn Magneten rund um den Frontrahmen befestigt.

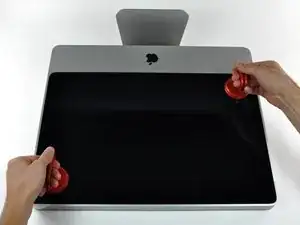
    • Befestige zwei Saugheber in gegenüberliegenden Ecken der Glasscheibe.

    • Um die Saugheber, die wir verkaufen, zu befestigen, musst du den Saugheber erst mit dem beweglichen Griff parallel zur Glasscheibe aufsetzen. Drücke ihn leicht gegen die Glasscheibe und kippe den beweglichen Hebel, bis er parallel zum anderen Hebel steht.

    • Wenn der Saugheber nicht gut haftet, dann reinige sowohl die Glasscheibe, als auch den Saugheber mit einem milden Reinigungsmittel.

    Save $15 dollars and use a plunger. Works perfectly.

    Michael Ybarra -

    Even better and more elegant: go to a household shop and buy two transparent plastic bathroom baskets with two suction cups each. I found them in Xenos in the Netherlands (maybe also in Germany).

    freed -

    Perhaps not so elegant but equally effective without any adverse effects to either... try a vacuum cleaner.

    Andrew Dobson -

    The same kind of suction cups are available from Harbor Freight Tools (Item # 62715) for $2.99 each or $5.98/pair (plus sales tax).

    Bob Atkinson -

  3. wOWEkQRIZSmjoKvF
    • Ziehe die Glascheibe vorsichtig gerade vom iMac weg.

    • Die Glascheibe besitzt um ihren äußeren Rand verteilt einige Positionierungsstifte. Vermeide es, diese abzubrechen und bewege die Glasscheibe beim Ausbau nur senkrecht nach oben.

    • Reinige das LCD und das Innere der Glasscheibe vor dem Zusammenbau akribisch. Jeder innen eingeschlossene Fingerabdruck oder jedes Staubkorn wird sonst störend sichtbar, wenn das Display angeschaltet ist.

    The glass panel is somewhat thin and should come away quite easily without much force so be gentle.

    adamngordon -

    Just an FYI - my glass panel did not line up perfectly when reinstalled. Off by just 1mm. May take another attempt at it later, but does not interfere with the iSight camera. Only someone with an eagle-eye (like me) will notice it's not perfect.

    ajpfl -

    To reinstall the glass, I lined up the bottom edge first, then pivoted the top in. The magnets pulled it quickly into place.

    Magnus Dalen -

    I didn't want to use such small suction cups.. so I got suction bathroom handles from Home Depot. Very sturdy and to me, safer choice.

    Gail -

  4. npTFBSoJoA4tyHCC
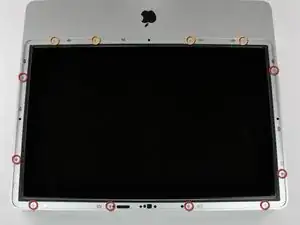
    • Entferne folgende zwölf Schrauben, welche die Frontblende am rückwärtigen Gehäuse befestigen:

    • Acht 13 mm T8 Torx Schrauben

    • Es können auch sechs 13 mm T8 Torx Schrauben und zwei 25 mm T8 Torx Schrauben sein

    • Vier 25 mm T8 Torx Schrauben

    • Es können auch zwei 25 mm Schrauben (außen) und zwei 35 mm T8 Torx Schrauben (innen) sein

    I only had two 25 mm T8 Torx on my model. (The two inner orange circles as shown in the diagram.)

    stevejansen -

    I don't know if this is different but i am in the process of disassembling a 24' imac emc: 2134. i have only: (2) 25 mm T8 screws the inner two on the bottom of the screen. I have (4) 13 mm t8 screws the outer most holes on the bottom and the 2 holes on the right side of the monitor above the drive entrance and the remaining holes are (6) 11 mm t8 screws

    ccarter314 -

    I have the same screws as ccarter on a 2211 except on the bottom row there are only 4 screws total, the longer ones go in the middle two.

    maccentric -

    The Torx set I bought from ifixIt is well worth the money. My screw heads in this step were T9 not T8. THe T8 bit was too sloppy in the screwhead and there was a risk of rounding the slots. Having the option to go a size-up was perfect.

    Troy -

    My 2211 has a different screw configuration.

    2 - 32mm long screws towards the middle of the bottom edge

    4 - 18mm long screws (2 at the corners of the bottom edge and 2 along the right edge)

    6 - 13mm screws along top and left edges

    christian -

    Mine is the same — two very long, four medium, and six short. Also my T9 worked better than my T8 which was a bit loose.

    johann beda -

    I have the same screws as Christian. The key is to make sure all screws are flush to the surface, so that the glass can be held up by the magnets.

    Kelvin Lau -

    On mine, for the red circles, I had the six 13mm Torx plus two 25mm Torx. It's not indicated in the picture here, but the 25mm Torx went on either side of the optical drive.

    JD Fox Micro -

    I marked next to each hole with a pencil "S, M or L" to indicate which length screw goes where. No guess work on reassembly.

    Magnus Dalen -

    I dropped my screwdriver on the lcd and nicked it. :(

    hewsey -

  5. OKTJoZ3T2TX2RBMP
    OKTJoZ3T2TX2RBMP
    NAuKQkjbMXru3q5Y
    • Die Frontblende ist mit dem iMac immer noch über das Mikrofonkabel verbunden.

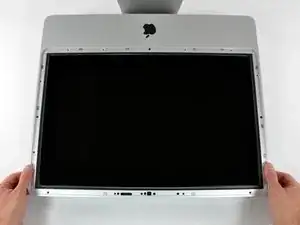
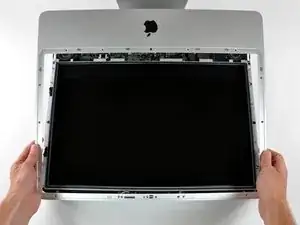
    • Hebe die Frontblende vorsichtig an der Oberkante aus dem rückwärtigen Gehäuse. Es hilft, wenn du dabei ganz sanft mit den Daumen auf die Ecken des Displays drückst.

    • Wenn die Oberkante der Frontblende weg vom rückwärtigen Gehäuse ist, dann drehe die Frontblende in Richtung des Standfußes und entferne sie aus dem rückwärtigen Gehäuse.

    • Beim Einbau der Frontblende solltest du an der Unterkante beginnen. Achte daruf, dass sie bündig mit dem rückwärtigen Gehäuse ist, bevor du die Oberkante in den iMac herablässt.

    The microphone cable must be disconnected BEFORE rotating the bezel towards the stand.

    Also, the bezel covers the sides of the case, not just the front. This isn't obvious from the pictures.

    wallace -

    Looking at the meaning of the LEDS

    i've got 3 LEDS on but i don't get a chime or the screen.

    i am going to check the inverter voltages but can only find info for the 20" macs iMac Intel 20" EMC 2210 Power Supply Output Voltage Test

    does anyone know where i can get info for the 24"

    samraby -

    i have the same thing, 3 LEDs on but no chime and no screen.

    what is the fix? and problem?

    Bill -

    I'm in the same position. 3 LED's, No chime, no life in the screen, Optical drive starts up but no other signs of life i.e.:fans also don't start up.....

    Any guidance would be greatly appreciated!!

    Dominik -

  6. hOeFeOWv1UYq2nCp
    • Löse das Mikrofonkabel ab. Entferne dazu das Klebeband, falls notwendig.

    • Damit die Frontblende wieder richtig passt, musst du darauf achten, dass das Mikrofonkabel und der Stecker in den freien Raum in der Nähe der Kameraplatine gesteckt wird.

    I didn't disconect the cable. I was working on a large table that allowed me to carefully flip the bezel upside down and rest it that way with the cable connected through the entire process.

    fulker -

    I also skipped disconnecting the microphone cable. I have a large table and I stacked some books next to the iMac. There was plenty of cable for the bezel to fold nicely over the top of the iMac.

    mikkorongas -

    I needed to move the bezel away, so disconnected the cable. On reassembly found that the pins had pulled out of the plastic housing. Need to know orientation of the 3 wires in the housing.

    prreitz -

    I used the floor instead of a table and left the cable connected.

    Frank Carrano -

  7. EAFGe3EPwQRM16RE
    • Um die LEDs zu beobachten, musst du den iMac mit ausgebauter Frontblende anschalten. Passe gut auf, dass du keine Bauteile und keine Leiterplatine anfasst, solange das Gerät unter Spannung steht.

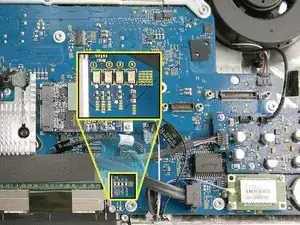
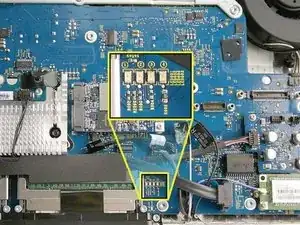
    • Finde die Diagnose LEDs zwischen den RAM Einschüben und dem SATA Stecker.

    • Die LEDs sind von links nach rechts mit 1-4 durchnummeriert. Möglicherweise musst du das SATA Kabel etwas wegschieben, um die LEDs gut sehen zu können.

    • Wenn du diese Anleitung für den iMac Intel 20" EMC 2210 und 2133 verwendest, dann findest du die LEDs -anders als gezeigt - über dem SATA Stecker.

    • LED 1 - zeigt an, dass die Indikatorspannung vom Netzteil durch die Hauptplatine festgestellt wurde. Diese LED brennt sogar dann, wenn der Computer heruntergefahren wurde oder im Schlafmodus ist. Die LED brennt nur dann nicht, wenn der Netzstecker gezogen ist oder das Netzteil defekt ist.

    • LED 2 - zeigt an, dass die Hauptplatine beim Einschalten korrekt mit Strom vom Netzteil versorgt wIrd. Sie brennt, wenn der Computer eingeschaltet ist und das Netzteil normal arbeitet.

    • LED 3 - zeigt an, dass der Computer und die Videokarte miteinander kommunizieren. Sie ist an, wenn diese Kommunikation in Ordnung ist. Wenn die LEDs 1 und 2 brennen und du den Einschaltklang hören kannst, aber LED 3 aus bleibt, dann könnte die Videokarte falsch installiert sein, oder muss ausgetauscht werden.

    • LED 4 - zeigt an, dass der Computer und das LCD Display kommunizieren. Sie ist an, wenn der Computer angeschaltet ist und ein Videosignal generiert wird. Wenn diese LED bei angeschaltetem Computer brennt, das LCD aber kein Bild zeigt, dann könnte das LCD oder der LCD Treiber falsch eingebaut sein, oder müssen getauscht werden.

    I have LED 1,2 and 3 lighting up, LED 4 is off. Does that indicate a videocard issue?

    nbeijer -

    3 leds appear to be the correct status - LED power supply and logic board tests

    Gwyn Evans -

    Hi friend, Your model is 24” a1225 emc2211? I have exactly the same problem...

    According to the led test it is a problem of the connection of the display or the video card, but I am almost sure that it is power supply, Did you find any solution?

    Victor -

    LED 1 lights when I plug in the power. As soon as I touch the power button, LED 1 goes off, and nothing else. All LEDs are off. Unplug and replug and LED 1 lights. This indicates there's no problem with the power supply.

    I'm fixing the oft-defective NVIDIA GeForce 8800 GS GPU. I reflowed the GPU and am in the process of seeing if the reflow worked. Before disassembly, the machine could turn on. Now nothing. During the process, I cracked the connector on the power inverter cable that goes from the power supply to the back of of the display.

    In my interest to get my iMac together, I placed the single dangling wire on its pin, then placed the two intact sides of the inverter connector on either side. (Gluing the connector together just didn't work.) I plan to order a replacement cable as soon as I can.

    Could this wonky cable connection cause the whole system to not function? I think it could, but thought I'd ask. Any other thoughts or gotchas from people who've done this type of work?

    walkingwired -

    Ok, display is black, I have led #1 lit when power is connected, led #2 comes on and stays on when power button is pressed, the fans come on, it checks the optical drive, I hear faint hard drive noise, but led #3 & led #4 do not come on. And I do not get a startup sound. What would this indicate?

    ferglesharky69 -

    Any update on this? I seem to be having the same problem.

    Hieu Nguyen -

    2008 24" iMac EMC 2211 Model 8,1 no power. I removed bezel and looked for Led lights. Non lit up. I'm thinking power supply? Thoughts. Video card? Thanks in advance.

    harley24052000 -

    it’s possible, I have the same issue. The #1 light is on when plugged in but soon as I press the power button it is gone….then no lights at all. Let it sit for 10 minutes plug it back in …no lights …nothing. I think maybe the power supply. I don’t think you can tell if it’s anything else like the logic board unless you have a known working power supply.

    QuickTech -

    I removed my screen to put in a hdd but after i put lcd back the forth light didnt come on, no display or start up tone.. cant work it out!?

    airbrushkits -

    Hi, I have a similar problem? Did you solve it?

    Daniele Sforza -

    On A1224 iMac i have LED 1 On. When I press power switch, led 2 turns on, but nothing more happens. I have not power on sound and fans do not turn on. What do you think is the issue? Videocard issue?

    Jorge Yerbito -

    I have light one come on stays on as long as the power cords plugged in light to stays on as soon as it boots or whatever and it makes a sound like 3 stays on but light for does not come on and I have nose thing on my screen but the screen works great prior to me upgrading the paste on my GPU and CP

    Clark Heisler -

    I get all four lcd lights on but nothing shows up on the lcd panel. Is there a way to test if it the panel or the inverter ?

    Kyle -

    Chances are you have a bad Lcd. They have fluorescent tubes that make the screen light up. Try a very high powered flash light to check for an image. If you see an I make chances are you need a new Lcd panel.

    mamashannon4u -

    I had this issue with an old iMac that stood for ages and the onboard battery ran flat. Replaced it and the machine powered on but no beeps or display. 4th LED was off. Only once I had it apart I tried various RAM combinations and got the bong with that. Re-connected everything and all good, including the 4th LED and display. Check the ram with known good RAM and try a few times.

    Alistair Wallis -

    It was the battery! Completely dead iMac A1225 EMC 2134. Was about to recycle it but figured I’d try this tutorial. I initially had just LED 1 green- and then none when I hit the power button. I replaced the PRAM battery and instant Bong and full boot up with 4 LEDs! Thank you for this great tutorial- I would simply add to replace the battery before doing anything major like a power supply.

    Kupe -

Abschluss

Um dein Gerät wieder zusammenzusetzen, folge den Schritten in umgekehrter Reihenfolge.

Richdave

Mitglied seit: 10/04/10

31842 Reputation

11 Kommentare

Hello,

I have iMac 2008 24" When I turn on the computer no startup sound but DVD / Motherboard / CPU Fan is still on. also two green LED is static on, anyone help me....

Raza

Syed Irfan Raza Abidi -

Does anybody know where I can buy the thermopads for the 4 chips on the video card. The ones it already had were all melted and can't reuse them. I appreciate your time and help. Thank you.

Jesus Juarez -

Does anybody know where I can buy the thermal pads to put on the 4 chips on the video card? Any help is very appreciated. Thank you.
Jesus Juarez -

Imac would not boot up (LED #1 lit only) about 9 months ago so I replaced PSU at that time. iMac was working fine until recently when it would not boot up again. Only LED #1 lit so I replaced the PSU again thinking this would solve problem……it did not. Only #1 stays lit and SuperDrive starts to spin yet no fans or chime or screen.

Question: Any other checks before logic board needs to be looked at or replaced. Is it worth replacing logic board on 10 year old iMac? How long and any special tricks?

Thanks from Florida.

Andreas -

Imac 24 2008 3.06ghz when turn on hear the chime screen on trying to boot up the bar under Apple logo starts moves about quarter way and stops

and would not move any further ,tried holding down all suggested sorts of key combinations no success .I also tried replacing new HDD ,after replacing and switch on screen comes on and display ? at this stage I loaded the Mac OS X Snow Leopard disc in the optical drive ,it starts spinning

the Apple Logo appears and below the logo a buffering circle starts spinning and carries on and on ,nothing else happens ,tried tuning computer on and off no success ,any suggestions what could be the fault.

Jim—07/11/2019

Basheshar S Legha -

I am also having some problem with led indications …. When i power plug plug into socket 1 led is constatnly lights, 2nd and 3rd leds on and off on and off… 4th led continuesly off.. any one gave suggestions for this problem.. i replace new power suply board also with ifixit support… but here is the problem… 2nd and 3rd on and off on and off…. What does it means any one explain.. please…

Ravi Komar -

Hi all,

my iMac A1224 has the following Situation:

- LED 1: always on

- LED 2 and 3: Flashing every 6 Seconds

- LED 4: always off

Do i need a new Power Supply?

SebastianM -

Hi all,

i replaced the power supply and it didnt fix my issue. The mag still does not switch on and boot. The LED behavior is still the same. Then i unplugged the power chord, pressed and hold the power button and plugged it on again. After a release and push again of the power button, the fans run up to full speed. LED 1-3 were constantly on. LED 4 is constantly off and there is no chime… The mac Still does not boot what could this be…?

SebastianM -

Hi, SebastianM. Did you repair your Mac? I have the same problem :-(

JAL -

Any update? I,too, am dealing w/ same issues. Disappointing, as I really neeeeeed my Mac! Tried all and even tried using an external display. Another question: With correct adapter&connection, this should work, right, using a smart TV as display??? Just want to see something.

CA Lawhun -

Hey gang-

TL;dr Replace the PRAM battery!

The full story. My 2007 24” iMac Core 2 Extreme- iMac 7,1 A1225 EMC 2134 has been sitting dead for years. Finally decided to see if it was salvageable before recycling it. So I completed this entire tutorial. For me I had LED 1- green and no others lit. When I hit the Power button, LED 1 went dark. Plugged and replugged- no help- all LEDs now dark. Not good.

So I unplugged and figured I’d wait 10 minutes. And since I was in the neighborhood, thought I might as well replace the PRAM battery. I replaced it and then plugged the Mac back in. And Bong! 4 LEDs and full boot up! Yes I know I got off easy- especially since I feared I was looking at a Power Supply replacement at the least. But by all means replace that battery before going any further! The battery simply pries up from its holder as illustrated here (for a different Mac but you get the idea.) iMac Intel 20" EMC 2133 und 2210 PRAM Batterie austauschen

Kupe -