Einleitung

Diese Anleitung zeigt dir, wie du die Festplatte austauschen kannst.

Werkzeuge

  1. 5kYpDOnZEnMIqQoF
    • Entferne, falls nötig, die Stücke von Klebeband, welche die Sensorkabel der Festplatte/des optischen Laufwerks am iMac befestigen.

  2. cNVHhS4bxL1WUUNE
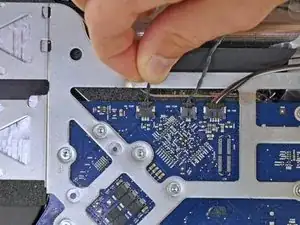
    • Löse den Thermosensor der Festplatte, indem du seinen Stecker nach oben in Richtung Oberkante des iMac ziehst.

    • Es geht leichter, den Stecker zu entfernen, wenn du die beiden Ausbuchtungen an jeder Seite des Steckers mit den Daumennägeln in Richtung Oberkante des iMac drückst.

    This is unnecessary since the other end of the heat sensor is removed from the old drive.

    dkulp -

  3. ieYx2LtGD215mRNi
    ieYx2LtGD215mRNi
    ZKUEX6ZEBeEMyu52
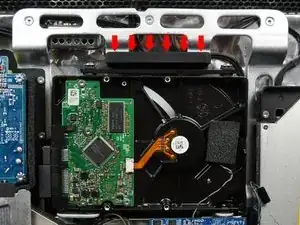
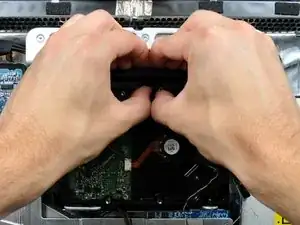
    • Um Festplattenhalterung zu lösen, musst du ihre Oberseite nach unten drücken. Dies erfordert recht viel Kraft und es besteht die Gefahr, dass du dabei deinen iMac umwirfst. Wir empfehlen deshalb, den iMac mit der Fußseite nach unten auf einen Tisch zu legen.

    • Drücke die Festplattenhalterung in Richtung Unterkante des iMac, damit sie vom rückwärtigen Gehäuse frei kommt. Drehe dann die Oberseite des Laufwerks zu dir selbst.

    To avoid the pain on my finger tips in applying enough force, I used a bit of microfiber towel as padding under the sharp plastic edge and it was then easy.

    Magnus Dalen -

    I found out that the black plastic bar is a lever, which swings up outwards left side — away from the backside of the casing — and then drops off of the right side, which releases the rubberized bolts, that hold the hard drive! The hard drive then could be lifted easily out of its hinges. Mind the cables!

    KönigT -

    Using a trigger clamp to compress the black retainer was the easiest method to remove the drive. Move the sensor wires out of the way then position the clamp in such a way that one jaw is on the drive and the other is on the black plastic. Compress it just enough to clear the metal support. Then to reinstall reverse the process.

    capt_ir8 -

    DON’T do this! you’ll likely hurt yourself. I tried doing this way and it just required more force than i was comfortable applying. just unscrew the HDD off the black “lever” piece. The HDD will just come right out. The side opposite of the black “lever” are secured with pins, don’t bother trying to unscrew from there.

    yamaoka01 -

  4. 1p2UnGrHBf3lKaoI
    1p2UnGrHBf3lKaoI
    y5FjuNWV6NUC6wDT
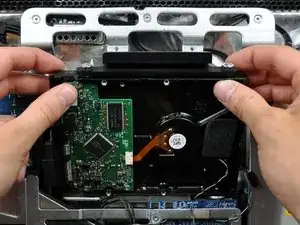
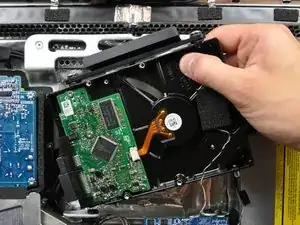
    • Drehe das Laufwerk zu dir selbst. Hebe es dann aus seinen Haltestiften heraus.

    • Die Festplatte ist immer noch über die SATA Kabel angeschlossen.

    • Achte beim Einbau der Festplatte darauf, dass du die Gummitüllen mit den unteren Stiften an der Festplatte nicht durch die Öffnungen im Rahmen drückst. Um sie wieder herauszuholen, müsstest du wahrscheinlich das Logic Board ausbauen.

  5. DSBY1AXTGMMcwtWH
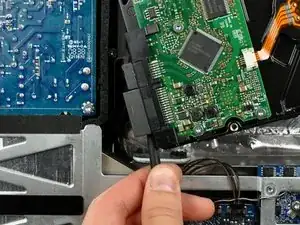
    • Setze das flache Ende des Spudgers zwischen den Stecker des SATA Versorgungskabels und der Kante der Festplatte ein.

    • Verdrehe den Spudger, damit sich der Stecker von der Festplatte löst.

    Please define "spudger"??

    Ken L -

    Here is a Spudger

    dkulp -

    This is the hard part if you're gonna use a bracket for 2.5 to 3.5 via SSD. I had to modify this one thrice. It's now all fit in nicely.

    xa0s -

  6. iClXOsTfEipveWMD
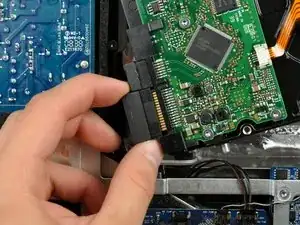
    • Ziehe den SATA Versorgungsstecker von der Festplatte ab.

  7. HpKqkZpfTUgDIjQv
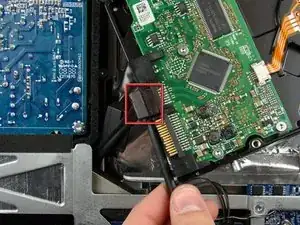
    • Löse das SATA Datenkabel, indem du seinen Stecker von der Festplatte abziehst.

    This cable was not long enough to reach the SSD connector for me. The adapter I used, and I suspect many used, puts the SSD centred, thus the data and power connectors a bit further away from where the original drive's connector were. The power cable had enough give to plug it in, but not the data cable. I knew the data cable had more give from the other end of it, so I careful pulled it with, ashamed to say, force. I heard tape giving away, so I figured it was taped down underneath. I managed to get just enough length to plug it in.

    Sccoaire -

Abschluss

Um dein Gerät wieder zusammenzusetzen, folge den Schritten in umgekehrter Reihenfolge.

Brittany McCrigler

Mitglied seit: 05/03/12

88148 Reputation

0 Kommentare