Einleitung

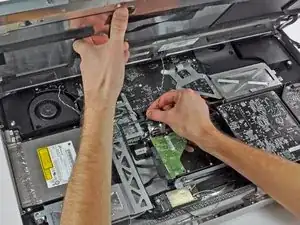
Hier wird der Austausch der defekten Kameraplatine gezeigt.

  1. sQYsHCwlim2WOs5y
    sQYsHCwlim2WOs5y
    wHiunt5LEPRI6Df1
    olRVCyJ2KOMrOshW
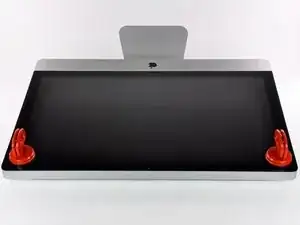
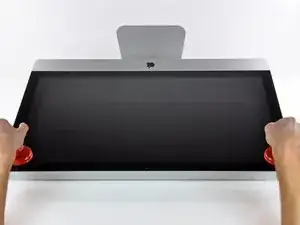
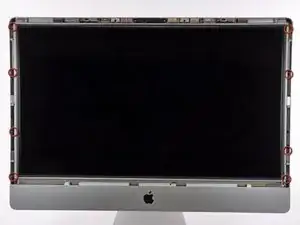
    • Befestige je einen Heavy Duty Saugheber in den beiden oberen Ecken der Glasscheibe.

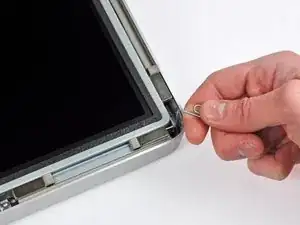
    • Um die Saugheber zu befestigen, platziere sie erst mit dem beweglichen Henkel parallel zur Glasscheibe (wie im zweiten Bild gezeigt).

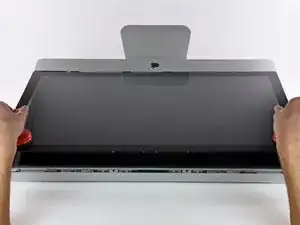
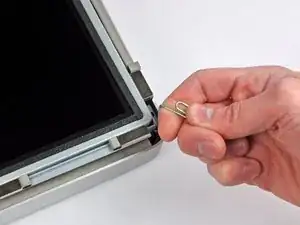
    • Halte den Saugheber leicht an der Scheibe und hebe den beweglichen Henkel bis er parallel mit dem anderen ist (wie im dritten Bild gezeigt).

    • Wenn deine Saugheber sich nicht befestigen lassen, reinige sie und den Bildschirm mit einem angefeuchteten, fusselfreien Tuch. (Am besten verwende destilliertes Wasser und, wenn das nicht hilft, ein 50/50-Gemisch aus weißem Essig und destilliertem Wasser.)

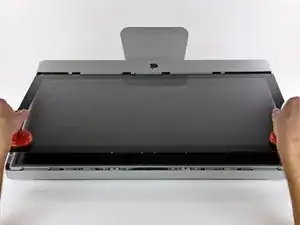
    • Hebe die Glasscheibe nicht nur an den Saughebern hoch, da sie dir sonst runterfällt, wenn ein Saugheber sich löst.

    • Die Originalverpackung des iMacs ist ein guter Ort, um die Glasscheibe abzulegen. Andernfalls tut es auch eine weiche und ebene Fläche, zum Beispiel ein Handtuch auf einem Tisch.

    You can easily lift the glass panel off the magnets with only your fingernails (or something thin like a credit card or a guitar pick). No need to buy suction cups you will only use once.

    Nick Caron -

    Yes, you don't need the specific suction cups to remove the display cover - it's held on by magnets, and if you start at the center by the iSight you can work out to the edges and remove it. I had an iPhone screen suction cup around and it helped with balancing the screen when you pull it out fully, but by no ways is it required.

    jtowner -

    Great guide and pretty straight forward the only thing that took me ages and I didn't manage to undo were the power btn cable (step 28) and the thermal sensor (step 25) Seemed like they were glued on! Very difficult to remove and obviously conscious so I didn't break anything!

    Eddie -

    Thanks!!! Worked excellently.

    I used a plunger (clean first ;-) to get the screen off, and http://exirion.net/ssdfanctrl/ for fan control.

    Then, i did not take out the whole display and left it in the hinges on the bottom side and held it up with two small cardboard boxes. Easy enough to disconnect the hdd then.

    I replaced with an ssd, put that into a ssd enclosure. Had to drill an extra hole in it to fasten the pins that hold it in place.

    Used Carbon Copy Cloner to make an image from the old hdd, with the sad connected via usb. Checked it of it booted via System Preferences > Startup Disk. It worked so the took the imac apart and replaced the disk. Booted, everything was working as always, only faster!

    Frank303 -

    I'm replacing my optical drive too. what exactly needs to be plugged into the SSD? I don't have the kit - as I am not sure one is required if I buy something like this: http://www.amazon.com/gp/product/B0056OB...

    Can you please advise? Can I do it with this piece, or do I need to get the entire bracket kit?

    Allen Borza -

    My display data cable forks, with a smaller section going up near the camera board. Where it forks, it is attached to the aluminum plate that attaches around the cpu board. I haven't seen any images that look similar, and I'm stumped at how to remove this second section of the cable. 2010 i7 build to order

    Awolf -

    Agree with the other comments here. Despite buying suction cups, not sure they were necessary as the screen removed very easily. A sat nav suction cup would do the job fine.

    Stuart Bloomfield -

    I can confirm that it is possible to remove the front glass using fingernails rather than suction cups. It isn’t easy, but if you try you should be able to pry off the glass.

    I did this twice: once at the beginning of the procedure and once again at the end, when I realized that a big pice of lint was trapped under the glass.

    gordonhamachi -

    Don’t use suction cups. totally unnecessary. screen pops off with fingernails.

    Kieran Hobbs -

    The reason for caution about suction cups tends to be making sure you don’t apply uneven pressure on the edges of the glass and crack it in the process of removal. I do agree however that some pretty small suction cups would do fine. These suction cups can be had at your local princess auto (Harbor freight) for a few bucks and are useful elsewhere as well. if you use your fingernails or other items just try and do it evenly :)

    Abirinder Brar -

    good duct tape or gaffer tape wrapped around your hands makes an excellent glass removal 'tool'. Even clear packing tape works a charm.

    Stu Blair -

    A great first step that minimizes that first gust of dust migration when the glass is lifted is to clean the glass, sides *and the back* before lifting the glass, and then lift SLOWLY. Most of that dust is already trapped inside and pulled up as the screen lifts, but with care you can keep it there (or gently vacuum out with a micro vac…).

    John -

    before starting any of this…there is a device that you can use that comes with the IFixit kit to format and either clone or restore your hard drive to the new drive…it will save you a lot of headaches..it is a SSD enclosure that you can plug into your existing computer …

    Tom Richter -

    Thanks for the instructions. Before doing this the first time, suggest to everyone, read through at least twice. This is the easiest step, as you’ll soon see. As for removing the glass, USE suction cups, either the ones the sell here, or others. DON’T skimp. Also wear gloves when handling the glass. Don’t take chances.

    ECJohansen -

    Duct tape works too!

    Dani -

  2. XBLBbPNDcxRAYYWS
    XBLBbPNDcxRAYYWS
    xMmDfMTyn4Ac1SkA
    mqbuAnq3Mon1YWiD
    • Hebe die Glasscheibe rechtwinklig so weit vom Display weg, dass sich die metallenen Befestigungsstifte an der Unterseite der Oberkante lösen.

    • Ziehe die Glasscheibe weg von der unteren Kante des iMac und lege sie vorsichtig beiseite.

    • Trage die Glasscheibe nicht nur an den Saughebern, da sie dir sonst runterfällt, wenn ein Saugheber sich löst.

    • Löse die Saugheber, nachdem du die Glasscheibe sicher abgelegt hast, da der Unterdruck auf Dauer das Glas beschädigen kann.

    • Denk dran, den Bildschirm und die Innenseite der Glasscheibe vor dem Wiederzusammenbau sorgfältig zu putzen, da eingeschlossener Staub oder Fingerabdrücke deutlich sichtbar sind, sobald du das Display einschaltest.

    you should do this mac up, because, for me, one of the suction cup failed, and the glass fall into the lcd screen. Now there is a big hole in it...

    Lau -

    do you still have this panel?

    Alpha Dimension -

    Reassembly: After powering on and running for a few minutes, found a large whitish patch on the screen. Persists after powerdown.

    Turned out to be condensation, though it didn't look like it - more like fine white powder rubbed in. Humidity is very high this time of the year. Fix: start airconditioner in a room, leave it running a while, take iMac in, prise open the glass again. Condensation vanishes instantly. Keep it out for a ~15 minutes running infinite loops to get iMac nicely heated up and fans running. Snap glass back.

    ganesh -

    I used a Swiffer dry cloth to get all the dust off the screen while just blowing with my mouth at a steep angle. I know I didn't get every speck, but the screen looks perfect once assembled and lit again. Removing the glass from the screen is pretty easy if you need to re-clean it.

    Jay Gillibrand -

    I used a microfiber cloth instead, which worked well. The same type as yo use to clean eye glasses, but in a larger form factor.

    Daniel -

    The Swiffer idea worked great! I just brush it over the LCD and glass panel lightly, and all dust particles are gone quickly. The screen after boot up looked beautiful. Thanks!

    dtsai2 -

    I strongly recomment to detach the suction cups while working at the rest of the steps. In my case after half an our i heart a crack noise behind me on the table... The vacuum of one of the suction cups braked the glass! maybe there should be a warning in the Repair guide

    shippe -

    I didn't crack the screen, but it popped out of the shims and then popped back in, as if the glass edge is magnetic or has steel in it to connect to magnets. Be careful with this step — it is pretty nerve-wracking, but doable!

    Alex Reynolds -

    You need a big clean surface free, or at least 2 or more free surfaces because the iMac, the glass and the LCD display are quite bulky. You'll also probably need space for a tablet or a laptop to read this guide while you are working. And don't forget room to work on the optical unit and for the tools you are going to use. I covered a large table with a double layer of bubble wrap. In my opinion it's better to put the glass face down to limit powder sticking on the internal surface.

    Roberto Blandino -

    Thanks good advice! I was wondering exactly about the working space issue!

    matteoslataper -

    I am doing this repair now. After successfully lifting off the glass panel (yay!), dust blew out of the lower open edge. So I sprayed a can of air around edges. But a poof of the “air” condensated on the LCD. Does anyone know if I can clean the LCD same as how the glass is cleaned (damp cloth with equal parts white distilled vinegar/distilled water) and if not then how?

    Amy C -

    Hi Amy,

    To clean the LCD panel, I would suggest using a clean microfiber cloth and rubbing alcohol. Distilled water can be used, but avoid regular water, which contains minerals. Make sure the microfiber cloth is absolutely clean and has no hard particles sticking on the surface, which will scratch your LCD when you wipe it.

    Wet the surface with some alcohol and gently wipe with the microfiber cloth. Wipe in one direction.

    Arthur Shi -

    I find that the LCD is not as fragile as we all think. they are very much like any LCD on a tv or monitor. There is no extra glass on the front of a monitor. Not the 23 HP Pro Displays I have anyway. I know this because I punctured one moving my video wall. so I took it apart to know how its put together. I will say, there are several 'lens’ like sheets and a reflective (silver} sheets that are the same size as the panel. and a 1/8”piece of acrylic, all behind the LCD panel. Take care with them and clean as you would your monitor.

    My suggestion is to stand the iMac up after the panel is secured back into the body of the iMac and clean while its vertical. took me 3 attempts before I realized that while laying flat the surface is large and collects dust with mind blowing speed.

    Stu Blair -

    If the LCD glass is badly cracked and broken you need to be extra careful removing as the sharp shard of broken glass can scratch/harm the underlying screen as they may “fall in or onto” the screen below.

    I found that strategically putting sheets of 8x11 paper(s) under the sharpest, largest broken sections help protect the underlying screen. A vacuum was also helpful removing some of the small glass shards.

    Mark Hilliard -

    Be advised: I did a perfect replacement of the hard drive, temperature sensor to the SSD, LCD screwed in, glass cleaned. I went to put back the final glass, I set the bottom edge in place and as I slowly moved to have the magnets take hold, they pulled the screen out of my gingerly held fingers, and smacked into place……cracking the glass! Ugh! So, on this last step, hold tight as you put the glass back in slowly. It will cost you about 40-50 bucks for a new glass (mine is on it’s way).

    R R MOOS -

    Yikes... that sucks. thanks for sharing this information. I took everyone's advice and removed and placed this back very very carefully.

    iSeeU ChilinHomie -

    Don't trust the suction cups after you remove the screen cover. Used both hands to hold this piece carefully!

    iSeeU ChilinHomie -

  3. ESNuZMMtVT22IbfX
    • Entferne die acht T10 Torx Schrauben, die das Display am Gehäuse befestigen.

    Be careful not to lose these screws when they are unthreaded. Use tweeters to grab them before removing the Torx driver.

    Gavin McMorrow -

    To prevent screws close to the magnets to leave your screwdriver, use a straw to encapsulate your screws. This is especially useful when putting them back. See pictures for details: http://cjoint.com/?CLCpN1nmK4M and http://cjoint.com/?CLCpOy6aF9G

    Marc66 -

    That was a brilliant idea. After trying for ten minutes without luck, the straw technique helped immensely.

    victorpoupet -

  4. GDPPCVGkB2PtSQTu
    GDPPCVGkB2PtSQTu
    lBPpn1rKQNMtQOab
    lFteLcmmOQATW5NN
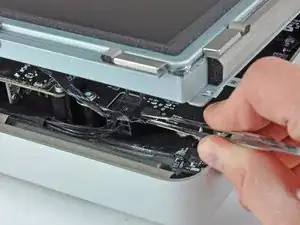
    • Lege den iMac vorsichtig mit dem Rücken auf eine ebene Fläche.

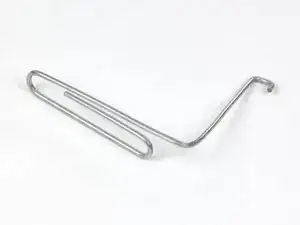
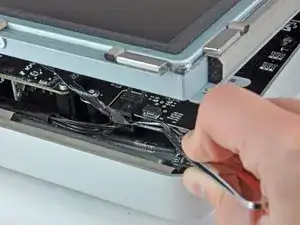
    • Da zwischen dem Display und dem Rahmen sehr wenig Platz ist, benötigst du einen dünnen Haken, um das Display anzuheben. Wie im dritten Bild zu sehen haben wir uns einen aus einer Büroklammer gebastelt.

    • Hebe eine der oberen Ecken des Displays mit einem dünnen Haken am Metallrahmen leicht an.

    • Nach dem Anheben einer der Ecken halte das Display kurz und hebe auch die andere Ecke mit einem dünnen Haken leicht. Um die angehobene Ecke zu stabilisieren kannst du einen Stift von der Seite zwischen das Display und den Rahmen schieben.

    • Hebe das Display nicht zu weit aus dem Gehäuse, da die beiden Teile noch durch einige kurze Flachbandkabel verbunden sind.

    Be very careful not to hook the Bluetooth antenna cable while you're lifting the display out. It's hiding under the top left corner of the iMac. I managed to snag mine with the paperclip and ended up pulling the antenna cable clean out of the tiny gold connector. Some very precise reconstruction work was required to get the cable seated in the connector again and back up to full signal strength.

    Ben Davies -

    My iMac has a couple of bits of mesh tape at the top. I don'r see these mentioned?

    andy pugh -

    I used an isolated screwdriver, since paper clips were too weak.

    Christoph Sold -

  5. ljO1oq2TyeXgaQLO
    ljO1oq2TyeXgaQLO
    yDZIHrYRHAplvpQj
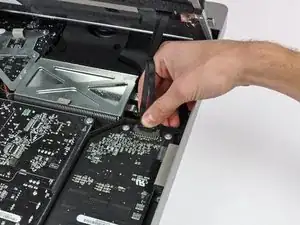
    • Ziehe mit einer Pinzette das Kabel für die vertikale Synchronisation vom Anschluss auf dem LED Board, nahe der oberen linken Ecke deines iMac.

    • Bei manchen iMacs können dies anstatt des Flachbandkabels auch vier separate, sehr dünne und anfällige, Kabel sein. Sei sehr vorsichtig, da du beim Abrutschen mit der Pinzette eines der Kabel aus der Steckereinheit ziehen kannst.

    I had a friend with me so all I did was disconnect the vertical sync ribbon cable, and I had my friend hold up the LCD for a couple of minutes as I swapped out my HDD with an SSD, thus avoiding steps 6-9 and going straight to step 10.

    Gabe -

    Can I purchase this cable separately?

    mamedovmarat -

    After removing the display, I noticed a high pitched whine coming from the machine, different loudness for different levels of display brightness. Reading up on it, it seems that the problem is with the vertical sync cable (and this is a well-known issue with Apple with new machines, too). So be careful when reinserting this cable!

    Adam Hintz -

    I noticed that the vertical sync cable seems to have been updated since the guide was produced. It now has a more normal plug and socket and 'regular' wires instead of the flat ribbon cable shown here. I used narrow nosed pliers instead of tweezers to unclip it as I was afraid that just pulling on the wires could have broken them.

    Eoin -

    WARNING: Take extreme care when removing these wires as mine were not a ribbon cable but individual tiny wires. I removed them cautiously with tweezers OK but when re-inserting, one of the wires came off. Obviously someone had been in here before.

    Peter Sinclair -

    Hi Peter, did you manage to get a replacement? Let me know please - Thanks Paul

    Paul Randall -

    be sure to keep this cable, because it does not come with a new display!

    Julian -

    I changed the HD yesterday and when I reinstalled the Display I had the same problem then Peter Sinclair. I started to panic first. But then I reinstalled the Pannel without re-insterting the cable at all and nevertheless my iMac works perfectly since 14 hours now. I'm really confused!

    muggooz -

    My vertical sync ribbon cable had two of the four contacts bent back, it may even have been like this originally. I straightened them out as best I could under a magnifying glass, and after reinserting, everything is working OK. Seems this cable is not particularly critical. Also, I used needle nose pliers for this and the other connectors, I can't get enough grip with tweezers.

    Andrew Crabb -

    Tweezers didn't work for me due to the angle and lack of grip (they kept slipping and I was concerned about squeezing any harder). I just used my fingers to grab the connector as close to the connection as possible for both removal and insertion and it worked just fine. I have big hands and meaty fingers, so this method should work fine for anyone.

    David -

    I have a late 2009 27" Mac and did something similar to Gabe, but being alone, after unplugging the vertical sync cable, I used two wooden chopsticks to hold the screen at about 45° and without disconnecting any more cables I could quite easily access the Superdrive to remove and replace with a 240GB SSD with help from a caddy from TheNatural2020, which required a tiny modification.

    All in all it took me about 45 minutes and was much easier than expected. It is working at a negotiated SATA speed of 3 Gbps Some report a speed of only 1.5 Gbps, but from what I had read before purchasing the Crucial M500, going for a 6 Gbps SSD is worse on a late 2009 Mac as it has to default to the basic SATA 1 speed of 1.5 Gbps, while the slower 3 Gbps SATA II drive works at 3 Gbps. The time from the Apple logo till the sign-in screen on startup has gone from 33.5 seconds to 8.5 secs, and my internal hard drive is a 7200rpm

    I am VERY satisfied and it was much easier than expected.

    Adam Griggs -

    Thanks for this suggestion! I didn't have chopsticks, but was able to use some pens instead. The pens are shorter, but still provided sufficient room for my tools to get to the screws holding the HD. I noticed there are two large, thumb size, indentations in the frame under the LCD that the pens fit into nicely. Since I did the repair by myself, this really sped up the process and I was able to complete the HD swap and memory addition in about 25 minutes. (I had planned 2 hours. Happy, happy, happy!)

    barry -

    I also did this step and then went straight to step 10. I installed a SSD so I didn't do step 15 either. You can use this to control the fans: http://exirion.net/ssdfanctrl/

    Overall, great guide! Thank you.

    Sam Im -

    Adam's technique with the chopsticks works great. I didn't even have to disconnect the V-sync cable. Mine wasn't plugged in for some reason. I guess the LCD works without it.

    Ashok -

    This was for me the hardest step when reassembling the iMac.

    I had to open and close the iMac several times as each time some of the cables was not properly connected: The vertical sync, the display data cable connector, even the Bluetooth antenna was off at some point and I had to re-open every time! Finally I left the vertical sync cable disconnected as with each operation it was in very bad condition and impossible to plug in. I'm amazed at how bad designed is this cable and how easy is to break it! It's nice to know that they improved it, poor technicians.

    I'd like to replace it in the future but I really don't know how or if it is available in its more up-to-date version… I didn't feel like dissasembling everything again to see how is it connected.

    carolaclavo -

    The portion of this little cable that plugs into the receptor is stiffer than the rest of the cable, but it is very slippery. For me, it was also very tight. Tweezers and fingers just slipped right off of it. Fortunately, I didn't tear the cable. I ended up using needle-nose pliers wrapped with cellophane to get traction. It was also very difficult to reinsert. By raising the display to the maximum level with all the other cables connected, I was able to push it in with my fingers.

    Also: if you get any smudges on the display, a lens pen works great to remove them. I used a swiffer to pick up dust.

    Michael Morris -

    I opened the case as far as I could without stretching this cable and used my fingers to get it. The end of the ribbon where it connects is stiff, so you can grab it there. There's not connector; the stiff part just slides in and out. Getting it back in is a pain, but if you get the perfect angle it slides back in without much force.

    Jay Gillibrand -

    That's what I ran into with my friends iMac as well. it was just (very carefully slid into place. a piece of celotape held it in as we put the pieces together.

    Wizbang FL -

    Pull the cable AWAY from the connector. Some cables have a plastic connector cap attached to the end. This one does not. The cable just slips out as if pulling a stick of gum out of a package. I used my index finger and thumb, no tweezers needed.

    Cameron Moll -

    I also plugged it out with my fingers, got more feeling in them. Put it in the same way. There is no barb or something on the cable, so this should be quite safe when not using too much force. And I also used chopsticks to keep the display up, just like an engine hood.

    Oliver Hahn -

    This ribbon had me flumoxed for a while. I had expected to have to remove the terminal from the circuit board. All you need to do it gently pull on the ribbon directly and it will come out of the terminal.

    Stuart Bloomfield -

    I followed the above tips and used chop sticks as struts to support the internal screen at an angle, whilst I worked on the hard drive. Allowed me to skip the remaining cable removal steps and go straight to step 10. And I didn’t need an extra set of hands to hold the screen whilst I worked.

    Stuart Bloomfield -

    So far so good. Had trouble with this first ribbon wire and not even sure I got it back in all the way. Computer is working just fine right now with Windows 10. The chopstick idea was absolute genius and saved me so much time!

    Matthew Muratore -

    Does this repair require a Hard Drive of the same brand like some of the later iMacs do?

    lee webb -

    The brand doesn’t matter per se, but it’s helpful to have a disk with the same temperature sensor connector. In some cases, it’s stuck to the disk. In other cases, it’s a long, thin connector with 4 pins. Or, it’s a thick, square-ish connector with two pins. I usually take the old disk to the store and ask “do you have a disk that has a temperature sensor that looks like this?” And….if you can’t find such a disk or you want to stick an SSD in there (they’re getting cheaper by the day!), then make sure you get Macs Fan Control software to help you manage the fans that will possibly run at full blast.

    David -

  6. 2tDkhS2PAFFoCTJR
    • Hebe das Display weit genug aus dem Gehäuse, um das Kabel der LED Hintergrundbeleuchtung vom LED Board zu trennen.

    Step 7 MAY be better done prior to Step 6. 7's cord comes tight before there is enough lift room to get to Step 6's plug in my opinion.

    Gavin McMorrow -

    Maybe it's just me but I couldn't see how to unclip this. It felt like it should just be a case of squeezing both sides and then pulling, but it was so stuck I was concerned about damaging it.

    If anyone has a little more detail on this step it'd be useful.

    Chris -

    The connector has a simple locking mechanism, essentially a ridge on the top where the thumb is placed in the picture. If you push down gently there the latch raises and you can pull the cable out.

    Rob Purcell -

    Thank You That was very helpful

    Patrick Zelenka -

    I found step 6 the most difficult of the whole procedure. The way I unclipped the connector was from the front, with my thumbnail. There's a little ridge over which the cable clicks tight. If you use your thumbnail to lift the connector over that ridge, you can then easily remove the cable. (Maybe iFixit should that advise to the guide, since especially step 6 is a bit too concise imho.)

    Daan -

    Agreed with previous comment :You should be very careful after step 5 - it may be necessary to do the step 7 before the step 6 because the connector on the motherboard for the LCD data is very very fragile. I broke it and found that a lot of people broke it as well .

    pierre -

  7. TKmkOMUuIj2ESJ1y
    • Drücke die beiden Pins des Displaykabels zusammen, um es aus seinem Anschluss auf dem Logic Board zu befreien.

    • Ziehe den Stecker des Displaykabels aus dem Anschluss auf dem Logic Board.

    • Sei sehr vorsichtig beim Entfernen dieses Kabels, da sowohl der Stecker als auch der Anschluss extrem fragil sind. Verwende beim Anschließen des Kabels während des Zusammenbaus so wenig Kraft wie möglich.

    I just spent 100€ at the Mac shop to learn this: when reattaching the display data cable be sure you get the ends right. Even if the cable fits perfectly the other way round, the computer won't even start.

    Julian -

    NOTE!  The internal video connector on the logic board is quite fragile - proceed with extra care when disconnecting. There are many postings of Mac users who have broken the display connector and are then left with quite a challenging proposition to replace it. Here is the link to one such thread: http://forums.macrumors.com/showthread.p....

    thorjurgen -

    Ditto. It is very fragile. Mine pulled off the motherboard while doing the upgrade (all else went well). Problem occurred because I tried to do the drive swap without removing the display. I had someone hold it up for me. Display is heavy and you can't feel the tug of the cable. Disaster.

    The repair is beyond most computer repair folks. Found these guys http://www.dttservice.com/ and they are great. For $195 they fixed it in 24hours.

    Dave -

    I ran into a big problem with step 7: my display data cable did not have any sort of plug to connect to the logic board. Instead, the cable seemed to be soldered onto the board or simply run under this small copper-colored band. There was no plastic plug to detach/attach.

    I was afraid to pull on the cable and break something, so I simply had a friend hold up the LCD and I replaced the logic board without removing the display. I'm not sure what I would have done if I needed to replace the drive.

    Has anyone else run into this issue where the display data cable doesn't have a plug? And are there alternative ways to detach it safely?

    fronesis -

    @fronesis - on my iMac it wasn't possible to pull out the connector at first. There was a small rectangular metal clip which locked the connector in place - this had to be pulled up first, and then the connector came out extremely easily.

    johnrowell -

    I'm having blackscreen issue and this cable is my main suspect. Here is my post regarding this issue.

    Black screen after SSD install (suspect is monitor cables)

    Mads -

    you will break your computer if you follow this step during the reassemble!

    it’s not possible to reconnect the display with the board because the cable is way to short to maneuver the connector in place and you have almost no sight - you’ll not see what you’re doing! the better approach is disconnect the cable on the display as well (since the connector here is more robust) and insert the connector on the board as a first step without having the display in front of your face..

    mike -

  8. LKCEiOECkd3DmUSK
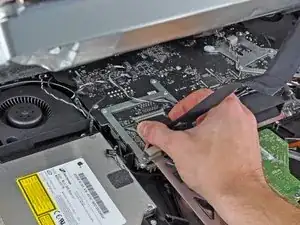
    • Hebe das Display weit genug an, um das Kabel des LCD-Temperatursensors von seinem Anschluss auf dem Logic Board trennen zu können.

    • Wenn dein Lüfter nach dem Wiederzusammenbau mit voller Geschwindigkeit dreht, überprüfe dieses Kabel und das Kabel des Festplatten-Temperatursensors. Der Anschluss der Temperatursensoren ist sehr fragil, sei beim Anschließen der Kabel sehr vorsichtig.

    Be very very careful when you pull out this plug as it is extremely fragile and also reattaching the LCD thermal sensor plug and very very gently ensure that the pins are actually going into the connector before you push the plug in. i damaged the top part of the plastic housing which then made it difficult to insert the plug into the connector. I can't believe how easy it was to damage this connector!! If you don't attach the LCD thermal sensor plug correctly the Mac fans will go crazy at full speed. It took a good 15 minutes to get the pins to finally go into the plug and they can bend easily.

    j74656 -

    This was too tight to get with my hands. I used needle nose pliers to grab the plastic connector and it popped right out. I need pliers to get it to snap back in too. The wire itself if very thin so be sure to only grab the connector.

    Jay Gillibrand -

    The connection of this cable is moot (and to the main drive too) if you purchase HDD Fan Control Monitor software that uses the SMART tech inside the drives to set the fan speeds. It was rather expensive but worth the $35

    Gary Kimes -

    This plug pulls out straight up towards the top of the screen. That is, standing above the top edge of the screen, straight towards yourself. DO NOT pull it ‘up’ 90 degrees from the board it is mounted on! You will deflect it away from the board—like I did, after reading this vaguely written instruction for this part of the procedure….

    You can easily remove it by using two fingernails on either side of the plug to gently and slowly lever it out of the socket. BEFORE YOU DO, paint one side of it white or yellow, so you can re-install it properly….

    Neo -

  9. b1XdVZeQluZHxVrP
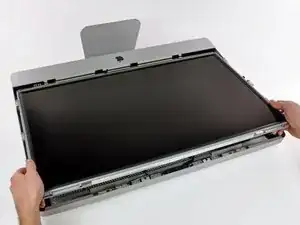
    • Ziehe das Display vorsichtig Richtung oberer Kante des iMac und hebe es aus dem Gehäuse.

  10. Bk34XTub3KgKRBWr
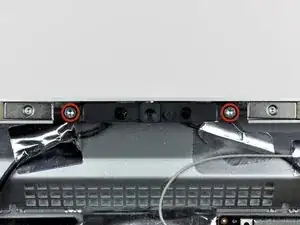
    • Entferne die beiden Torx T10 Schrauben, welche die Kameraplatine am äußeren Gehäuse befestigen.

  11. iV4avJRD6yRXhxMo
    • Die Kameraplatine hat einen kleinen Kühlkörper, der auch mit Wärmeleitpaste auf seiner Oberfläche versehen ist. Achte darauf, dass die Paste vor demEinbau wieder gleichmäßig verteilt ist.

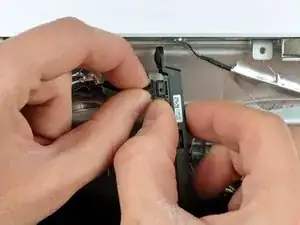
    • Hebe die Kameraplatine vorsichtig aus dem äußeren Gehäuse. Achte darauf, dass das Klebeband aus Aluminium, welches das Kamerakabel am äußeren Gehäuse befestigt, nicht verrutscht.

    • Löse das Kamerakabel, indem du seinen Stecker vom Sockel auf der Kameraplatine wegziehst.

Abschluss

Um dein Gerät wieder zusammenzusetzen, folge den Schritten in umgekehrter Reihenfolge.
Andrew Bookholt

578335 Reputation

0 Kommentare