Einleitung
Prereq only.
-
-
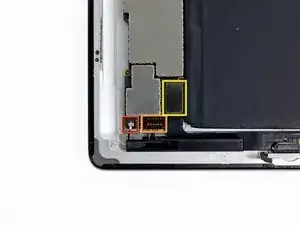
Löse folgende Verbinder aus ihren jeweiligen Sockeln auf dem Logic Board:
-
WiFi Antennenkabel
-
Lautsprecherkabel
-
Dock/Lightninganschlusskabel
-
Abschluss
Um dein Gerät wieder zusammen zu setzen folge den Schritten in umgekehrter Reihenfolge.
Ein Kommentar
is there a release for the speaker connector? i didn’t release anything and ripped the connections from the logic board off…


This was an ambiguous step. The Dock/Lightning connector and Wi-Fi antenna cable lift off fairly easily, but the Speaker connector cable does not. I ruined the existing Logic Board at this step. Not an emotional event, as I was replacing it, anyway, but showing how the connector looks, lifted out of it’s socket, would have helped. What tool did you use to pull/lift the connector from it’s socket? Prying from under the wires just stressed the wires, and I had to stop that attempt for fear of damaging the connector. Once I ripped the socket from the Logic Board, I was able to pry the two apart with my fingers, and had a better understanding of how to connect the Speaker cable to the replacement Logic Board. Sometimes these connections slide together, sometimes they’re pressed down into a socket connector. Do one when the other was intended, and you ruin things. You fell short, here.
robk64 -
it would be helpful to show the image as to how to pry speaker connection cable.
ian -
All connectors are pressed directly into the logic board (in the negative-Z direction). Use a spudger or, with extreme caution, tweezers, remove the connector straight out and away (plus-Z direction). Perform leverage as close to the connector as possible, to reduce any risk of wire damage. The dock/lightning connector is rectangular and centered in the depicted area highlighted in yellow.
Josh Crim -
I applied some heat with a fan to the connector and pried him softly up from the left to the right. My first ipad went to !&&*, but with my workaround the second one was saved.
Nils Grobys -
For the speaker cable, the connector needs to be lifted straight up to be released. The connector actually fits within a raised socket that surrounds it on three sides (up/camera side, and left and right sides). For this reason, don't try to pry directly from the left, the right, or the camera side, because you will actually be prying the socket rather than the connector. I used a pointed metal tweezer to pry on the bottom right corner immediately next to and just underneath where the wires connect. The socket popped off immediately with little force.
chrism83 -
Not showing how the speaker cable comes off is a serious oversight. The connector lifted off logic board. Disappointed. Everything good until that critical point. And then, you don't have logic board in stock.
Vincent Martinez -