Einleitung
Werkzeuge
Ersatzteile
-
-
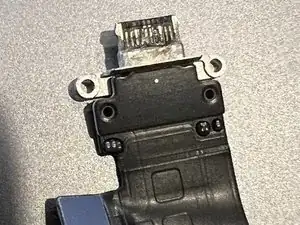
Our iPad's port likely got some water damage, and was completely corroded. The symptom here was the iPad would no longer charge.
-
I apologize for the lack of pictures. I didn't intend to create a guide, but after performing this repair I thought it would be valuable to at least record my process.
-
You'll need some tools: 00 phillips bit, thin razor blade, thin metal spudger, guitar picks or popsickle sticks, and a way to heat up your iPad. I purchased the replacement USB-C port and pre-cut replacement adhesive stips.
-
It took me two hours. I've replaced iPhone screens and batteries before. If you are patient, careful, and have some experience fixing things, then you can do this.
-
This isn't a novice repair, but it isn't technically difficult. You need to be comfortable working with small screws and have reasonable dexterity to control your cutting tools well.
-
-
-
The LCD is held on with strong adhesive, which isn't fun to deal with. Heat is key for softening this adhesive. First, shut down your iPad.
-
There are many ways to heat up the adhesive. What I had on hand was a large flat non-stick coated aluminum electric pancake griddle with a temperature knob. I also has an accurate thermometer.
-
I set the griddle's temperature to 135F as read by my accurate thermometer, and left it for 10 minutes to make sure its temerature was stable.
-
I put the iPad on the 135F griddle screen side up. I covered it with a fluffy towel and left it for ten minutes to heat up. The towel is insulation to insure the entire iPad reaches 135F.
-
Starting at the lower right corner (USB-C port side) I used a thin razor blade to carefully begin cutting the glue. Don't go deeper than 1/8".
-
Once the corner was free, I used a thin metal spudger to work my way around the iPad cutting the glue. Again don't go deeper than 1/8" or you may damage digitizer cables. Also stay AWAY from the front camera. There is very little glue there and you don't need to cut it. Try to complete your first cutting round quickly while the iPad is warm.
-
Use guitar picks or popsicle sticks or whatever you have to keep the LCD from sticking itself back down as you cut the glue.
-
Once the glue is all cut you can carefully pry the screen away from the frame. There will be glue tendrils to cut. Pry the screen up starting at the USB port side.
-
-
-
The screen is attached by a few cables. I left them alone, and replaced the port while they remained attached.
-
You can pivot the screen to the side and them remove the four screws that attach the USB-C port to the frame, along with the left and right side spring clips on either side of the port.
-
The cable connecting the port to the iPad electronics is under a shield. Remove the 5 screws holding the shield down and keep track of which screw is assigned to each hole on the shield - there are different sizes here.
-
Once the shield is removed, you can pry up the USB-C port's connector. Then peel away the connector from the iPad - it is held down with adhesive.
-
Locate the replacement connector into the frame, then seat the connector to the electronics. Reattach the screws and clips, then stick the cable back down. In my case the adhesive stayed on the iPad so the new port's cable stuck well with the old adhesive.
-
-
-
With the new port secured, I plugged in a charger and verified the system booted up and began charging.
-
I also verified the iPad worked properly including the touch screen. Because the face ID sensor was partially covered I got an error that Face ID wasn't working, but that is expected.
-
-
-
I again shut the iPad down.
-
Then you'll want to remove the old LCD adhesive. I didn't attempt to get a clean surface, but instead just used tweezers to pull off the strips of old adhesive.
-
After doing this there will be sticky residue on the LCD and the frame. I didn't bother removing that, feel free to do so but I doubt it's necessary.
-
I applied the new custom adhesive strips and left the top plastic layer on.
-
After the new strips were applied I tested the iPad one more time, and again shut it down.
-
I then removed the final plastic layer on the adhesive and carefully placed the lcd back into the frame. Take your time - I'm thinking you have one chance to get this right given how strong that adhesive is.
-
-
-
You may have to retrain Face-ID. We did. Otherwise, if you were able to get this far successfully congratulations - YOU DID IT!
-
To reassemble your device, follow these instructions in reverse order.

