Einleitung

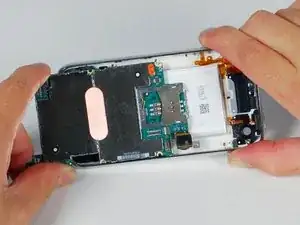
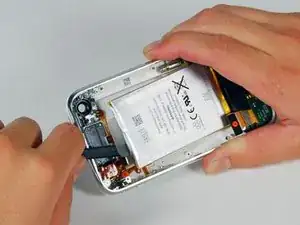
Der Akku hält nicht mehr lange? Tausche ihn aus.

  1. R3ZoR1IJ5LQ1Vyue
    R3ZoR1IJ5LQ1Vyue
    aPa5NgjfVl3XStxJ
    vtEYqJeccDVDH4oS
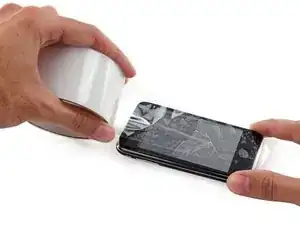
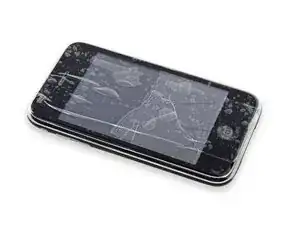
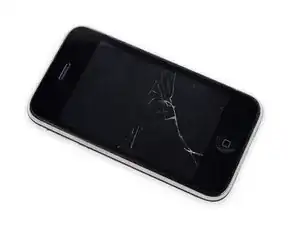
    • Falls das Displayglas gesprungen ist, halte die Bruchstücke zusammen und vermeide Verletzungen während des Reparaturvorgangs, indem du das Glas mit Tape zusammenhälst.

    • Lege sich überlappende Streifen von durchsichtigen Klebestreifen über das Display des iPhones, bis die gesamte Vorderseite bedeckt ist.

    • Dadurch werden die Glasscherben zusammenhalten, wenn du am Display hebelst und es heraushebst.

    • Trage eine Schutzbrille, um deine Augen vor Glassplittern zu schützen.

  2. 6MDaEATCCBdIK3F5
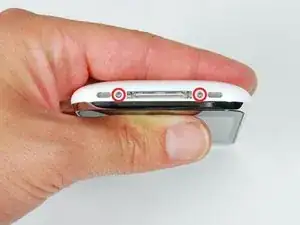
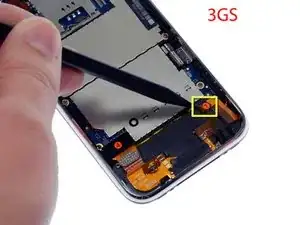
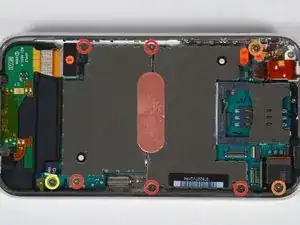
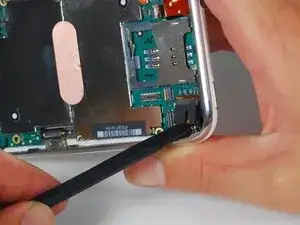
    • Entferne die zwei 3,7 mm Kreuzschlitzschrauben #00 von dem Ende des iPhones, an dem sich auch der Dockanschluss befindet.

    Shesh - why doesn't the first line of step #1 say "Turn off your phone" by holding the power button down and shutting it down. I know you don't HAVE to do this, but it certain didn't feel right opening a device while the screen was humming along looking at me.

    mattfife -

    The power button is broken... that is why?

    Marc Tobe -

    You might also want to have a little tweezer which comes in very handy when reassembling the phone

    Mathias -

    Do seriously consider ESD when getting to the internals. External connectors have ESD protection circuits, but these will not help if you touch the internals!

    HaJo Schatz -

    I highly recommend using a slew of refrigerator magnets to hold the screws for each step. I also used post its to label each step, making reassembly a snap.

    In the end, I was able to successfully replace the jack, but they weren't kidding when they said it was difficult.

    christine -

    ok, I did it but the vibration stopped working… I don’t know why. Is there a way to fix it?

    Logan Clark -

  3. pbK5AQRCPSAhGsBD
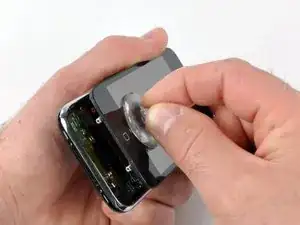
    • Entferne den Metallgriff vom Saugheber. Es ist einfacher und sicherer, am Saugheber direkt zu arbeiten, als mit dem Metallgriff.

    • Sei vorsichtig beim Öffnen des iPhones, damit die Kabel unter dem Display keinen Schaden nehmen.

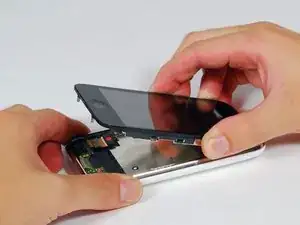
    • Zwischen der vorderen silbernen Edelstahl-Fassung und der schwarzen Display Einheit befindet sich eine Gummidichtung. Es ist daher etwas Kraftaufwand notwendig, um die Display-Einheit des iPhones zu trennen.

    • Verwende einen kleinen Saugnapf in der Nähe des Home Buttons, um vorsichtig den unteren Teil der Display-Einheit anzuheben.

    • Falls die Displayeinheit so beschädigt ist, dass der Saugheber nicht mehr daran hält, verwende Paketklebeband.

    The small suction cup near the home button didn't quite work for me, but i found some kind of workaround: just use the suction of your iPhone-carkit (if you have one)

    matthias -

    that works like a charm

    Rodrigo Marques -

    Duck Tape also works. :)

    Matt Butson -

    How should i say, do this step really really slow and with patience.

    P.S. Ducktape fix nearly everything

    Andi -

    Be very very careful with this step. The back of connector 4 (barely visible in the Step 2 photo) was stuck just enough to the back of the display unit to shear the connecter cable right in two when I separated the phone. Ack!

    Mikael S -

    Be really careful at this point not too pull too hard when you're trying to get the screen out - I did, the screen came out suddenly and I pulled all the connectors off :/

    Tom George -

    put your fingers at power button end of phone, resting on edge of glass/bezel you can use them as lever so when you pull on suction at other end you don't need to apply much pressure and the cables underneath aren't ripped off

    pollytintop -

    As a help to doing this step, put your thumb/fingers around the phone around the middle so it's cradled in your hand. Keep your fingers wrapped around and resting gently on the top of the screen with your thumb and the first few fingers. See how his thumb is sitting on the edge like that, but ready to 'catch' the screen when it comes up? Do that with your thumb and the tips of your fingers on the other side.

    Now carefully use the suction cup to 'walk/rock' the screen out with a left-to-right while pulling up motions. With your fingers gently clamped around the phone and providing a little pressure on the edges overlapping the screen when the screen comes out, they'll catch the screen before you pull it up too far and yank the cables out.

    mattfife -

    I was very careful, but not careful enough removing the display with a suction cup, and Everything came unplugged in an instant. CAUTION: Pull with the suction cup near the round button, AND ALSO have someone else support the other end of the display so that only the end of the display with the round button comes out. I was very lucky.

    David Mitchell -

    I put on a piece of duct tape on the Iphone where the Sim tray is. Keeps the display assembly in place preventing cable damage.

    johnplim -

    I used some insulation tape to wrap around the top of the phone so this was secure to prevent yanking the whole screen off. This was very effective as my screen was pretty jammed into the case so need extra leverage using the metal ring on the screen sucker

    Alf -

    I had no grip at all on the suction cup with my fingers. Problem solved by inserting the screw driver in the s-cup, which gave just the right leverage to control pulling loose the display assembly.

    kaivonfrese -

  4. 1opQfeBnduhXZ3SF
    • Die Display-Einheit ist immer durch mehrere Kabel mit dem iPhone verbunden, also versuche noch nicht, sie komplett zu entfernen.

    • Klappe die Display-Einheit um ca. 45 Grad nach oben

    When you get back to this step as you are reassembling it, it's tempting to test that you've got all the cables plugged in properly by switching the phone on and testing it. However the Home button will not work until the front panel is back in position, because the electrical connection is done by a pair of touch contacts which only work when the phone is assembled.

    Jon Evans -

    When the instructions say "Rotate the display assembly up until it is at an angle of approximately 45 degrees." they really mean "TILT THE HOME BUTTON END OF display assembly up until it is at an angle of approximately 45 degrees. Looking at the picture makes this step brain dead simple, but if you were using another iPhone to read the directions it would be easy to miss.

    ratioswitch -

  5. pwSlolqxhBFFQOej
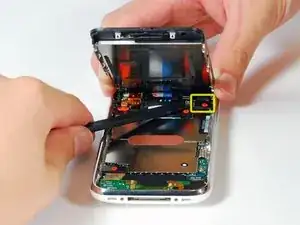
    • Halte die Display-Einheit weiter mit einer Hand fest und trenne mit dem Spudger in der anderen Hand das schwarze Flachbandkabel mit dem Label "1" (Kabel 1 ist für das Display).

    • Achte darauf, den Spudger von der linken Seite, wie auf dem Bild dargestellt, einzuführen (UNTER DEM FLACHBANDKABEL). Wenn du versuchst, das Flachbandkabel von rechts nach oben zu hebeln, könntest du den Flachbandkabelanschluss beschädigen, woraufhin du das Display ersetzen müsstest.

    • Alle Anschlüsse außer dem Flachbandkabelanschluss "3", der in Schritt 7 erwähnt wird, werden nach oben hin gelöst.

    What part is 1? My seems to keep dropping out and the ear speaker is not working. Is this what it is?

    Russell Graham -

    What are the flex cables #1, #2 and #3 for? There's a lot of questions about this, but no answers?!

    SOMEONE has to know!?

    Turbo Fredriksson -

    Zitat von Turbo Fredriksson:

    What are the flex cables #1, #2 and #3 for?

    Aparently #3 is 'Earpiece & Proximity Sensor'.

    Turbo Fredriksson -

    Zitat von Turbo Fredriksson:

    Aparently #3 is 'Earpiece & Proximity Sensor'.

    Found the thread: What Ribbon "1" and "2" and "3" do?

    1. Ribbon #1: Runs the LCD

    2. Ribbon #2: Runs the digitizer

    3. Ribbon #3: Earspeaker and various sensors on the iPhone face

    Turbo Fredriksson -

    Note that The connectors have a rubber-like Top surface. Make surre The spudger is inserted underneath that rubber piece. To disconnect, The connector ha to lifted upwards from the PC-Board (i.e. Orthogonally from the electronics board, as opposed to being moved sideways). holds true for all of those connectors, except for the one with the flip-tab.

    martinkoschel -

    I had more joy using a home-made spudger from a bamboo skewer. Being thinner, it can release the connectors from the end rather than a side or corner. (I also tried all the different spudgers made by Menda Tools.)

    cheongi -

    I already gave up on this step:-)

    becky -

  6. sEnRTx2qtmMPCyh2
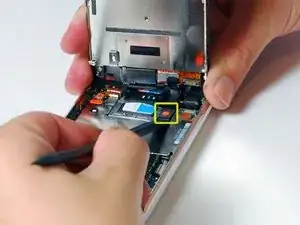
    • Rotiere die Display-Einheit nach oben, bis sie in etwa vertikal steht. Dies ermöglicht einen leichteren Zugang zu den verbliebenen Kabeln, die nun getrennt werden müssen.

    • Trenne das schwarze Flachbandkabel, das mit einer "2" gekennzeichnet ist, mit einem Spudger. (Kabel 2 ist für das kapazitive Touch Panel).

    At step 5 my ribbon crumbled. I had nothing left to replace. I now have a dead spot on the screen.

    billsly -

  7. QDOLUTpIiNcdCgKb
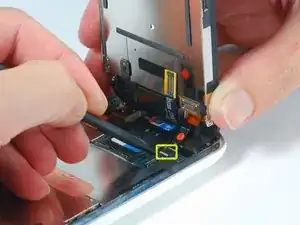
    • Beachte bitte: Bei einigen nicht-amerikanischen Modellen (chinesischen, europäischen) des 3G ist diese Kunststofflasche nicht vorhanden. In diesem Fall schiebst du das Flachbandkabel in Richtung des Screens, bis es sich löst. Beim Wiederzusammenbau übst du Druck auf das Band aus, damit es zurück in die "Fassung" gleitet.

    • Bei einigen iPhones sind die Farben an Anschluss "3" möglicherweise umgekehrt (schwarze Kunststofflasche, weißer Anschluss). Klappe die Lasche ordnungsgemäß um, da du andernfalls den Anschluss beschädigen könntest.

    • Klappe die weiße Kunststofflasche um, die das Flachbandkabel "3" an Ort und Stelle hält. Der weiße Anschluss dreht sich um bis zu 90 Grad und das Flachbandkabel wird freigegeben.

    • Hole das schwarze Flachbandkabel aus seinem Anschluss und entferne die Display-Einheit vom iPhone.

    On my 3G, the piece that flips up on the #3 connector was black and the connector itself was white, seemingly opposite of the pictures. I mistakenly tried to pry up the wrong piece, but fortunately didn't do too much damage before I realized this. My phone was replaced on warranty in February so this must be the case in some newer 3G's.

    lolsen4 -

    Zitat von lolsen4:

    On my 3G, the piece that flips up on the #3 connector was black and the connector itself was white, seemingly opposite of the pictures. I mistakenly tried to pry up the wrong piece, but fortunately didn't do too much damage before I realized this. My phone was replaced on warranty in February so this must be the case in some newer 3G's.

    Thanks for the heads-up. I added a note so that people are aware that the colors may be reversed.

    Miroslav Djuric -

    That flip tab on the #3 connector split in half and came off completely. Be careful. And if anyone knows where to buy a replacement flip tab, that'd be cool too :)

    cliffcurtis -

    I should also note that I used a little flat head screwdriver when lifting the flip tab and the narrow pressure point is what cause it to split. Should of used a spudger.

    cliffcurtis -

    I bought my black iPhone a full housing white cover off ebay. No phone shops seem to be able to change it for me.

    If I follow this guide, will I be able to pull my phone apart, change the covers and put it back together?

    That is, once I pull the phone apart, will it work properly once I put it back together again?

    kristymic -

    Zitat von kristymic:

    I bought my black iPhone a full housing white cover off ebay. No phone shops seem to be able to change it for me.

    If I follow this guide, will I be able to pull my phone apart, change the covers and put it back together?

    That is, once I pull the phone apart, will it work properly once I put it back together again?

    Yes, if you take care and follow the instructions to the letter.

    marmalade -

    How on earth do I get the black ribbon cable back into its connector???

    Cor Berkelaar -

    Zitat von Cor Berkelaar:

    How on earth do I get the black ribbon cable back into its connector???

    Cor, You have to slide the little bar on the connector away from the body of the connector before you can insert the ribbon cable into it. I know it's tight quarters, but even my meat hooks were able to finally get it inserted. The 'trick' is that once you have inserted the cable into the body of the connector, quickly slide the bar back toward the body as this will lock the cable into the connector. I hope this is helpful.

    David

    dheady -

    Is there a way of replacing the connector?

    i have torn the top of the connector......... would that be the reason that the iPhone would not start even though the ribbon is in the connector and fastened secured with the white plastic tab is down.

    Vishal Vaidya -

    I HAVE DONE IT GUYS SO THANK YOU.

    Zitat von Vishal Vaidya:

    Is there a way of replacing the connector? i have torn the top of the connector......... would that be the reason that the iPhone would not start even though the ribbon is in the connector and fastened secured with the white plastic tab is down.

    Vishal Vaidya -

    Zitat von Vishal Vaidya:

    Is there a way of replacing the connector?

    You could replace it. That's what I'll have to do. Luckily my brother is great with soldering surface mounted components.

    But if you had to ask if it can be replaced, you don't have knowledge to do it yourself! It's VERY difficult! Look among your friends or the 'Net. I found quite a lot of forums where they talk about the difficulty on replacing SMD's. Just mail one of them that seem to know what they're doin'...

    Turbo Fredriksson -

    Zitat von cliffcurtis:

    if anyone knows where to buy a replacement flip tab, that'd be cool too :)

    http://www.earth2k.com/fpc-ribbon/

    http://cgi.ebay.com/ws/eBayISAPI.dll?Vie...

    I'm currently waiting for mine... :)

    Turbo Fredriksson -

    [quote|I'm currently waiting for mine... :)[/quote]

    And my younger brother managed to replace it with only a couple of minutes whining about it's size :).

    Works just fine now (exept that I can't seem to turn the darn thing off, even though I've also replaced the button harness!)

    Turbo Fredriksson -

    I have torn the top of the connector too and the iPhone is not starting.. Was that the reason? Did it work after replacing the connector?

    Zitat von Vishal Vaidya:

    Is there a way of replacing the connector? i have torn the top of the connector......... would that be the reason that the iPhone would not start even though the ribbon is in the connector and fastened secured with the white plastic tab is down.

    veloudo -

    Zitat von lolsen4:

    On my 3G, the piece that flips up on the #3 connector was black and the connector itself was white, seemingly opposite of the pictures. I mistakenly tried to pry up the wrong piece, but fortunately didn't do too much damage before I realized this. My phone was replaced on warranty in February so this must be the case in some newer 3G's.

    Maybe it adds Value to the explanation to say that the piece that needs to be flipped up is located on the opposite side of where the ribbon cable exits the connector. It needs to flip upwards towards the ribbon cable.

    My confusion was to identify which connector I have in my phone, since everything in there is so tiny that it is hard to identify which is which. Maybe a zoom-in on the connector with the tab flipped up would be a good addition to the instructions also.

    martinkoschel -

    I accidentally lost the black plastic tab (mine was black) when I was removing the ribbon cable. I managed to get the ribbon cable back into the white connector and the phone seems to be working fine. Is this going to be a problem?

    Mike -

    Note: You cannot slide the black ribbon connector back into place unless the lock is flipped open (up)--see the instructions on replacing a broken screen for images)

    czubko -

    The tab (black in my case) is the thin horizontal plastic piece opposite where the ribbon is inserted. Use the spudger in the center, approaching from the bottom side of the phone, and it flips up easily.

    larry -

    Be VERY careful when working with ribbon 3. I thought I was but when I got the phone back together the earpiece didn't work. While doing research to find out why, I discovered that ribbon 3 is very delicate and easy to damage. I'm now waiting for a new one... if I can't fix it, I'll have to get a new phone since I can't see myself hearing only via Bluetooth or speakerphone.

    MarySC -

    When re-inserting the #3 connector how much force does it take to get the connector fully inserted? How can I tell whether it is fully inserted?

    slessard -

    Be very careful, in some cases the ribbon damages. After this damage the proximity sensor won't work anymore.

    JanWillem -

    I think that this is where the problem is. I must have one of the unique (Chinese) versions and while trying to lift up, I should have been sliding back. It is too difficult to see. Mine broke off and crumbled and now the screen has a dead spot.

    billsly -

    That step also had me thinking & reading for quite a while. Maybe a close-up picture of the connector might be helpful, seems that a lot of people screw up badly here.

    HaJo Schatz -

    My American 3GS white connector did not flip open. It split into 3 little pieces of white plastic when I tried lifting it with the spudger. The plastic seemed very brittle; the phone is 4 years old. Amazingly to me, I was able to slide the flex tail back in to position and it made all the necessary electrical contacts (at least for the time being). Wi-fi cable #6 was not properly seated after first assembly, but everything is working now! Thank for the help.

    Dennis Smith

    denniskristen -

    I strongly recommend that you review Step 7 of the 3GS 'Display,' 'Front Panel' or 'Front Panel Assembly' guide. As of this date (June 2015), only those three guides include a photo of a mock-up of Connector 3 that will provide you with detail that will help you avoid damaging that fragile connector.

    jpa -

  8. EOIPHToqCfIMHyJM
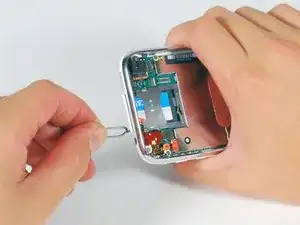
    • Stecke dein SIM-Auswurfwerkzeug oder eine Büroklammer in das Loch neben der Kopfhörerbuchse.

    • Drücke das Werkzeug hinein, bis der SIM- Karteneinschub herauskommt.

    • Fasse den SIM-Karteneinschub und ziehe ihn aus dem iPhone heraus.

    Can you take the SIM card out before you start the procedure?

    alex -

    This is the hardest step of all :)

    Modima65 -

  9. rGWSGdsIfraEEGDF
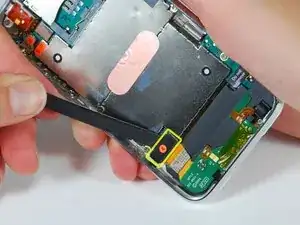
    • Trenne das Flachbandkabel "4" mit einem Spudger.

    Note! Be EXTRA careful with this cable #4. Twist and brakes easily!

    taneliteittinen -

    What if I have one of those thin film screen protectors applied, would the suction cup peel it right off instead of lifting the screen up?

    zneumann66 -

  10. BQMTNLaEuoTM1dbP
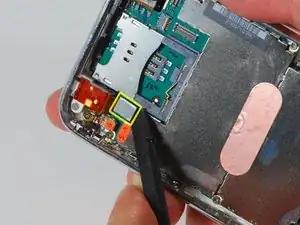
    • Trenne das Flachbandkabel "5" mit einem Spudger.

  11. jZ6cQMUHCQjSQYch
    jZ6cQMUHCQjSQYch
    gohXQQbpAZGklMZF
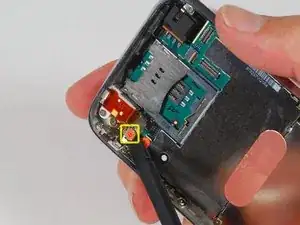
    • Trenne das Flachbandkabel "6" mit einem Spudger.

    • Wenn du ein iPhone 3GS hast, schau dir das zweite Bild an und trenne mit dem Spudger das Flachbandkabel "7".

    • Stelle sicher, dass die Anschlüsse auf dem Flachbandkabel perfekt mit den Anschlüssen auf dem Motherboard ausgerichtet sind, bevor du Druck ausübst. Für diesen Schritt kann es hilfreich sein, eine Lupe zu verwenden.

    Those "6" and "7" antenna connectors are quite fragile.

    Be very careful when assembling not to force the connector down; It should click actually quite easily once it's placed properly.

    If you try to force the connection, it might easily be deformed, which would really be a pity.

    jimbbo -

    Actually, I had to apply some pressure to #7 to get it back in place - I tried not to force it as advice above said, but it wouldn't go in. The pressure wasn't too strong, but it doesn't just slide right in.

    iluxan -

    I think the steps to replace the connectors 6 & 7 should be emphasized because of the size/fragility of the connectors.

    satsho -

    I agree with the others that cable 6 and 7 are very fragile and can be difficult to reattach. I was able to get #7 back on but #6 just wouldn't attach. I put too much pressure on it so now I have a cell phone without WiFi or GPS. I would rate the repairability of this phone lower than it is because of the 50-50 chance of flattening these connectors. My 3GS is now effectively an iPod, but with a new battery.

    plink53 -

    In hindsight I should have read over the whole recipe twice and looked at the comments before starting but I didn't because I thought I could do it and was impatient. I agree that there should be warning at the top to draw attention to the multiple wires that could be damaged when you do this.

    My antenna doesn't work now and there is a small metal part that looks like a letter p that fell out of my phone. I thought it wouldn't matter till my friend said it might attach the antenna. Does anybody know where it is supposed to go?

    tumaru -

    The small metal part that looks like a "p" is a clip that holds the camera in place. You need to put it in place before you replace the screw immediately next to the camera. It's mentioned in step 12 of many of the guides.

    Dieter Groll -

    #6 would not reattach. I spent an hour trying to reattach that ONE thing. I finally had to give up. What a complete waste of time.

    d10boe -

    I had edited this step months ago to add a warning to make VERY certain that the connector on the ribbon cable for #6 is centered on its mating connector on the motherboard before applying pressure to it. If it's not centered and you apply pressure you will very likely destroy both halves of the connector. The half attaced to the ribbon is replaced with the wifi antenna- very inexpensive. However, the half on the motherboard is tiny and soldered on. You'll need to get someone equipped to repair circuit boards.

    When I ruined my #6 I ended up getting another phone. If you don't repair it, your phone will work but your wifi will not because #6 is the wifi connector.

    Tom Brandolini -

    Months ago I wrote and placed an edit into step 10 which read something like this:

    " Be very certain that the #6 connector half on the ribbon cable is perfectly concentric with the #6 connector half on the mother board before applying pressure. This may require a magnifying glass or jewelers' loupe. Failure to ensure proper alignment of these connector halves prior to applying pressure will destroy both connector halves."

    At some point someone removed this much needed edit. WHY???????

    Tom Brandolini -

    "concentric" is not the right word. Try "parallel and aligned".

    Veloaficionado -

    No, actually concentric is exactly correct. When the center of the circle in the ribbon is exactly over the center of the connector on the board the respective circles of the connector halves are CONCENTRIC and properly aligned.

    Tom Brandolini -

  12. 2qikdfJo3tebRKuE
    • Entferne die folgenden acht Schrauben

    • Fünf 2,3 mm Kreuzschlitzschrauben #00 mit Teilgewinden, die das Logic Board am hinteren Gehäuse befestigen.

    • Zwei 2,3 mm Kreuzschlitzschrauben #00 mit vollen Gewinden, mit denen Logic Board und Kamera befestigt sind.

    • Eine 2,9 Kreuzschlitzschraube #00, die sich unterhalb des "Do not remove"-Stickers befindet.

    • Beachte beim Wiederzusammenbau:

    • Die Schraube neben der Kamera (die orange markierte Schraube unten rechts) weist zusätzlich eine Metallleiste auf, welche die Kamera an Ort und Stelle hält.

    • Denke daran, diese Leiste zurück an ihren Platz zu setzten, bevor du die 2,3 mm Kreuzschlitzschraube #00 mit ganzem Gewinde neben der Kamera eindrehst.

    One of the two full thread screws holds a small retention clip not shown in this diagram to keep the camera in place (3G model). Remove this clip when removing the screws.

    jake2 -

    Please note that iFixit supplied screwdriver is way too big for these tiny screws, you'll need a smaller one like the ones used to repair wrist watches!

    The good side is that iFixit's screwdriver is magnetized, a bonus when working with such small parts.

    paolo -

    while re assembling i couldnt for the life of me figure out where the metal plate thing off the camera went until i saw the gap for it (i had spent about half an hour trying to put it in)

    jjw123 -

    My Camera is not working anymore =( going to open my iphone once again...

    l4ci -

    I found that after putting the battery in place and reattaching the logic board with the screws I had to press down a little bit to get the screws to reach because the battery contacts kept the logic board from settling in this tension gives positive contact between board and battery.

    Bill -

    I am unable to remove the screw that holds the camera in place. I'm afraid I am stripping the screw head. Any advice?

    libchis -

    My battery had swollen - so much so that the back cover was bulged. So when I was removing screws, I was really careful and did every-other-one first on one side, and then the other, then back to the first side, etc. Even in doing that, one of the screws went flying...somewhere...I never did find it, but it hasn't seemed to effect anything. And when I do find it I know I can get back in my phone to put it back.

    djjdohio -

    I didn't have a removable screw in the bottom right with a metal strip, there was a fastening in there without a Philips type depression, but the camera came out with the board. Not sure if the last person in here before me broke something, as there was an aftermarket battery in the phone with no adhesive. However the camera works after putting it all back together

    panchocole -

  13. FctBMcDEDkIIEtJt
    • Verwende einen Spudger, um die Kamera vorsichtig nach oben und aus ihrer Einfassung auf dem hinteren Gehäuse zu hebeln.

    • Die Kamera kann nicht vollständig entfernt werden, da sie noch mit der Unterseite des Logic Boards verbunden ist

    After removing the 2.3 mm Phillips #00 screw attached to the camera a small retaining clip may be present.

    Take note of its position and orientation for later reinstallation.

    John Zemko -

    As mentioned, some 3g phones there is a small metal clip holding down the camera (held in place by the screw there). Be sure it doesn't fly out or fall into the phone workings. Fine point tweezers would help here, to take it out and to put back in place during re-assembly.

    Tim -

    3G and 3GS camera enclosure: As I was transplanting a 3G cover onto a 3GS, I realized as I was trying to re-assemble the camera that it would not fit: the 3GS camera does not fit in the 3G enclosure. Luckily, you can remove just the camera enclosure from the 3GS and transplant it to the 3G. It's dirty, I broke the ring, I transplanted some of the double face tape... but in the end it worked.

    chuvux -

    There were many places where I wished there were clearer instructions on putting it back together; this was a big one. It was very difficult to get the camera back in place. I heard a snap when mine went into place.

    atlemar -

  14. NMdOyCP4DiDuVULx
    • Heble das Logic Board vorsichtig an dem Ende, wo sich der Dock Anschluss befindet, mit einem Spudger nach oben.

    • Neben dem "Do not remove"-Sticker befindet sich einekleine goldene Erdungstab auf dem Logic Board. Sei SEHR vorsichtig, dass diese nicht an die Seitenwand des Gehäuses stößt; sie bricht leicht. Wenn du Signalstörungen hast, nachdem du das Logic Board einmal entfernt hast, kontrolliere diese Erdschleife.

    • Wenn sich das Board nicht herausbewegt, kontrolliere noch einmal, ob alle Schrauben, mit denen das Logic Board befestigt ist, entfernt wurden.

    Even after the eight screws are remove, the board won't lift up easily. That is because the golden clip nearby the "do not remove sticker". In the picture above, it simply jumped out for no reason, while I had to use a tweezer to make it out...

    wandonye -

    When removing the logic board, a slight push towards the top of the phone, will "unclip" the bottom edge of the logic board near the "Do Not Remove" screw.

    When reinserting the logic board, there is a tab in the top edge of the rear shell case that the edge of the logic board goes under. It is the edge closest to the camera.

    Without this "comfortable" fit, you won't be able to get the SIM in.

    The camera itself also has an element of "comfortable" Fit.

    Fritz -

    Be careful when putting the circuit board back in also... the golden grounding tab is very easy to break...

    rclyons -

    If the “Do not remove”-sticker is damaged it’s a warranty thing I suppose? It doesn’t have any function, does it?

    Stefan Theurer -

  15. h4yEmmTrpKcHXvSB
    • Lasse das Logic Board in Richtung Dock Anschluss und aus dem iPhone heraus gleiten.

    • Wenn du das Logic Board wiedereinsetzt, nachdem du den Akku installiert hast, verbinde die Kamera mit dem Logic Board, bevor du es in das Gehäuse einsetzst. Stelle dann sicher, dass du die obere Seite des Logic Boards (wo sich das SIM Fach befindet) in Position bringst, bevor du den Rest des Boards zurechtrückst.

    • Das ist wichtig, da sich der SIM Karten Slot manchmal nicht richtig ausrichtet. Du weißt, dass das Logic Board in der richtigen Position sitzt, wenn das SIM Fach hinter der Öffnung im iPhone Gehäuse sitzt und das Kameramodul richtig an seinem Platz sitzt.

    When reversing directions for reassembly, the logic board needs to be clipped into the clips on the side.

    Lenore -

    Zitat von Lenore:

    When reversing directions for reassembly, the logic board needs to be clipped into the clips on the side.

    ++

    Although I would say "needs to be slipped under the clips on the side". The most obvious clip is next to the camera, facing south (if the camera is in the NE corner). There is a corresponding clip on the opposite side of the north end the logic board, facing east (a bit east of the #6 ribbon cable).

    It's still possible to get all the screws back in with the logic board above the clips (trust me), but it's a serious barnus because the SIM card holder won't fit back in and the camera will be pointing a bit askew ... and you'll have to pull all the screws back out and figure out what you did wrong (and why you had a naggling suspicion the logic board wasn't placed quite right).

    I would recommend sliding in the SIM card tray *before* putting any screws back, just to make sure.

    johnhart -

    Slipping the SIM card in first is a helpful suggestion.

    My motherboard actually was not quite lined-up as mentioned, and so after the SIM didn't fit, I was able to pull and reposition the motherboard properly before proceeding.

    Zitat von johnhart:

    ++

    Although I would say "needs to be slipped under the clips on the side". The most obvious clip is next to the camera, facing south (if the camera is in the NE corner). There is a corresponding clip on the opposite side of the north end the logic board, facing east (a bit east of the #6 ribbon cable).

    It's still possible to get all the screws back in with the logic board above the clips (trust me), but it's a serious barnus because the SIM card holder won't fit back in and the camera will be pointing a bit askew ... and you'll have to pull all the screws back out and figure out what you did wrong (and why you had a naggling suspicion the logic board wasn't placed quite right).

    I would recommend sliding in the SIM card tray *before* putting any screws back, just to make sure.

    ianwright -

    When putting it back together, it helps with alignment to put in the SIM Card tray. This beats having all your screws back in and finding out it's misaligned. Put the logic board 5/6 the way in, and insert the SIM Card tray like normal. Allow it to guide your logic board into the proper place.

    Mathew Taylor -

    When re-installing the mother board ensure that all of the previoulsly diconnected connector cables are out of the way and do not become trapped by the motherboard.

    Tom Brandolini -

    Definitely watch out to have all your connectors above the board. I managed to get my #5 connector trapped under it. Still hope wasn't damaged, we'll see in a few minutes :)

    iluxan -

    check also that the golden cicuit is opened when the sim card tray is inserted. this circuitry controls the presence of the sim card tray.

    maxt -

  16. CtlO6qZ3oNR3gjDx
    • Heble den Akku mit einem Spudger vom hinteren Gehäuse weg. Der Akku ist rundherum mit einem Klebestreifen befestigt.

    • Um zu verhindern, dass sich der Akku während dem Entfernen biegt, empfehlen wir, die Kunststoffziehlasche nicht zu verwenden.

    • Um die GPS-Antenne zu ersetzen, ist es NICHT notwendig, den Akku zu entfernen. Es schafft dir nur mehr Platz, um die Kopfhörereinheit zu entfernen (die man ebenfalls nicht unbedingt entfernen muss).

    • Der iPhone Akku ist mit einem leichten Kleber am hinteren Gehäuse festgemacht. Dieser Kleber kommt normalerweise mitsamt dem Akku heraus. Wenn dein Ersatzakku schon eine Kleberückseite besitzt, ist alles geritzt. Wenn dein Ersatzakku keine Kleberückseite besitzt, muss der Kleber von dem alten zum neuen Akku transferiert werden.

    • Wenn der Akku sich nicht vom Gehäuse trennen lässt, gib ein Paar Tropfen hochprozentigen (über 90%) Alkohol unter den Rand des Akkus. Warte etwa eine Minute, bis der Alkohol den Kleber auflöst. Nimm das flache Ende des Spudgers, um den Akku vorsichtig anzuheben. Lasse den Alkohol an der verdunsten, bevor du deinen neuen Akku einbaust.

    • Versuche nicht den Akku mit Gewalt anzuheben. Gib lieber ein Paar zusätzliche Tropfen Alkohol hinzu um den Kleber weiter aufzulösen. Verforme oder beschädige den Akku auf keinen Fall mit deinem Werkzeug

    • Du kannst einen Fön oder eine Heißluftpistole auf niedrigster Stufe verwenden, um die Rückseite des Gehäuses zu erhitzen. Das wird helfen, um die Klebeverbindung zu lockern, bevor du den Akku mit einem Spudger vom hinteren Gehäuse trennst.

    • Achtung: Eine Überhitzung des iPhones könnte den Akku entzünden.

    The glue is very strong under the battery and you may end up snapping a few spudgers in the process so make sure you have a few spare for moving onto other steps. A screwdriver is to hard and will end up damaging the battery.

    viper501 -

    Splendid job. it was like a walk. perfect Instructions.

    A tip: to handle the screws, very small, I used a pair of tweezers for eyebrows wrapped in double sided adhesive tape.

    Thanks. Alessandro

    AlexPi -

    it is said on step 18 "Carefully peel up the orange ribbon cable from the rear panel"

    but when you reassemble the iPhone, how do you glue the ribbon on your new panel?

    bobbyfrog -

    I successfully completed these steps to dry out a wet phone. While everything inside was dry as a bone, I never did remove the battery since the adhesive was so strong.

    I found the spudger far too weak to even attempt the removal of the battery. Instead, I used a folding bone (something I've had for years that's used for making perfect folds in heavy printmaking paper) however, I was still bending the battery far more than I was comfortable with. Since my mission was not to mess with or replace the battery anyways I just left it alone.

    Excellent directions!

    ratioswitch -

    Installed and the phone is working... You'd think Apple didn't want us to be able to replace the battery. Good directions.

    lazygorilla -

    I did not need to remove the battery. The power button, headphone jack, volume rocker, and vibrate switch were all accessible with the battery still in place.

    Mike M -

    I've done all the steps and phone switches on and works just fine with the one exception that I do have a signal! Is it possible I've damaged the aerial in the process? The strange thing is that on checking the networks I can see T-Mobile, but not 02, so implies something is working. All very odd. Currently my iPhone has become an iPod! Erkk

    Any tips?

    John -

    You most likely forgot to re-atatch the antenna. It is one of the connecters you unhooked after the first 3...its located in the top left of the case..Its a circular connecter.

    Zitat von John:

    I've done all the steps and phone switches on and works just fine with the one exception that I do have a signal! Is it possible I've damaged the aerial in the process? The strange thing is that on checking the networks I can see T-Mobile, but not 02, so implies something is working. All very odd. Currently my iPhone has become an iPod! Erkk

    Any tips?

    Charles Ravaglia -

    Sorry...Its the connecter on the bottom left..Rectangular shaped

    Zitat von John:

    I've done all the steps and phone switches on and works just fine with the one exception that I do have a signal! Is it possible I've damaged the aerial in the process? The strange thing is that on checking the networks I can see T-Mobile, but not 02, so implies something is working. All very odd. Currently my iPhone has become an iPod! Erkk

    Any tips?

    Charles Ravaglia -

    I put back together my iPhone and put it in a new shell but I just finished and the power button won't work what could i have done wrong?

    thomas manning -

    Zitat von thomas manning:

    I put back together my iPhone and put it in a new shell but I just finished and the power button won't work what could i have done wrong?

    oh also the vibrate button won't work any ideas there?

    thomas manning -

    I managed to replace the mute button without removing the on/off button :o)

    luisgarcillan -

    Great tutorial guys, I must admit it's not easy, due to tiny parts and screws, but you can do it!

    Great!

    KrissWeb -

    Was able to peel the ribbons without removing the battery. Worked great with a 3G. Thanks

    midiman127 -

    Instructions and notes made this fairly easy to do. I had one scary moment where my screen would not turn on but a Hard Reset on the phone fixed it.

    richardskevinm -

    any help welcome,just changed the battery on the wife's iPhone after it took a little swim,it wouldn't charge after drying out and i thought a new battery would be the answer,phone switches on ok and everything works except it won't charge on any of our proven chargers.guess something on the main board's knackered. if you have any ideas i would be a very happy chap.

    gareth jones -

    Be careful when trying to pry the battery from the side, as the spudger will break.

    zeke -

    There are no delicate parts below the battery so you can push the spudger under the battery without damaging anything. Just be careful at the top of the phone that you don't damage the orange ribbon cable.

    Erik Mouw -

    Just a little tip I thought I might add. I would recommend having a digital camera handy to taking snap shots before proceeding with each step, so that you can see exactly how it originally looked at each stage. Once you've gotten to the battery section, just pop the card from the camera into a computer or applicable device and you now have a simple guide for reassembly that is specific to your device.

    Also, it may be prudent to take a picture of the screws laid out in a tray along side the phone in the same positions they came out of.

    szr -

    Agree with others - spooger will almost certainly break if you try to pry it out using just that and you can't pull hard enough on the plastic tab. Even on my 2 year old phone, the glue was still *quite* good at holding the battery in.

    I used an equally small flat-blade screwdriver and gently walked around the battery lifting against the bottom plastic and the edge of the phone being careful NEVER to touch any of the flat-cable wires. While you can pry against the bottom since there is nothing under it (just double-check since there are some wires running along the side of the phone and the pressure you need to remove the battery would damage the wires if you pryed on them), you need to be careful against the edge of the phone. It's cheap plastic. You can pry against it, but I dared not use more force than enough to start hearing the adhesive start to rip/creak loose. SLOWLY walking around the battery at safe pry points several times finally loosened it enough that I could pull it out. GO SLOW.

    mattfife -

    I found removal of the batt was easier to accomplish by prying slightly and slowly around, starting from the edge opposite the Volume control.

    Fritz -

    Same - the key is to start prying with a screwdriver, not a plastic spudger, but make sure to keep away from any wires.

    iluxan -

    If you have the plastic spudger that comes in the kit, it will most likely break when trying to remove the battery. A butter knife worked extremely well, however ...

    jargogle -

    Agree with this comment. Prying the battery up from its adhesive was the hardest part of this repair, and yes, I did break the spudger thingy.

    Barb -

    Make sure no unplugged cabel is under the circute board when inserting the board again.

    This happens easily since the cable tend to spring back.

    Mathias -

    Since I didn't have a hair dryer (never needed one) I used a 500W construction lamp... Those things get very hot. The battery came free relatively easy.

    DefCharlie -

    Had to use pliers to slowly pull the battery free by it's tab. When you reverse the steps to reassemble the phone - make sure to get all 6 (or 7 for the 3GS) cables plugged back in. I forgot connector 5 and had to take the phone back apart. Then realized the next day I also had missed connector 6 (wifi). So because I reassembled too quickly the first time - I got to do all the steps 3 times! But phone works perfectly now with a new battery.

    pdusini -

    Actually broke the plastic spludger trying to get the battery off. Considered it the hardest part of the tutorial. I kept looking at it to see if I hadn't ruined something.Asides from this, reassembling was fairly quick although there was no sliding back of the logic board for me on a 3G. Turned it back on, tested sound, microphone and wifi. All seems good. Thanks alot for all the help guys.

    pedromcerveirapinto -

    I've made all the disassembling process with no problems, but when I put the logic board back the battery starts getting hot and hotter. Any suggestions??

    germanperezsalva -

    When I put the new battery in, it was a smidge too far toward the bottom. As a result the logic board didn't quite fit back into place and I was unable to put two screws back in. However, the repair seems successful and my phone is working now. Additional guidance on installing the battery would help.

    atlemar -

    So, I replaced the battery, but now, when I charge the phone, it shuts down and restarts. It also shuts down with use. Hmmm. What is it? Is it the "Do not remove tape"? Or som eother connector?

    jonatgree -

    I replaced the battery and it works great...battery wise...however my home button and power button do not work. I can turn the phone on by plugging it in and then out again only. HELP PLEASE?!?!?!

    eswolski -

    The new battery that I have had air pocket in it. It kinda bloated. The logic board would not fit back perfectly because of the bloated battery.

    So using a sharp cutter, I cut a bit hole. Pssssttt... the air came out. Watch out for the chemical smell. Using a good tape, tape back the hole. Double did that to make sure.

    Don't know whether I supposed to do that or not, but sending back the battery to ifixit was not an option as I live on the other side of the planet.

    Indramin Darmadi -

    any one can help me fix my iphone 3g. i was using it the other day when it suddenly turned off by itself and i cant turn it back on, any tips?

    albano.k275 -

    OK, I replaced the battery following the instructions (was more of a struggle than I thought it would be to get the logic board back in place) and put it all back together. All appears to be working fine except the Camera. The Camera App will not open the camera to let me take either a photo video. As the camera is never disconnected from the logic board I am puzzled as to what could be the issue. Very frustrating. Any ideas?

    Guy Manchester -

Abschluss

Arbeite die Schritte in umgekehrter Reihenfolge ab, um dein Gerät wieder zusammenzubauen.

Ben Eisenman

87505 Reputation

97 Kommentare

pay close attention to the pictures

use a business card type refrigerator magnet to keep the screws in order and to keep them from being lost. Its hard to see the black plastic latch that retains the ribbon number 3, it simply flips up toward the top of the phone. go slow and methodical.when reinstalling insert the Sim card holder before replacing all the screws, it helps to hold the board in the proper place.

chuck -

GREAT tip about the flat fridge magnet to lay out and hold the screws as you take them out. I would have certainly dropped a screw or mixed them up if I'd not used this tip.

mattfife -

Agree totally, very important guideline! Also, have a tweezer handy.

xint -

There is a tiny metal clip that holds the camera down on my iPhone 3GS. It fell out after I had removed the screw that holds the camera in place, as directed. Only intuition and good luck allowed me to figure out where it had come from.

I also found out that the connector for my camera came loose from the BACK of the logic board. it snapped back in place, no problem, but I could have easily tried reassembling the phone without it connected, and either found things didn't want to fit, or ended up without a functioning camera, and a panic attack that I had clumsily destroyed same.

Edward Bianchi -

Hi. The little metal clip that holds the camera fell out for me too. Where exactly do you reinstall it and how does it line up? Thanks.

Simple Simon -

After replacing the battery the motherboard became hot before I could put the screws back on. What do you think is the problem?

alicia alexander -

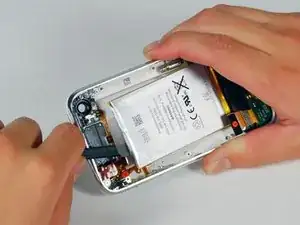
An old mechanic's trick -- you can magnetize a screwdriver by rubbing it with a magnet. Makes it worlds easier to pick up and install tiny, easily lost steel screws. They'll stay on the end of the screwdriver due to the magnetism. You rub the magnet down the length of the screwdriver to magnetize it. It works best if you have the polarity of the magnet (plus to minus, north to south) lined up with the length of the screwdriver, and you rub in one direction only. After each swipe lift the magnet away from the screwdriver before you make the next swipe. You'll find the screwdriver will stay magnetized for a very long time.

Sometimes having your screwdriver magnetized can be a pain. In that case you can de-magnetize it by rubbing it the opposite direction.
Edward Bianchi -

For the first few charging cycles the new battery acted like it was not taking a full charge, but then settled down to behaving like I had hoped -- charging up quickly and then running all day with capacity to spare.

But just yesterday the phone started acting like it was NOT charging. The little lightning bolt icon came on when the phone was plugged in, but the percent of charge did not increase -- it slowly went down.

There did appear to be substantial charge in the battery, despite it being 'in the red'. It took a very long time for it to completely discharge.

Going by comments found online, I allowed the phone to completely discharge, then plugged it in overnight. It was up to about 70% charge when I checked it in the morning. I did a system restore on the phone -- an option in iTunes. It wiped the entire system then rebuilt it from the iTunes backup files. Dunno if that helped, hurt, or had no effect. But so far today the battery and charging have been back to behaving normally.

edwardbianchipe -

Did anyone else suddenly start having random resets when they put in the new battery?

Mark Greenway -

It is due to the wrong battery like apn 616-0428 in a 3gs

Mark Greenway -

I did replace the battery, now I have no wifi, no sound and no cell phone reception. But hey battery is lasting a lot now!

caioiglesias -

You may have reinstalled the cables incorrectly.

mmaryanoff -

I just performed a battery replacement on my 3GS last night. I got everything plugged back in and it went smoothly - but when I turned it on - the screen would backlight, but no icons/images. Plugged into a computer I could see all my music/etc - so I knew I didn't brick the phone; but no images after opening and re-seating everything 3 times.

Saw someone else had trouble with charging until he restored factory defaults so I figured I'd try that. I told iTunes to restore factory defaults, and right after the update - screen appears. Why a software reset would bring a screen back from a battery change makes NO sense to me - but that did it.

mattfife -

I was given a 3gs that had fallen in the toilet. (clean bowl) afterwards it only came on when it was plugged in and you could get it into restore mode but that was it. I felt it worth a punt to get a battery of the flea bay and have a go. I found putting the mother board back in a fiddle but i did it and tested the old battery. it was completely dead. I then replaced it and hay presto a working 3GS for the price of a battery. AWESOME! thanks FIXIT.

there are loads of people trying to sell 3G and 3GS models on Flea bay in a similar state as this one but not sure if the fix would be this simple!

gsmc01 -

Removing the stuck down battery was made easy by warming the back case. i did this warming plate beside my stove but similar techniques for screen replacement could be employed!

gsmc01 -

Replacing ribbon #3 is the most difficult procedure. Use scotch tape to hold ribbon #1 and #2 out of the way while working with #3. Slightly straighten ribbon #3 and then thread it into the receptacle by moving the display toward the dock connector end of the phone. When the ribbon enters the receptacle use the broad part of the spudger to slide the ribbon contacts fully into the connector. Working from the top end of the phone, slip the spudger beneath the display to seat the ribbon, gently pressing the ribbon toward the dock connector end. Then snap the plastic tab on the connector shut.

kolbypeterson -

I just successfully replaced my iPhone 3GS battery today, as mentioned above, make sure you slide the sim card tray back in as soon as the slot is aligned correctly, it'll help hold the logic board down and in the correct position. I also had to apply a larger than expected amount of force to the logic board in order to reattach the side screws.

The camera was one of the hardest steps to replace, I also dropped the small metal clip for the camera, but it's easily reattached. Realigning the camera was easier for me when most of the other internal screws were already attached.

I did notice that once I'd finished the reassembly, my phone complained about invalid certificates for email constantly. This ended up being resolved about 2 minutes after my phone booted, due to the date & time being reset!! I had quite the panic at first, I hope this saves someone else the brain trauma :)

Overall, an AWESOME guide.

Tristan Dawson -

This is a great guide, I just replaced a co-workers battery in about 15 minutes. Thanks for the amazing pictures and guide!

Jarred Sutherland -

Just completed this task in about 30 min. I am typically a high tech junky doing this kind of stuff all the time, but I got to admit this job on my iPhone was like performing an operation on your own child.... not something I wanted to do. However, with the gross lack of support in the phone service world for this relatively easy task, I felt I had no real options. Thanks for the comfort of having pictures and clear descriptions to "hold my hand" as I progressed cautiously and successfully through this procedure.

rgant3703 -

Question: after completing I have no werking speaker anymore. Only the loudspeaker works. What connection is not correct ? Which one should I check ?

Thanks.

Nicolette Planteydt -

My screen is now just white after Iput everything bck together what should I do:(

cfkavanagh -

I have the same problem just a white screen........Did you get an answer?

thecorydons -

This repair took me longer than advertised, and I had to do it twice to get the camera back working properly. My tip for "magnetizing' the screws was to dip the screwdriver head into a glue mouse trap ever so slightly. This put just enough adhesive on the end to enable me to get the screws back in place before tearing my hair out. I also put a white cotton cloth down on my workspace so I would not lose any parts and that turned out to be a good thing. As of now, the new battery on this phone is performing better than the one on my new 4s.

Barb -

For those who wanted to know what all the connectors are for in one place (there seemed to be a lot of inconsistent or incomplete posts in this guide and throughout the site), here are the connector summaries in one place for the 3GS model (3G is different):

1. LCD Display

2. Digitizer/Touchscreen

3. Ear speaker, Proximity Sensor

4. Charging Port, Microphone, Speaker

5. Audio Controls (Headphone Jack, Volume Buttons, Silent Switch)

6. GPS, WiFi, Bluetooth Antennas

7. Cell/WWAN Antennas

shaun -

if ribbon 3 isn't connected can i still hear threw the speaker \??

lovekingswood -

Overall went very smooth, but three recommendations are use the fridge magnets to hold the screws, get some tweezers to help handle the screws, and put the sim card in before replacing the logic board. Hardest part was getting the logic board back in just right and getting sim card to enter easily.

chrisnettles -

I had sweaty hands, weavering hands, but, finally, after 20 minutes or so, i completed the replacement of the battery! thanks a lot for the very detailed and complete industructions! :)

Jan Mer -

I bought the replacement battery, I realized after installing, it does not come charged. Is this the case that everyone faced after the installation ?

satsho -

Mine showed 50% charge as it should when I plugged it in to power and it turned it self on. (using an ifixit replacement battery for 3gs.)

Brian Smith -

My experience:

* remove the SIM tray first before starting

* pull hard to open the iPhone with the suction cup, make sure you hold the other side as you need to disconnect the first three cables before fully removing the display

* when disconnecting the cables, take your time, they give a 'click' when they're disconnected

* cable 3 is a pain to slide back in, do this by wiggling the display a bit

* take care when sliding the logic board back in: do not push too hard or the camera will be disconnected from the logic board at the bottom

* the hair dryer hint actually works!

Stefaan -

The battery you send me was bad. It didn't works and I had to go to a specialized repair company to have it works again... :-/

christophe -

This worked great for me! everything works and it was not as hard as I thought it was going to be. I just hope that it can stand the test of time!

zeroxfh -

Fantastic, worked perfectly. A couple of tips:

* The ribbon cables have a plastic housing on the underside, which contains two rows of metal teeth which bite onto a similar row of metal teeth on the logic board itself. The tiny ribbon cables e.g. 6 have a small round metal 'popper'. Both types can be simply levered off with the spudger, and then pushed back on with your finger (i put the spudger beneath the whole ribbon cable on number 1, to ensure I was pulling up the whole housing and not just the spongy bit of foam with a sticker on that lies on top of the ribbon.

* Another tip I have is that if you don't have a magnet to store the screws on then a bit of blue tack (silly putty) words well. Useful for when you drop the screwdriver on the desk and everything else goes flying..

* Especially when replacing ribbon 3, I found I had to stick the phone to the desk to stop is sliding while I put the cable into the clamp housing using tweezers. Pretty fiddly but quite satisfying when you get it right. Note that it doesn't go all the way in; you can still see a couple of mm of orange poking out when it is time to clamp the tab down.

* Very happy with iFixit; I've ordered twice now, and both times I have received my order within a week. And I live in China. Top notch!

carlrobinson -

Great guide, carefully following steps made battery replacement on my wife's 3GS really easy. I bought the spudger from ifixit, thinking it might be a bit pricey for a piece of plastic but it turned out to be a great tool. Thanks a lot.

paulruf -

Using the spudger may be more annoying and takes longer to remove the battery the danger with using a metal object is damage to the case and/or cabling. I also had a loose screw in the case which came from the power button assembly. That sidetracked me for a while

foxygolf -

I did complete but took a little longer than I anticipated. The "do not remove" sticker was a pain because it tore off in little pieces, and my battery was hard to get unstuck(good adhesive I suppose). In the end I did get the battery changed, the only thing that doesn't work now is my camera, but I'm sure it was 100% user error. Oh well I just need the phone to work till the iPhone 5 comes out.

nlong1 -

Battery I was sent by ifixit is longer and wider then the original in my 3gs. i think it all due the orange tape they use to hold the side flaps and bottom circuit board on. just poorly taped. not sure i am going to be able to make this fit with out re taping the sides and bottom. guide is great. i am surprised no one else has commented about the battery being a hair to long and wide.

Brian Smith -

It took a some real pressure to push the battery toward the doc connector to get the connector that is attached to the battery to be able to slide over the pin/ screw hole that it mounts to and once it did that whole connector was a little twisted but the contact pints it hits on the board are pretty big so i don't think it will be a problem... and no problem its back together and working now.

Brian Smith -

The directions were spot on! Easy to follow. Big High Def pictures that could be blown up to show detail. Very Nice!!

helinursemedicjunkmail -

Did it

eddie -

Just finished doing this. Seems to have worked at first plug in. All the features I tested are still going. Guide was great. A few notes from my experience:

- I had trouble peeling up the Do Not Remove sticker. Ended up shredding the part covering the screw. Tucked it back over top of the screw when I reassembled and hopefully won't have a negative effect

- The screw attached to the battery was in really tight and the screwdriver supplied by IFixit wouldn't budget it (but worked for all other screws). Ended up using a flat edge eyeglasses screwdriver.

- Had a lot of trouble pulling up the battery as it is stuck really hard. I used the hair dryer trick to warm the glue, but I broke one end of the spudger doing it. I recommend getting at least one extra. Turns out though the broken spudger was the best tool for prying out the battery. After snapping off the edge, the remaining plastic still had a bit of curve and was a lot sturdier so I was able to get it under the battery and pop it up.

wesleybenjamin -

great guide!

just one thing.. he button "I did it" is at the wrong place!

It should be put when you get back to assemble the iPhone!

metrofire -

• Fitting the new battery was difficult, as the ifixit battery is about 1.5mm longer than the original one, so the connector end has to be opened slightly and re-taped in a slightly tighter configuration.

• With all the fiddling at the battery connector end it's easy to let cable 6 slip under the battery, which is annoying. In the end it's a bit of a squeeze but it does fit eventually.

• The whole phone was full of dust, hairs and cruft and took some time to pick it all out. I used a trimmed matchstick to clean the groove the screen fits into, and inadvertently dropped a tiny sliver of wood on connector 2; when it didn't click down properly I found it and removed it with the point of a needle.

richardjenkins -

Well, that was much harder than the guide makes it look. My camera doesn't work now and even with reading glasses I could hardly tell the screws apart. (I did separate them during disasembly, but still...) Be sure to position the battery just right and if your phone is important to you, have a service do this. I regret doing it myself now. And if you DO try this yourself, get the toolkit or make sure you have a watchmakers kit and a suction cup.

Martijn Warnas -

Battery came ok by working around the edges first. Also another tip. Dip screwdriver in some jam so the screws stay in place when reassembling. Also note the metal clip above camera to know how to put back on.

Alecf -

I replaced the battery, and when I switched it on again, the battery level showed 100% and than later goes in start up mode again or asks for activation by connecting to i tunes. As soon as I take the connector from the charger out, the phone dies. I also tried to connect the phone directly to the computer, but there it does not start at all!! Any suggestions?

hvaneldik -

I'm having this same issue- but my old battery is totally dead, that's why I have to replace it. Did you ever resolve this?

bmhawk00 -

out of frustration, I havw just put the old, not so good working battery back, phone works fine. So something is wrong with the battery. Yes, its the correct one for 3GS, even the APN numbers are identical!!

hvaneldik -

Did this once and afterwards Wifi was greyed out, not available and none of the apps would run; just blink back to the home screen. Doesn't seem to be holding a charge--I let it sit plugged in x 30 minutes, it died as soon as I unplugged it--so can't get it to iTunes to restore from backup. I repeated the entire repair in case I missed something, maybe had a slight alignment problem somewhere etc. It's charging now--we'll see.

Tips I learned: cables #6 and #7 are round snap-on connectors. Line them up carefully, they should "click" in place. Also, the "Do Not Remove" sticker got obliterated in the process of repair; first time through I didn't put anything over the screw at the end--wonder if that caused a problem? Second time through I put a small square of electrical tape over it. lastly, cable #3 is tricky. That white bar flips up like a latch. Slide the cable back in at the end, then flip the latch down to secure it.

AndyPDANP -

Got a replacement battery from ifixit a couple days ago to replace the bad one they sent out to me the first time. I put that one in and everything works fine now. I would definitely recommend that if you do this fix and are "sure" you did it right, consider that the battery you got might be a lemon. I thought it would be a matter of powering on=good, DOA=bad, but it's apparently much more than that. The first time I did this fix my wifi stopped working and the second time I couldn't get a cell signal. I figured I'd screwed up the repair, but it was the battery. One other tip I learned doing this process a 4th time--make sure all the ribbon cables are above the logic board before you screw it back down. I had #5 pinned under the board, and thankfully didn't damage it, though a small piece of black plastic was near it when I discovered my mistake (maybe from the SIM tray?). But it didn't seem to affect anything. Phone works great now.

AndyPDANP -

I can't believe it! My 3gs was totally dying all the time. This totally fixed it. The instructions were great and easy to follow.

My only criticism is that I wish they just wrote out reverse instructions for after the battery was installed, rather than having to scroll backwards.

But otherwise, I'm thrilled this site offered solution i could do myself!

christine -

The "Do not remove" sticker that needs to be removed to get to one of the screws didn't come off in one piece. It would have been nice to have a plastic sticker like that in the kit, but since it wasn't there I cut a matching piece of plastic out of the double stick plastic that held in the old battery and used that. It isn't as clean, but it will prevent metal on ribbon contact that potentially will ground something.

Thomas Bauer -

Just adding a thank you to ifixit. My 3GS battery was on it's last legs when I came across the ifixit website. Ordered the replacement kit, and everything is fine now. Thanks again.

jeffyo -

I Did it ! These site is very useful for service technician.Thk you so much for your supporting.

sanaytar -

Step 0: Lay off the coffee or caffeinated beverages at least twenty four hours before attempting any of these manoeuvres.

Overall, the process was easy to follow. There are a few steps where you can ruin your device. Closeups would have gone a long way to make this even easier.

akobelan -

My 3gs had a APN:616-0435, recieved an APN:616-0431 which had the 3M self adhesive on the back of the battery. I noticed a needed clarification in the instructions, when prying up cable No:1 pry up oposite of ribbon towards outside of case not as pic shows. White release tab for ribbon, mine was black. Also battery only had 30% charge when I activated phone. No full as web page states.

Overall seems like a good kit.

k7iou -

super easy when you have ifixit's guides!!! My try here http://www.youtube.com/watch?v=O16pZBtCA...

Michalis Myrsiadis -

Had a replacement battery from a German company via amazon and was warned that under iOS 6 there are frequent bugs like phone restarting, battery not charging fully etc... They said I'd better send it in or at least do a reset. So I did a DFU-reset before and one after installation and it works fine. (iOS 6.1)

Megabert -

I replaced both the battery and power button on a 3GS that is old and has been opened up several times (by me and my predecessor). The battery starting dying after I opened it up last time to replace the digitizer. I think because of ESD damage, but really not sure. As far as the process itself, it was probably the dirtiest (literally and figuratively) repair I've ever done. The inside of the phone was very dusty and dirty which didn't help. Getting the logic board back in was a pain! Really don't have any advise to give to those who are struggling with that as well, don't give up! You'll get there eventually. I definitely could have been more gentle with the camera, golden ground tab and the cables, but in my experience, electronics are a lot more durable and strong than we sometimes think. I did use a anti-static wristband this time though (iFixit sells them, but so does Radioshack), just to make sure I wouldn't fry anything again. Good luck!

Mirte -

Went smooth. Taking it apart was the easiest. About 5 minutes. Battery a little tough to detach from the adhesive but it eventually gave. Putting back together took about 15 minutes. Its always harder to put stuff back together, but possible. Thanks ifixit!!

truefan -

When removing the display assembly with the suction cup, put some duct tape on the Iphone where the Sim card tray is. This prevents destroying the internal cables if the display assembly comes off too fast. Also it helps to hold the display assembly at 45 degrees, so you can remove cables #1, 2, and 3.

Make sure when you are re-assembling, that the cables snap in, you can feel it happen. Some of my cables were hanging loose when I re-open the Iphone to troubleshoot why it wasn't working the first time.

johnplim -

I replaced my old battery with new one, and soon after the replacement it began to restart. It also had the following problems. 1). shows full charge when connected with the computer 2). sometimes doesn't show signals 3). restarts even in the Airplane Mode.

So I replaced the new one with the old one again and now its working as usual. I rechecked the battery APN and it is 616-0435.

wht could possibly go wrong? plz help me guys

nalin -

Just replaced an Iphone 3gs Battery.

Disassembling is easy, the problem is reassembling.

Some tips:

Take your time on connecting the cables. When they connect, they connect. It's hard to connect them but once you do it right you'll feel it. I did very light tappings around the connector to see if any part was loose to check if it was all correct.

On the 3 cables from the logic board, connect number 3 first, it doesn't go all the way like it was before, that's ok AFAIK. After number 3, connect number 1 and then number 2. It worked better for me that way.

The battery even comes with a 20% charge, hehe.

Good luck to you all and have a lot of patience. I did it in one hour aproximately.

plabonia92 -

Follow the written directions, I found the video to be of very limited use. I looked at the iMore video, much more detailed and with good practical tips

leonardgerald -

These instructions are superb. Thank you very much!

Rod -

Step 6 requires a detail diagram of the clip for connector 3...like a line drawing or something. The picture is very un-detailed and low contrast right where clarification is necessary. For someone new at connector types, doing similar pop-out connectors and then this singular slide-out connector with a hinged clip it's confusing - and could easily lead to damaging these delicate parts.

Thanks for the tutorial.

billyounger -

No matter what I do, I cannot get the screen back on. It is too high on the sim card end. I thought maybe the battery wasn't fitting right and put the original back in. I still cannot get the phone back together. It just seems like everything is too high at the sim card end. Any ideas?

rdksra -

Great pics Other than the weee screws and the fat fingers it was a wonderful change Thanks for the step by step Awesome :)

Andy -

Great guide, thank you.

Things I found:

1. Putting connectors back on was easier with my thumb because I could feel very clearly when it was in the right position and push softly across the surface. All connectors seemed to click back in place, except 1-3.

2. I had a lot of trouble getting the screen off (perhaps because the phone is so old). I eventually had to use a "hooked screwdriver" on the edge of the glass at the button-end. It came out quite easily but be careful not to damage seal around class.

3. I used some of the old battery adhesive tape to cover the screw under the "Do Not Remove" sticker, which was impossible to flip back without destroying at least half of it. I think it should be ok this way.

4. I dropped a screw into the phone when re-assembling and took a long time to find it. Be careful, the screws can fit in little spots and become fixed without even screwing. I finally found it, looked like it was a permanent screw but splutter could move.

MrHatken -

5. The grounding tab (triangular shape metal piece sticking out from the mother board that grounds the phone to the case looks very fragile and gets caught up in the cable. Be careful with this.

6. As mentioned, I couldn't get the suction cup to work, pulling off the screen. Perhaps would be easier using an iFixit suction cup. Mine was an old one from around the house and not as sturdy or strong.

7. Spluder is excellent, so glad I got that.

8. Getting the battery off was quite difficult. I highly recommend heating the back of the phone for a while (it takes a while for the glue to soften as well). Be careful when prying the battery off as there are some ribbon wires and other bits around the battery.

9. Highly recommend the fridge magnet and a magnetic screw-driver for handling the screws. They are very small and jump about very easily when knocked or dropped. Also you do need the correct screw-driver, won't work with larger ones.

Thanks to all the other comments as well.

MrHatken -

Replaced the battery... and it entered and endless loop of "apple symbol for a few minutes", "spinning clock", shutdown, "apple symbol...", and so on. Tried to restore using iTunes, same issue. Then I decided to open it again and check all the connectors... put it back together, new restore... and "voila"! It's working.

It's unfortunate that I had to restore the system... but all is well when it ends well. Just remember to always backup before replacing the battery.

Luis -

Changed the battery with no problems. Reassembling was not that hard. Little problem getting the main board in and had to swear a bit to get one of the cables in place. Now we can use the phone again without having it connected to the charger all the time.

Bjørn Roger Thomassen -

Absolutely brilliant, easy to follow and accurate, only improvement i can suggest is to use either use a magnetic screwdriver or stick a small magnet to your your screwdriver to make handling and positioning the screws easier.

I attempted this a few months ago without the guide and it cost £40 ($66 app.) to get it repaired after my attempt, this time £3.50 ($5.60 app.) big difference!!

Again many thanks.

James T -

Read all the steps in the guide, guide is below the video, pictures explain each step in detail. Don't just see the video and start.

John -

Thanks chuck very keen eye.

usbreaks -

Just completed the battery instal based on this guide, very good & was able to complete it pretty well until switching it back on to find i had no service, a quick format sorted that though and all seems good now

Darren -

Hey There,

thank you guy so much for the repair guide that worked just perfectly – and unfortunately still didn't fix the problem. I changed the battery, the phone started and worked fine, until the battery got low. When I tried to charge it, it wouldn't work. Maybe the battery I replaced wasn't even broken, maybe it was something else. I will never find out since I measured charged of the old battery and it was dead; but maybe it died sometime in the six month I left the phone in some drawer.

Anyways: Idead about what to do now, or maybe if there just isn't anything left to to will be really apprecciated.

Thanks!

Fritz -

I flawlessly replaced the battery my first try thanks to this guide.

Samuel -

The instructions were spot on. New battery (from iFixit) is in and everything appears to be working great.

I just wish I read the fridge magnet trick to help catch the screw you know your are going to drop, which I did. After about an hour of hunting for it, I found that bounced to the back of my desk. Thank goodness for hardwood floors or I don't think I'd ever find it.

Mr Mike -

The instructions were clear and I managed to change the battery. Removing the old battery was the biggest hurdle. The whole operation took me maybe 45 minutes as I tried to be careful and also tried to clean the phone as I worked on it.

However, the replacement didn't fix my phone. The old battery pack of my 3GS was spent and the phone only worked when plugged in until it finally completely died off and would not hold charge or turn back on, just showing the empty battery/charging icon and occasionally the Apple logo before switching off again. With the new pack, this problem persists. The battery appears empty, phone will not turn on. I suspect the replacement battery may be a lemon. The battery heats up while charging, but so did the old one.

The problem is not in the charger/cables as I have tried many. The phone also has had problems with the mute switch and power button already before the battery started dying. I cleaned them the best I could but the power button still won't work except occasionally.

Antti Autio -

Don't do it! I'm one of those guys who fixes everything. I'm really good with my hands. I should have been able to replace my battery. I followed the directions meticulously. Even used a large, mounted magnifying glass at times. Taking the iPhone 3GS apart was no problem. Halfway through the take-apart, I wondered whether all the tiny pieces would fit back together exactly the right way. Too late to stop then, however. I replaced the battery and backtracked to put everything back together. The board didn't want to go back in flat…it just wobbled. It took 2-3 attempts to finally get it in correctly. One of my ribbon connectors was different than the photos (an old model?) and needed to be slipped into place. I really needed the magnifier for that. Got it all together, and the phone would only stay on for a few seconds before shutting down. I went back inside and reconnected that suspicious ribbon connector. Now the phone works, but no camera and the battery won't charge above 50%. Now I need a new phone.

Rik Meyers -

Mate,

Dropped my phone into the toilet on a train - bugger - dead as a Dodo. Six hours later after using this guide to pull apart the phone I dried it in the oven at 50˚C (122˚F) for 2 hours and reassembled. Booted up and so far all is working again!

Thank you so much, fantastic guide!

Cheers from Downunder

Chris

ceobrien44 -

The first time I tried this, I bricked my phone, and had to sell it for scrap. It works fine as long as you do everything very carefully. Also, it's helpful to test the battery for +3.7V before taking the phone apart. Lithium batteries can't run to 0, or they're good for nothing but a paperweight. One tip is to run your fingernail along the margin between the screen and case to remove stuck dirt which inevitably ends up there. Don't use a spudger and definitely don't use anything metal. It's way too easy to scratch or damager something. Clean margin will make the screen removal way easier. My phone is now working fine, although I only use it now for a portable music player and ooma client. Well worth the $6.50 I spent on a new battery.

marti -

Excellent guide. Worked like a charm. My battery was just a touch thicker than the original and it took a little extra pressure on the screws putting back together.

justincarper -

replaced a new battery two times...phone still shuts off 5 minutes after turning it on :(

battery charges to 100% ok...don't know what's wrong...anyone have any suggestions? thanks.

steveoo987 -

Ordered a new battery from iFixit for my poor, abused and aging 3GS (hand-me-down to my kids who use it as an iPod). The original battery was old, not holding a charge, and was expanding, pushing the case open. I've taken apart Apple laptops before, this was my first shot at an i-device. It helped me to watch the video, go over the whole guide first, and make sure I had a plan for screw organization prior to beginning. Took less than an hour, everything went as described in the guide, nothing really I wasn't prepared for. New battery works great! Thanks iFixit for the parts and the help.

Jere -

Good News - Bad News: This was my very first time,ever, in trying to repair any electronic device. Yes I was 100% successful in replacing the battery in my iPhone 3GS. Thank you iFixit for the parts. BUT---- No thanks to iFixit for the not very helpful instructions, dark photos and no close-up shots. Also, the iFixit video is utterly useless. THANK GOD I found a iCracked.com video on YouTube (" Official iPhone 3G / 3GS Battery Replacement Video & Instructions - iCracked.com ). It gave me the confidence I needed to actually do the repair. The instructions were very clear and the video was also very precise. Especially about how the #3 ribbon cable connector works - Very Important. It even helps you re-assemble the iPhone in the reverse order. I am a complete idiot when it comes to this stuff, and even I was able to replace the battery and have the iPhone boot-up in perfect working order when I was finished. iFixit got my money for the parts which is terrific - but the instructions from them were lacking.

Brett -

Changed battery and had problem that others seem to have had with cable 3, but now touch screen doesn't work. Any suggestions on where to look for solution?

Kasandra Evans -

Purchased a battery for iPhone 3gs, followed steps from iFixit. 1st step,the case almost opened by itself, and noticed a bulging from center of the phone. Upon removing the battery, noticed bloated battery, that had distorted the logic board. In addition, the back cover and bezel were distorted, but fit back well. May need some adhesive to ensure closure. Any suggestions to source a logic board? iFixit doesn't, from what I see, carry it. As the logic board is distorted, is the best path to replace? Thanks

Danny -

After following all the steps and replaced the old battery by the knew one and reassembled my iPhone 3GS, I tried to turn it on but nothing appeared on screen. Suddenly a ton sounded and the Photo Application on my Mac opened up showing the pictures stored inside the phone and I, fast as I could….lol…, imported everything that was “arrested” inside, but on screen of the phone nothing appeared. If I unplug the charging cable from the phone, a white screen shows up for some seconds and after that it disappears. With the iTunes software opened, it detects the phone, show it and I can see that it is being charged and has 58%, opps, now is 59%. What else could I do tô have my dear iPhone 3GS working, at least as a phone.

Thank you all in advance.

Fredy.

Fredy -

Hello I fix it , I am very impressed, the tool kit is excellent, the instructions here are the best ;) I could not be more impressed ,I'm an ASE certified Master mechanic , if the auto assembly books I use were this good , I would be out of business, as anyone with any sense can perform any repair with this great instruction, thank you very much, now I look like a rock star to my girlfriend, her I phone has a new battery , I can fix anything, woo hoo:) yours sincerely Duncan Harkness

duncan harkness -

Super simple, old 3gs back up and running and have access to all my old photos and movies! Thank you!

Paul Csogi -

VERY WELL DONE! IT WORKED! What a great tutorial and guide. I was amazed, but followed these instructions and - voila -the dead iPhone 3gs is alive again! Thanks so much for the great tutorial.

j winters -

Génial ! Pour une somme dérisoire, j’ai pu donner une seconde vie à mon 3GS :)

jtf0001pwned -

Great instructions! It all worked! New battery installed and working! Certainly could not have done it without your great and very clear guide. Great to read the relevant comments as you go. Thank you so much!

sarahmanly -

Well I followed the instructions & changed the battery ok.. But no power at all… completely stuck now… don't know if replacement battery is faulty or just not charged. I live on a boat so only 12v charging, not touching it. So will have to try mains charging at work… if that doesn't work I'm snookered. Old battery just wouldn't charge anymore. Would have thought new battery would have had some charge at least…Totally puzzled

Julia elizabeth -

The volume +/- button is made of two parts ( metal and plstic) , are simply glued together?

And after? The assembled button is glued to the metal bezel?

What kind of glue is recommended?

Mario Gioia -