Einleitung

Dies ist nur eine grundständige Anleitung beim Ausbau des Akkus.

In dieser Anleitung wird auch die Displayeinheit ausgebaut, um Schäden an den Displaykabeln zu vermeiden. Wenn du dich sicher genug fühlst, den Austausch meistern zu können, ohne die Displaykabel zu überlasten, dann kannst du die Schritte mit dem Ausbau des Displays einfach überspringen.

Es ist zwar möglich, die Klebestreifen am Akku gleich nach dem Öffnen des Smartphones zu entfernen, die Anleitung empfiehlt aber, zuerst die Taptic Engine zu entfernen. Du vermeidet es so, dass die unteren Klebestreifen versehentlich zerreißen, entweder, weil sie an der Taptic Engine hängen bleiben, oder weil du sie unter zu großem Winkel herausziehen musst.

Für eine optimale Leistung empfehlen wir, den neu installierten Akku gleich neu zu kalibrieren: Entlade den Akku auf weniger als 10% und lade ihn dann ohne Unterbrechung auf 100% auf.

Wenn du das iPhone 8 Plus öffnest, werden die Dichtungen am Display beschädigt. Wenn du sie nicht ersetzt, wird das iPhone zwar normal funktionieren, aber nicht mehr wasserdicht sein.

  1. QEiwXOLOCt5t6bkO
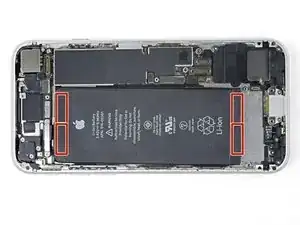
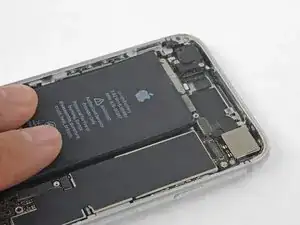
    • Der iPhone Akku ist mit vier elastischen Klebestreifen befestigt, zwei oben und zwei unten.

    • Jeder Klebestreifen verfügt über eine schwarze Zuglasche am Ende, die leicht auf der Vorderseite des Akkus angeklebt ist.

    Be careful prying around the side button connector when trying to remove the top tabs. There is very little room to maneuverer

    Tom Millard -

    £ Tapes broke on me so I applied iISOPROPYL ALCOHOL using an Eye Dropper waited 30 seconds tHen heated up some oil in the bag rice for 2 minutes on 700W and the applied the unopened packet to the back of the iPhone for 90 seconds.

    Themn I used an out of date credit card with the raised numbers facing down to easily release the battery.

    David Howard

    David Howard -

    Great tip! Worked perfectly and easy. Thanks.

    Stephen Smith -

    It should read heated up some boil in the bag rice

    David Howard

    David Howard -

    Very difficult. be very careful on the limited space end that you don't puncture the battery!

    Carl Schultz -

    I really hope you guys not to skip steps for detaching taptick engine because it is really hard to pull out string with taptic engine. 4 of 3 strings were cutted when I treid to detach batteries with taptic engine. So, I really recommend you to get rid of taptic engine before you start this step. But if you skipped and strings are cutted, there is a way. Use hair dryer 90 secs as maximum hot behind the battries and detach the batteries. It worked to me.

    Min Su Kang -

  2. vs4oMYcRlWEFb2lY
    vs4oMYcRlWEFb2lY
    jImYu1JRHGErUfnj
    okM1ORGZUueh1Xi6
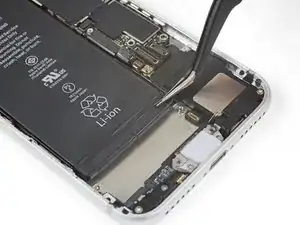
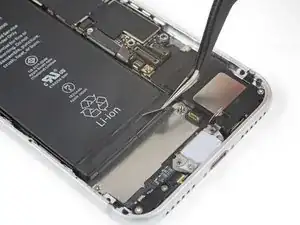
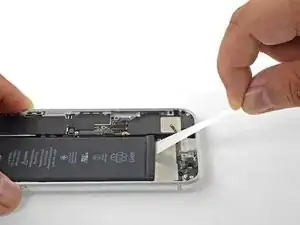
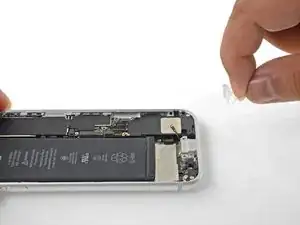
    • Löse die erste Akkuklebelasche von der unteren rechten Kante des Akkus.

    • Benutze deine Fingernägel oder eine stumpfe Pinzette. Vermeide es, scharfes Werkzeug zu benutzen, um den Akku nicht zu beschädigen.

    Vor Schritt 30 umbedingt die Rückseite des iPhone erwärmen. Ich habe das iPhone 10 Minuten auf eine heiße Wärmflasche gelegt.

    Moritz Hartges -

    Strongly suggest you remove the display. Also the picture shows the "perfect world" it is far ore difficult to remove and get to those white adhesive pull strips. be very careful!!!

    Carl Schultz -

  3. 4eDyPbJ62yPLKLAd
    4eDyPbJ62yPLKLAd
    J3TMbulIt5RYhCcJ
    fjKZrs3OCvNRVb3I
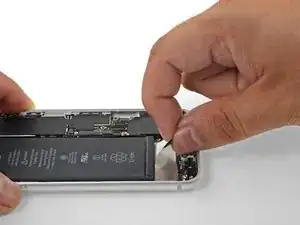
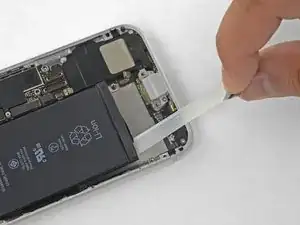
    • Halte die Streifen immer glatt und faltenlos, denn verknitterte Streifen werden sich verkleben und reißen, statt sich sauber herausziehen zu lassen.

    • Drücke den Akku nicht nach unten, während du die Streifen herausziehst. Wenn du auf den Akku drückst, entstehen Druckstellen , die sich verhaken können und den Kleber beschädigen.

    • Ziehe langsam die Akkuklebelasche weg vom Akku, in Richtung Unterkante des iPhones.

    • Ziehe gleichmäßig und halte konstanten Zug auf den Streifen, bis er zwischen Akku und rückseitigem Gehäuse herausrutscht. Das gelingt am Besten, wenn du den Streifen in einem möglichst flachen Winkel ziehst, ohne dass er sich an anderen Bauteilen des iPhones verfängt.

    • Der Streifen wird sich auf ein Vielfaches seiner ursprünglichen Länge dehnen. Ziehe immer weiter und fasse, falls nötig den Streifen am Akku nach.

    • Wenn der Akkuklebestreifen bei diesem Verfahren reißen sollte, dann hole das restliche Stück des Streifens mit den Fingern oder einer stumpfen Pinzette heraus und mache mit dem Ziehen weiter.

    • Wenn einer der Streifen unter dem Akku abreißt und nicht geholt werden kann, dann entferne zuerst die restlichen Streifen und fahre wie im Folgenden beschrieben fort.

    This was the most frustrating step of the process. I found that if you pull steadily and slowly while continuing to grip the adhesive as close to the battery as you can there is a much smaller chance of breaking the adhesive strip and losing it under the battery.

    Benjamin Boldt -

    I did not have replacement adhesive tabs for my battery so I needed to re-use the old ones. First, I pulled back the black tabs from the top and sides of the battery (Steps 28 and 29). Then I laid the phone on a hot water bottle (Wärmeflasche for our German friends) while I very, very, very slowly prised the battery out of the body using the flat end of a spudger, starting at the corner closest to the volume buttons. The battery did deform somewhat during the process, but it was fully discharged and I had no combustion problems. After a few minutes of gentle pressure on the battery corner, it started to release from the adhesive. Full removal took about 5 minutes and the adhesive tabs were not damaged in any way and happily re-adhered to the new battery.

    I did all this after skipping over steps 18 to 27 and put the new battery in place after connecting it first to the circuit board to ensure correct alignment.

    jnbruin -

    All 4 strips tore after just removing a small portion… even though I took great care to pull slowly and at a small angle. Could not imagine how anyone could have managed this with my phone. Had to heat and pry out.

    griffin.weber -

    I damaged the graphite film underneath the battery while removing it from stubborn adhesive using a card from the side. Can I buy replacement graphite film? Should I remove it altogether since it's ripped or will that cause problems for heat dissipation? Thank you for any information.

    Anne Marie Hammock -

  4. yAxAcOuZkVKD1xAY
    yAxAcOuZkVKD1xAY
    vMCND6xEQrEDRyJI
    woB3TYHUSBFt1Phm
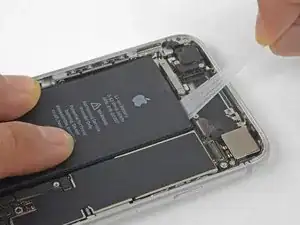
    • Wiederhole die vorigen Schritte, um die restlichen drei Streifen zu entfernen.

    • Achte darauf, den Akku festzuhalten, wenn du den letzten Streifen herauslöst, denn er könnte den Akku unerwarteterweise herausschleudern.

    • Wenn du es geschafft hast, alle Klebestreifen erfolgreich zu entfernen, kannst du den nächsten Schritt überspringen.

    • Falls einer der Klebestreifen unter dem Akku gerissen ist und nicht herausgeholt werden konnte, dann mache mit dem nächsten Schritt weiter.

    If you have a thin flexible plastic shim shaped like a letter opener, you can slip it under the battery and take it off the adhesive.

    Spencer Chan -

    I damaged the graphite film underneath the battery while removing it from stubborn adhesive using a card from the side. Can I buy replacement graphite film? Should I remove it altogether since it's ripped or will that cause problems for heat dissipation? Thank you for any information.

    Anne Marie Hammock -

    Good luck with the top two…. Virtually impossible to remove. Both of mine broke almost immediately. I tried floss and a strong thread and both broke before they did much good.

    so I took a plastic card (an old credit card would work, but you’ll have to cut it thinner or work from the sides. If you got the bottom two out successfully, you should be able to get enough lift to start prying gently with the card.

    Good chance you’ll scuff up the super-thin carbon film over the charging coil if you’re too aggressive. And DO NOT use alcohol to soften the glue because it will melt right through that thin carbon layer and make a mess. Best bet is to go gradually…. Put the plastic card under the battery, pull up a bit to add tension, and then stick a pencil or popsicle or something under the card to keep keep the tension and give it 5 minutes or so for the tape to loosen. Then pull up on the card to add new tension, move the stick up, and wait again. It’ll take 20-30 minutes. Repeat until free and don’t rush.

    Bigh -

    Anne, I had little rips in that layer, and it doesn’t seem to have affected anything.

    Bigh -

  5. DBnvH5CTIVnxfCdd
    DBnvH5CTIVnxfCdd
    Ch4yrKmbroeQvpsG
    • Falls einer der Klebestreifen unter dem Akku gerissen ist und der Akku am Rückgehäuse festgeklebt bleibt, dann entferne ihn folgendermaßen: Tröpfle etwas Isopropylalkohol (mindestens 90%ig) unter den Akku in der Nähe der betreffenden Streifen. Lasse ihn mindestens eine Minute lang einwirken und hebe dann den Akku vorsichtig hoch.

    • Heble den Akku nicht mit Gewalt heraus. Tröpfle, falls nötig, noch etwas Alkohol ein, um den Kleber weiter zu schwächen. Verforme den Akku niemals und stich ihn nicht an.

    • Falls du Hebelwerkzeug benutzt, um den Akku aus den iPhone zu heben, sei extrem vorsichtig, damit du die Flachbandkabel oder die kabellose Ladespule direkt unter dem Akku nicht beschädigst.

    • Wenn der Akku doch noch am Rückgehäuse festgeklebt bleibt, dann bereite einen iOpener vor oder benutze einen Fön, um das Rückgehäuse direkt hinter dem Akku zu erhitzen. Dadurch wird der Kleber aufgeweicht.

    • Erhitze das Rückgehäuse bis es etwas zu heiß ist, um es noch bequem anfassen zu können. Überhitze das iPhone nicht, denn sonst könntest du versehentlich den Akku entzünden.

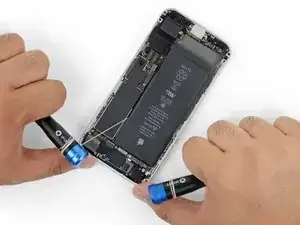
    • Du kannst auch einen starken Faden (wie zum Beispiel Zahnseide oder eine Gitarrensaite) unter dem Akku durchziehen.

    • Ziehe den Faden über die ganze Länge des Akkus wie eine Säge hin und her, um den Kleber zu lösen. Verforme oder beschädige auf keinen Fall den Akku.

    • Schütze deine Finger und trage Handschuhe oder Schlinge die Enden um ein Werkzeug (z.B. Schraubendrehergriffe, so wie im Bild gezeigt).

    In my case the floss caught on the sharp edge of the wireless charging coil pulling up the edge of the coil, butane cutting off the floss. I think the coil had been damaged by some previous repair, but be careful. After you pull past the first two adhesive strips, peek under the battery to make sure the floss is sliding over not under the coil. The coil doesn't look like a coil – more like a paper thin pad.

    Joel -

    Soaking the floss in rubbing alcohol helped also. It took some doing, but eventually came through without issue.

    Trever Knie -

    the wireless coil accidently got a little tear just to the right middle area. I put the new battery in and everything seems fine. I wonder if I should change the coil? anyone have any suggestions of what symptoms to look for if there were to be an issue ? thank you

    cb brooks -

    I ended up heating the back of the phone for 30-60 seconds (don't do anymore than that) and used the opening tool as a fulcrum to lift the battery. As long as you're careful it should work!

    Vladimir Stanev -

    I damaged the graphite film underneath the battery while removing it from stubborn adhesive using a card from the side. Can I buy replacement graphite film? Should I remove it altogether since it's ripped or will that cause problems for heat dissipation? Thank you for any information.

    Anne Marie Hammock -

    We used my heating pad set on low, placed the case on it, about two minutes and using the opener tool, lifted the battery out. This was the only bump/snag we had, the remaining steps went well and I have my phone back.

    Pete P -

    All the adhesive strips broke, so I used the long plastic tool for brute force extraction, twisting the old battery in the process. Most of the old strips in the back remained, so reused them for the new battery.

    Boaz Ben-Zvi -

  6. 4bYRPYeqSJkQMwrH
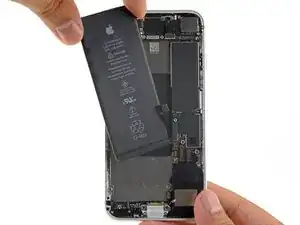
    • Entferne den Akku vom iPhone.

    • Sollte dein Ersatzakku in einer Plastikhülle geliefert werden, entferne zuerst die Plastikhülle vom Akku, indem du die Hülle vom Flachbandkabel abziehst, und setze erst dann den Akku ein.

    • Wenn noch Reste vom Alkohol im im iPhone verblieben sind, dann wische sie sorgfältig weg oder lasse sie gut austrocknen, bevor du den neuen Akku einbaust.

    • Wenn dein neuer Akku nicht mit Klebestreifen ausgestattet ist, dann benutze diese Anleitung, um die Akku-Klebestreifen zu ersetzen.

    • Führe einen erzwungenen Neustart nach dem Zusammenbau durch. Das kann einigen Problemen vorbeugen und macht die Fehlersuche einfacher.

    • Schließe den Akku probeweise am Logic Board an, bevor du ihn wieder festklebst. Damit stellst du sicher, dass er richtig in seiner Vertiefung drin sitzt.

    • Klebe den Akku fest, trenne ihn wieder ab und fahre mit dem Zusammenbau fort.

    Having received a replacement battery from CE Store, the phone is now OK with top battery performance. The one received earlier was just a scrap, not chargeable. Now, I’m quite satisfied.

    Miklos Barton -

    I made the mistake of powering the phone on once the new battery was connected to make sure it was working, before I put the screen back on. Now my home button doesn’t work, even after two hard resets. Anyone know how I can get it working again? Note I didn’t disconnect the screen or taptic engine or anything else. I just left the screen hinged 90°, the only connector I touched was the battery connector.

    John M -

    Same issue. Home button is dead. No cables were damaged. Everything else works. Any ideas?

    Aaron Soderholm -

    I had the same issue with the Home button, I turned on Virtual Home Button, which makes the phone usable. Shutting the power off off and restarting the phone bring you to the login screen. go to Settings, Accessibility, Touch, Assistive Touch.

    Gary Berman -

    I recommend making sure the battery connector is lined up with the socket before setting it down on in the compartment, mine was very close, but a little too high and it made getting it connected a little more difficult than it needed to be.

    Benjamin Boldt -

    I agree Benjamin. Eager to ask anyone starting this, since it added 90 minutes onto my project, be careful, though I can testify that the metal flex connector bends. In other words, I bent it about 3 times so the proper alignment could be attained - sort of a zig zag. Amidst that phase I had practically given up, almost started removing the new battery, but alas I got the phone to work again. We'll see if its function can last.

    Steph B -

    Performing a force restart at this point makes no sense. Shouldn’t it be performed after the display is installed?

    Richard Dempsey -

Abschluss

Um dein Gerät wieder zusammen zu setzen, befolge die Anleitung in umgekehrter Reihenfolge.

Entsorge deinen Elektromüll fachgerecht.

Die Reparatur verlief nicht wie geplant? Schau in unsere Community zur Fehlerbehebung.
Arthur Shi

Mitglied seit: 03/01/18

218620 Reputation

0 Kommentare