Einleitung

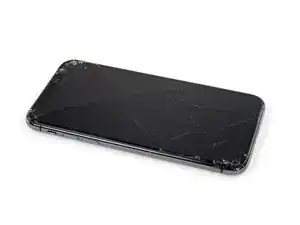
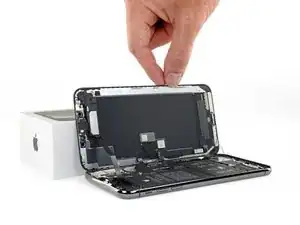
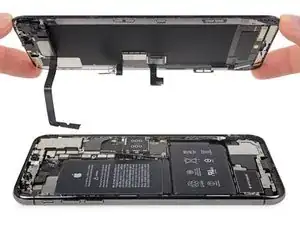
Wenn das Display deines iPhone XS Max einen Sprung hat, nicht mehr auf Touch reagiert oder nach dem Einschalten kein Bild mehr anzeigt, dann kannst du anhand dieser Anleitung, ein neues Display einbauen, damit dein iPhone wieder richtig funktioniert.

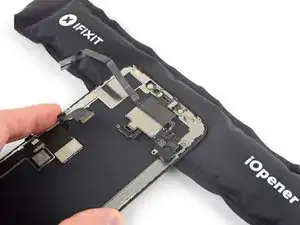
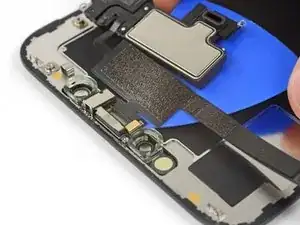
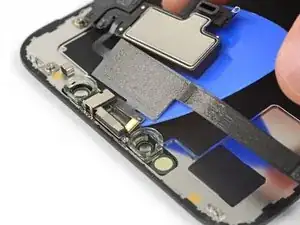
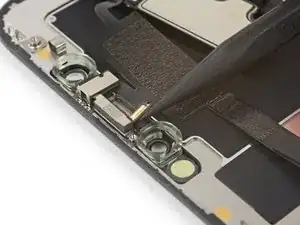
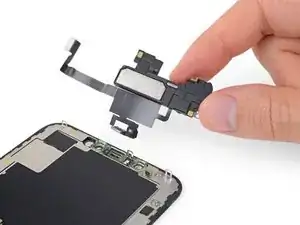
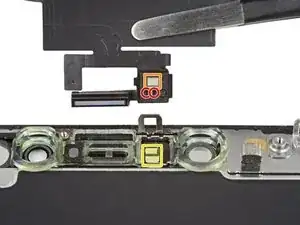
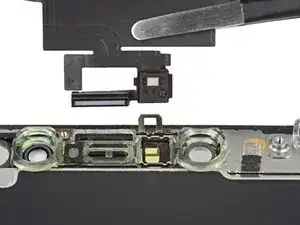
Die kombinierte Baugruppe aus Ohrhörer-Lautsprecher und Sensoreinheit, die auf der Rückseite des Displays angebracht ist, ist ab Werk mit deinem individuellen iPhone gekoppelt. Daher musst du sie bei allen Display-Reparaturen vom alten Display auf das neue übertragen. Sie enthält auch den Flood-Illuminator, der Teil des biometrischen Face ID Sicherheits-Features ist. Falls er beschädigt oder ersetzt wird, funktioniert Face ID nicht mehr, sei also besonders vorsichtig, um keine dieser Komponenten während der Reparatur zu beschädigen. Bei einer Beschädigung kann nur Apple die Face ID Funktion wiederherstellen.

Hinweis: Die True Tone Funktion ist nach einem Displaytausch deaktiviert, selbst wenn ein originales Apple Display benutzt wird.

  1. QBK2j4bUWjgpw3Ww
    QBK2j4bUWjgpw3Ww
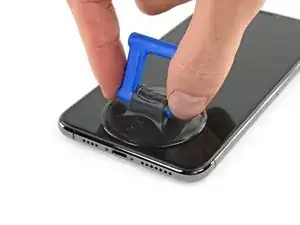
    V5ShMdpIfEVM1AKx
    • Entlade deinen iPhone Akku auf unter 25% bevor du anfängst. Ein geladener Lithium-Ionen Akku kann Feuer fangen und/oder explodieren, wenn er versehentlich beschädigt wird.

    • Schalte dein iPhone aus, bevor du mit der Demontage beginnst.

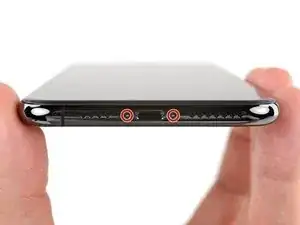
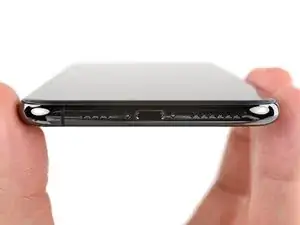
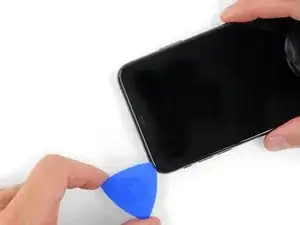
    • Entferne die beiden 6,9 mm langen Pentalobe Schrauben an der Unterkante des iPhones.

    • Durch das Öffnen des iPhone Displays werden die wasserfesten Dichtungen beschädigt. Du solltest also Ersatzdichtungen zur Hand haben, bevor du weitermachst. Falls du dein iPhone wieder zusammenbaust, ohne die Dichtungen zu erneuern, dann achte darauf, dass dein iPhone nicht mit Flüssigkeiten in Kontakt kommt.

  2. voNWTD25eWiGUdu3
    voNWTD25eWiGUdu3
    XTM1CepRnVkDnbfI
    NgVMfmOgJwEalMFF
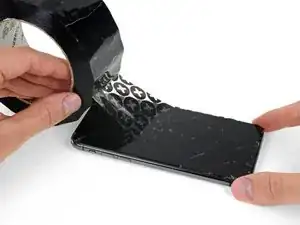
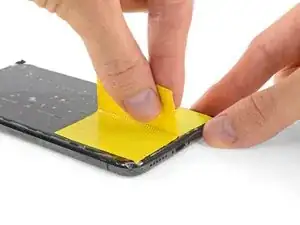
    • Wenn das Display deines iPhones gesprungen ist, kannst du es mit Klebeband abkleben, damit es nicht weiter zersplittert und du dich nicht daran verletzt.

    • Platziere Klebestreifen überlappend über die gesamte Oberfläche des Displays.

    • Dadurch werden die Glassplitter zusammengehalten und das Display ist stabiler, was den Ausbau vereinfacht.

    • Trage eine Schutzbrille, um deine Augen während der Reparatur vor Glassplittern zu schützen.

    • Falls der Saugheber in den nächsten Schritten durch das gesplitterte Glas nicht gut anhaftet, empfiehlt es sich, ein Stück starkes Klebeband so zu falten, dass es als Griff benutzt werden kann, um das Display anzuheben.

    How to detect my Iphone what screen it is, OLED or LCD?

    sabrihakulii -

    It’s OLED. You can find the specs here, https://support.apple.com/en-us/HT201296

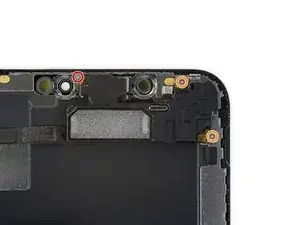
    When you find your phone, at the bottom of the description click on, See the tech specs…

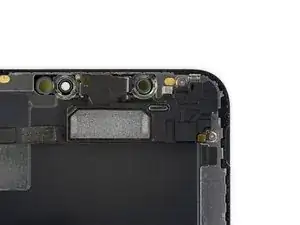
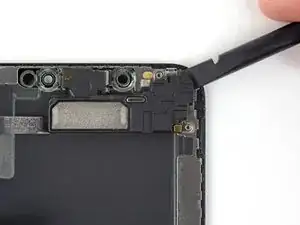
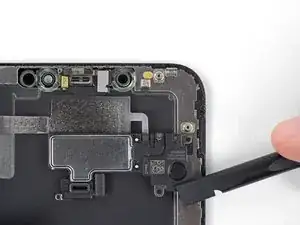
    mcr4u2 -

    The included suction cups were stiff and worthless. They would not lift the screen. Also, I tried every type of tape on the screen to help the suction cups stick without success. Heavy duty suction cups were for my bathroom also failed. However, I had an old GoPro mount with some preapplied double sided 3M VSB tape and stuck that on the screen near the bottom. Magic! This method had the added bonus of being able to use a GoPro attachment as a handle to lift the screen, and propped up the screen like a kickstand in step 12.

    Tawan Khamapirad -

    Very cool! Thanks

    Antonio -

    My screen was pretty stuck… would not budge. Heated, super glued the suction cup, tried gorilla tape. Ended up doing the GoPro mount with 3M VSB tape method mentioned. Worked great. That 3M tape is the bomb.

    Rich Wachtel -

    The included suction cup took a few tries but ended up working for me.

    charlotte -

    If you have flat feeler gauges (for adjusting engine valve tappet clearance, ignition points … old school) the .003 thick goes right in. Work your way up until you can get the pick or supplied pry tool in.

    William Olstad -

    where can I buy 3M VSB plis!!

    gerardo artigas cuellar -

    3M VHB tape is at auto stores and other big box stores, or online.

    nicO Gurney -

    I used the tweezers that came with the replacement screen and jammed one of them into the glass and that eventually worked. Heating with a blow dryer is also important. The suction cup was helpful in loosening the adhesive for sure, but just not enough to get the display to come out.

    J Olin -

  3. BW3q5FMfmVGImZHb
    • Durch das Erwärmen der Unterkante des iPhones wird der Kleber, mit dem das Display befestigt ist, aufgeweicht und das Display kann leichter geöffnet werden.

    • Benutze einen Fön, eine Heißluftpistole oder bereite einen iOpener vor und lege ihn etwa eine Minute lang auf die Unterkante des iPhones, um den Kleber darunter aufzuweichen.

    besteht da die Gefahr das sich das Displayglas vom lcd löst?

    roter spieler -

    Besteht da die Gefahr das sich der Kleber vom Displayglas löst?

    roter spieler -

  4. 3IMmwN6eAATEC1Ur
    3IMmwN6eAATEC1Ur
    TxYEKPBSHh5qQK2n
    EOGJPXKMDR4gqZVI
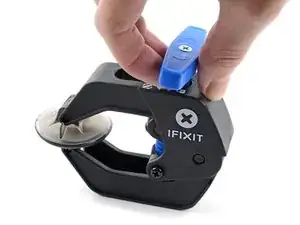
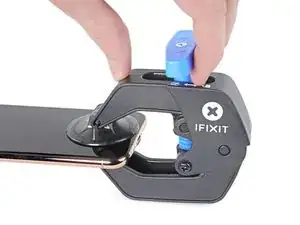
    • Wir haben die Anti-Clamp entwickelt, um das Öffnen von Geräten zu erleichtern. Die nächsten beiden Schritte zeigen, wie sie verwendet wird. Wenn du sie nicht benutzen willst, überspringe die nächsten zwei Schritte und folge einer anderen Methode.

    • Genaue Anweisungen für die Anti-Clamp findest du hier.

    • Drücke den blauen Griff zum Scharnier hin, um den Öffnungsmodus einzustellen.

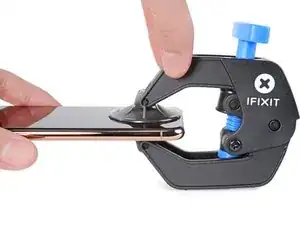
    • Bringe die Saugheber nahe an der Unterkante des Displays an, einen auf der Vorderseite, den anderen auf der Rückseite.

    • Drücke die Saugheber auf den Oberflächen fest.

    • Wenn die Saugheber nicht gut auf den Flächen haften, dann klebe Paketband darüber.

  5. FXFUNTPZn2TSrPfg
    FXFUNTPZn2TSrPfg
    QRIqTHh32IOjkfXd
    RPK4s4imhoHyRDeh
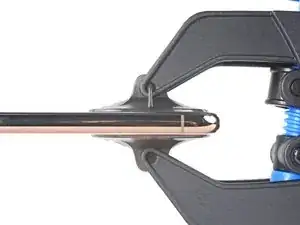
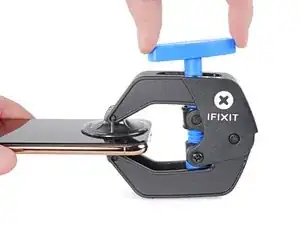
    • Drücke den blauen Griff vom Scharnier weg in die Stellung für den Öffnungsmodus.

    • Drehe den Griff im Uhrzeigersinn, bis du merkst, dass sich die Saugheber dehnen.

    • Achte darauf, dass sich die Saugheber weiterhin gegenüber stehen. Wenn sie sich nicht mehr gegenüber stehen, dann löse die Saugheber ein wenig ab und schiebe sie in die richtige Position.

    • Warte eine Minute, damit sich der Kleber allmählich ablösen kann und sich ein Spalt bilden kann.

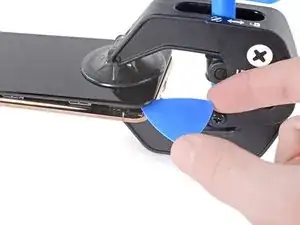
    • Wenn der Spalt groß genug ist, dann setze ein Plektrum unter das Display ein.

    • Wenn es nicht gelingt, mit der Anti-Clamp einen ausreichend großen Spalt zu erzeugen, dann erwärme die Stelle nochmals und drehe den Griff eine halbe Umdrehung im Uhrzeigersinn weiter.

    • Drehe den Griff jeweils nicht mehr als eine halbe Umdrehung weiter und warte jedes Mal eine Minute lang. Gib der Anti-Clamp Zeit, ihre Arbeit zu erledigen.

    • Überspringe die nächsten zwei Schritte .

  6. v5JlCmJpbAURMTtH
    v5JlCmJpbAURMTtH
    vv1FBnsV1GwM44ks
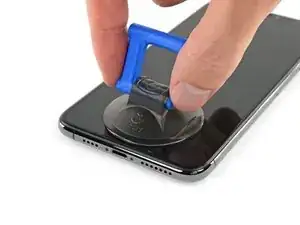
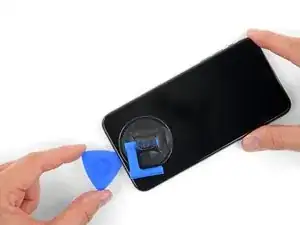
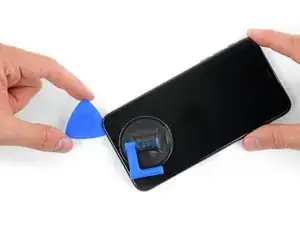
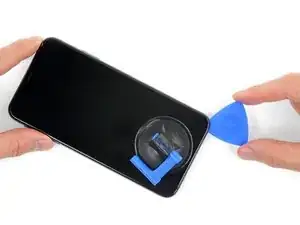
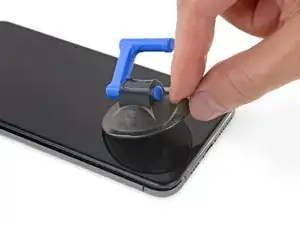
    • Wenn du einen einzelnen Saugheber benutzt, dann setzte ihn an der Unterkante des iPhones auf und vermeide dabei den gebogenen Teil des Glases.

    • Falls dein Display sehr stark gebrochen ist, kann es hilfreich sein, es mit einer Lage durchsichtigen Klebebands zu bedecken, so kann der Saugheber besser anhaften. Alternativ kann das Klebeband auch statt des Saughebers benutzt werden. Im Notfall kannst du den Saugheber auch mit Sekundenkleber am gebrochenen Display festkleben.

  7. 5dqKhPLYjtcWGgy3
    5dqKhPLYjtcWGgy3
    F55jAMXGPEW3rXDT
    HDE2vLMvyXosnjZf
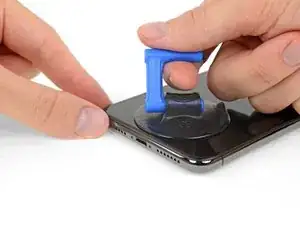
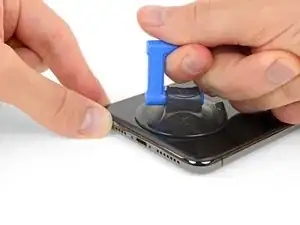
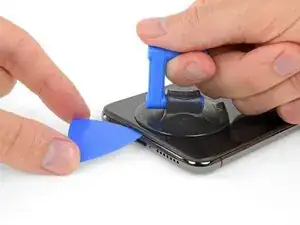
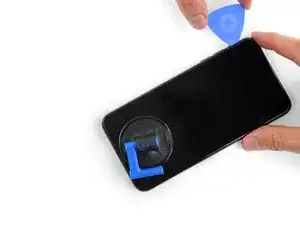
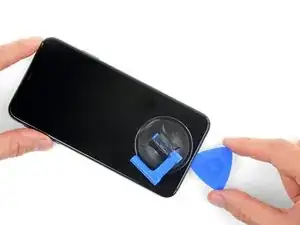
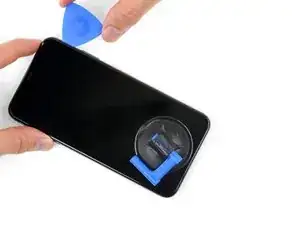
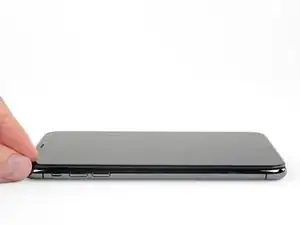
    • Ziehe fest und konstant am Saugheber, sodass ein kleiner Spalt zwischen dem Front Panel und dem Rückgehäuse entsteht.

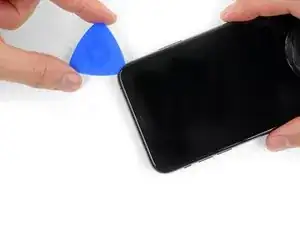
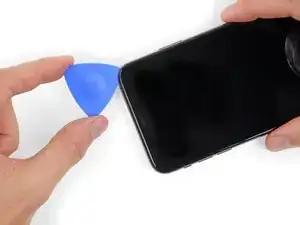
    • Setze ein Plektrum in den Spalt.

    • Der wasserfeste Kleber, mit dem das Display befestigt ist, ist sehr stark, es ist also ein gewisser Kraftaufwand nötig, um diesen ersten Spalt zu öffnen. Falls du Schwierigkeiten hast, erwärme das Display erneut und wackle das Display hoch und runter, um den Kleber zu schwächen, bis die Öffnung groß genug für ein Plektrum ist.

    I need help. I inserted the pick under the screen, but above the touch screen. When I lifted it, all I see is the silver touch screen instead of the interior of the iPhone. How do I to opening the screen the right way from here?

    Joe Blaze -

  8. u3gxvpcYX5nus2KG
    u3gxvpcYX5nus2KG
    Lf4lNqYGWUSKSFVk
    cjFo6MCSU6GWPW2M
    • Schiebe das Plektrum um die untere linke Ecke und die linke Seite des iPhones nach oben und zerschneide so den Kleber, mit dem das Display verklebt ist.

    • Schiebe das Plektrum nicht zu weit in das iPhone hinein, sonst beschädigst du unter Umständen Bauteile im Inneren.

  9. BPtLHcqaCd5VPRCl
    BPtLHcqaCd5VPRCl
    D3jOIZyacMYEGeCZ
    kV1cF5WCY4t4WLiE
    • Setze erneut dein Plektrum an der Unterkante ein und schiebe es die rechte Seite nach oben, um so weiterhin den Kleber zu durchtrennen.

    • Schiebe das Plektrum nicht zu tief hinein, sonst beschädigst du unter Umständen die Displaykabel an dieser Seite des iPhones. Schiebe es nur ein paar Millimeter hinein, bzw. etwa die Breite der Displayblende.

  10. dZWF1DbESTeClxfK
    dZWF1DbESTeClxfK
    FTYkljksen6hwJjd
    KPEiFcOPGIMQHsyu
    • Die Oberkante des Displays ist sowohl mit Kleber als auch mit Clips befestigt.

    • Schiebe das Plektrum um die obere Ecke des Displays herum und ziehe das Display gleichzeitig vorsichtig nach unten in Richtung des Lightning Connectors. Eine leichte Wackelbewegung kann hilfreich sein.

    • Die Clips werden brechen, wenn du zu stark ziehst. Arbeite vorsichtig und sei geduldig.

    • Setze auch hier das Plektrum nicht zu tief ein, ein paar Millimeter, also etwa die Breite der Displayblende, reichen aus, sonst beschädigst du die Sensorgruppe des Front Panels.

    • Schiebe das Plektrum zur gegenüberliegenden Ecke und durchtrenne jegliche Klebereste, mit denen das Display noch befestigt ist.

  11. eLPsgvEXHeyiFWdQ
    • Ziehe an der kleinen Noppe am Saugheber, um ihn vom Front Panel zu entfernen.

    • Wenn du einen iSclack benutzt und er immer noch am iPhone befestigt ist, kannst du ihn jetzt entfernen.

  12. bCEGsUKgCRjVFMl6
    bCEGsUKgCRjVFMl6
    IgautN6iuZ1aXRAO
    a6gkDXJJRmyOh3fH
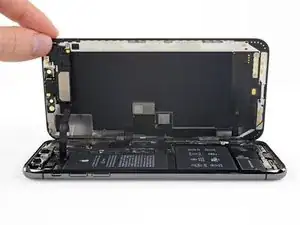
    • Öffne das iPhone, indem du das Display von der linken Seite her hochklappst wie einen Buchrücken.

    • Versuche noch nicht, das Display vollständig zu entfernen, da es noch durch mehrere empfindliche Flachbandkabel mit dem Logic Board verbunden ist.

    • Lehne das Display gegen etwas Stabiles, damit es offen bleibt, während du daran arbeitest.

    • Lege das Display beim Zusammenbau in die richtige Position, richte die Clips an der Oberkante aus und drücke die Oberkante vorsichtig herunter, bevor du den Rest des Displays einrasten lässt. Wenn es nicht problemlos einrastet, dann kontrolliere den Zustand der Clips um das Display herum und stelle sicher, dass sie nicht verbogen sind.

  13. 1SQyyqNOEOrZUDke
    1SQyyqNOEOrZUDke
    w4YH32anIMmeUVdb
    • Entferne die vier Y000 Schrauben, mit denen die Halterung der Logic Board Abdeckung befestigt ist. Sie haben folgende Längen:

    • Zwei 1,1 mm Schrauben

    • Eine 1,5 mm Schraube

    • Eine 3,7 mm Schraube

    • Während dieser Reparatur musst du auf jede einzelne Schraube aufpassen und darauf achten, dass sie wieder genau dahin zurückgesetzt wird wo sie herkam, um Schäden an deinem iPhone zu vermeiden.

  14. G62FCvpLRGTCWaB5
    • Entferne die Halterung.

    • Die Halterung kann etwas festgeklebt sein. Hebe sie vorsichtig aber fest an, um sie abzulösen.

    • Beim Wiederzusammenbau ist dies der ideale Moment, um dein iPhone einzuschalten und alle Funktionen zu testen, bevor du das Display wieder fest verklebst. Achte darauf, dein iPhone wieder komplett auszuschalten, bevor du weiterarbeitest.

  15. 4CJtRQHCJdJnTQXU
    4CJtRQHCJdJnTQXU
    Dvq1GumBRbewcbYT
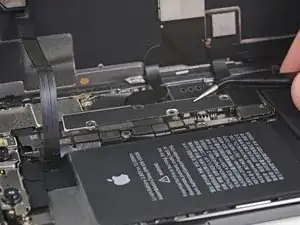
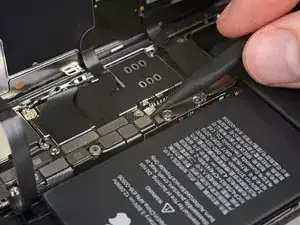
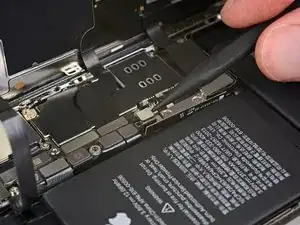
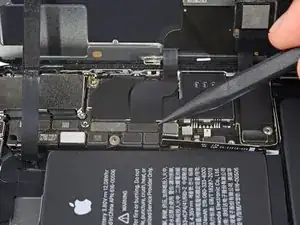
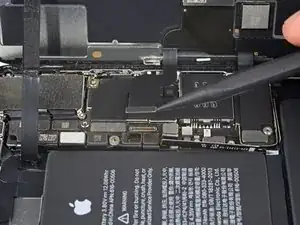
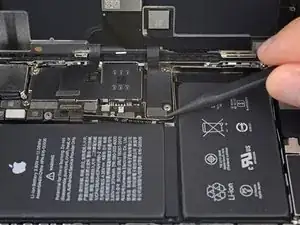
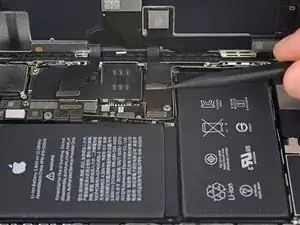
    • Benutze einen Spudger oder einen sauberen Fingernagel, um den Akkustecker aus seinem Anschluss auf dem Logic Board hochzuhebeln.

    • Versuche, die schwarze Silikondichtung um diesen und andere Anschlüsse auf der Platine nicht zu beschädigen. Diese Dichtungen liefern zusätzlichen Schutz vor Wasser und Staub.

    • Biege den Stecker etwas vom Logic Board weg, um zu vermeiden, dass er sich versehentlich wieder mit dem Anschluss verbindet und dein iPhone während der Reparatur mit Strom versorgt.

  16. kFBx36yybRbt4ene
    kFBx36yybRbt4ene
    dmoCxINdWdXgvQWr
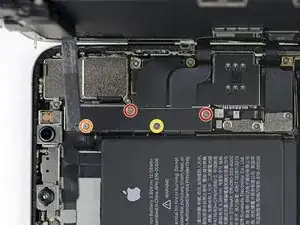
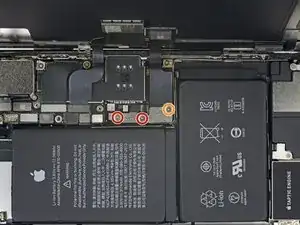
    • Entferne die drei Y000 Schrauben, mit denen die Halterung des Displaysteckers befestigt ist:

    • Zwei 1,5 mm Schrauben

    • Eine 1,1 mm Schraube

    I am replacing the screen for the 2nd time - the first repair was done by someone else, and the first 2 screws are 1.5mm and the last screw is 1.1mm… If I put the screw back in am I risking Long Screw Damage?

    Sarah Ybarra -

    I think that the outside screw (red one, one the right) is actually 1.5 mm or something longer than 1.1. Looked that way to me.

    Paul Key -

    From the top, the screws are: 2 x 1,5mm + 1 x 1,1mm

    serdev94 -

    I can confirm the above comments on the screw length. Pls correct it in the description!

    k_neuper -

    Thanks for all your comments! I'll amend this step.

    Arthur Shi -

    Hi, I just changed the screen on my XS Max and for this bracket I used 2 x 1.1 mm and 1 x 1.5 mm.

    Starting from left to right:

    - left 1.1 mm (I tried with 1.5 mm like in the above picture but I felt that it didn't wanted to go deeper so I didn't forced and I tried it in the middle and it fit perfectly)

    - middle 1.5 mm

    - right 1.1 mm

    For the two brackets I had 7 screws, I aligned them on the desk by length and I had 2 x 1.5 mm, 4 x 1.1 mm and 1 x 3.7 mm.

    Good luck and I hope it will help someone!

    Adrian Slabu -

  17. 1qRGSCYAJCHCGdPV
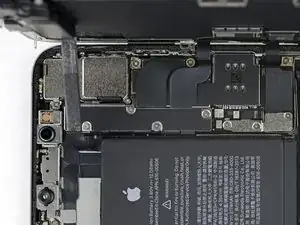
    • Entferne die Halterung.

  18. ERNHPFP6lZuchZCE
    ERNHPFP6lZuchZCE
    S6ekGfOmSEsrpLgY
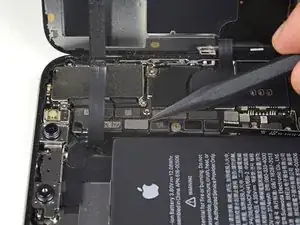
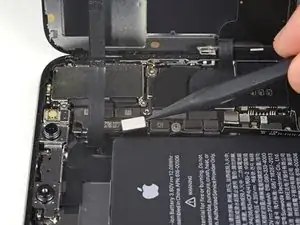
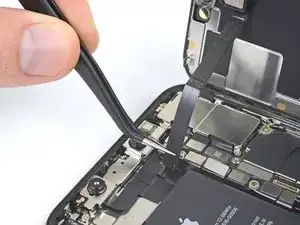
    • Heble den Stecker der Front Panel Sensor Einheit mit der Spudgerspitze oder einem Fingernagel hoch und trenne ihn.

  19. L6fXcoghCZH2MMV1
    L6fXcoghCZH2MMV1
    TVPTLk2aj2kihWvT
    • Trenne den Kabelstecker des OLED Panels mit einem Spudger oder einem Fingernagel.

    • Um Steckverbinder wie diesen hier wieder zu verbinden, musst du ihn sorgfältig ausrichten und auf einer Seite herunterdrücken bis er einrastet, und dann das gleiche auf der anderen Seite wiederholen. Drücke nicht in der Mitte herunter. Wenn der Stecker falsch ausgerichtet ist, können sich die Stifte verbiegen und dauerhaften Schaden verursachen.

  20. 4qW2r2RGlLa1H1Wv
    4qW2r2RGlLa1H1Wv
    ARJbNRJOyuL3uDjb
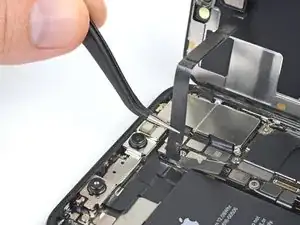
    • Heble den Stecker des Touchscreen Kabels mit einem Spudger oder einem Fingernagel aus seiner Buchse.

    • Falls ein Teil deines Bildschirms nach deiner Reparatur nicht mehr auf Berührungen reagiert, dann trenne den Akku und setze diesen Stecker erneut ein. Achte darauf, dass er richtig einrastet und dass sich kein Staub oder andere Fremdkörper in der Buchse befinden.

    Mine still won’t respond even after reseating any ideas? Ground issue?

    Jasom -

  21. mhRHh2htSTUovyWb
    mhRHh2htSTUovyWb
    YKTqIYc1ultNHsW3
    PTmKBNdlaMjMDDDY
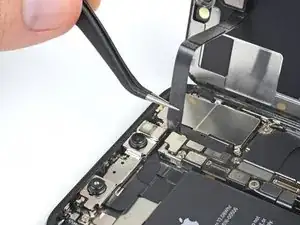
    • Das Flachbandkabel der Sonsoreinheit auf dem Front Panel ist leicht festgeklebt.

    • Hebe das Kabel vorsichtig an, bis es sich vom Kleber löst.

    What if that cable brakes how do u fix that?

    Kourtney Williams -

  22. QYkTkpjLWEUFjK21

    No olviden que para que pase el Face Id tienen q cambiar el flex que va encima de la camara delantera con mucho cuidado ya q si le ponen otro flex no funcionara.

    jeferson -

  23. V3Lvx6DQOmJFJmuW
    V3Lvx6DQOmJFJmuW
    TW1ZmXcJYGmgq3qi
    • Entferne folgende drei Y000 Schrauben, welche die Lautsprecher/Sensoreinheit festhalten:

    • Eine 1,4 mm Schraube

    • Zwei 1,5 mm Schrauben

  24. GBOWoTvgpCgGhogB
    GBOWoTvgpCgGhogB
    wLTGWgfwgw4yBRjq
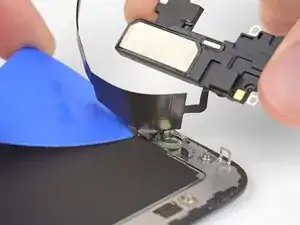
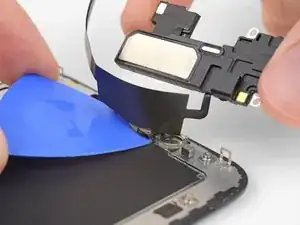
    • Der Ohrhörer-Lautsprecher ist leicht angeklebt.

    • Heble vorsichtig mit einem Spudger unter der Oberkante der Lautsprechereinheit und drehe sie nach unten herum, weg vom oberen Displayrand.

    • Der Lautsprecher ist noch mit einem sehr dünnen Flachbandkabel angeschlossen. Belaste das Kabel nicht zu stark und beschädige es nicht.

    If you are using a refurbished display, check for dirt in the earpiece speaker cutout.

    If you have poor quality or low sound after changing the display, use a cotton bud and isopropyl alcohol to clean the earpiece cutout.

    John Gildert -

  25. uOsZrVKFUDQkAMvP
    • Benutze einen Haartrockner, ein Heißluftgebläse oder einen iOpener, um die Vorderseite des Displays etwa eine Minute lang zu erwärmen, damit der Klebstoff, mit dem die Sensoren befestigt sind, weich wird.

  26. uvvkyECTiPAxNotm
    uvvkyECTiPAxNotm
    1LkAuAGt2Tq6CR3L
    JUkBWJvIyFADJpGl
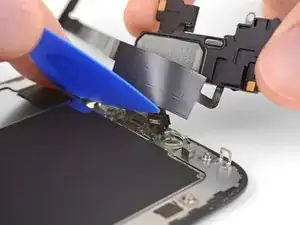
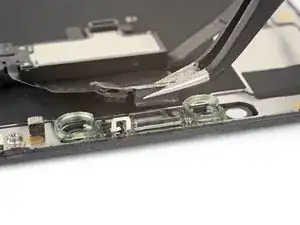
    • Schiebe vorsichtig die Kante eines Plektrums unter das Flachbandkabel unterhalb des Mikrofons.

    • Verdrehe es vorsichtig, um das Mikrofon abzulösen. Achte darauf, das Kabel nicht zu stark zu belasten oder zu beschädigen.

    • Falls nötig, kannst du mit der Spudgerspitze nachhelfen, das Mikrofon aus seiner Einkerbung im Frontpanel zu lösen.

  27. CMZJeqFvdECFWqjU
    CMZJeqFvdECFWqjU
    vGjRYoixXjXwTspM
    2Pc2IMXqxoove4gE
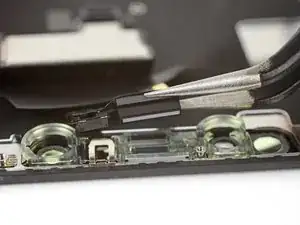
    • Schiebe ein Plektrum von links nach rechts unter dem Flachbandkabel und unter dem Modul des Näherungssensors/ Flood-Illuminators entlang.

    • Wackle vorsichtig ein bisschen und löse das Modul aus seiner Einkerbung im Frontpanel.

    • Es ist hilfreich, den Lautsprecher nach oben aus dem Weg zu heben, um besser heranzukommen. Achte aber darauf, dass du bei der Arbeit nicht das dünne Flachbandkabel beschädigst.

  28. oRRqE3jhhflOoegY
    oRRqE3jhhflOoegY
    LVIs3UuVBIxOTvuF
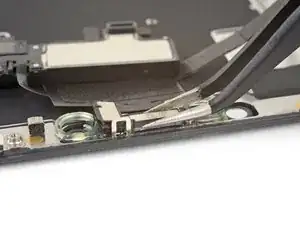
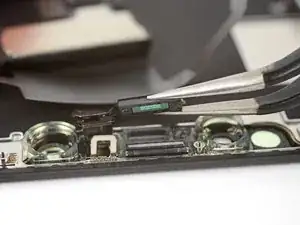
    • Nimm eine Pinzette und hebe mit wackelnden Bewegungen den Umgebungslichtsensor aus seiner Einkerbung im Display.

    • Wenn der Sensor nicht nach wenigen Sekunden frei kommt, dann erwärme den Bereich erneut und probiere nochmal.

    • Der Sensor ist mit einem sehr dünnen Flachbandkabel an der restlichen Sensoreinheit angeschlossen. Belaste das Kabel nicht zu stark und beschädige es nicht.

    This was the most difficult part for me so i erred on the side of caution. I reheated the display in the oven at 85 degrees celsius. Like in the third picture in the next step, i got a razor into the slot below, to get the diffuser a little loose before wiggling the sensor out. I didn't understand the wiggling until i simply rocked it like a boat would side to side like to the top of the display to the bottom on the display, and voila, all came out easy and in one piece with the diffuser still attached.

    Nachman Laufman -

  29. Oa5c1ikPYKOIxi4m
    Oa5c1ikPYKOIxi4m
    MFkxgZkwWSBLyOh1
    h3VqGkSsQqPmdeY4
    • Wenn du den gesamtenUmgebungslichtsensor wie im ersten Bild entfernt hast, dann fahre mit dem Schritt weiter unten fort.

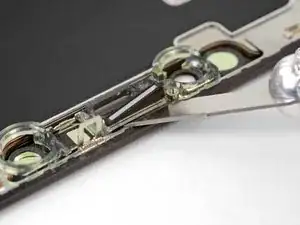
    • Wenn aber der weiße Diffussionsstreifen wie im zweiten Bild eingebettet im Display verbleibt, musst du ihn sorgfältig an der Oberkante mit einer Rasierklinge oder einem geeigneten Hebelwerkzeug herausheben. Es ist hilfreich, zuerst erneut diesen Bereich zu erwärmen, um diese Arbeit zu erleichtern.

    • Setze beim Zusammenbau diesen Diffusor zuerst in das Display ein. Achte dabei darauf, dass er richtig positioniert ist (die Vorderseite ist im ersten Bild zu sehen, die Rückseite im dritten).

    • Setze dann den Umgebungslichtsensor auf den Diffusor auf. Du musst den Sensor in dieser Lage festhalten, während du die Schrauben, die Ohrhörer-Lautsprecher/Sensoreinheit befestigen, einsetzt. Wenn die Schrauben festgedreht sind, dann hält auch der Sensor fest und funktioniert ganz normal.

    I have accidentally damaged flood illuminator will it affect the face id also or if I just replace the Earpiece Speaker and Sensor Assembly it will get fixed.

    Devashish Nayak -

  30. HMf3vwiLB2uVca6E
    HMf3vwiLB2uVca6E
    XXVJ2LmpHnFInRgo
    sZrD5AnHONwSQaYc
    • Entferne die Ohrhörer-Lautsprecher/Frontsensor Einheit.

    • Überprüfe beim Einbau die Position des schwarzen Kunstoffmoduls, das folgende Bauteile enthält:

    • Näherungssensor

    • Flood-Illuminator

    • Das Modul muss so eingesetzt werden, dass diese Komponenten nicht durch Klebstoff behindert werden.

    Do you have to remove the earpiece speaker and front sensor assembly. If you are taking a screen from another Xs max with it already attached?

    atkinson_98 -

    The front sensor assembly is part of Face ID, so you must transfer the original assembly to the replacement screen in order to maintain Face ID functionality.

    Arthur Shi -

    In order to keep the original assembly, do you have to solder?

    qwerty77x -

    No, you just take the whole unit. Warm it up and remove the glued sensors like described. Handle it carefully, the speaker cable is quite thin. If damaged, you might loose your face-ID functionality.

    rob_repair -

    Does the screen need a reprogamation onto the new screen?

    Diogo Helms -

Abschluss

Vergleiche dein neues Ersatzteil mit dem originalen Teil, unter Umständen musst du vor dem Einbau einige Komponenten übertragen oder Schutzfolien vom neuen Teil abziehen.

Um dein Gerät wieder zusammenzubauen, folge dieser Anleitung in umgekehrter Reihenfolge.

Entsorge deinen Elektromüll fachgerecht.

Hat die Reparatur nicht so geklappt wie erhofft? Auf unserem Antwortenforum findest du Hilfe bei der Fehlersuche.

Jeff Suovanen

Mitglied seit: 06/08/13

407169 Reputation

35 Kommentare

Nice guide. I could be wrong but for the first time in a while, changing a display on an Apple phone looks like it’s not anymore difficult than previous models.

John K

the-screen-savers.com

John Knirr -

If you remove the screen but then apply the same screen back on the phone, will True Tone still be disabled?

Onel Jimenez -

@onslivion Nope! It'll continue to work fine, so long as you didn’t damage anything.

Jeff Suovanen -

Hi i broke the Flex cable of the Part.

what i can do now.

is their some Parts for sale?
murtasa972 -

I just switched the screens from 2 phones and both are unresponsive, if put them back to its original logic board the work again, any idea why they dont work? both are original.

martinlpz0422 -

Why is True Tone disabled afterwards? Even with an Original Screen how is that possible?
indra.schleiffer -

That's normal. There's a chip in the screen that has info that is specific to the original logic board so unless you have a special machine to read/write to that chip, truetone will not work.

schaubjimmy -

Hello, I just came across a xs max that works otherwise but 1-2 cm from the top wont work. Is this a known issue with a fix? LCD works fine, but digitizer is cracked.

teemupa -

Awesome guide!

iTony -

This was perfect. It definitely helped me replace the screen on a friend IPhone XS Max!

Jordyn Everson -

Every authoritative source (such as Apple Support, Wikipedia) that I read about the iPhone XS Max display states that it has an OLED display - not an AMOLED display, and not an LCD display (such as on the XR model). Yet the parts associated with this guide are LCD (website quirk?) and the written text for XS Max mention AMOLED. Isn’t this important to get right when replacing? The model I have is A1921.

Mark Johnson -

Hi Mark,

The iPhone XS Max uses an AMOLED display. Active Matrix OLED (AMOLED) is a subcategory of the general OLED tech—AMOLED displays contain circuitry which allows them to switch each OLED pixel on or off. Compared to Passive Matrix OLED, AMOLED displays have a higher refresh rate and are more energy efficient . However AMOLED displays are complex, difficult to source, and very expensive to replace (think $200-400 for the part!) Hardware manufacturers sought to resolve this problem by producing LCD replacement screens. These screens are made to be completely compatible with the iPhone XS Max, but are significantly cheaper to replace. They do look slightly different compared to the original screen. Check this link out for a more in-depth review of the differences.

Arthur Shi -

Where is the INSTALL GUIDE this is just removal? And don’t tell me it’s the reverse. I have a small gasket that’s not mentioned in this and it doesn’t explain how to remove the main old gasket or install the new gasket

James Baker -

Where is the installation guide? This is just a removal guide. Don’t tell me that it’s the opposite of removal to install because I have a small gasket that is not mentioned in the YouTube video or on this site in my package
James Baker -

I would like to echo this comment. It is extremely disappointing to see a guide this comprehensive and detailed stop short of reassembly. Especially because some parts need to be transferred from the original display to the replacement one.

Bobby Adamson -

Completed the Repair with the more Expensive alternative - the OLED display.

The guide is very comprehensive and covered all the points including looking out for bits left behind!

- I noticed a tiny piece of conductive foam on the old display which i moved to the new one.

The OLED display is top quality, but a little darker due to losing the “True Tone” no doubt.

The Adhesive kit is very good, but separating the two films was a little difficult and messed up the alignment slightly, however I managed to recover!

John Gildert -

One more addition I had to make after undertaking this repair.

I had noted that after swapping the display the earpiece was very quiet. I thought that I had missed a gasket, misaligned the earpiece speaker or not plugged in the leads correctly.

Nope. Much simpler than that. CLEAN THE EAR PIECE CUTOUT! *Eeeewwww* After putting up with this for about 4 weeks, I happened to get out the Cotton Buds. A quick wipe revealed someone elses EAR GUNK was clogging up the ear piece cutout !

Disgusted, I got out the Isopropyl and cleaned it (carefully) about 10 times, the audio is now crystal clear.

@ifixit - Please ensure your “Refurbished displays” have a clean earhole. It was pretty gross that it was clogged to the point that I could not HEAR!

John Gildert -

Great guide, completely worked for me!

Jonathan Holland -

This guide worked perfectly for my iPhone Max XS screen replacement. This is only my second “project” from iFixit (the first was a replacement display screen for my Canon 6D) and both times, miraculously, everything worked. I’m really not sure if it is my skills or the details in the guides (it’s definitely the latter and a tiny bit of the former). The replacement parts are reasonably priced and the toolkits are VERY GOOD in quality.

For this iPhone screen fix, I used a previously purchased toolkit and “borrowed” suction handles (yes, definitely makes a difference and better than the tape alternative—I tried both) from a bathroom rack.

It took me about 3 hours to get this done. I rushed on step one and stripped the first pentalobe screw. Luckily, one stripped pentalobe screw is still OK. I managed to pull it apart by wiggling the screen around (without too much force). I used a hair dryer to heat the frame/adhesive.

Follow the instructions closely and don’t lose the tiny screws. A magnetic screwdriver helped.

uropygi -

I have accidentally damaged flood illuminator will it affect the face id also or if I just replace the Earpiece Speaker and Sensor Assembly it will get fixed.

Devashish Nayak -

Step 1: Remove pentalobe screws…is very careful to NOT STRIP THE SCREW…tools provided/metal is not hard enough and is unable to take out the screw in Step 1 and am now currently going out to buy better pentalobe screw driver. THANKS. Why don’t you just provide better tools and increase the cost……………………………………………

Michael Wu -

work just fine ,thank you…

moostafak -

for me at least once you get use to repairing this it can take around 30 min too an hour but i also repair all devices even phones for living so i do have experience with repairing these

Zach Mentz -

Changing just the glass screen on my iphone xs max and the black part behind the screen is cracked what do I do ?
Amber Hankins -

Executed this repair almost flawlessly. The FaceID flex cable is very fragile and glued down very well. I advise you be careful when removing is as not much pressure at all can cause it to break (Speaking from experience). Other than that the guide was very easy to follow.

Gerald Johnson -

This was an incredible guide! With the video, it was the perfect guide and I managed to complete the fix in less than 2 hours.

Akshar Jain -

Can water damaged iphone be restored by replacing screen?

Andrea castaneto -

Hey Team iFixit, vielen dank für diese ausführliche Anleitung. Einfach richtig lesen dann macht man auch keine Fehler haha

Valentin Ochs -

Last month I ordered and received a new screen/digitizer for my iPhone XS max. Installation was easy and the phone was back on-line in half ah hour. Not for long unfortunately. A week after the replacement, the digitizer became irresponsive. I had to let the battery die and subsequently reboot my phone.

It fixed the problem for one day. Then the digitizer froze up again. I decided I was going to open the phone to check the ribbon cables for faulty connection. Alas, when opening the iPhone,one of the cables between the screen and the main board tore.

I resorted to re-installing my old cracked screen that now has been working flawlessly for one week.

Is there a fix for the broken ribbon cable, or can I return the screen for credit or repair?

Maurice -

Hey, I'm thinking on fixing up my Iphone Xsmax screen will the Face Id still function after replacement

oguntayo tosin -

Hello oguntayo tosin, as mentioned in the introduction, for Face ID to work you have to transfer the earpiece speaker + sensor assembly as they are paired to your individual iPhone.

Manuel Haeussermann -

I cant put the display on the iPhone and I dont know why.It just doesn't fit right and rises about 2mm higher than it should.What can I do?

Robin -

Hello Robin, did you already go through the recommended troubleshooting steps? It sounds like it could be a bracket or elements of the earpiece speaker and front sensor assembly that are not seated correctly or that there is some issue with the clips holding the display. You could also try checking whether your replacement part deviates from the original screen as discussed here. Hope this helps!

Manuel Haeussermann -

If purchasing the OLED option from here, would I be able to use a programmer to enable back True Tone?

Jeremy Rampersad -

There's a couple extra chips near the bottom of the original screen that aren't on the replacement. Are they surplus to requirement?

Thomas Pharazyn -