Einleitung
Lässt sich der Akku nicht mehr laden? Tausche ihn aus!
-
-
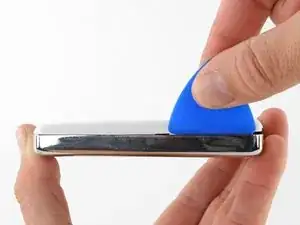
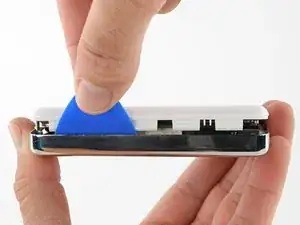
Setze ein Plektrum so tief wie möglich an der rechten Kante des iPods in die Naht zwischen der Kunststoff-Vorderseite und der Metallrückseite ein.
-
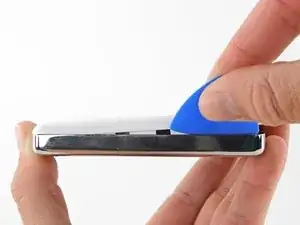
Heble mit dem Plektrum gegen die Kunststoff-Vorderseite, so dass sich die fünf Haltelaschen lösen (im dritten Bild zu sehen).
-
Heble weiter mit dem Plektrum um die Kanten des iPods herum und löse die restlichen Haltelaschen.
-
Wenn die fünf Haltelaschen an der rechten Seite gelöst sind, sollte sich das Gehäuse leicht öffnen lassen.
-
-
-
Öffne das Gehäuse wie ein Buch mit der Kante des Dockanschlusses nach oben und lege die Rückseite neben die vordere Hälfte des iPod.
-
-
-
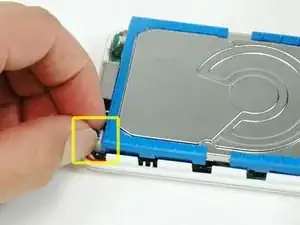
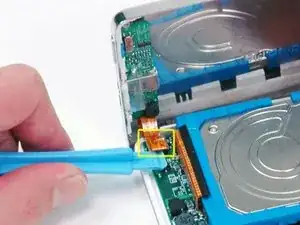
Benutze ein Plastikwerkzeug oder deine Fingernägel, um das orange Kopfhörerbuchsenkabel vorsichtig zu lösen. Achte darauf, am Stecker gerade nach oben zu ziehen, nicht am Kabel selbst.
-
-
-
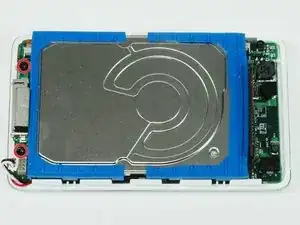
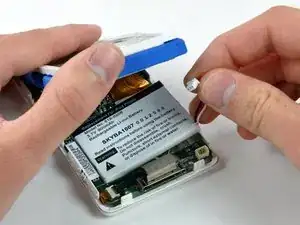
Trenne behutsam den weißen Akkustecker vom Logic Board ab. Ziehe nur am weißen Stecker selbst, nicht an den Kabeln.
-
-
-
Hebe die Festplatte mit einer Hand hoch, um an den Akku darunter heranzukommen.
-
Führe das Akkukabel sorgfältig um die Enden des Logic Boards herum. Sei beim Ablösen des Akkukabels vorsichtig und ziehe dabei nicht zu sehr das Logic Board hoch.
-
-
-
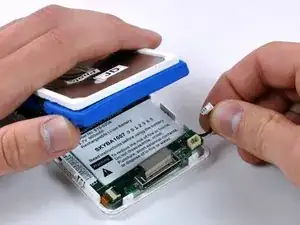
Ziehe den Akku an den Akkukabeln hoch und hebe ihn aus dem vorderen Gehäuseteil heraus.
-
Wenn es nötig ist, musst du den Akku fest anfassen, um ihn aus der Klebeverbindung zum vorderen Gehäuseteil herauszulösen.
-
Hebe den Akku hoch und entferne ihn aus dem vorderen Gehäuseteil.
-

Um dein Gerät wieder zusammenbauen, folge den Schritten in umgekehrter Reihenfolge.

59 Kommentare
Biggest trouble I had was step one. I actually broke the edge off the large tool. A note somewhere else on this site recommended using a razor which work far more easily then the large blue tool. Common sense, your using a sharp razor, be careful!
As previously noted the screws are TINY, very easy to lose of you drop one.
I jockeyed the battery to get just a crack of space and then used the spluger tool to pry the battery free from the adhesive, very strong.
My IPOD is currently recharging for the first time in years. :o)
msdaly59 -
I have a 4thG original ipod. This was a simple process and it was successfully completed. The ipod was able to be synced after 6 months of sitting in a drawer. The only issue so far is that the entire ipod gets warm to the touch while it's charging. Hopefully that will lessen after subsequent charges. The only bit of confusion in the instructions is the beginning step of inserting the ipod tool at the top. I thought I was trying to unlatch a tab there but there is none on top. Otherwise everything else was clear and exactly as described and pictured.
Nando -
Broke the cute blue soft plastic tools that came with it. Used a credit card to open it up - worked miraculously well!!! Started up great!! Ooops - forgot the torque screws - opened it again.....closed it again. My iPod works again after years of hibernation!
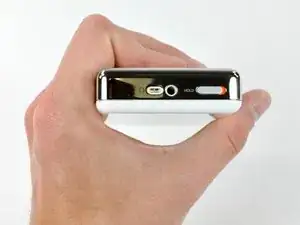
How necessary is it to have the HOLD switch in the locked position? On my iPod the switch is stuck in the unlocked position and I can't force it into locked.
Is locking the iPod for a mechanical reason or an electrical/software reason?
gabeshaikh -
It is for an electrical reason. If the iPod hold switch is kept on, the device will not turn on, thus ensuring the device stays powered off while performing service.
trusty -
I have a 60 GB iPod photo that needs a new Logic Board. I bought a 30 GB used iPod on eBay and replaced the Logic Board. Now the iPod thinks the hard drive is only 30 GB, when it is really 60 GB. It works, but the hard drive is not recognized for its full size. Sites like this offer a 20 GB and 40 GB logic board...I apparently need 60 GB. Can I bypass this somehow, or do I really need a logic board that is specifically made for 60 GB???
Mark -
My 30gig drive shows up as a 16.4gig. I can not for the life of me, figure out why this is doing this. Can anyone help? Thanks!
Stephan -
Hello,
First thank you for this tuto and help.
I did follow your instructions and every step was ok but when I closed my i'Pod, it kept staying on the lock position even with moving the lock button.
Now it has charged but I could not make it run.
So I did a complete reboot by connecting it to my Mac with i'Tunes to restore.
It's still locked.
What can I do?
Than You for your answer
Thomas
Voisin -
Much quicker and far easier opening from the right side instead of from the top using the blue plastic spudger. Opened in under 10sec. Do not know why this guide asks you to start from the top and work it to the left corner. Perhaps it was meant as a challenge.
Edwin Seah -
Well, I did it! I am pretty mechanically inclined, but I don't work well with small stuff. Anyway, as others mentioned, this step was the hardest for me, the included tools, worthless (to start to separate the case) As another person mentioned, I used a razor blade on the side on the upper left corner pushing down toward the metal clips, 'pop' once the first came off, then I used the blue tools to release the remaining clips. I didn't want to remove the connector in step 8, but had literally no room to work, the connector is a square push in type that is attached to the ribbon cable, I pryed with the blue tool carefully at the connector base, it popped right off! (getting is back on was more challenging, but managed with a small pair of needle nose pliers.) Had to pry the old battery out carefully - it was really in there. Got it all back together, works like a champ! Thanks ifixit!
mikesnyder -
Promptly broke both blue plastic tools. I used a putty knife to pop the case. Opening was the only hard part. I didn't disconnect the headphone cable. No problems and the battery has enough charge that I listening to Bare Naked Ladies now. Last week I installed a new hard drive in my Mac mini. IFixit is the greatest!
heldon -
If you are lucky, your battery may swell up like mind did, short of blowing up it opened the case for me. That being done really made it easy and encouraged me to do the repair myself. I still needed the proper screw driver (T6 Torx Screwdriver) to remove the two black torx screws that are found at step 10 of this repair guide. I purchased the iFixit 64bit driver kit, simply because I intend to work on several other iPods and phones, the kit is of good quality, well worth the purchase. If you have some mechanical ability, and follow the instructions, I was done in about 20 minutes, placed it back on my Bose player. I couldn't wait for it to charge, just wanted it to start playing, and after a minute or so my iPod 4th gen 20 gb was playing the music which I hadn't heard in about 3 to 4 years, as a result of a enlarged battery. As I write these comments down, I'm listening to my sweet tunes with a big smile on my mug, the sign of a satisfied customer. Thanks to iFIXIT.!!!
Alex DeLeon -