Einleitung

Erweitere deinen Speicherplatz mit einer neuen Festplatte.

  1. HlKSigoVChUGNZVN
    • Apple hat ihre neuen iPods so konzipiert, dass sie sich nur sehr schwer öffnen lassen, ohne wichtige Komponenten zu zerstören. Aufgrund der Metallfrontplatte, der Metallrückseite und der 13 (ja, 13) Metallklammern, die das Gehäuse zusammenhalten, ist dies einer der am schwierigsten zu zerlegenden iPods.

    • Gehe mit Vorsicht vor. Sei gewarnt, dass du deinen iPod erheblich über den derzeitigen Zustand hinaus beschädigen kannst. Außerdem kannst du während der Installation einige zusätzliche Plastiköffnungswerkzeuge benötigen, da diese beim Öffnen des iPod leicht ruiniert werden können. Viel Spass!

    • Vergewisser dich vor dem Öffnen des iPod, dass sich der Halteschalter in der verriegelten Position befindet.

    If you're meticulous, the job can perfectly be done, without any of the recommended tools. I hadn't the time to order them, so I opened my iPod with the large blade of my Victorinox swiss army knife. By just following the instruction I succeeded in releasing all of the metal tabs all around the iPod, and didn't damage any of them. You can clearly hear them "declipsing". I think the blade of the Victorinox is thiner than the putty knife, the only thing you have to take care of, is not to cut the black or silver painting of the front of the case, but if you are used to cut with a knife, you should succeed. Just be aware that it is however a difficult job !

    jcfsystems -

    Thank you for these instructions - my dead iPod classic (that died whilst attached to an ipod dock during a heavy thunderstorm which took out the dock too) is now working again. Opening the case took me 40 minutes and 7 plastic case openers not to mention very sore hands but the rest of the process worked fine. thanks again

    Stuart Hutchesson -

    Opened it up with MANY super thin nylon guitar picks in less than a minute starting from the two tabs on the bottom - I used the putty knife in my shop for wood filler and patching walls :)

    cmguitar -

  2. TMahKXJZJgji32ia
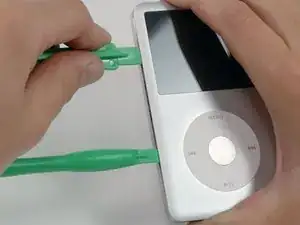
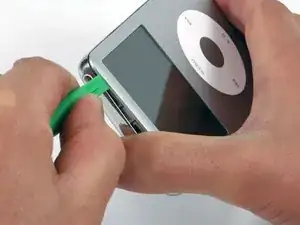
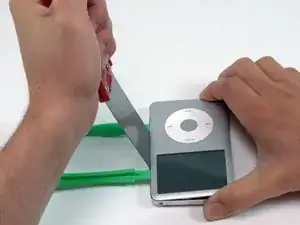
    • Das Öffnen dieses iPod ist eine Herausforderung. Lasse dich nicht entmutigen, wenn du einige Versuche brauchst, bevor der iPod offen ist. Eine Sache, die du beachten musst, ist der Winkel der Spitze des Plastiköffnungswerkzeugs beim Einsetzen in den iPod. Im Idealfall sollte der Winkel so vertikal wie möglich sein.

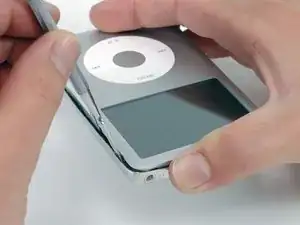
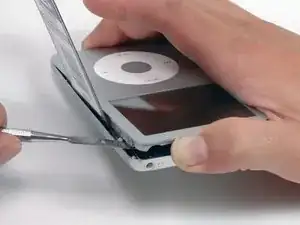
    • Stecke ein Plastiköffnungswerkzeug in die Naht zwischen Vorder- und Rückseite des iPods.

    I have with luck (several times) used the metal spudger to create a small initial gap.

    But be careful, it's easy to severely scratch the iPod.

    rousp -

    right here, you should insert a picture of the little clips on the rails inside the back of the ipod, so that we can visualise what we're trying to undo, & get a better idea of which way to bend, which way NOT to bend the tools.

    duncanrmi -

    Good point! There is such a picture showing the location of at least four (4) clips on each side of the case here:

    https://d3nevzfk7ii3be.cloudfront.net/ig...

    in the Step 4 of the “iPod Classic Teardown”: iPod Classic Teardown

    As mentioned below by Kevin M there are 3 more (1 on top and 2 on the bottom sides).

    LDS -

    Actually it’s a wayyyyyyy easier using the iFlash opening tool and following the pdf of this guy (youtube link)

    Bastien Arata -

    Actually it’s wayyyyyy easier using this tool as mentioned by this awesome guy on his video.

    Bastien Arata -

    That video is excellent. He has a PDF you print which is the same size as the iPod so you know exactly where the 11 clips are (1 on top, 2 on bottom, and 4 more along each side).

    Kevin Moorman -

  3. DTLaVqXC1FjvRSd6
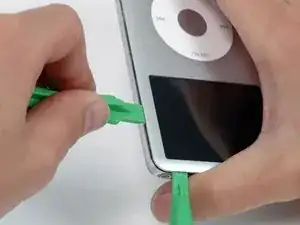
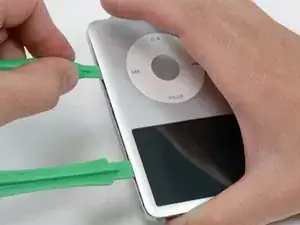
    • Schiebe ein anderes Plastiköffnungswerkzeug in die Naht zwischen der Vorder- und Rückseite des iPods und lasse zwischen den beiden Werkzeugen mindestens 3,8 cm Abstand.

  4. AjwVmTujX6qNNXGM
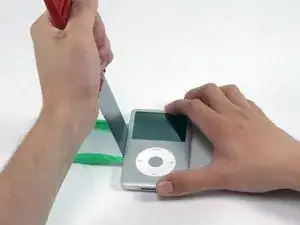
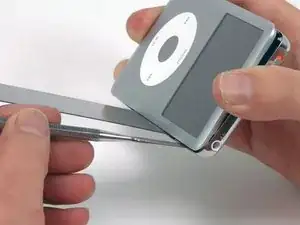
    • In einem Winkel vorsichtig ein Spachtel etwa 3,1 mm in die Naht zwischen den beiden Öffnungswerkzeugen einsetzen.

    • An der Innenseite der Rückwand befinden sich dünne Metallschienen, daher ist beim Einsetzen des Spachtels große Vorsicht geboten.

    • Sobald der Spachtel die Lippe der Rückwand hinüber ist, schwenkst du den Spachtel senkrecht und drückst ihn vorsichtig (aber fest) in die Lücke zwischen den Öffnungswerkzeugen, indem du ihn etwas hin und her bewegst.

  5. HxWIx5TXNmhDgsU3
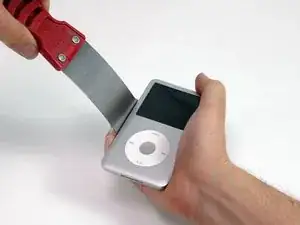
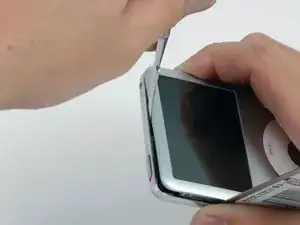
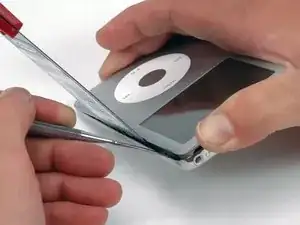
    • Drücke mit den Fingern auf die Rückwand hinter dem Spachtel, um die Biegung zu minimieren. Biege den Spachtel wie in der Abbildung gezeigt langsam, um sicherzustellen, dass die meisten metallenen Laschen auf dieser Seite des iPods gelöst sind.

    • Statt versuchen, die Rückwand nicht zu verbiegen, soll sie so verbogen werden, dass sie später problemlos wiederhergestellt werden kann. Aus diesem Grund sollte sich die Rille der Rückwand vom iPods wegbiegen, anstatt auf die gekrümmte Oberfläche zu drücken. Durch diese Methode werden soviel Clips wie möglich gelöst.

  6. aNCeOBjpj5HYkmB5
    • Entferne den Spachtel vom iPod und setze es mit der gleichen "Wackel-Methode" wie zuvor näher an die Ecke des iPods ein.

    • Verbiege, wenn überhaupt möglich, die Ecke der Rückwand nicht.

  7. FgHtXYWPTgxy3Zd6
    • Setze in der Nähe der Kopfhörerbuchse ein Kunststofföffnungswerkzeug in die Naht zwischen Vorder- und Rückseite des iPods ein.

    • Es kann hilgreich sein den Spachtel vorsichtig nach unten zu biegen, um eine größere Öffnung für das Öffnungswerkzeug zu schaffen. Achte jedoch darauf, die Ecke der Rückwand nicht zu biegen!

  8. xqAXMuDvPVFcIGRW
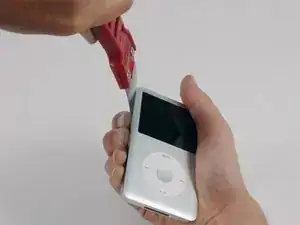
    • Führe nahe der Mitte des Displays vorsichtig einen Metallspudger in die Lücke ein, die durch das Kunststofföffnungswerkzeug erzeugt wurde.

    • Es ist einfach, hier eine merkliche Beule in der Rückwand zu schaffen, die schwer zu reparieren ist. Versuche den Metallspudger an der Kante der Rückwand zu schwenken, anstatt die Rückwand nach außen zu biegen.

    • Löse mit dem Metallspudger den einzelnen Clip oben am iPod.

  9. Bqw5KqOkoFUsHXNU
    • Setze nahe der anderen oberen Ecke den Plastiköffner in die Naht zwischen Vorder- und Rückteil des iPod.

  10. O1NN16PPNOimMOGd
    • Setze auch an der anderen Seite einen Plastiköffner in die Naht zwischen Vorder- und Rückteil

    • Es geht leichter, wenn du den Plastiköffner, der noch an der Ecke steckt, etwas hebelst um so den Spalt zu vergrößern.

  11. LvxVZUSAiBFGhjd1
    • Entferne den Plastiköffner von der oberen Ecke und setze ihn in den Spalt zwischen Vorder- und Rückteil. Lasse einen Abstand von etwa 3,8 cm zwischen den beiden Werkzeugen ( so wie an der anderen Seite auch schon).

  12. BRwwGnZsuZN1XIex
    • Setze unter einem Winkel sorgfältig einen Spachtel ungefähr 3,1 mm tief in den Spalt zwischen den beiden Plastiköffnern.

    • Passe auch hier auf, es laufen dünne Metallstreifen entlang der Innenseite der hinteren Gehäusehälfte. Sei mit dem Spachtel sehr vorsichtig.

    • Der Spachtel hat auch hier wieder die Verzahnung mit dem Rückteil gelöst. Hebe ihn bis er senkrecht steht und zwinge ihn dann sorgfältig (aber kräftig) in den Spalt zwischen den beiden Plastiköffnern.

    • Drücke mit den Fingern auf die Rückseite des iPod hinter dem Spachtel, um sie möglichst wenig zu verbiegen. Bewege den Spachtel leicht und versicherte dich, dass die meisten der Metallklammern an dieser Seite geöffnet sind.

  13. WBxxsUkUbMvEbvWE
    • Die Klammern an der Ecke sind besonders widerspenstig. Du musst sie unbedingt lösen, um den iPod zu öffnen.

    • Setze vorsichtig einen Metallspatel in die Nähe der widerspenstigen Klammer ein.

  14. wCf1mEJHHZHBBt5l
    • Drücke den Spatel wackelnd nach unten bis er auf die Rückwand stößt.

  15. D1pyJADPmTbONVjk
    • Löse vorsichtig die Klammer vom Front Panel.

    • Es geht leicht dabei eine Delle in die Rückwand zu stoßen, die kaum zu reparieren ist. Wenn du die Klammer freihebelst versuche den Drehpunkt des Spatels and der Kante der Rückwand zu halten als sie nach außen zu verbiegen.

  16. nIT5C5UuJLRBs4XO
    • Fahre fort das Front Panel mit dem Spatel hochzuheben bis sich die Metallklammer löst.

  17. yBjPfGwOHMgbF2wS
    • Zwei Flachbandkabel verbinden das Rückteil mit dem Rest des iPod. Achte in den folgenden Schritten darauf diese nicht zu beschädigen.

    • Fasse die Front Panel Einheit mit einer Hand und das Rückteil mit der anderen.

    • Atme tief ein!

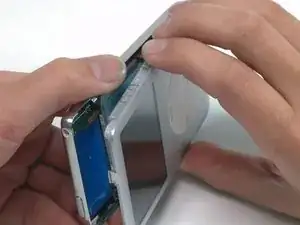
    • Löse vorsichtig (VORSICHTIG) die restlichen Klammern am Rückteil, indem du die Oberkante beider Gehäusehälften voneinander weg ziehst. Verstehe dabei die Unterkante als Achse eines Scharniers. Achte sehr darauf dass Flachbandkabel die beiden Hälften verbinden.

  18. NEhfuCxwcOlLmnrS
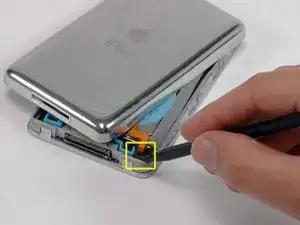
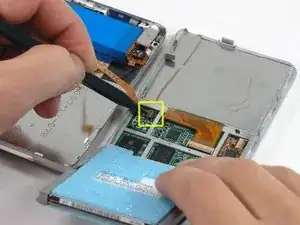
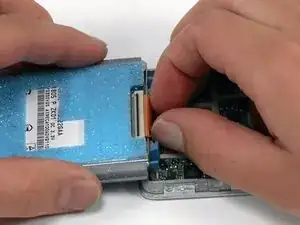
    • Schiebe den Verbinder, der das orangene Akkukabel befestigt, mit einem Spudger weg. Du musst nur etwa 2 mm hochheben, um das Kabel zu befreien.

    • Schiebe das orangene Akkukabel aus seinem Verbinder.

    If the small battery black/white connector pumps out of the ipod when you are trying to unplug the cable...REMEMBER the "U" black shape is meant to be just in the same direction as the blue plastic "U" beside it. If you plug it back in the wrong way it will display "Charging please wait..." forever!.

    :)

    riverate -

    How did you get the black battery piece to stay in after it popped out?

    Katrina Frantz -

    I knocked this little bit out too! Any tips to get it back in? Soldering?

    David Ewing -

    This step is what ultimately destroyed my iPod. A caution to be very careful would be good.

    I got the whole black white thing disconnected from the pins. After a lot of struggle I was able to get it back in, but I couldn’t get the black locking part to go up on its own. after many tries and some tries to get it in when the black thing is closed, i tore out the pins that were connected to the panel. can’t get it back on so it isn’t connected to the battery…

    Now i have a perfect iPod with a new harddrive but I can’t use it.

    Please add a red caution sentence because I’m pretty sure that if i had known what I had to do I would’ve been more careful and I would now have a functioning iPod.

    Nonetheless, great guide! without this I wouldn’t even have tried and the harddisk came from another broken down iPod classic so it’s not that I lost money.

    stef.kuypers -

    I got the whole battery clamp connector (black and white) all out too… So angry about it! I thought that the white part should be disconnected too, like former iPod models. Be careful, you only have to release the BLACK locking bar! One more photo with a zoom on the battery connector could have been useful… Great guide anyway :-)!

    kabalbuzard -

    Hello! Trying to identify the problem on my Ipod. I think I'm not qualified to open it and do the fixing. Do you know a shop or someone in Paris that would try it? Apple says they are not qualified anymore.

    Thanks in advance!

    Baudu Camille -

  19. F5n2MKhrY2QcrZ2q
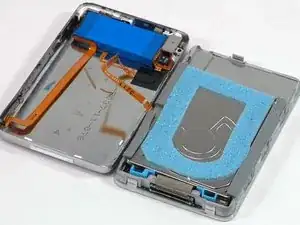
    • Lege das Rückteil neben den iPod, spanne dabei aber nicht das orangene Kabel zur Kopfhörerbuchse.

  20. lFcEDKOamuOJ3Kbr
    • Hebe die Festplatte mit einer Hand hoch, so dass du an das Flachbandkabel zur Kopfhörerbuchse herankommst.

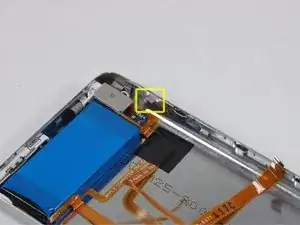
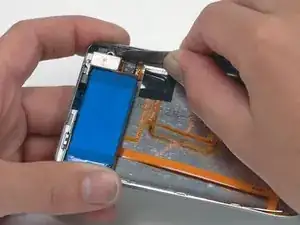
    • Klappe den Plastikhalter der das Kopfhörerkabel festhält mit einem Spudger auf. Er wird etwa 90° kippen und dabei das Kabel freigeben.

    • Ziehe das orangene Kopfhörerkabel aus seinem Sockel.

    • Nun ist das Rückteil vom iPod frei.

    I broke off the plastic tab I lost it any suggestions. How could I replace the plastic tab?

    Fabio a -

  21. ja12hPNcYwIfyRO6
    • Du musst jetzt eventuelle Schäden reparieren, die durch das Entfernen der internen Komponenten des iPod Classic entstanden sind! Sicher ist mindestens eine der Metallklammern am Rückteil nach oben verbogen. Sie müssen alle wieder nach unten zeigen, bevor du das Rückteil wieder einbauen kannst.

  22. jbcMZn2WUC4SgaHd
    • Drücke die Klammer mit der breiten Klinge des Spatels nach unten, achte darauf nicht die dünne Metallschiene von der Rückseite zu reißen.

    • Achte auch darauf dabei nichts an der Kopfhörerbuchse zu beschädigen, während du diese Teile in Form bringst..

  23. ifdqJ24fUaCUXaut
    • Lege das Rückteil mit der Seitenkanten auf eine ebene harte Oberfläche. Drücke kräftig aber sorgfältig nach unten und bringe so wieder die Seite mit der Rille in Form.

    • Das musst du möglicherweise mehrmals wiederholen, um die Kanten schön gerade zu kriegen. Es ist besser, wenn der Rand leicht nach innen gebogen ist als nach außen, weil das Front Panel später das Rückteil richtig ausrichtet.

    • Jetzt ist das Rückteil wieder schön in Form und du kannst den iPod selbst reparieren.

  24. aNss56gIJvOeRwaB
    • Drehe die Festplatte aus dem Rahmen und lege sie so, dass der Verbinder nach oben zeigt.

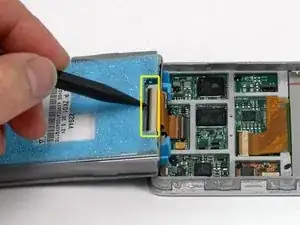
    • Kippe den Plastikhalter, der das Flachbandkabel zur Festplatte befestigt, mit einem Spudger hoch. Er wird sich um 90° drehen und dann das Kabel freigeben.

    To be clear, the plastic tab to be flipped up is the SMALL BLACK piece shown vertically in the photo above. The spudger is pointing directly to it. The tab flips TOWARDS the ribbon. While the picture is correct, this wasn’t obvious to me.

    Linda and Brian Henning -

    Thanks for the feedback! I will adjust the wording to clarify this.

    Arthur Shi -

  25. PwklrBNbr3smVkBa
    • Ziehe das orangene Flachbandkabel zur Festplatte aus seinem Sockel.

    • Wenn du die Festplatte austauschst und die neue Platte ohne Gummihalterung und Schaumstoffpolsterung geliefert wurde, musst du diese von der alten auf die neue Festplatte übertragen.

Abschluss

Bevor du das Gehäuse zuschnappen lässt, solltest du die Funktion des Geräts gut testen

Folge diesen Anweisungen in umgekehrter Reihenfolge, um das Gerät wieder zusammenzusetzen.

iRobot

Mitglied seit: 25/09/09

0 Reputation

45 Kommentare

The instructions worked like a charm. This is not for the faint of heart and requires some modicum of skill, but I saved a buttload of money by doing it myself. You will definitely need the recommended tools.

johannesdecruce -

It worked like a charm... Just need to follow the instructions carefully and you can avoid to spend 200 something € to buy a new iPod!

Thanks iFixit

Fanny Millon -

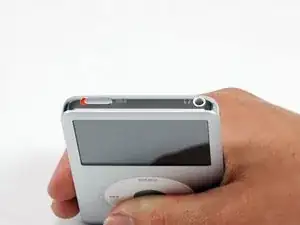
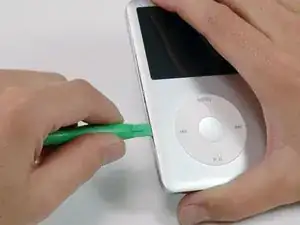
i couldn't get the plastic opening tool in between the 2 sections. i ended up using two razor blades instead of the plastic tools and the putty knife, i was able to replace the hard drive with very little struggle and almost no cosmetic damage(not that i care what the thing looks like)
algore2016 -

Thanks for a highly useful guide. Slowly and methodically, using a single-bladed, razor blade, I was able to open the case, following this procedure. Patience is, indeed, a virtue, in this case.

I was able to successfully replace the hard drive and battery.

The only snag I encountered was that the headphone jack ribbon was glued to circuit board adjacent to the connector under the hard drive. (I just left this ribbon be, not wanting to risk damaging the ribbon.) It was a bit awkward straightening the case edges, but I managed.

Overall, I'd give this guide a grade of "A"....it was nearly perfect and very clear. Bravo!

rgstout -

Well I managed to get it apart, though it wasn't all that difficult with the right tools, but getting it back together has been a nightmare. Just saying "reverse the process" is reall not quite enough in this case. All the little pieces of shock padding keep falling off, it's almost impossible to get the two wires plugged back in as well as keeping them in place, but I got there in the end. Or so I thought . Now my ipod has no sound (except from dock output) - and on investigating I find I have severed the orange cable near the jack itself- either by bending it or catching it on something. So another part to buy. So it's a warning to be very careful.

James Skilton -

Yeah. I did it. It wasn't easy, and the results could have been prettier, but I did it.

On opening, I found my plastic tools to be useless. I ended up taking the blade of a cheap Gerber knife to the thing, being careful not to damage the rails. I found that thin grade guitar picks were a great thing to stick in the spaces!

It's a good idea to take a picture of the innards once you open it. The little bumpers can be a bit tricky to reposition when you put it back together. Also you'll want to remove the blue foam padding if possible from the old hard drive and stick it to the new one.

Don't freak out when you get to the ribbons. They're tougher than they look, and they seem to know where to go. I did have to use a pair of needlenose plyers to guide the headphone ribbon back into place.

If you're a stickler for aesthetics, then pay close attention to steps 21-23. Especially 23, or you'll have unsightly gaps along the edges.

The hardest part of this project is taking it apart. Take your time.

David -

This is great instruction.

Could you please add the list of compatible hard drives.

I have a need for larger hard drive and plan is to install 512GB SSD drive for my iPod Classic 160GB 7th Gen. Do you now is there some limitation in HD size in iPod?

The plan is to replace original 160GB hard drive with Samsung PM851 512GB SSD drive

Based on my understanding this adapter works

Mini PCI-E Msata SSD to 40pin ZIF Adapter Card

http://www.ebay.com/itm/Mini-PCI-E-Msata...

with Samsung PM851 512GB mSata Internal Solid state drive SSD

http://www.ebay.com/itm/Samsung-PM851-51...

I guess that I need also new wider back cover for iPod classic.

http://www.ebay.com/itm/upgrade-iPod-Cla...

I'm not sure how much space is needed for Msata to SSD adapter and ssd drive

Any comments?

Jari -

@Jari

Have you considered using a Compact Flash instead of SSD? i.e. check eBay for "CF to Zif 1.8" HDD SSD IDE Adapter"...

htk -

I tried to install Samsung PM851 512GB SSD drive for iPod Classic, but iPod does not detect the drive.

I formatted SSD drive to FAT32 beforehand, but finally I had to intall original 160GB drive back.

Jari -

This was indeed a tough shell to crack! The plastic tools can bend easily and become weak so be careful as you are trying to create the initial gap for the putty knife. Once you get one side unhinged, the rest moves much more quickly!

Upgraded my 80 to a 120 and did the battery while I was at it...now hopefully I can squeeze another 5 years out of my iPod which should be long enough for a Apple to release Touch with a large enough hard drive for all my music!

doomius -

The guide is very good. Take your time and with patience and perseverance it can be done. I used a kitchen palette knife to prise open the case. I replaced the hard drive and after several attempts at fixing the hard drive cable in place given that the flimsly retainer clip broke first time on the new drive. I used a piece of paper in the slot to keep the cable connected and secure which was then curved back and taped into place to keep the pressure on. Fiddly but sucessful. I now have my ipod up and working. Not bad for a 7 year old piece of kit which has has a few knocks and bashes on the way. So it is worth trying!

Paula Pompei -

Had great success using 6 guitar picks instead of the putty knife. Allowed me to move in smaller sections and caused zero damage to the iPod. Didn't even bend any metal clips mentioned in Step 21! Replacing a damaged drive with 128 GB of flash memory using StarTech 1.8-Inch ZIF to CF Adaptor and Komputerbay Dual Micro SD to CF adaptor. Can use two cheaper 64 GB SD cards to achieve a solid state 7th Gen Classic!

http://www.amazon.ca/gp/product/B001CC3N...

http://www.amazon.ca/gp/product/B004WKIG...

Sea Pea -

Don't know much about memory technologies but why did you use 2* micro SD cards instead of a 128gb CF card?

matt donovan -

A very useful guide -I read through a couple of times before starting. I did not have spudgers, but used a variety of other small tools. It came apart more easily than expected, and the case only needed one clip bending back. There are some minor marks at the joint between case and front, but all works fine.

Esbjorn -

I don´t have the plastic tools, which I believe are meant to open the device without scratching it. I still haven´t repaired my iPod Classic, but I followed the instructions to open it and identify the hard drive model so I could order a new one. I opened it with a round blade knife and two coffee spoons. :) I wasn´t afraid to scratch the dang thing as it was already badly scratched. It will be my "backup" Classic, as I already got myself a new one (one of the last ones).

Ubirata Silva -

Is there a drive bigger than the 160 Gb that will fit? I just need more space. :)

Orcinus Orca -

I have a 512gb flash memory iPod Classic. It has a Tarkan adapter in it. Paid $400 for it. Didn't do the work myself. Just paid for, basically, a new iPod.

Chris George -

I would like to try this because my iPod classic died and I'm very upset that it's been discontinued. I have no want for a Touch and I listen to too much music for a low GB. I must ask though where you got the new hard drive? Or what kind of hard drive it is. I've only ever installed a hard drive in an XBox 360 slim and that was just opening a panel and slipping it into a port. Thanks.

CyanideBreathmint -

Do a flash memory upgrade. Mine is at 512gb now. Replaces the hard drive with flash memory. It has no moving parts and it's lighter!!!

Chris George -

Everything went smoothly. I replaced both the drive and the battery at the same time. I suggest you invest a little $ and buy the necessary tools as I did. Makes everything sooooooo

much easier. Took about an hour but what the heck.....I wasn't doing much else. Now I have my Tunes back! Thanks iFixit.com!

Kenny From San Clemente, CA

kenwinters1 -

Great guide, just take your time and make sure you use the proper tools. Used this guide for my iPod and you can't tell it has been opened whereas I used a different guide in the past for the Mrs's iPod with no where near as good results.

Michael Gregory -

This is a great guide, I was able to change both my hard drive and my battery in a simple 30 minutes since my package arrived. My iPod always worked really hard just to stay powered on, it felt like it was going to explode every time I picked it up, now the iPod is running quietly and smoothly with no problems. And for once I am able to sync all of my music from iTunes onto it.

Patricia Princivil -

A few weeks back I saw someone selling a 160 gig Classic on LetGo for $35 and decided to get it. Got home and discovered why the price was so low, the disk could not be accessed when I tried a restore. So I ordered up some parts from Amazon, a ZIF to CF adapter board and a CF to SD adapter. Ran about $20 for the pair. I went to Harbor Freight Tools to see about a putty knife but decided to get a razor blade with handle that I found in the paint scraping aisle where the putty knives were. Turned out this was the only tool I needed to get the clips undone while not uglifying the iPod. I pried on the edge of the back case like the instructions show using the putty knife to do, then a very small amount of persuasion by placing a small flathead screwdriver in the gap and a bit of twisting got it apart.

Randy -

(cont'd) I put a 32 gig SD card in the adapter for testing, then put the adapter into the ZIF adapter and slid it in. I had a 32 gig solid state Classic to show for my efforts. I synced some music and tried playing through some headphones to see what I got, after all this was a cheapie secondhand 'Pod so had to find out if it'd work. Works great.

I see that Other World Computing has a more elegant part going straight from ZIF to SD, I think I'll try that. The slim 7th gen doesn't look like it'll hold the adapter contraption in there now. I haven't tried closing it yet since I need a bigger SD.

Randy -

Thank you for the guide! It is indeed very difficult, but not impossible. I followed the directions as closely as possible. I had to use a utility knife to open it. The seam was too tight for the plastic tools. Everything else went fine. If you use extreme care and follow the directions exactly you should be able to do this with no damage to ribbon cables. I did, at times, feel like I was performing microsurgery. :-) All went well in the end and I once again have a working iPod classic - at a fraction of the cost of replacing it. Thanks again for the guide and for the great customer service when ordering the parts.

Richard Tracy -

The instructions were absolutely clear( even if I deduced some of the words from the context) :-) The only difficulty for me, was to put as much power on the putty knife as necessary. Too little and too shy at the beginning. ... but then you get the necessary feeling! Again it's not as difficult as it seems in the beginning. By the 25-th fixing you can open a little fixing shop :-D. Thank you iFixit!!! Thank you all enthusiasts who post here!!!

laureantudor -

I was able to successfully install the physical drive, however the volume is not working well-it can be heard faintly if the volume is cranked all the way up-but its all very distorted. Any suggestions?

Alexander Mathew -

I was able to do this with an 4" icing spatula without bending the case at all. Great guide. My classic is now 250GB of storage, faster, and lighter. Thanks!

azcodemonkey -

Hi I have 2 questions.

1) I accidentally broke the (brown) connector holding the battery cable to the logic board. What is it called and how can I get a replacement?

2) I exchanged the LCD Color display between 2 ipod classic (one and A1238 80GB with broken screen and the other A1238 160GB perfect screen) the result was a blank whote screen but if i switched it back to the broken screen, I could see the apple logo n startup. How can i solve this problem? Should i buy a new LCD Color display? Are there any difference between the parts?

Please help....

epatmos -

Just replaced my bad hard drive, so far so good. This site was a lifesaver

john maibauer -

Great instruction, had two iPods- one with screwed battery, the other one with damaged hard drive: Made one out of two- was easy even though i didn't had the plastic tools, a hair clip is perfect for this job! the iPod is dead, long live the iPod

Bep Straßenkehrer -

I have saved a lots of valuable photos in my iPod classic. I dropped it one time and it is not working now.It can’t turn on, can’t link to itunes .If I replaced the hard drive and battery,I can still find my photos back? Anyone who can help me please send me an E-mail.dylanweicn@icloud.com Thank you in advanced .

ducwei2001 -

So I’ve been using my iPod classic as an external drive, and I dropped it and now my computer won’t recognize it, and won’t even come on; I really don’t care about the iPod but the contents how can I test the Hard drive to see if I can get the documents off of it? Any ideas :(

Abe Montes -

The instructions were perfect. I did use a few different tools for my own preference but anyone can improvise a little on this project. Had no issues. You have to go slow and be methodical. This is not an easy tear-down but not nearly as difficult as you might think. Of course hand/finger size may come into play. I was successful on my first attempt. You not only need to be mechanically inclined but have some knowledge of electronic assembly, in general. Not for the inexperienced unless you learn quickly.

Kelly -

This guide worked very well for me. I found a jewelers loupe to be indispensable and recommend one highly.

Linda and Brian Henning -

Is it possible to install a HD from a 160GB Ipod to a 120GB Ipod Classic? Will the device read 160Gb normally?

carlosedgi -

This site is super handy for that:

https://www.iflash.xyz/store/iflash-comp...

Looks like that ipod gets capped at 128gb but the HD would still work I think.

Alec McWilliam -

The opening method works great with other i Pods too.

Daniel Zwerver -

I can't wait to attempt this. I either have a fix iPod or it remains the same just in many pieces.

Jose Godoi -

I need to have the hard drive replaced, but I have the worst luck doing things like this. Maybe I should pay someone who’s more nimble to do it for me.

elvimark01 -

Hello,

I am looking to upgrade my classic 5ht gen ipod. where in toronto can i find techs and or services.

hugablepercy@gmail.com

purcell greene -

Gracias por las guías y a quienes las traducen al español.

Son de gran ayuda¡¡

Miguel Pestruchi -

How do you load a new hd with operating software? I have an MP102, Ipod. Help

pookyman69 -

The instructions were amazing- I did improvise & used a metal clip to disassemble the iPod completely in 1/2 an hour without breaking any thing or bending the clips. I was lucky-the case was already slightly separated at one corner from being dropped…

Ronni Marcinkowey -

Where today can I buy a hard drive replacement for my iPod classic 80gb

Stacey David -