Einleitung

Rüste deinen iPod mit einer neuen Festplatte auf.

  1. vNNW5HEbOIm6FvDI
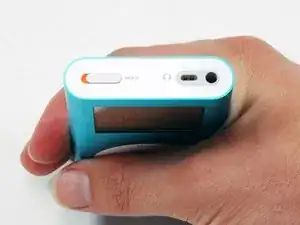
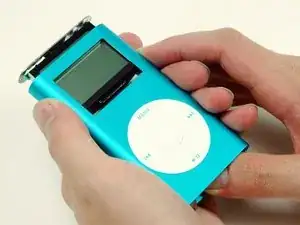
    • Bevor du den iPod öffnest, vergewissere dich, dass der Hold Schalter (Tastensperre) in der verriegelten Position ist.

  2. ZXkcuyTsDJVZLZru
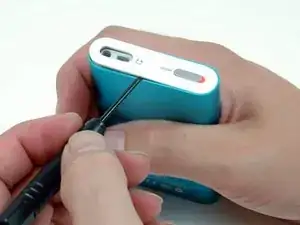
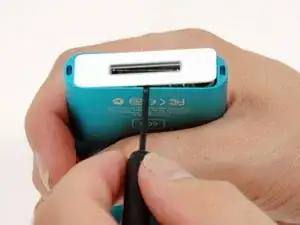
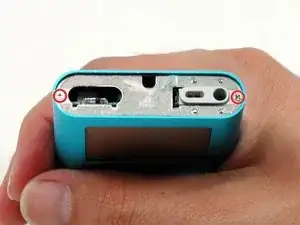
    • Setze vorsichtig einen kleinen Schlitzschraubendreher oder einen Jimmy zwischen das Metallgehäuse und die obere weiße Plastikabdeckung. Heble die obere weiße Plastikabdeckung mit den Schraubendreher ab. Passe darauf auf, dass du das weiche Plastik nicht mit dem Schraubendreher beschädigst.

    • Die obere Blende ist mit Kleber befestigt. Versuche an verschiedenen Stellen anzusetzen, um das Teil zu lösen

    • Um das Lösen einfacher zu machen, kannst du mit einem Fön die Blender ein paar Sekunden lang leicht erwärmen.

    You can also gently use a metal spudger to lift up both the top and bottom bezels. Allow only 1/8" of the metal spudger (like the screwdriver in the picture) to get inside to get leverage, before fully lifting the bezel up. Please note where the little "teeth" are underneath the bezels, or you can damage those if you are not careful.

    Also, using too big of a flathead screwdriver can cause damage to the plastic and chips away plastic from where you were trying to pry up the bezels, ruining the look of the iPod.

    Ryan -

    There should be a button here for "I did it -- EPIC FAILURE!!" When I put my iPod back together, the components on the mainboard were scraping against the clickwheel, and maybe the battery wasn't in perfect alignment, but the result was that there was a lethal amount of friction when sliding the assembly back into the case. As I was trying to relieve the pressure by tilting the board down using a spudger from the bottom, the top of the display bezel ended up scraping against the casing in such a way that it cracked from the center of the right edge. OUCH!! There goes a $50 repair job and a $40 replacement cost! Bye Bye perfectly working iPod Mini )-;

    There are two safeguards that can be done when reassembling this iPod. First, use a stiff piece of plastic film as a shim and lubricant between the top of the logic board and the top inside of the case, such as anti-static packaging, or the clear bag packaging of Apple display dongles (use an exacto knife to cut a long strip of it). Don't cover the display with the plastic, just the logic board components. Second, instead of pushing down on the assembly from the top or sides of the display which will place dangerous pressure on it, connect a cable to the dock connector and pull on it from the bottom, and pull out the plastic shield deftly and easily after the assembly is in position.

    steadfast I and I -

    If it's held on by adhesive, how do I get it back on?

    Cam -

    If you have longish fingernails and don't mind ruining them, I found it helpful to run my thumbnail between the plastic and the metal casing before going at it with a screwdriver. The little "teeth" a previous commenter mentioned are at approximately the 1/3 and 2/3 marks on the long edge of the plastic casings.

    rongshifen -

    Instead of gouging the end caps out with the flat screwdriver, try hot gluing a piece of wood (I used a tongue depressor-like ‘craft stick’) to the end cap, then just lever the cap out without damaging the aluminum. Removing the stick and the glue from the end caps takes a little patience but can be done without leaving a mark.

    Human -

    Don’t use any kind of metal tool to get these plastic caps off. Metal on metal will scratch up the body. I use a thin guitar pick, work it in between the cap and case, then turn it horizontal and slide around enough until you can use your fingernail to pull the cap the rest of the way off. Don’t be aggressive and break off the little fingers on the bottom side of the cap.

    Ken Mastri -

    Use plastic picks or the back of an iSesamo tool to get in.

    TheYootz Media Group -

    For a newbie, consider removing the bottom bezel first. In case of scratches due to lack of practice and expertise, the bottom bezel usually isn't as visible during usage.

    Using your fingernail, determine which edge would be best for starting. Feel for an edge where the aluminum case is a tiny bit higher then the plastic when pressing down gently on the bezel.

    Only use plastic tools. The plastic picks from Ifixit are good. A plastic spudger may work but it needs a very sharp edge.

    As you work the pick in between the bezel and the aluminum case, note that you can push the pick in more toward the middle of the bezel and much less (1/8") elsewhere. Avoid deep probes at the 1/3 and 2/3 points where plastic clips reside.

    For those who are looking at the suggested timeline and wondering how it is possible, this step alone took me 45 minutes. So, take your time as you see fit.

    YeeWee -

    As an alternative to using hot glue: I cut a command strip to the width of the white bezel, then stuck it onto the bezel, then stuck a plastic card on the other side. Then it is easy to pull out the bezels. It is also easy to remove the command strips without damaging the bezel.

    Ian -

  3. mTMHBGo2Bswvagrd
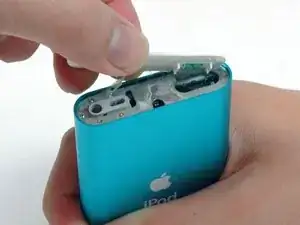
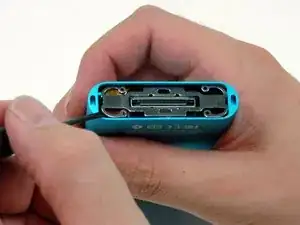
    • Hebe die obere Blende vom iPod ab.

    A thinner blade, such as a small pocket knife blade worked for me.

    dean dillon -

  4. 64orHJOkjncKWkE5
    • Setze vorsichtig einen kleinen Schlitzschraubendreher oder einen Jimmy zwischen das Metallgehäuse und die untere weiße Plastikabdeckung ein. Passe darauf auf, dass du das weiche Plastik nicht beschädigst.

    Again, be mindful and careful of the little white teeth on the underside of the plastic especially the two on the ends of the long sides.

    DITOSP -

    I used Stanley knife blade to gently prise both top and bottom plastic covers

    jimbo20039 -

    Like I do for the top, I use a thin plastic guitar pick to wedge between the plastic cap and metal case. Once it’s in, turn the pick horizontal (same as the cap) and work it around until you can get your fingernails under it. Also, I believe this cap is made to go on only one way, so maybe mark which edge is front or back

    Ken Mastri -

  5. vhqerDqLcLqmyc5S
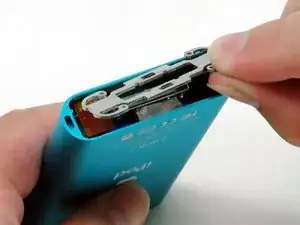
    • Eine kleine Sprengringzange ist das beste Werkzeug, um die Metallhalterung zu entfernen.

    • Du kannst auch einen Schlitzschraubendreher benutzen, um die Metallhalterung wie gezeigt unter der unteren Blende zu lösen. Dücke dafür zuerst die Metallarme an den Ecken ein. Hebe dann die Halterung an.

    Be *very* careful on the left hand side. It's almost too easy to scrape the click wheel cable and cause damage to it!

    LambdaCalculus -

    I used a circlip tool and for removal and reinsertion. It was fast and easy and avoids bending the part. They are also referred to as snap ring pliers.

    thezazupits -

    Zitat von thezazupits:

    I used a circlip tool and for removal and reinsertion. It was fast and easy and avoids bending the part. They are also referred to as snap ring pliers.

    There are two kinds of snap ring pliers available. One pivots like regular pliers, one hinges in reverse (when you squeeze the handles, the tips spread). Use the first type.

    PZencak -

    My click wheel lost some of its functionality. The back button, and the touch sensitivity to scroll through songs isn't working. :(

    coombsnahuel -

    Hi,

    I have followed this very good tutorial as carefully as I could and I thank you very much for having posted it!

    However, my problem is not solved. After having connect-disconnect issues when used with car charger, the iPod started making faint noise when plugged and refused to charge or start-up. I thought it was a mechanical noise (hard drive?) but obviously it is not the case because battery and hard drive are now unplugged, and the board-screen assembly still makes the same noise when plugged in a USB socket (but of course I can't localize the origin of that noise).

    Do you have any idea what it might be due to?

    Thank you in advance for any advice,

    Maxime

    Maxime Gommeaux -

    I would definitely recommend either circlip pliers to take out the metal retaining bracket because using a screwdriver leaves obvious marks on he corners of the case. I have noticed many for sale on eBay that have these marks. There are now plastic 'lifters' available to remove the top and bottom bezels and these are brilliant if used carefully and go in easily on the click wheel / screen side but be aware that when removing the bottom bezel it may bend the case a bit but it is easily persuaded back into shape. I too have carried out 64 GB, 128 GB and 256 GB conversions to the mini with a compact flash to SD card adapter and before fitting I format the card in my Sony Alpha 350 camera and it works a treat. My daughter loves her 128 gb converted mini and it's almost bombproof with a solid state memory on board.

    ptrmayhew6 -

    Rather than pry the ends of the clip out, insert the flat screwdriver as shown ( maybe a little more straight up) and slide it toward the open end, lifting as you go, and the corner of the clip will pop right out.

    Human -

    This is possibly the hardest part of this job for me. Getting this metal spring clip out without damaging the ribbon cable that’s right under one side is tricky. Take your time and use care to avoid touching the cable.

    Ken Mastri -

    In my ‘repair’, I managed to do the above on the side away from the clickwheel connector. I pried it up, and gently wiggled it free from the space. That way you don’t need to go prying at the connector, at cost of causing some scrape marks on the inside of the casing. Rather have internal scrapes than needing to replace the clickwheel!

    Casey -

  6. YLtjQ6AqEsDF2DfT
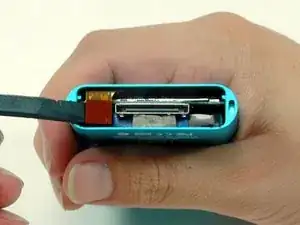
    • Hebe die metallene Halterung aus dem iPod heraus.

  7. sGdyA53vq1EVvoWn
    • Löse das orangene Flachbandkabel zum ClickWheel vorsichtig mit dem Spudger oder der Fingerspitze vom Logic Board.

    Best to wiggle this one side at a time or else you will be replacing a click wheel

    Duck -

  8. SpBcGgI3neI6finU
    • Entferne die beiden Kreuzschlitzschrauben #00, mit denen die Kopfhörerbuchse am Gehäuse befestigt ist.

  9. CLp2g21xPVwPuZxY
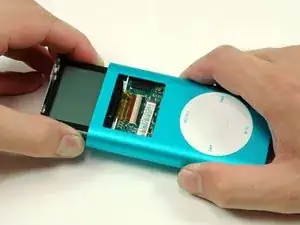
    • Drücke nahe am unteren Rand des ClickWheels vorsichtig auf das Logic Board und schiebe den iPod aus seinem Gehäuse heraus.

    • Ziehe nicht an der Platine mit der Kopfhörerbuchse oben am iPod, der Stecker am Logic Board ist sehr empfindlich.

    This comment is about the re-assembly, the inverse of this step:

    When pushing the assembly back into the casing, note that there is a spongy block at the bottom of the assembly on the battery/drive side (can be seen on the picture attached to step 12, at the extreme left of the picture). This block scrapes against the casing wall and pushes the circuit board towards the click wheel.

    I used a spudger to gently push the circuit board away from the click wheel and compress this block. This allows the assembly to slide into the casing without halting at, or scraping against, the click wheel.

    Yishai Sered -

    there is a capacitor (c78) that is prone to breaking due to the facts mentionned in the comment above if the logic board is not carefully insterted, it can break and your clickwheel stops working and you probably don't want that... i had to buy a entire ipod mini logic board just because of this

    Hazel -

  10. lCGvtIanOnHiZkaf
    • Wenn das Logic Board weit genug herausgeschoben ist, fasse es an beiden Seiten des Displays behutsam an und hole den iPod weiter aus seinem Gehäuse heraus.

    be sure to wipe the screen with a microfiber cloth when reinstering the logic board into the ipod... there's nothing more frustrating than that piece of dust behind the glass...

    Hazel -

  11. omybxtlHQCqD6W66
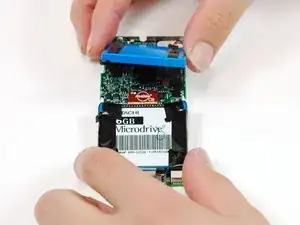
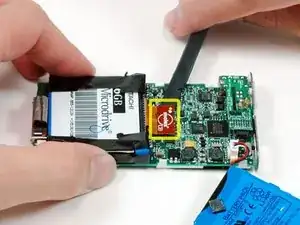
    • Hebe den Akku vom Logic Board weg und lege ihn seitlich vom iPod ab.

  12. UKHcTyfEC4NOEvWV
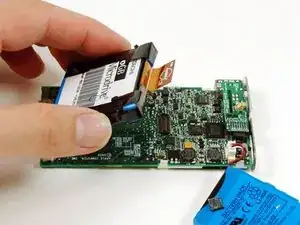
    • Löse das orangene Flachbandkabel zur Festplatte vorsichtig mit dem Spudger oder der Fingerspitze vom Logic Board ab.

    So, why do you show it on the pic to pry it from the side?!?

    Kirsten A. Schuck -

    I just left the ribbon connector attached to the logic board, peeled back the tape on the sides of the drive and unplugged it.

    Human -

    I preferred to flip up the drive and pry from the side to the left in this picture which would be underneath the drive itself. The black spudger is your best friend for prying miscellaneous iPod connectors.

    SEAN Tanton -

  13. srDBqmcCElIgVuEZ
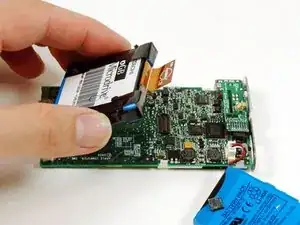
    • Hebe die Festplatte aus dem iPod heraus.

    This is the point when your iPod is finally and total &&^&@@ up, cuz it´s not possible to connect the hard disk again….FUUUUUCK!!!

    Kirsten A. Schuck -

    if you're upgrading the spinning hard drive with a cf card, i would suggest putting double-sided tape on the back of the cf card to keep it from rattling inisde the ipod and possibly disconnecting itself

    Hazel -

    Does the new drive/CF card need to be formatted? How does that get done?

    Matt Weatherford -

Abschluss

Um dein Gerät wieder zusammenbauen, folge den Schritten in umgekehrter Reihenfolge.

iRobot

Mitglied seit: 25/09/09

0 Reputation

24 Kommentare

I have been tinkering with the iPod classics, the 5th gens and now the iPod minis. I think the minis have a cool form factor and the plug and play for a compact flash card is handy. I have purchased a compact flash adapter to SD card, I then put a 128GB microsd into an SD to micro adapter and now I have 128GB mini. As a note, I did have to format the new card to FAT32 with AOMEI prior iPod restore.

djcfuzz -

Hello good sir i unfortunately speakn't good english but i try best now .. having a good day are you… i am also have a service and for fixing ipods … if you want i will give it too you send me an email albertogeniusipodfixes@gmail.com

Alberto Ambréña de la Cejã -

can i change the type of hard disk

valery labiche -

Hello good sir i unfortunately speakn't good english but i try best now .. having a good day are you… i am also have a service and for fixing ipods … if you want i will give it too you send me an email albertogeniusipodfixes@gmail.com

Alberto Ambréña de la Cejã -

Yes www.iflash.xyz has good stuff for these or u can just use a CF Card and it'll be Plug N Play…literally

the bongo guy -

So….thx, now it´s absolute broken!!!

Kirsten A. Schuck -

Do not do step 12 in the method shown. lift the ribbon from the overhanging end at the top and not the side.

This caused me to break the connections from the plug to the ribbon cable, rendering the ipod useless as you cant get that part any longer.

Also you can use a glue gun and a piece of wood to remove the top and bottom covers without marking the ipod.

James MacLean -

A great guide. I have used it to upgrade an iPod Mini (only works on 2nd gen, I read somewhere else) to 128 GB by replacing the existing drive with a Compact Flash.

It now works really well, and battery life is noticeably better.

Going backwards, I stopped before doing step 6 to check that all was working as expected and to set up the “new” Ipod - just in case further adjustment had proved necessary (putting that bracket back is one of the hardest parts of this).

I agree with James MacLean (above) about removing the hard drive ribbon cable.

Don -

Hello good sir i unfortunately speakn't good english but i try best now .. having a good day are you… i am also have a service and for fixing ipods … if you want i will give it too you send me an email albertogeniusipodfixes@gmail.com

Alberto Ambréña de la Cejã -

Is there some sort of adapter for this particular hdd that could be connected to usb? I have a dead Ipod mini tht id like to get the content off of.

Dalen -

Thanks for the great guide. I used it to replace the existing, dead drive on my iPod Mini with a 16GB Compact Flash..

Do not use a metal flathead screwdriver for steps 2, 4, and 5 unless you want to mar the plastic and possibly the aluminum housing as well. I used the iFixit Jimmy instead which was much gentler.

Also I agree with James MacLean—don’t mess with the ribbon. You can actually replace the drive with the ribbon in place.

Phoebe Kuo -

So I completed the hard drive upgrade (and replaced the battery while I was at it) but when I plugged the device into my MacBook Pro, to restore it, I received an error message (1432) that the iPod could not be restored due to an unknown error. Oddly enough, iTunes recognizes the iPod Mini’s presence and properly recognizes its upgraded storage capacity. I can even copy music over to it and play that music from the iPod using iTunes. What it won’t do is properly eject from iTunes. When I try to eject it, the device immediately reappears. If I quit iTunes, I can eject it from the finder, but then I get a file folder icon on the screen and a reference to Apple’s iPod site. I even tried running Disk First Aid from the Disk Utility but that did nothing. Any insights would be greatly appreciated.

Human -

I finally got the iPod back to full functionality. I had to attempt to reformat the CF card in Disk Utility at the root level instead of at the iPod level and then when I went into iTunes, I got a dialog box saying that my iPod appeared to be corrupted and then followed the prompts to restore it yet again, which finally worked.

Time to install the CF card and battery: about 40 minutes.

Time to get the iPod to work properly after completing the installation: almost two hours.

Bottom line: Success is success, no matter how long it takes.

Human -

Upgraded two iPod Minis Gen 2 using iFlash.xyz’s CF to SD adapter. Both are now 256GB (original HDDs were 4GB). I also replaced the battery with iFixit’s generic found on Amazon.com. It looks identical to the blue ones found on ebay. It came in an anti-static bag with battery calibration instructions branded with iFixit’s logo.

Windows:

I first formatted the SD Card as Fat32 with 16KB cluster size. Then restored in iTunes. Followed with installing Rockbox 3.14 and a custom theme that looks real similar to the original UI.

Battery drain test shows 7-hrs and 48-min. I looped a FLAC file on repeat with headphones attached at moderate volume settings. I’m guessing I’d get close but less than that with the Mini on shuffle.

The original/used battery only lasted 2-hrs and 40-min with the FLAC on repeat. If you do this upgrade I’d buy a new battery too.

Shiftnumlock -

The ipod mini doesn't play flac right?

Martijn Both -

@Martijn Both hi good sir .. i am able to use flax on my ipod .. give me contact at albertogeniusipodfixes@gmail.com

I hope you are heving good day . .

Alberto Ambréña de la Cejã -

Thanks! This tutorial was perfect. Easy to follow, great pix, and detailed enough for an idiot.

lp.incinerator@gmail.com -

Thank you! I agree with my hdd flex…soldered…;-) but now Software Update and recovery doesnt work with iTunes. Even tue schon one i blüht…Plug into usb wall charger doesnt start install Routine…any suggestions??? Thx in advance!!!

Sebastian Chyla -

my ipod stop wroking

owen wint -

Do not do step 12 in the method shown. lift the ribbon from the overhanging end at the top and not the side.

Yes, as James MacLean has stated, this is a terrible idea and I too broke the connector that way and had to order a replacement click wheel.

Sidney Rutledge -

Let’s face it, you’re replacing it with a CompactFlash card or CF - MicroSD adapter at this point.

In my experience, on a Mac I used Disk Utility to completely erase my MicroSD, and replace it with GPT table and a single, max size partion formatted to exFAT. I tried leaving it as it was, hoping the iPod restore process would just wipe it, but no - lazy me got error 1432.

I’m not a fan of double MicroSD adapters running JBOD, so I went for a single CF->SD adapter. I was surprised to see this mini IDE connector has no clear orientation! Mine worked with the fancy label bit up, and the blank/writable bit facing down.

My advice, do not unplug the drive ribbon! What I found worked better was to keep it connected, remove the sheathing around the drive (my adapter is entirely plastic, so figured there’s no short-out danger), and very gently pull the mini IDE connector out. Careful not to apply force or bend the connector. Wiggle until you got a sight of the connectors, then a gentle pull and the drive is free!

Casey -

Where would I obtain a casing? have an iPod mini MB and connector, as well as numerous CF cards. Supposedly anything up to a 16GB will work, but has to support certain functions. I later found out that some older cards were not in fact “633x” and this was simply marketing. These days the biggest problem is getting batteries for these as they are EOL so unless they are new unused stock will have degraded in storage.

Andre -

I didn't find one, on Aliexpress just the top cover, for classics you can basically build whole iPods out of these spare parts, but no Mini parts.

However you may 3D print a case: https://www.thingiverse.com/thing:386527...

I recently got a 1st gen and upgraded it to 128Gigs (Lexar SDXC with CF adapter), works fine AFAIK that's the Maximum storage capacity the 1st gen can handle, the 2nd can handle up to 256Gigs.

Marcel Pape -