Einleitung

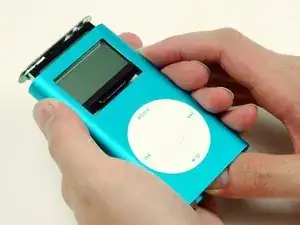
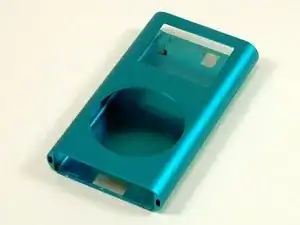
Das farbige Metallgehäuse.

  1. vNNW5HEbOIm6FvDI
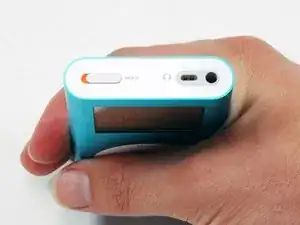
    • Bevor du den iPod öffnest, vergewissere dich, dass der Hold Schalter (Tastensperre) in der verriegelten Position ist.

  2. ZXkcuyTsDJVZLZru
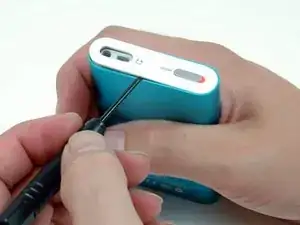
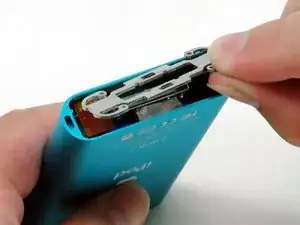
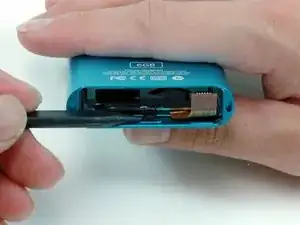
    • Setze vorsichtig einen kleinen Schlitzschraubendreher oder einen Jimmy zwischen das Metallgehäuse und die obere weiße Plastikabdeckung. Heble die obere weiße Plastikabdeckung mit den Schraubendreher ab. Passe darauf auf, dass du das weiche Plastik nicht mit dem Schraubendreher beschädigst.

    • Die obere Blende ist mit Kleber befestigt. Versuche an verschiedenen Stellen anzusetzen, um das Teil zu lösen

    • Um das Lösen einfacher zu machen, kannst du mit einem Fön die Blender ein paar Sekunden lang leicht erwärmen.

    You can also gently use a metal spudger to lift up both the top and bottom bezels. Allow only 1/8" of the metal spudger (like the screwdriver in the picture) to get inside to get leverage, before fully lifting the bezel up. Please note where the little "teeth" are underneath the bezels, or you can damage those if you are not careful.

    Also, using too big of a flathead screwdriver can cause damage to the plastic and chips away plastic from where you were trying to pry up the bezels, ruining the look of the iPod.

    Ryan -

    There should be a button here for "I did it -- EPIC FAILURE!!" When I put my iPod back together, the components on the mainboard were scraping against the clickwheel, and maybe the battery wasn't in perfect alignment, but the result was that there was a lethal amount of friction when sliding the assembly back into the case. As I was trying to relieve the pressure by tilting the board down using a spudger from the bottom, the top of the display bezel ended up scraping against the casing in such a way that it cracked from the center of the right edge. OUCH!! There goes a $50 repair job and a $40 replacement cost! Bye Bye perfectly working iPod Mini )-;

    There are two safeguards that can be done when reassembling this iPod. First, use a stiff piece of plastic film as a shim and lubricant between the top of the logic board and the top inside of the case, such as anti-static packaging, or the clear bag packaging of Apple display dongles (use an exacto knife to cut a long strip of it). Don't cover the display with the plastic, just the logic board components. Second, instead of pushing down on the assembly from the top or sides of the display which will place dangerous pressure on it, connect a cable to the dock connector and pull on it from the bottom, and pull out the plastic shield deftly and easily after the assembly is in position.

    steadfast I and I -

    If it's held on by adhesive, how do I get it back on?

    Cam -

    If you have longish fingernails and don't mind ruining them, I found it helpful to run my thumbnail between the plastic and the metal casing before going at it with a screwdriver. The little "teeth" a previous commenter mentioned are at approximately the 1/3 and 2/3 marks on the long edge of the plastic casings.

    rongshifen -

    Instead of gouging the end caps out with the flat screwdriver, try hot gluing a piece of wood (I used a tongue depressor-like ‘craft stick’) to the end cap, then just lever the cap out without damaging the aluminum. Removing the stick and the glue from the end caps takes a little patience but can be done without leaving a mark.

    Human -

    Don’t use any kind of metal tool to get these plastic caps off. Metal on metal will scratch up the body. I use a thin guitar pick, work it in between the cap and case, then turn it horizontal and slide around enough until you can use your fingernail to pull the cap the rest of the way off. Don’t be aggressive and break off the little fingers on the bottom side of the cap.

    Ken Mastri -

    Use plastic picks or the back of an iSesamo tool to get in.

    TheYootz Media Group -

    For a newbie, consider removing the bottom bezel first. In case of scratches due to lack of practice and expertise, the bottom bezel usually isn't as visible during usage.

    Using your fingernail, determine which edge would be best for starting. Feel for an edge where the aluminum case is a tiny bit higher then the plastic when pressing down gently on the bezel.

    Only use plastic tools. The plastic picks from Ifixit are good. A plastic spudger may work but it needs a very sharp edge.

    As you work the pick in between the bezel and the aluminum case, note that you can push the pick in more toward the middle of the bezel and much less (1/8") elsewhere. Avoid deep probes at the 1/3 and 2/3 points where plastic clips reside.

    For those who are looking at the suggested timeline and wondering how it is possible, this step alone took me 45 minutes. So, take your time as you see fit.

    YeeWee -

    As an alternative to using hot glue: I cut a command strip to the width of the white bezel, then stuck it onto the bezel, then stuck a plastic card on the other side. Then it is easy to pull out the bezels. It is also easy to remove the command strips without damaging the bezel.

    Ian -

  3. mTMHBGo2Bswvagrd
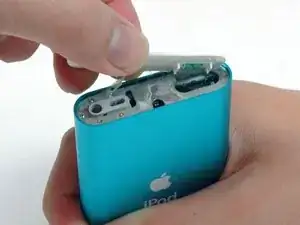
    • Hebe die obere Blende vom iPod ab.

    A thinner blade, such as a small pocket knife blade worked for me.

    dean dillon -

  4. 64orHJOkjncKWkE5
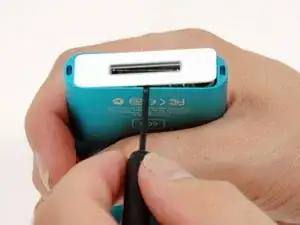
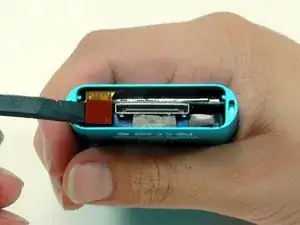
    • Setze vorsichtig einen kleinen Schlitzschraubendreher oder einen Jimmy zwischen das Metallgehäuse und die untere weiße Plastikabdeckung ein. Passe darauf auf, dass du das weiche Plastik nicht beschädigst.

    Again, be mindful and careful of the little white teeth on the underside of the plastic especially the two on the ends of the long sides.

    DITOSP -

    I used Stanley knife blade to gently prise both top and bottom plastic covers

    jimbo20039 -

    Like I do for the top, I use a thin plastic guitar pick to wedge between the plastic cap and metal case. Once it’s in, turn the pick horizontal (same as the cap) and work it around until you can get your fingernails under it. Also, I believe this cap is made to go on only one way, so maybe mark which edge is front or back

    Ken Mastri -

  5. vhqerDqLcLqmyc5S
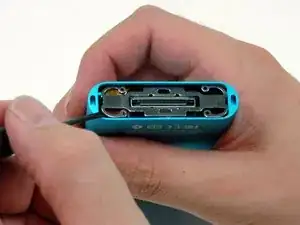
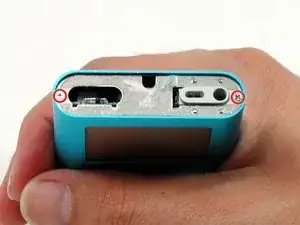
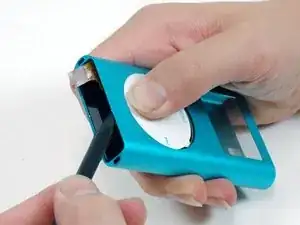
    • Eine kleine Sprengringzange ist das beste Werkzeug, um die Metallhalterung zu entfernen.

    • Du kannst auch einen Schlitzschraubendreher benutzen, um die Metallhalterung wie gezeigt unter der unteren Blende zu lösen. Dücke dafür zuerst die Metallarme an den Ecken ein. Hebe dann die Halterung an.

    Be *very* careful on the left hand side. It's almost too easy to scrape the click wheel cable and cause damage to it!

    LambdaCalculus -

    I used a circlip tool and for removal and reinsertion. It was fast and easy and avoids bending the part. They are also referred to as snap ring pliers.

    thezazupits -

    Zitat von thezazupits:

    I used a circlip tool and for removal and reinsertion. It was fast and easy and avoids bending the part. They are also referred to as snap ring pliers.

    There are two kinds of snap ring pliers available. One pivots like regular pliers, one hinges in reverse (when you squeeze the handles, the tips spread). Use the first type.

    PZencak -

    My click wheel lost some of its functionality. The back button, and the touch sensitivity to scroll through songs isn't working. :(

    coombsnahuel -

    Hi,

    I have followed this very good tutorial as carefully as I could and I thank you very much for having posted it!

    However, my problem is not solved. After having connect-disconnect issues when used with car charger, the iPod started making faint noise when plugged and refused to charge or start-up. I thought it was a mechanical noise (hard drive?) but obviously it is not the case because battery and hard drive are now unplugged, and the board-screen assembly still makes the same noise when plugged in a USB socket (but of course I can't localize the origin of that noise).

    Do you have any idea what it might be due to?

    Thank you in advance for any advice,

    Maxime

    Maxime Gommeaux -

    I would definitely recommend either circlip pliers to take out the metal retaining bracket because using a screwdriver leaves obvious marks on he corners of the case. I have noticed many for sale on eBay that have these marks. There are now plastic 'lifters' available to remove the top and bottom bezels and these are brilliant if used carefully and go in easily on the click wheel / screen side but be aware that when removing the bottom bezel it may bend the case a bit but it is easily persuaded back into shape. I too have carried out 64 GB, 128 GB and 256 GB conversions to the mini with a compact flash to SD card adapter and before fitting I format the card in my Sony Alpha 350 camera and it works a treat. My daughter loves her 128 gb converted mini and it's almost bombproof with a solid state memory on board.

    ptrmayhew6 -

    Rather than pry the ends of the clip out, insert the flat screwdriver as shown ( maybe a little more straight up) and slide it toward the open end, lifting as you go, and the corner of the clip will pop right out.

    Human -

    This is possibly the hardest part of this job for me. Getting this metal spring clip out without damaging the ribbon cable that’s right under one side is tricky. Take your time and use care to avoid touching the cable.

    Ken Mastri -

    In my ‘repair’, I managed to do the above on the side away from the clickwheel connector. I pried it up, and gently wiggled it free from the space. That way you don’t need to go prying at the connector, at cost of causing some scrape marks on the inside of the casing. Rather have internal scrapes than needing to replace the clickwheel!

    Casey -

  6. YLtjQ6AqEsDF2DfT
    • Hebe die metallene Halterung aus dem iPod heraus.

  7. tyTTDdRZJpgBbjsj
    • Benutze einen Spudger oder deine Fingerspitze, um das orangefarbene Click Wheel Flachbandkabel vorsichtig aus dem Stecker zu lösen.

  8. eTNr3HTovKBkeT5J
    • Entferne die beiden #00 Kreuzschlitzschrauben, mit denen der Kopfhöreranschluss am Gehäuse befestigt ist.

  9. mrJfEAYJOM3x1UVT
    • Schiebe den iPod vorsichtig aus seinem Gehäuse, indem du gegen das Logic Board nahe an der Unterkante des Click Wheel drückst.

    • Ziehe nicht an der Kopfhöreranschluss-Platine an der Oberkante, da der Stecker zum Logic Board empfindlich ist.

  10. T5hxphZPAbWQLseg
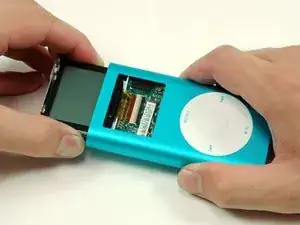
    • Nachdem du das Logic Board ausreichend herausgeschoben hast, kannst du das Logic Board vorsichtig auf beiden Seiten des Displays greifen und den iPod aus seinem Gehäuse herausziehen.

  11. elfYPb6GcQkxfXFT
    • Benutze einen Spudger um das kleine schwarze Plastikteil zurückziehen, welches das Click Wheel festhält.

  12. QcwvVj4WLnW2QDPx
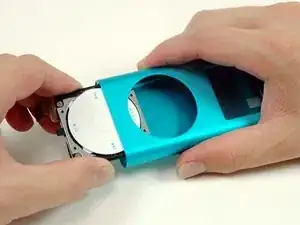
    • Ziehe das schwarze Plastikteil weiter zurück und benutze deine andere Hand, um auf das Click Wheel zu drücken. Schiebe dann das Click Wheel aus dem Gehäuse.

    • Es ist wichtig, dass du das Click Wheel beim herausschieben auch herunterdrückst. Es könnte sonst sein, dass das Click Wheel von dem iPod Gehäuse zerkratzt wird.

  13. pWj1u2CX6E6SxFIs
    • Schiebe weiter, bis sich das Click Wheel vom Gehäuse löst.

  14. hFMu4kEjFALqlUBT
    • Das Aluminiumgehäuse bleibt übrig.

    Great guide. My daughters boring silver Mini is now a hot pink Mini!

    Jeff -

Abschluss

Um den iPod wieder zusammenzubauen, folge den Anleitungen in der umgekehrten Reihenfolge.

iRobot

Mitglied seit: 25/09/09

0 Reputation

3 Kommentare

Followed your instructions to the letter. Put it back together and now it won't work . Thanks for breaking my iPod mini.

kolbyhardy -

You probably &&^&@@ something up by mistake. Don’t blame the author for your own mistakes.

Tristan Haugh -

dude the pod mini is an mp3 player from 2005 it literally does not matter, plus, you probably &&^&@@ up the repair anyways
Memez_idk -