Einleitung

Du brauchst zum Austausch des Akkus einen Lötkolben mit feiner Spitze. Dies ist eine schwierige Reparatur und du solltest es nur probieren, wenn du gut löten kannst.

  1. PPRBVTSUNkPCZOVi
    PPRBVTSUNkPCZOVi
    KmP4kCJDMgCEWKlu
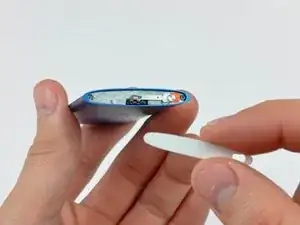
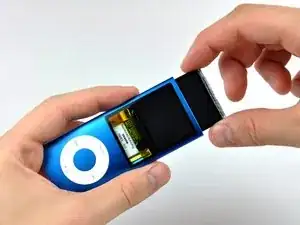
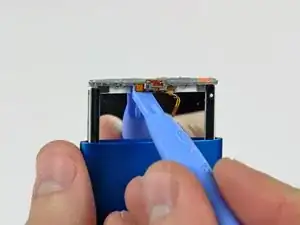
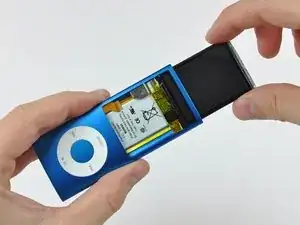
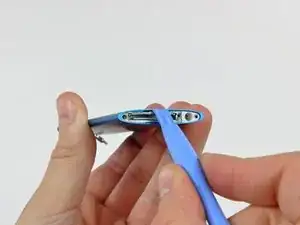
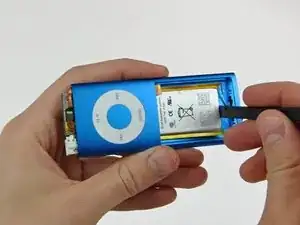
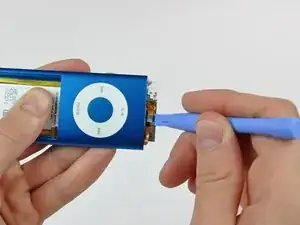
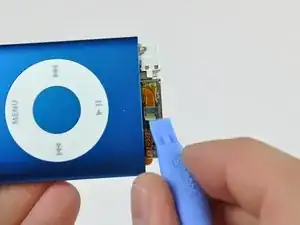
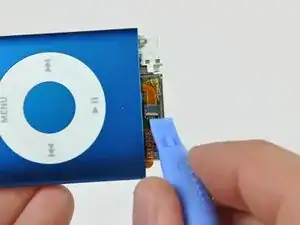
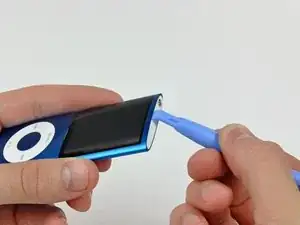
    • Setze die Kante eines iPod Öffnungswerkzeugs in den Spalt zwischen äußerem Gehäuse und der oberen Blende ein.

    • Hebele die obere Blende aus der Klebeverbindung zur Displayhalterung heraus.

    • An diesem Punkt ist der Hold-Schiebeschalter lose und kann herausfallen. Achte darauf, ihn nicht zu verlieren..

    Be sure to use the smaller iPod opening tool and press it in FIRMLY in order to get enough leverage to get under the bezel and pry it off. Adhesive is very strong, so don't be afraid to use a little bit of force.

    captcarl13 -

    Tool broke before I could get the cover off !!! So I’m done before I even started !!

    linda45p -

    I have a Apple iPod Nano 4th gen(Green) and I only have 7 tech pieces to the iPod and I may/might have the small philips screws and I am not sure how to fix the iPod nano

    Nick Davies -

    I also had Problems to remove the bezel. The solution was to start with a very small screw driver from the hole of the switch. There I could lift it a bit and get the plastic tool in between. Than it was easy.

    Michal Niewiadomski -

    After replacing the battery, the old glue would lump up too thick, and also become too weak to fix the panel back to the outer case. I have scraped all the old glue off using a small flat head screw driver, and affixed a double sided adhesive tape cut into small strips, which was successful in both aspects.

    diytradjazz -

    TIP: Use a plastic tool and pull it out through the hold switch. This may break the top bezel, but this was the only way to get it off.

    Caleb Murphy -

  2. P3MabKnUxfTTFoZA
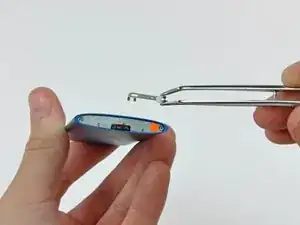
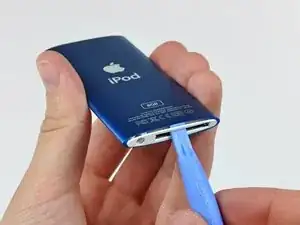
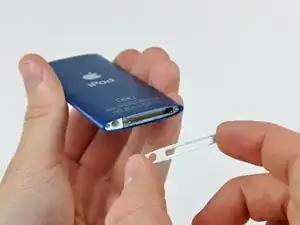
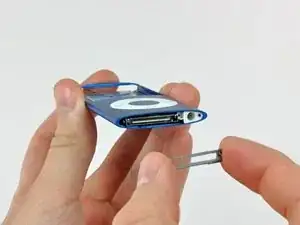
    • Entferne den Hold-Schiebeschalter von der Oberseite des Nano.

  3. WkZkbeQLoEnD2uPb
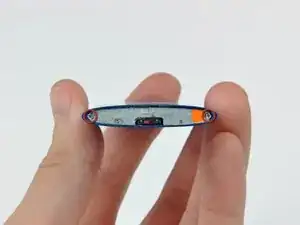
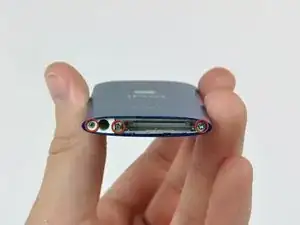
    • Entferne die beiden abgewinkelten Kreuzschlitzschrauben in den beiden Ecken der Displayhalterung.

    • Diese Schrauben sind sehr klein und ihre Köpfe können leicht ausschlagen.

    Be sure to use a good phillips #00 screwdriver here, or you run the risk of stripping the very small screws.

    iTronics Repair -

    The screws were covered with the adhesive. They were very difficult to remove.

    I RUINED the hold switch! I accidentally broke the cord. 0_o The directions were kind of unclear.

    bodieg -

    Zitat von bodieg:

    The screws were covered with the adhesive. They were very difficult to remove.

    I RUINED the hold switch! I accidentally broke the cord. 0_o The directions were kind of unclear.

    Step 12 is misleading as it does not show to remove the screen from the metal frame.

    bodieg -

    Sorry guys, but the explanations are really bad. Go onto youtube and watch it. This site misses heaps of steps. I just broke my iPod :(

    S Mile -

    Like others have noted, screws are covered in adhesive and difficult to remove. Take extreme care to not strip the heads. I'd suggest using a very small flathead to scrape some of the adhesive off before attempting to remove the screws.

    captcarl13 -

    a 1mm slotted screwdriver will work in a pinch, but be carefull and make sure you get the angle just right

    andrew -

    The tools list doesn't say you need an iPod opener to, nor does the parts list day you'll need a new click wheel, though this is called ”...click wheel REPLACEMENT​”. I don't get the feeling these are very trustworthy instructions, ESPECIALLY after having read other comments. I'd say BEWARE, and look at a variety of resources to get a much more comprehensive picture.

    Skyfire -

    Actually, the screws are not aligned with the edges of the iPod, which means that you must not try to unscrew them vertically. If you do there is a good chance that you damage the head of the screws. Thus look carefully with a torch to see at what angle you have to unscrew them.

    Fabrice Sarelli -

    Actually, the screws are not aligned with the edges of the iPod. That means that if you try to unscrew them vertically, there is a good chance that you damage the head of the screws. Thus, look carefully with a torch to see exactly at what angle you need to unscrew them safelly.

    Fabrice Sarelli -

    Everything was good up to this point. I could barely see the screws and ended up stripping them. Just gave up at this point and threw the

    Ipod on the ground and stomped on it.

    gonzalo gonzalez -

    I agree with several other contributors here, that a properly sized flat screwdriver *that is not worn* held at the correct angle is a better option than a phillips because the screw head is filled in with adhesive tape. BEWARE: The screws on the top and bottom outer edges are not parallel to the case. They are offset by 25 or 30 degrees, with the tips of the screws pointing out towards the outer edge of the case with respect to where the heads are. Use something to get magnification so you can really see how your screwdriver fits, and whether it’s engaged. An undamaged and properly sized standard screwdriver held in the appropriate orientation will readily remove the top and bottom side screws without stripping and with very little force. Feel for engagement — press the screwdriver in just enough to get past the adhesive. Not much torque or pressure is required — just a good fit. You must have the right tools to do this job successfully, and look under high magnification. Align your screwdriver!

    Barry L. Kramer -

    In accordance with another source, I have bought online and used a Phillips #0000 screw driver, which worked pretty well here. It costed me only $2 .

    diytradjazz -

    Screws are inserted under an angle. Would suggest to use a jeweler’s magnifying glass to check the angle before sticking any screw driver in there.

    aramis -

  4. wowAESYW5MIgBHGa
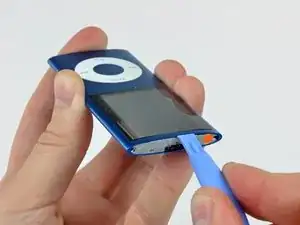
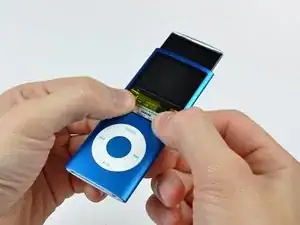
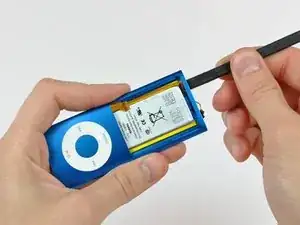
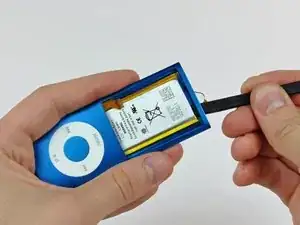
    • Setze ein iPod Öffnungswerkzeug zwischen dem äußeren Gehäuse und der Displayhalterung ein.

    • Schiebe die Displayeinheit mit dem Werkzeug etwas aus dem Gehäuse heraus.

    • Drehe die Displayhalterung nicht um die Oberkante des Displays, da sie an einer dünnen Klammer aus Stahl befestigt ist, die leicht brechen kann.

    • Entferne die Displayhalterung nicht mit Gewalt, das Kabel zum Hold-Schalter kann leicht zerreißen.

    I found I had to gently pry the retainer open with a craft knife (xacto knife?) as the plastic opener tool was too blunt or soft to get any purchase...

    aaaidan -

    My nano had a "swollen" battery which wedged the LCD between battery and front glass. As a result, this step didn't work, I couldn't pull out the TFT and botched case, TFT and TFT frame until it came out. Telltale sign was a display that looked like there is a water between glass and LCD. The other nanos I've opened didnt have this problem and came out effortlessly, so if yours is stuck, don't feel bad, there's not much you can do!

    oliver -

    What to do if the upper metal base (which is fixed to the circuit with 2 screws) came off when extracted?

    Which side can I anchor to force the display to exit?

    Francesco Taliercio -

  5. Jn6IfmciWEsIA3lv
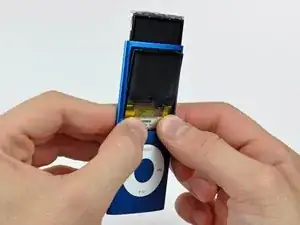
    • Schiebe das Display aus dem Nano heraus. Es lässt sich etwa 1,3 cm weit bewegen, bis es vom Displaydatenkabel gestoppt wird.

    • Belaste das sehr dünne Displaydatenkabel nicht unnötig..

    I have several problems in taking it out. I don't know if it is dued to the glue that the iPod has inside. Could you help me. Thanks

    Hector -

    instructions say 5" (inches) it really means 5mm

    pedalsandpicks -

    Zitat von pedalsandpicks:

    instructions say 5" (inches) it really means 5mm

    If you're gonna repair the way you read it will get you nowhere: the text reads .(as point)5 inch. Which is about 12mm.

    Frank veenis -

    The glass panel can be very difficult to get moving requiring a lot of downward force. I have found good old fashioned spit to be very useful here.Just lick both thumbs and rub on fingers until just sticky enough.

    This willl move the glass.

    Pete Green -

  6. gMG11SGblFtXEUok
    gMG11SGblFtXEUok
    2CFmT4oCbHvteNOL
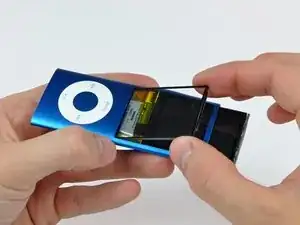
    • Wenn das Display soweit wie möglich herausgezogen ist, kannst du vorsichtig auf die Unterkante der Glasscheibe drücken, bis sie ein wenig hereinspringt. (ca 1 mm)

    • Schiebe die Glasscheibe mit den Daumen auf der Unterkante nach unten in das Gehäuse hinein, bis die Oberkante aus dem Gehäuse herausspringt.

    I found the adhesive (or fit) quite strong. Pushing on the bottom part of the glass created a small gap at the top, which I could fit a craft knife (xacto blade) into. This made it easier to carefully lever the glass out for me.

    aaaidan -

    I slipped and broke the LCD. So !#^&@@ off. What an absolute bastard of a job!

    lf -

    What is the "rear edge" of the nano? Can this be a bit clearer please? Maybe a video of this step would be a good idea. Then again, since Apple owns this site, I guess that's not gonna happen, is it?

    lf -

    I don't see "rear edge" anywhere in the instructions. I do see "lower edge" a few times and it looks pretty clear to me. I did this repair a couple years ago without much trouble.

    Rene Jeddore -

    You could do all these steps and really mess up your nano. Instead of disassembling the iPod, carefully remove the remnants of the old glass which I assumed you have cracked. With the new glass in hand CAREFULLY sand one edge of the glass evenly. I used my fine grinder on my dremel tool. After assuring a snug fit I removed the adhesive and installed the glass. Looks great and functional and I didn't ruin my iPod in the process. And when I said sand one edge I mean one of the edges that has a "lip" on it. The other lip you can slide right in and push gently down for a nice fit. Do not remove the adhesive until you are sure of a good fit. This is a quick fix for those who are too queezy to take apart their device.

    Jim -

    My battery had expanded and pushed out the glass enough for me to peel the glue out like a battery pull tab on a phone so it was pretty easy to remove, but the screen is giving me some trouble. The expanded battery is holding the screen to the frame making it more difficult to remove.

    Elijah -

    Absolut falsch beschrieben, die Anleitung ist

    Herbert -

    Grottenschlecht

    Herbert -

    Lieber Herbert,

    schade, dass dir die Anleitung bisher nicht geholfen hat. Stand heute haben bereits 35 andere Nutzer ihr Gerät damit erfolgreich repariert, deshalb wäre es gut zu wissen, was genau bei dir nicht geklappt hat und wo es hakt?

    Unsere Anleitungen werden nach dem Wikipedia-Prinzip geschrieben, das heißt du kannst auch selbst jederzeit noch zusätzliche Punkte hinzufügen oder Änderungen vornehmen, die besser beschreiben, was hilft, damit für diejenigen, die nach dir diese Reparatur versuchen, eine noch umfassendere Dokumentation zur Verfügung steht.

    Sandra Hiller -

  7. atKZj2BZZdmKDcVM
    • Hebe die Glasscheibe aus dem Nano.

    • Bevor du die Glasscheibe wieder einsetzt, musst du die Oberfläche des Displays und die Rückseite der Glasscheibe gut reinigen. Jeder Fingerabdruck und jedes Staubkorn ist sonst störend zu bemerken, wenn der Nano eingeschaltet ist.

  8. S3TnWbTehNQ2cBQd
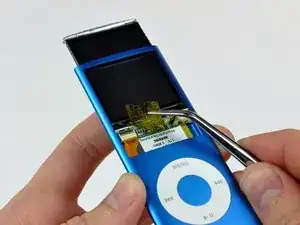
    • Trenne den Hold-Schiebeschalter mit der Kante eines iPod Öffnungswerkzeug aus der Klebeverbindung zur Oberkante des Displays.

    • Das Flachbandkabel zum Hold-Schiebeschalter ist sehr empfindlich und kann leicht beschädigt werden. Arbeite sehr sorgfältig!

    Be extremely careful while doing anything around the screen. The slightest bit of pressure in the wrong direction and you will be replacing the screen along with the battery. I speak from experience.

    Brian Campbell -

    I was extremely careful… and, I broke the display! ~ Gah! ~ $18 for a new one on Ebay (half the price if I wanna wait 3-4x as long to purchase from overseas, twice the price if I buy it from this site!) ~ What a bummer! ~ The goal was to fix this for a customer, and instead I created a longer wait & obviously have to pay for the screen I broke. LISTEN TO BRIAN! BE CAREFUL! THE SCREEN _WANTS_ YOU TO BREAK IT! DON’T FALL FOR IT!

    cybrosis catharsis -

    Does anyone know where I could get the power button flex cable replacement? I was too extremely careful but the screen has a very precise fit. I is fine when you push the screen into the case but !&&* of a work to pull it out.

    [deleted] -

  9. qQ1uRANSHxkdguvd
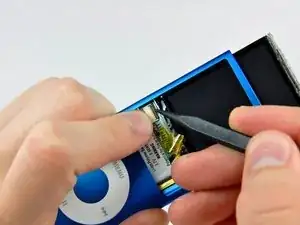
    • Ziehe das Kaptonband vom Sockel des Displaydatenkabels ab.

  10. YtE2AALyli1QwqyF
    • Halte den hellgefärbten Sockel mit einem Finger nach unten und kippe mit der Spudgerspitze den Sicherungsbügel am ZIF Verbinder nach oben in Richtung Unterkante des Nano.

    Continue to carefully hold the socket down while doing the next step. If the cable come off at the wrong angle it can pull the connector away from the board at the base of the screen.

    Brian Campbell -

  11. RRt2bIO1HNwokM1B
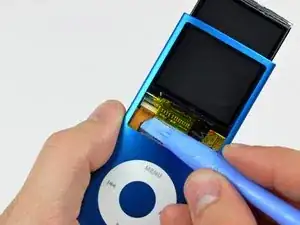
    • Löse das Displaydatenkabel mit einem iPod-Öffnungswerkzeug von der dünnen Metallplatte ab, die am Display angebracht ist.

    • Sei dabei vorsichtig und zerreiße nicht das Displaydatenkabel.

    Some of the ribbon is inside the white housing with the lock on, it needs to slide out of the housing. I didn't notice this because everything is so small - be sure not to slide your pry tool right through it.

    Martin Mccaffrey -

    The display can actually be pulled out slightly further than it initially seems. When you gently pull it up, you'll experience some resistance, which I initially thought indicated it was as far as it could go. But an extra bit of (still very gentle) force can pull it up a few more millimetres, which means the opening tool can fit.

    Also, it seemed to me to actually be helpful to lever the cable out of its port before removing the ribbon from the adhesive on the plate, since this allowed better access to the adhesive with the opening tool.

    aaaidan -

    As commenter Brian Campbell wrote on the previous step, it is important to hold down the white cable socket while carefully working the cable loose from the adhesive. Even a small amount of upward force on the display data cable while it is still inside the socket could be enough to tear the socket off the board. Try not to pry up - use a thin, new (undamaged) opening tool to get under the ribbon cable and keep it parallel and as close to the metal plate as possible. It needs to be worked *under* the data cable, not to pry, as the cable just slides straight out the bottom of the white socket.

    Barry L. Kramer -

  12. TGEl3oMXhFojrsDA
    • Ziehe das Display aus dem Nano heraus, achte dabei darauf, dass sich das Kabel zum Hold-Schiebeschalter nicht verfängt.

    • Passe beim Herausziehen des Displays aus dem Gehäuse auf, dass du nicht das Kabel zum Hold-Schiebeschalter beschädigst.

    WATCH THE HOLD SWITCH!! Be *sure* it is disconnected before pulling out the screen! (I've made that mistake too many times :P)

    iTronics Repair -

    disconnected from what?

    I never saw where it was connected to!

    Fred Rodolf -

    By "caught" do you mean glued to the case? Mine was, and I cant tell how I could possibly have removed the screen without it breaking. Luckily my Ipod was already broken, but now its even more broke because of this guide.

    swd311000 -

    Oops!!!…..I managed to break the little ribbon cable going to the hold switch…lots of very “colourful“ words aimed at myself are in my head now.

    Simon Kormendy -

  13. lngWrtN5cJcKLYHu
    lngWrtN5cJcKLYHu
    oWmTKkVZotdydYWc
    • Setze ein iPod-Öffnungswerkzeug zwischen der unteren Blende und dem Dock-Anschluss ein.

    • Trenne die untere Blende aus der Klebeverbindung zum Nano und lege sie zur Seite.

    Follow this picture exactly, inserting the tool in the dock port to pry off the bottom plastic piece-- if you pry on the edges you may bend or break this plastic piece.

    iTronics Repair -

  14. hdLhrLOIySxlmWP2
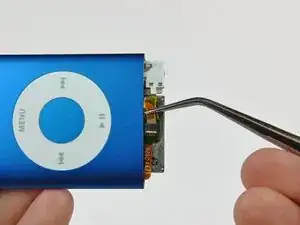
    • Entferne die drei Kreuzschlitzschrauben an der Unterseite des Nano.

    • Diese Schrauben sind sehr klein und ihr Kopf kann leicht ausschlagen.

    • Die etwas längere Schraube gehört in die Mitte.

    In my case, the screw on the left was impossible to remove, it looked like it was unscrewing but was not ... I could not proceed any further.

    Any advice?

    Gauthier Scavée -

    If a screw is stripped, you need to somehow get another under the head to apply pressure to unscrew it (while unscrewing it). It’s an unpleasant operation where you have to apply pressure to keep the screwdriver pressed into the head while prying outward so the threads back out. Try not to strip the head, and try not to strip the threads, while helping the threads to catch.

    If this happens, you’ll need to replace the screw. It’s not a good idea to reinstall a stripped screw.

    Barry L. Kramer -

    우선 하판을 들어내면 나사에 접착제가 있을거에요 핀셋같은걸로 충분히 제거하고나서 나사를 푸시는게좋을듯

    jongjun307 -

  15. RgVCNfHEsSMxtfP3
    RgVCNfHEsSMxtfP3
    VwjUXruSwe2TJgKq
    • Heble die Aluminiumblende um den Dockanschluss mit einem iPod-Öffnungswerkzeug vom iPod weg.

    • Diese Blende ist aus sehr dünnem Aluminium geformt. Um zu vermeiden, dass sie zerbricht, darfst du sie nicht zu sehr verbiegen.

    I found using the opening tool to wedge up (toward the case) from between the metal bit (which is a plate) and the dock socket was the easiest way to do this.

    aaaidan -

  16. LC2JJGLvI5B6cBIl
    LC2JJGLvI5B6cBIl
    EHXZOOSrqbWI1IaB
    sCZhFJqjvOTxGWGa
    • Löse den Akku mit dem flachen Ende eines Spudgers aus der Klebeverbindung zum äußeren Gehäuse.

    • Der Lithium Polymer Akku im iPod ist sehr flexibel. Verbiege ihn nicht zu stark , wenn du ihn vom äußeren Gehäuse trennst.

    • Schiebe die Logic Board Einheit und den Akku mit dem flachen Ende des Spudgers ein wenig aus dem unteren Teil des iPod Nanos heraus. Höre damit auf, wenn er etwas herausspringt.

  17. JmnEveiF1JZnfxuP
    • Löse das Flachbandkabel zum Klickrad und seinen ZIF Sockel mit der Kante eines iPod-Öffnungswerkzeugs vom Dockanschluss ab.

    No, don’t do step 17 without reading step 18 and 19 first! Step 17 is very misleading read on its own, you will break the connector. You need to read setps 17, 18 and 19 before starting step 17.

    John beGood -

    Pay heed to the word “peel”. Don’t pry. Work the tool slowly under the connector, keeping it as close to the board as possible. Don’t pry. The unit I repaired also had a small piece of Kapton tape, the corner of which can be lifted with tweezers.

    Barry L. Kramer -

    Looks like I may have broken the little ribbon cable for the click-wheel, so, I might have to call it quits and spend another Au$260.00 on a new iPod Nano.

    Simon Kormendy -

  18. s1IoGsqIpQPTAKqF
    s1IoGsqIpQPTAKqF
    KOLyubt1LLNVUsgQ
    • Kippe den Sicherungsbügel am ZIF Verbinder mit der Kante des iPod-Öffnungswerkzeugs hoch in Richtung der Kopfhörerbuchse.

    you might want to put a note for the delicacy of this cable on Step 16... because the cable can break as you slide the logic board assembly out :o(

    juliforsyth -

  19. yVpneelIPN1vydaQ
    • Schiebe das Flachbandkabel des Klickrads mit einer Pinzette aus seinem Sockel.

    • Bevor du fortfährst, musst du sicher sein, dass sowohl der Sockel des Flachbandkabels zum Klickrad als auch das Kabel nicht mehr am Dockanschluss und am Logic Board festkleben.

    • Löse das Kabel an beiden Enden ab!

    You forgot to mention that the click wheel ribbon cable needs to be detached from the adhesive holding it to the main board. Now my ipod is really broken. Please review your instructions to include all the steps!

    Mike -

    Zitat von Mike:

    You forgot to mention that the click wheel ribbon cable needs to be detached from the adhesive holding it to the main board. Now my iPod is really broken. Please review your instructions to include all the steps!

    Mine too, but the iPod was already toast :D, so now i have a stylish 8GB External SSD

    Chris Green -

    There has got to be a trick to it, or something I am missing when putting it back together. I can't get the click wheel ribbon to go back in properly. It keeps getting bunched up and sticking out the end. It is long enough to stick out so you can detach it from the other ribbon, so is it supposed to fold up inside when you push it in?

    reedc1 -

    Does anyone know of a source of mainboards for this Nano. Preferably in the European Community or China? Every other part seems to be available but this one.

    I've even found dud mainboards for sale on the U.S. Ebay site. What on earth would anyone do with a faulty Maiboard?

    Pete Green -

    TOOLS: I've ben reading a few commments regarding difficulty wth the screws. I was also told the Phillips screwdriver isn't a true Phillips but has an offset leg. Not having seen one I can't comment with any certainty.

    However,being an improvisor,I've been doing very well with a couple of watchmakers screwdrivers.The flat blades are about 1mm across and made of hard blued steel. The sharp corners dig into the screw and push any glue out of the way. A phillips won't push though glue. I used to buy these in a small plastic box - usuallly on street markets.

    Pete Green -

    Well... beware, this part is tricky ! the click-wheel ribbon stuck and get cut when pulling the battery+motherboard out. Too bad :(

    Anyway it was "last chance" for my 7-years old blue nano, battery wasn't providing more than 15 minutes autonomy.

    Too bad, it was my fist iPod and I liked it much than my new 7th gen'.

    Playoff -

    Your photos are showing the wrong cable being removed from the zip lock connector and freed, you are not showing that the cable coming from the click wheel is disconnected and freed. Your photo is showing that the cable from the logic board is disconnected and freed. This means that when the logic board is removed, the cable to the click wheel breaks. Your text and warnings are correct, but your photos are misleading. Very bad compared to the rest of the instructions in steps 1 - 16, which are excellent and better than anything else I found. A shame to spoil it with this step. It is not sufficient to warn in the text that “both ends of the cable need to be freed”, you have to add a photo showing the click wheel cable has been disconnected and freed (and what do you mean by both ends of the cable need to be freed - there are TWO cables, one to the logic board, one to the click wheel and you are showing the wrong cable to the logic board as being freed.

    John beGood -

  20. 5t2JLsoBbtqVAQ2k
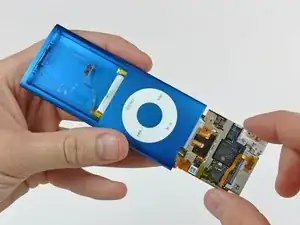
    • Ziehe die Logic Board Einheit aus dem äußeren Gehäuse heraus. Achte darauf, dass sich die Kabel des Hold-Schiebeschalters und des Klickrads nicht verfangen.

    • Sorge beim Zusammenbau dafür, dass das Kabel zum Klickrad auf der Vorderseite des Nanos ist und nicht in den Rillen auf den Seiten. Wenn es sich in einer der Rillen befindet, wirst du es wahrscheinlich beim Einschieben des Logic Boards durchtrennen.

    My click wheel cable got sliced reinserting the logic board, so make sure your click wheel cable is on the front (like the instructions say), and not on the side. It would help if there were explicit reassembly instructions and not just "do these in the reverse order", so that special reassembly notes stand out more.

    Randall Theobald -

    Instead of pulling it out, I found it easier to use the display hole to push on the top part of the battery straight down toward the bottom of the unit. This gives you far greater control of the battery/mainboard removal operation; you can push it out (down) in tiny increments and confirm no cables are caught as you do it. Pulling can cause a sudden, catastrophic release and if something is caught, it’s destroyed.

    Barry L. Kramer -

    Das Problem ist, das sich der alte Akku aufbläht wenn er kaputt geht bzw. sehr alt ist und das Gerät so gut wie nicht zu zerlegen ist. Bei mir ging das Display und das Kabel des HOLD Schiebers kaputt weil alles so dicht gepackt war. Empfehle den Ärger niemanden bzw. vor der Akku Bestellung zu überprüfen, ob sich der Ipod prinzipiell zerlegen lässt.

    G911CX -

    Ein einziger Mist diese Anleitung es wird nicht hingewiesen dass man den Ipod Weg werfen kann wenn der Akku aufgebläht ist was meistens der Fall ist.

    Herbert -

    Bei einem aufgeblähten Akku muss man tatsächlich sehr vorsichtig sein. Ob das immer gleich heißen muss, dass man das Gerät wegwerfen muss, wage ich zu bezweifeln, ich würde zunächst einmal schauen, welche anderen Teile eventuell in Mitleidenschaft gezogen worden sind und ob die ebenfalls austauschbar sind. Falls du dich wirklich gezwungen siehst, das Gerät wegwerfen zu müssen, haben wir hier einige relevante Informationen zum Recycling von Elektroschrott zusammengestellt: How to Recycle End-of-Life Electronics.

    Sandra Hiller -

  21. aYEkJMoFp4RT1nt2
    aYEkJMoFp4RT1nt2
    rWX1ORiissX2SwBe
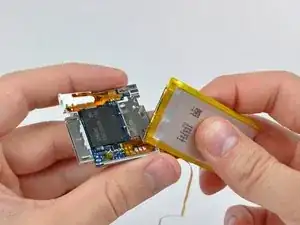
    • Ziehe das Kabel zum Hold-Schiebeschalter von der Kante des Akkus ab und lege es zur Seite. Das Kabel ist nicht am Akku befestigt.

    • Der Akku ist fest mit dem Logic Board verklebt. Du brauchst schon etwas Kraft, um den Akku vom Logic Board zu trennen.

    • Heble den Akku aus der Klebeverbindung zur Metallumfassung auf dem Logic Board.

    Achtung! Metallfassung NICHT von der Platine herunterschieben! Die Metallfassung ist beweglich und es kann das 2-polige Flachkabel welches genau gegeüber der 3 Akkukontakte ist durchreißen !!!

    Bild 21/ 2 und Bild 22 sehr gut erkennbar

    René Herwig -

  22. FmBGl5iyPMPlBbvN
    FmBGl5iyPMPlBbvN
    enRsZHZiWydwriRL
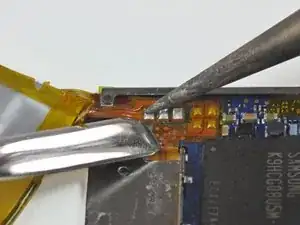
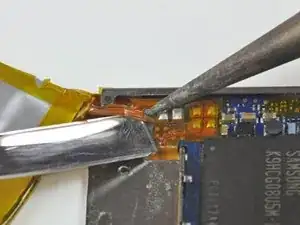
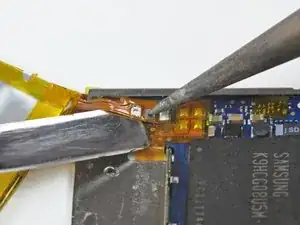
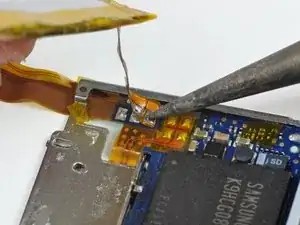
    • Der Akku am iPod Nano 4. Generation ist mit Lötpads, die kleine Löcher haben, an der Oberfläche des Logic Boards angeschlossen. Die Löcher gehen durch das Flachbandkabel zum Akku und stellen den Kontakt zu kleinen Lötaugen her. In diesem Schritt wirst du jede einzelne Verbindung entlöten und mit einem Metallspatel vom Logic Board ablösen.

    • Überbrücke dabei nicht mit dem Spudger die Kontaktstellen auf dem Logic Board und am Flachbandkabel. Ein Kurzschluss kann das Logic Board dauerhaft beschädigen.

    • Überhitze weder das Board noch das Kabel. Halte die Lötspitze nur so lange an die Lötstelle, bis das Lötzinn schmilzt. Zu viel Hitze kann das Logic Board zerstören oder das Kabel schmelzen. Lasse das Board abkühlen, bevor du an der nächsten Lötstelle weiterarbeitest.

    • Beginne die Arbeit an einer Seite des Flachbandkabels zum Akku. In diesem Fall wurde auf der linken Seite begonnen. Erwärme die Lötstelle ganz links und heble vorsichtig unter dem Kabel hoch, um es vom Logic Board zu lösen.

    i would suggest instead of using a spudger to push up the battery solding points, instead hold onto the battery and use a slight amount of pressure to pull each point off as you heat them with the soldering gun.

    iTronics Repair -

    Zitat von iTronics Repair:

    i would suggest instead of using a spudger to push up the battery solding points, instead hold onto the battery and use a slight amount of pressure to pull each point off as you heat them with the soldering gun.

    I did it this way and lifted the center trace off the board. Now the logic board will need to be replaced.

    Tom Buttner -

    THIS WAY COULD BE BETTER!

    In the course of soldering on the new battery, I bridged a couple of the tiny pads. In my attempt to fix, I delaminated the tiny pads from the new battery's lead. So I reattached the old battery's circuit and leads, and then soldered the new battery (cut from its board) to the old battery circuit.

    To do this, simply remove the tape from the end of the battery, unfold the leads, and unsolder the two pads that connect the battery to its board. Do the same with the new battery, and then solder the two leads from the new battery to the old board.

    I believe this is an easier way of fixing (assuming the battery is dead, and the circuit attached to the battery is fine, as mine was. My wife dropped the ipod in water).

    Bradley Borch -

    When desoldering, you should REALLY be using braid instead of just "pulling up". That makes it 100x easier.

    Drew Jensen -

    I used scissors to very quickly cut the ribbon cable off close to the battery so it’s not in the way. Work under a microscope if you have one — I taped the logic board down with black electrical tape so it stays centered in the field and is easier to work with. Note that there is adhesive on this cable (at the top in the above photo) which should be carefully pried loose before desoldering. I used tweezers to grip the ribbon cable, one terminal at a time while heating with the soldering tip. Without the battery hanging there, you have a good feel for how much pressure is being applied. It was very clear when it was melted loose (comes off with no resistance and no prying, which leaves the pads intact) because there’s no heavy battery hanging on in the way nor adhesive working against you. This also avoids the possibility of shorts electrically damaging the logic board.

    Barry L. Kramer -

    I forgot to add, my soldering station was set to 590 degrees Fahrenheit, for both desoldering and resoldering the new battery. I taped down the new battery cable with a very small triangle of tape prior to soldering — align it; tape it in place, put a little solder on your tip and just touch. It melts right through the hole, and bonds. Then remove the tape and solder the other two terminals (then I also remelted the first one). I would not want to do this job without a 1X-3X microscope! Always let the board cool completely between terminals as the guide suggests. There is a reason surface mount work is almost exclusively done by machines or with hot air and skilled technicians.

    Don’t apply any upward force to a SMT pad, ever! If it doesn’t release on 1st attempt, don’t continue heating. Let it cool and try again in 10 minutes. Most components and pads are rated for only 5 seconds of melt temp. (and very little force). Cut off the dead battery and detach adhesive so you can feel what you’re doing.

    Barry L. Kramer -

    well i was doing this step and flung soulder in my face. so yeah wonderfull.

    Ivan -

    MY METHOD:

    I used a friend at this point. I heated up one pad, and she would lift it up with tweezers so the cable wouldn’t reattach. Did it like this one by one in a row. No spudgers were used, I don’t think it’s necessary and it might even increase the risk of damaging the pad or shorting them.

    I initially thought that I’d use soldering braid to collect away the melted stuff, but there’s so little of it or my braid wasn’t the right size, I just couldn’t get it to do anything.

    I used the cheapest Hakko soldering station, which has a digital display for controlling the temperature precisely. Default tip. At first I didn’t get it to melt, but I increased the temperature carefully only until it did. I started with 300°C which has worked fine with leaded solder, but I had to increase it until 480°C to get this to melt. Let the soldering iron tip touch the pad slightly horizontally rather than vertically, so it gets more contact area. Use flux pen or similar when resoldering.

    Riku -

    !!!DO NOT PULL ON THE CONNECTOR BEFORE DESOLDERING!!!

    I have once ruined a device by doing this, it rips the pads clean off

    Dawid K -

  23. VdeVhyEdZHBJtTLM
    VdeVhyEdZHBJtTLM
    quHYkVlcWdUJLRWq
    • Wiederhole den vorherigen Schritt für die beiden übrigen Lötstellen. Arbeite entweder von links nach rechts, oder von rechts nach links.

    • Jetzt sollte der Akku frei vom Logic Board sein.

    • Hebe den alten Akku aus dem Nano und lege ihn beiseite.

    Me too lifted the center pad off the board :( :( :(

    Can the center pad of the battery be wired to a point wich is connected to center pad?

    I mean, does anybody know where to wire center battery pad when logic board's center pad is lifted?

    perepe -

    Same here, if anyone ever found where to connect the center wire if the pad came loose, please let us know.

    Mathias Claeys -

Abschluss

Um dein Gerät wieder zusammenzusetzen, folge den Schritten vorsichtig in umgekehrter Reihenfolge, ohne dabei deinen iPod zu beschädigen.

Walter Galan

685540 Reputation

34 Kommentare

There is one small point which is worth a mention here.After disconnnecting the screen by flicking up a little black bit on the ZIF Connector, I went on to open the next ZiF (The Click Switch)

Yes- bits of ZIF connector everywhere.I actually had to examine a new Click Switch circuit carefully to find that this one is different.

Yes - you flick the White bit. Do apple do this just to keep us on our toes?

Pete Green -

I have taken the nano apart and started to use a solder iron to remove the old battery. I must have pulled on the battery before fully melting the solder and have pulled off two of the three tabs from the board.

Can this be fixed?

Vicente -

I tried what Bradley suggested because it really seems easier than to solder the new battery to the iPod circuit board, which is really tiny. Still I couldn't do it. The battery pads are very fragile and I had an hard time folding the leads and the battery circuit board so that it looked the way it originally was. This was the part where I failed because afterwards I wasn't able to insert the battery plus the iPod circuit board inside its case again and ended it breaking it.

ruigsantos -

When I soldered my battery in I first touched the top and bottom of the pads on the new battery with flux and then added a little solder to the top and bottom of the pads. When I put the pads in place I only had to apply a quick touch and it soldered on perfectly.

Overall it was a real pain! :)

Rene Jeddore -

After 3 hours of hard work I did it !

It's the first time I try such a job, and I found it "quite easy" to change the battery with the guide. Just follow the pictures and you'll be done.

The hard work for me was the solder part - and a friend of mine gave me a hand as he was more used to do this.

You can do it, it worth a try :)

maxdelamure -

He forgot step one where it says "Go on Amazon and purchase a new Ipod."

haaren -

Was able to do it, but got lucky with the soldering working out before I burned it beyond repair. If you're going to do this I recommend getting the toolkit! Or at least having an exacto knife, very tiny phillips screwdriver, and tweezers and PATIENCE. Also be sure to have a very sharp tip soldering iron, and I used .032 soldering wire - but a bit smaller would work too. Also the most important thing is be able to see very small close up details, or use reading glasses or a microscope. Honestly if I had to do it again, I wouldn't - but I love the scroll wheel on the 4th gen over the touch screens and also wanted a challenge. Be prepared to fail, but do your best! Good luck.

baranowskijoe -

Awesome directions.

williamauld1964 -

I have soldered for almost 20 years, for occasional hobby stuff. I'm nowhere near an expert (some people are amazing!), but I am quite experienced. I have a good power soldering iron with interchangeable tips. I've also repaired countless phones, ipods, computers, etc. But this stupid thing kicked my butt. I hate dealing with such tiny components, and I hate dealing with Apple's fear of exposed fasteners.

Just buy a new one at this point.

Jon Miller -

Great instructions. Very easy job to complete if you work carefully and follow each step. Pictures were a big help. If you are not experienced with a soldering iron, I recommend getting help with this part. It is very easy to overheat these tiny components and make a mess of the whole job. Comments above seem to reinforce this point.

chuckjohnson89 -

Hello Chuck. I have a blue iPod Nano 4th Generation in perfect condition that needs a battery swap. I don’t have time to set aside to swap it yet don’t want to see it in a landfill. If you shoot me your address I’d be happy to send you this unit for you to keep if you don’t mind doing another battery swap. Kind Regards.

Dan Lee -

Is there anywhere Uk I can send this to be done by someone more expert ? I don;t want to tackle it myself. My son picked it up in a charity shop and it worked for a bit, but then died, defiantly the battery problem.

derekndonna -

Everything went perfectly, but when I inserted the display cable there was a beep, and after finishing the assembly it never came to life. I’m not sure what went wrong. I was very careful not to bridge the solder pads, and to keep the board as cool as possible. I thought maybe it was a display issue, but it doesn’t appear when I plug it in to a computer either. Sigh.

Brad Richards -

My battery must’ve been in water because there is corrosion under the battery, so it doesn’t hold a charge anymore, also the clickwheel died while i was removing it, im suspecting this water had a lot to deliver, yet it still worked whilst plugged in

Joshua Turnbull -

What to do if the upper metal base (which is fixed to the circuit with 2 screws) came off when extracted?

Which side can I anchor to force the display to exit?

Francesco Taliercio -

From my experience - this is a very hard fix to execute. The guide is good, but you’ll need a good amount of patience and skill to pull it off. Thanks iFixIt!

Jed Leslie -

If your battery is puffed up, don't bother and just bin it. I've spent 4 hours now trying to get it out and I've just snapped the metal piece on the top and the screen assembly refuses to get out.

Pierce Menze -

I’m having the same issue now. I feel ya.

Era -

Really wish there was a guide for a swollen battery, the number one battery issue with this model. Can not get the inner case out whatsoever.

Era -

First of all. I really respect the guys who finished alone. I've got a few questions.

1. It could be a stupid question. should i really need soldering iron?

2. I don't know if it's worth buying a new one because of this ten-year-old thing that doesn't have one at home.

3. Is there an explanation not in the text? Please let me know if there's anything else I need to be careful about.

jongjun307 -

1. Yes.

2. That’s entirely up to you. I’ve found that a cheap supermarket iron can do more damage than good because you don’t know how hot it is and the quality is bad. I rarely solder, but I’ve been happy with Hakko FX-888D. You need to practice soldering on something else first, you need to learn the basic soldering techniques (no, you don’t melt the solder as if it were candle wax!), and you will need to learn how to take care of and store the soldering iron correctly when it’s not in use. Leaded solder is far easier to work with than lead-free solder. Besides the tool itself, you’d ideally have flux in some form, some means of removing solder, and the appropriate stuff for cleaning and refreshing the tip. Any neglect will lead to frustration and the solder just not behaving as you’d expect. I also found an ammonium chloride block to help a lot when solder doesn’t stick to the tip.

3. We’re all in the same boat. Read all the comments for the extra remarks that people following this guide have made.

Riku -

Superb instructions, thank you, but a fail for me due to the swollen old battery. It crushed everything so tightly into the casing that it was impossible to remove the display or motherboard without damage. They may as well have been set in there with araldite. Try it, but hold off ordering a new battery until after it’s stripped, is my advice.

stevep02 -

Okay, so I broke the ribbon wires going to the hold switch and the click-wheel….my own fault…., I’m going to have to call it quits on replacing the battery in my 2009 iPod Nano 4th Gen, and just buy a brand new one….Thanks Apple for making a really difficult to repair device.

Simon Kormendy -

I think you can get at least a replacement assembly for both. If yuo are willing to spend that money, maybe you are better going to buy an android phone and use it as player.

Daniele Carminati -

My hold switch cable snapped too, it’s so %#*@ tiny. I don’t know if it matters that I left the hold switch to off position before I started, but now that it’s snapped, after the battery change the iPod has come alive and the buttons work despite of the snapped hold switch. Now it just can’t be locked, but that’s okay.

With the click wheel, I’m afraid you’ll have to hunt down a new one. That part might just be available somewhere.

Riku -

Thanks for the excellent guide, I couldn’t have done it without you! This was definitely the most difficult repair I have attempted so far, mainly because everything is so small and tightly fitted into the case. The most time consuming part was actually fitting the logic board back into the case; the click wheel cable kept getting dragged into the case as I moved the logic board in. I had to keep bringing it out again to ensure it wasn’t going to get broken, and it did NOT slide in smoothly! You need a LOT of patience! But I got there in the end and now have a fully working 4th gen again! Rene’s tip above about using flux on the solder pads really does make the soldering part very easy if you are carful about it, so thanks for that. I would agree with the difficulty rating, this is not easy and certainly not for a novice repairer, but if you have the patience and go gently it can be done.

Nigel Henry -

Hallo Fellows,

I tired to manage the tutorial, unfortuneatly i ripped of my power connector cable. I thinking about to shorten it and remove the function of button. Is there an option that the ipod powers down if no music is played, in a way that the button is not required to use? Could anybody have a try what it is doing? best regards and thank you

Zaremia Draigtmoore -

Hello,

I need a battery for Ipod Nano 4Gen!

Does any one know here can i buy a replacement battery for it ?

I am in advance very grateful for the attention and information that someone can provide me!

Kind Regards,

gogomes

Pedro Gomes -

Excellent but a bit unfinished guide. I'll tell my experience in this comment and put questions in another due to the char limit.

The story so far:

The battery wasn’t fully swollen but occasionally I had noticed a small black area appear to the screen, meaning that it’s now or never if I want to save it. Before starting, I had set the key lock button to off position just in case. It took me literally days to get the contents out from the iPod, but I kept trying. The most frustrating thing ever. In the middle of this I taped the lock ribbon onto something in order to keep it out of the way, but forgot to free it up, and it snapped. I have now successfully soldered a new battery onto it (got it from a shop that specializes in batteries, try searching with P11G73-01-S01; Do use a flux pen!) Without putting the cover back on, I connected the clickwheel and display cables, and put the iPod on charger. Turns out that it comes to life normally, and the clickwheel works! No more key lock but I can live with that.

Riku -

Comment 2/2, the issues:

Now that the battery has been soldered, the problem is putting it back together. With most iFixit guides, you can just retrace your steps in the reverse order. But this is more complicated than that. It’s hard to remember how exactly you removed tapes and adhesives, and from where. The battery with its soldered on ribbon cable laid out is a bit too long to fit into the case, so I think something must’ve been folded up, but how? Something in the battery “root” was taped and folded up really tight, but I can’t imagine how it was. Youtube videos don’t help either, because some have batteries that connect to a different place with two places to solder, while others only show a teardown without reassembly. If we need to use adhesives, where should they be applied, and what kind of adhesive would be appropriate so it doesn’t damage the battery bag surface? And optional: what adhesive would be ideal at the top+btm, should we want to retain the ability to change batteries in the future too?

Riku -

Addition: I felt that I needed a pair of extra hands for desoldering the battery, and attaching the new one. I wouldn’t have had enough hands on my own to carefully peel the ribbon cable away while melting the solder, and to keep it in the right angle when soldering the new one. The actual circuit board was gently held stationery by a small and cheap jewelry vise, the kind that’s designed to hold things such as small round rocks, and the touching parts are covered in plastic instead of raw metal touching the object.

Before soldering the new one, I applied flux pen on both sides of the ribbon connector because I was skeptical of whether the solder would genuinely just fall through the hole and between the ribbon and the circuit board itself. This seemed to work. I used leaded solder because lead-free solder has a higher melting point so unless you’re very experienced, it has a higher tendency to make cold joints that look good but aren’t actually good inside. Too much heat for too long can also damage parts.

Riku -

3.5 Hours - and it works. Many thanks to the author. Without these instructions it is impossible. While reassembling, the clicwheel cable didn't slip in well, then I removed the logic board again, but the battery already was sticked to the case an tore out the metal frame of the logic board and killed the cable to the speaker connector. But I can live without it.

It was a real challenge, but also fun to be able to repair a device that was not designed to be repairable.

Matthias -

Welp I was successful in changing the battery on mine but I tore my hold switch's ribbon and in the process I also believe I fried the logic board. It was working before reassembly! Sadly not after...

Dimondminer11 -