Einleitung

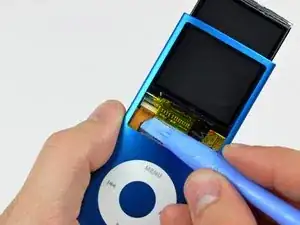
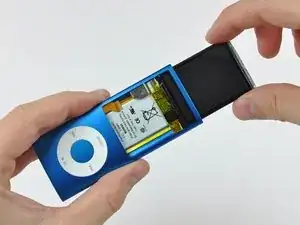
Hier wird der Austausch des Displays gezeigt.

  1. PPRBVTSUNkPCZOVi
    PPRBVTSUNkPCZOVi
    KmP4kCJDMgCEWKlu
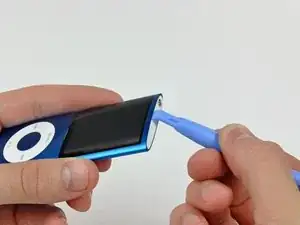
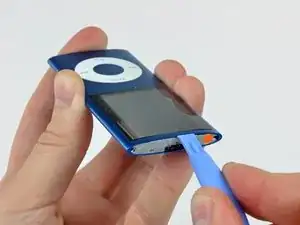
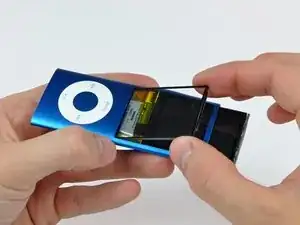
    • Setze die Kante eines iPod Öffnungswerkzeugs in den Spalt zwischen äußerem Gehäuse und der oberen Blende ein.

    • Hebele die obere Blende aus der Klebeverbindung zur Displayhalterung heraus.

    • An diesem Punkt ist der Hold-Schiebeschalter lose und kann herausfallen. Achte darauf, ihn nicht zu verlieren..

    Be sure to use the smaller iPod opening tool and press it in FIRMLY in order to get enough leverage to get under the bezel and pry it off. Adhesive is very strong, so don't be afraid to use a little bit of force.

    captcarl13 -

    Tool broke before I could get the cover off !!! So I’m done before I even started !!

    linda45p -

    I have a Apple iPod Nano 4th gen(Green) and I only have 7 tech pieces to the iPod and I may/might have the small philips screws and I am not sure how to fix the iPod nano

    Nick Davies -

    I also had Problems to remove the bezel. The solution was to start with a very small screw driver from the hole of the switch. There I could lift it a bit and get the plastic tool in between. Than it was easy.

    Michal Niewiadomski -

    After replacing the battery, the old glue would lump up too thick, and also become too weak to fix the panel back to the outer case. I have scraped all the old glue off using a small flat head screw driver, and affixed a double sided adhesive tape cut into small strips, which was successful in both aspects.

    diytradjazz -

    TIP: Use a plastic tool and pull it out through the hold switch. This may break the top bezel, but this was the only way to get it off.

    Caleb Murphy -

  2. P3MabKnUxfTTFoZA
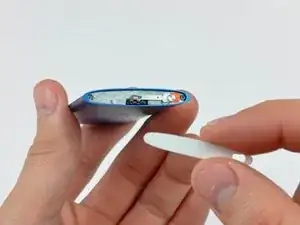
    • Entferne den Hold-Schiebeschalter von der Oberseite des Nano.

  3. WkZkbeQLoEnD2uPb
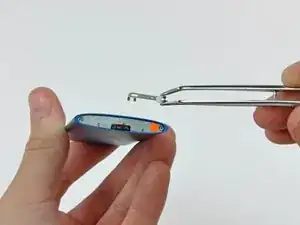
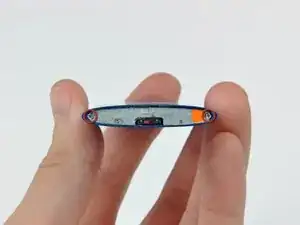
    • Entferne die beiden abgewinkelten Kreuzschlitzschrauben in den beiden Ecken der Displayhalterung.

    • Diese Schrauben sind sehr klein und ihre Köpfe können leicht ausschlagen.

    Be sure to use a good phillips #00 screwdriver here, or you run the risk of stripping the very small screws.

    iTronics Repair -

    The screws were covered with the adhesive. They were very difficult to remove.

    I RUINED the hold switch! I accidentally broke the cord. 0_o The directions were kind of unclear.

    bodieg -

    Zitat von bodieg:

    The screws were covered with the adhesive. They were very difficult to remove.

    I RUINED the hold switch! I accidentally broke the cord. 0_o The directions were kind of unclear.

    Step 12 is misleading as it does not show to remove the screen from the metal frame.

    bodieg -

    Sorry guys, but the explanations are really bad. Go onto youtube and watch it. This site misses heaps of steps. I just broke my iPod :(

    S Mile -

    Like others have noted, screws are covered in adhesive and difficult to remove. Take extreme care to not strip the heads. I'd suggest using a very small flathead to scrape some of the adhesive off before attempting to remove the screws.

    captcarl13 -

    a 1mm slotted screwdriver will work in a pinch, but be carefull and make sure you get the angle just right

    andrew -

    The tools list doesn't say you need an iPod opener to, nor does the parts list day you'll need a new click wheel, though this is called ”...click wheel REPLACEMENT​”. I don't get the feeling these are very trustworthy instructions, ESPECIALLY after having read other comments. I'd say BEWARE, and look at a variety of resources to get a much more comprehensive picture.

    Skyfire -

    Actually, the screws are not aligned with the edges of the iPod, which means that you must not try to unscrew them vertically. If you do there is a good chance that you damage the head of the screws. Thus look carefully with a torch to see at what angle you have to unscrew them.

    Fabrice Sarelli -

    Actually, the screws are not aligned with the edges of the iPod. That means that if you try to unscrew them vertically, there is a good chance that you damage the head of the screws. Thus, look carefully with a torch to see exactly at what angle you need to unscrew them safelly.

    Fabrice Sarelli -

    Everything was good up to this point. I could barely see the screws and ended up stripping them. Just gave up at this point and threw the

    Ipod on the ground and stomped on it.

    gonzalo gonzalez -

    I agree with several other contributors here, that a properly sized flat screwdriver *that is not worn* held at the correct angle is a better option than a phillips because the screw head is filled in with adhesive tape. BEWARE: The screws on the top and bottom outer edges are not parallel to the case. They are offset by 25 or 30 degrees, with the tips of the screws pointing out towards the outer edge of the case with respect to where the heads are. Use something to get magnification so you can really see how your screwdriver fits, and whether it’s engaged. An undamaged and properly sized standard screwdriver held in the appropriate orientation will readily remove the top and bottom side screws without stripping and with very little force. Feel for engagement — press the screwdriver in just enough to get past the adhesive. Not much torque or pressure is required — just a good fit. You must have the right tools to do this job successfully, and look under high magnification. Align your screwdriver!

    Barry L. Kramer -

    In accordance with another source, I have bought online and used a Phillips #0000 screw driver, which worked pretty well here. It costed me only $2 .

    diytradjazz -

    Screws are inserted under an angle. Would suggest to use a jeweler’s magnifying glass to check the angle before sticking any screw driver in there.

    aramis -

  4. wowAESYW5MIgBHGa
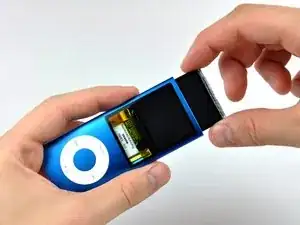
    • Setze ein iPod Öffnungswerkzeug zwischen dem äußeren Gehäuse und der Displayhalterung ein.

    • Schiebe die Displayeinheit mit dem Werkzeug etwas aus dem Gehäuse heraus.

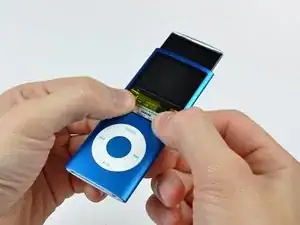
    • Drehe die Displayhalterung nicht um die Oberkante des Displays, da sie an einer dünnen Klammer aus Stahl befestigt ist, die leicht brechen kann.

    • Entferne die Displayhalterung nicht mit Gewalt, das Kabel zum Hold-Schalter kann leicht zerreißen.

    I found I had to gently pry the retainer open with a craft knife (xacto knife?) as the plastic opener tool was too blunt or soft to get any purchase...

    aaaidan -

    My nano had a "swollen" battery which wedged the LCD between battery and front glass. As a result, this step didn't work, I couldn't pull out the TFT and botched case, TFT and TFT frame until it came out. Telltale sign was a display that looked like there is a water between glass and LCD. The other nanos I've opened didnt have this problem and came out effortlessly, so if yours is stuck, don't feel bad, there's not much you can do!

    oliver -

    What to do if the upper metal base (which is fixed to the circuit with 2 screws) came off when extracted?

    Which side can I anchor to force the display to exit?

    Francesco Taliercio -

  5. Jn6IfmciWEsIA3lv
    • Schiebe das Display aus dem Nano heraus. Es lässt sich etwa 1,3 cm weit bewegen, bis es vom Displaydatenkabel gestoppt wird.

    • Belaste das sehr dünne Displaydatenkabel nicht unnötig..

    I have several problems in taking it out. I don't know if it is dued to the glue that the iPod has inside. Could you help me. Thanks

    Hector -

    instructions say 5" (inches) it really means 5mm

    pedalsandpicks -

    Zitat von pedalsandpicks:

    instructions say 5" (inches) it really means 5mm

    If you're gonna repair the way you read it will get you nowhere: the text reads .(as point)5 inch. Which is about 12mm.

    Frank veenis -

    The glass panel can be very difficult to get moving requiring a lot of downward force. I have found good old fashioned spit to be very useful here.Just lick both thumbs and rub on fingers until just sticky enough.

    This willl move the glass.

    Pete Green -

  6. gMG11SGblFtXEUok
    gMG11SGblFtXEUok
    2CFmT4oCbHvteNOL
    • Wenn das Display soweit wie möglich herausgezogen ist, kannst du vorsichtig auf die Unterkante der Glasscheibe drücken, bis sie ein wenig hereinspringt. (ca 1 mm)

    • Schiebe die Glasscheibe mit den Daumen auf der Unterkante nach unten in das Gehäuse hinein, bis die Oberkante aus dem Gehäuse herausspringt.

    I found the adhesive (or fit) quite strong. Pushing on the bottom part of the glass created a small gap at the top, which I could fit a craft knife (xacto blade) into. This made it easier to carefully lever the glass out for me.

    aaaidan -

    I slipped and broke the LCD. So !#^&@@ off. What an absolute bastard of a job!

    lf -

    What is the "rear edge" of the nano? Can this be a bit clearer please? Maybe a video of this step would be a good idea. Then again, since Apple owns this site, I guess that's not gonna happen, is it?

    lf -

    I don't see "rear edge" anywhere in the instructions. I do see "lower edge" a few times and it looks pretty clear to me. I did this repair a couple years ago without much trouble.

    Rene Jeddore -

    You could do all these steps and really mess up your nano. Instead of disassembling the iPod, carefully remove the remnants of the old glass which I assumed you have cracked. With the new glass in hand CAREFULLY sand one edge of the glass evenly. I used my fine grinder on my dremel tool. After assuring a snug fit I removed the adhesive and installed the glass. Looks great and functional and I didn't ruin my iPod in the process. And when I said sand one edge I mean one of the edges that has a "lip" on it. The other lip you can slide right in and push gently down for a nice fit. Do not remove the adhesive until you are sure of a good fit. This is a quick fix for those who are too queezy to take apart their device.

    Jim -

    My battery had expanded and pushed out the glass enough for me to peel the glue out like a battery pull tab on a phone so it was pretty easy to remove, but the screen is giving me some trouble. The expanded battery is holding the screen to the frame making it more difficult to remove.

    Elijah -

    Absolut falsch beschrieben, die Anleitung ist

    Herbert -

    Grottenschlecht

    Herbert -

    Lieber Herbert,

    schade, dass dir die Anleitung bisher nicht geholfen hat. Stand heute haben bereits 35 andere Nutzer ihr Gerät damit erfolgreich repariert, deshalb wäre es gut zu wissen, was genau bei dir nicht geklappt hat und wo es hakt?

    Unsere Anleitungen werden nach dem Wikipedia-Prinzip geschrieben, das heißt du kannst auch selbst jederzeit noch zusätzliche Punkte hinzufügen oder Änderungen vornehmen, die besser beschreiben, was hilft, damit für diejenigen, die nach dir diese Reparatur versuchen, eine noch umfassendere Dokumentation zur Verfügung steht.

    Sandra Hiller -

  7. atKZj2BZZdmKDcVM
    • Hebe die Glasscheibe aus dem Nano.

    • Bevor du die Glasscheibe wieder einsetzt, musst du die Oberfläche des Displays und die Rückseite der Glasscheibe gut reinigen. Jeder Fingerabdruck und jedes Staubkorn ist sonst störend zu bemerken, wenn der Nano eingeschaltet ist.

  8. S3TnWbTehNQ2cBQd
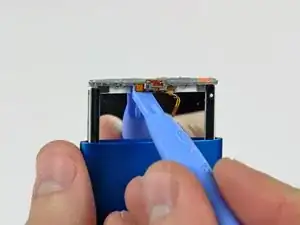
    • Trenne den Hold-Schiebeschalter mit der Kante eines iPod Öffnungswerkzeug aus der Klebeverbindung zur Oberkante des Displays.

    • Das Flachbandkabel zum Hold-Schiebeschalter ist sehr empfindlich und kann leicht beschädigt werden. Arbeite sehr sorgfältig!

    Be extremely careful while doing anything around the screen. The slightest bit of pressure in the wrong direction and you will be replacing the screen along with the battery. I speak from experience.

    Brian Campbell -

    I was extremely careful… and, I broke the display! ~ Gah! ~ $18 for a new one on Ebay (half the price if I wanna wait 3-4x as long to purchase from overseas, twice the price if I buy it from this site!) ~ What a bummer! ~ The goal was to fix this for a customer, and instead I created a longer wait & obviously have to pay for the screen I broke. LISTEN TO BRIAN! BE CAREFUL! THE SCREEN _WANTS_ YOU TO BREAK IT! DON’T FALL FOR IT!

    cybrosis catharsis -

    Does anyone know where I could get the power button flex cable replacement? I was too extremely careful but the screen has a very precise fit. I is fine when you push the screen into the case but !&&* of a work to pull it out.

    [deleted] -

  9. qQ1uRANSHxkdguvd
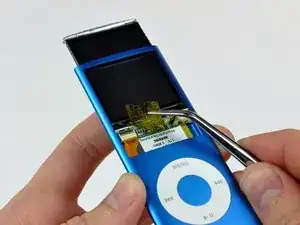
    • Ziehe das Kaptonband vom Sockel des Displaydatenkabels ab.

  10. YtE2AALyli1QwqyF
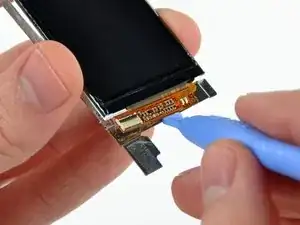
    • Halte den hellgefärbten Sockel mit einem Finger nach unten und kippe mit der Spudgerspitze den Sicherungsbügel am ZIF Verbinder nach oben in Richtung Unterkante des Nano.

    Continue to carefully hold the socket down while doing the next step. If the cable come off at the wrong angle it can pull the connector away from the board at the base of the screen.

    Brian Campbell -

  11. RRt2bIO1HNwokM1B
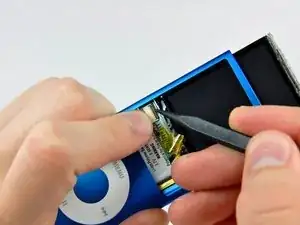
    • Löse das Displaydatenkabel mit einem iPod-Öffnungswerkzeug von der dünnen Metallplatte ab, die am Display angebracht ist.

    • Sei dabei vorsichtig und zerreiße nicht das Displaydatenkabel.

    Some of the ribbon is inside the white housing with the lock on, it needs to slide out of the housing. I didn't notice this because everything is so small - be sure not to slide your pry tool right through it.

    Martin Mccaffrey -

    The display can actually be pulled out slightly further than it initially seems. When you gently pull it up, you'll experience some resistance, which I initially thought indicated it was as far as it could go. But an extra bit of (still very gentle) force can pull it up a few more millimetres, which means the opening tool can fit.

    Also, it seemed to me to actually be helpful to lever the cable out of its port before removing the ribbon from the adhesive on the plate, since this allowed better access to the adhesive with the opening tool.

    aaaidan -

    As commenter Brian Campbell wrote on the previous step, it is important to hold down the white cable socket while carefully working the cable loose from the adhesive. Even a small amount of upward force on the display data cable while it is still inside the socket could be enough to tear the socket off the board. Try not to pry up - use a thin, new (undamaged) opening tool to get under the ribbon cable and keep it parallel and as close to the metal plate as possible. It needs to be worked *under* the data cable, not to pry, as the cable just slides straight out the bottom of the white socket.

    Barry L. Kramer -

  12. TGEl3oMXhFojrsDA
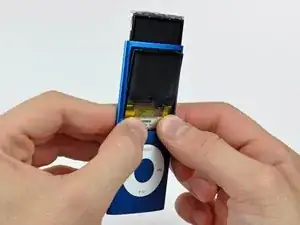
    • Ziehe das Display aus dem Nano heraus, achte dabei darauf, dass sich das Kabel zum Hold-Schiebeschalter nicht verfängt.

    • Passe beim Herausziehen des Displays aus dem Gehäuse auf, dass du nicht das Kabel zum Hold-Schiebeschalter beschädigst.

    WATCH THE HOLD SWITCH!! Be *sure* it is disconnected before pulling out the screen! (I've made that mistake too many times :P)

    iTronics Repair -

    disconnected from what?

    I never saw where it was connected to!

    Fred Rodolf -

    By "caught" do you mean glued to the case? Mine was, and I cant tell how I could possibly have removed the screen without it breaking. Luckily my Ipod was already broken, but now its even more broke because of this guide.

    swd311000 -

    Oops!!!…..I managed to break the little ribbon cable going to the hold switch…lots of very “colourful“ words aimed at myself are in my head now.

    Simon Kormendy -

  13. QrlMD6py2Yqh6UYE
    • Entferne, falls vorhanden, das Stück Klebeband, welches die Elektronik des Displays bedeckt.

  14. NZlxTrZ4JBtlGsRy
    NZlxTrZ4JBtlGsRy
    onJMEtmqEYfJuLGt
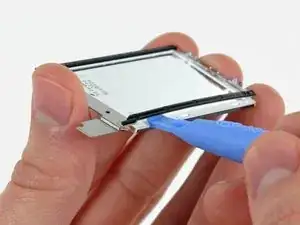
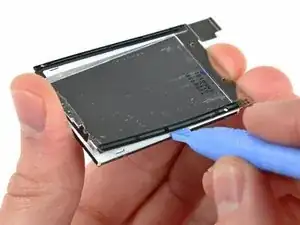
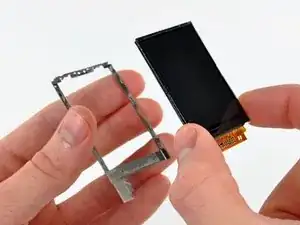
    • Die Displayhalterung ist mit einem Klebestreifen um den Rand des Displays herum angebracht.

    • Hebele die Displayhalterung mit der Kante eines iPod-Öffnungswerkzeugs vorsichtig von der Rückseite des Displays weg.

    • Fahre damit fort, die Displayhalterung entlang der Seite des Displays abzutrennen.

  15. sFCSHZTT1FTMwVyo
    • Trenne die Displayhalterung von der anderen Seite des Displays ab.

  16. ThX3QdEK5JjFhVX1
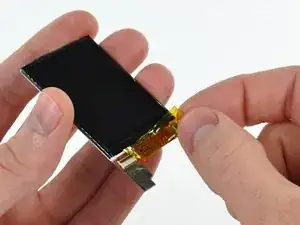
    • Löse vorsichtig die Displayelektronik mit dem iPod-Öffnungswerkzeug von der Displayhalterung ab.

  17. KAgUfmwA5EYj6URG
    • Entferne das Display von der Displayhalterung.

Abschluss

Um dein Gerät wieder zusammenzusetzen, folge den Schritten in umgekehrter Reihenfolge.

Andrew Bookholt

578335 Reputation

4 Kommentare

And what to do if you break the hold switch?!

Fred Rodolf -

Hello, can I connect a 10" LCD display to the iPod display connection instead of it's original display?

irrevocablemihiranga97 -

No. No idea what you're talking about because even if it was connected it wouldn't physically fit. TV out would be your best friend.

the bongo guy -

Your instructions are well prepared and very helpful! Thanks a lot!
ndinijimi -