Einleitung

Diese Anleitung zeigt, wie ein defektes Logic Board ausgetauscht werden kann.

  1. tqsQP4hmm1ViTtsW
    tqsQP4hmm1ViTtsW
    Cmg1al5GwuC2hEkt
    bjEVlvUPsKOGkBWV
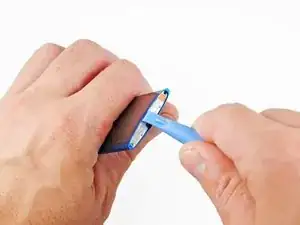
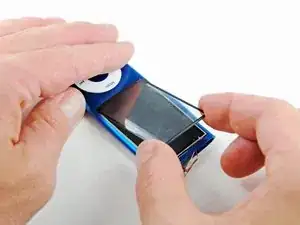
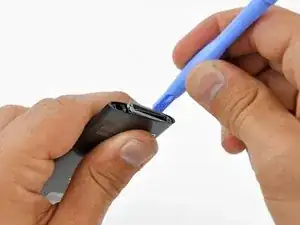
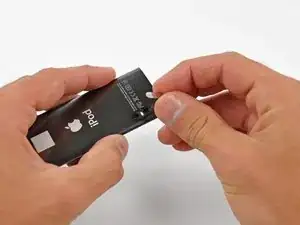
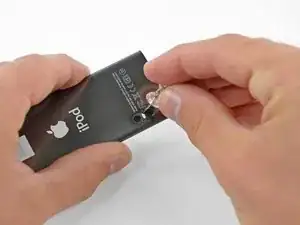
    • Setze ein iPod Öffnungswerkzeug zwischen dem äußerem Gehäuse und der oberen Blende an.

    • Heble das iPod Öffnungswerkzeug an, und entferne sachte die obere Blende.

    • Die Blende ist mit Kleber befestigt und es kann etwas Kraft benötigen um den Kleber zu lösen.

  2. OKnHRbj3gTQE3qTr
    • Benutze das iPod Öffnungswerkzeug, um den Hold Schalter von der Platte zu entfernen.

  3. CmYxxu342QlfWCWN
    • Entferne die beiden 3,2mm Kreuzschlitzschrauben.

    • Diese Schrauben sind zum äußeren Gehäuse gewinkelt und sehr klein. Benutze einen kleinen Schraubendreher, und sei vorsichtig, die Schrauben nicht zu beschädigen.

  4. 6MDFV4EeOGRDMKYM
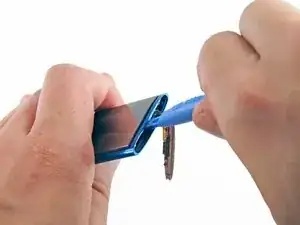
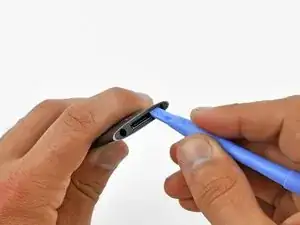
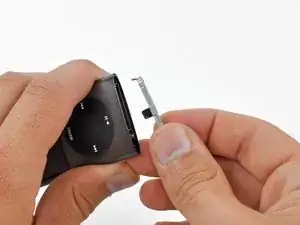
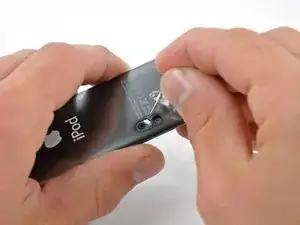
    • Führe ein Öffnungswerkzeug zwischen dem äußeren Gehäuse und der metallenen Platte ein.

    • Heble leicht am Werkzeug und ziehe die Platte aus dem iPod.

    • Die Platte ist immer noch mit dem iPod durch ein sehr empfindliches Flachbandkabel verbunden. Pass auf, dass du es nicht zerreißt.

    My ribbon broke.

    I see that on the pictures further down, you removed the covering plate, which I would suggest to do, as it'll put less weight on the ribbon.

    Luckily, we can find spare ones. In fact it doesn't sell alone, it's with the earphones jack.

    Michel Raj -

    could you elaborate more as to how did you remedy the broken ribbon?

    michael deaner -

    is the broken ribbon fixable?

    michael deaner -

    is the broken ribbon fixable?

    michael deaner -

    I am new to this my ribbon broke when I was taking out the battery  doesn't  the new battery ribbon connect to the one connected to the end switch, by that I mean can I connect the new battery ribbon to the end switch ribbon?,where it broke?

    michael deaner -

  5. eqSOH2HFnInuMkBW
    eqSOH2HFnInuMkBW
    mhPVVNhyeEgRBoAb
    • Die Glasscheibe ist mit Kleber an allen vier Seiten befestigt. Arbeite sehr vorsichtig in den nächsten Schritten, um das Glas nicht zu beschädigen.

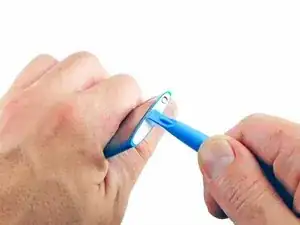
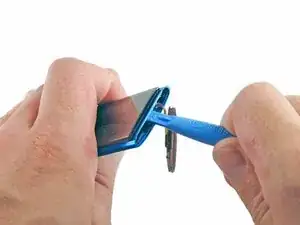
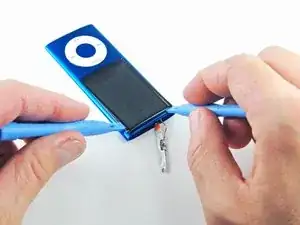
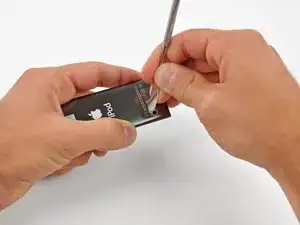
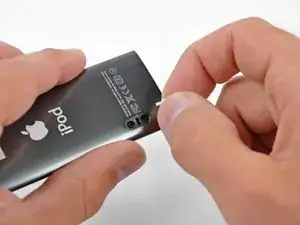
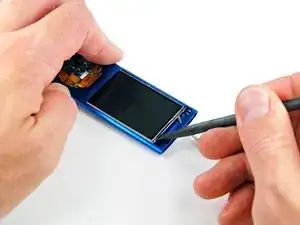
    • Führe ein Öffnungswerkzeug zwischen dem Display und der Glasscheibe oben am Gerät ein.

    • Drehe das Werkzeug zur Rückseite des iPods und hebe die obere Seite des Glases leicht heraus.

    • Das Glas wird sich nicht viel heben. Versuche nicht, die Glasscheibe komplett zu entfernen, oder du beschädigst das Display

    I would recommend using a heat gun.

    raul mald -

    At this point, I find it helps to separate the lock switch from the top metal casting. You then have just the switch dangling on the fragile ribbon cable. Much less likely to snag or break the ribbon. Just loosen (Don't remove completely) the two Phillips screws. The heavy clunky casting bit can be removed.

    Pete Green -

    You can remove this lens with virtually zero risk to the LCD underneath:

    Get a couple guitar picks or spudgers ready, and another old spudger. Using a hot glue gun, glue the old spudger into the very middle of the lens. Let the glue cool completely.

    Using a heat gun pointing up from the bottom, heat the 3 edges of the shell around the top and sides of the lens. Avoid getting heat on the lens or hot glue as it will soften.

    Using the spudger as a handle, pull up on the lens to get the top edge started and get your guitar picks/spudgers under the sides at the top of the lens.

    Complete removal as above.

    Using a spudger/guitar pick, start to peel an edge of the hot glue loose to remove old spudger from lens; then clean any residue with alcohol.

    Paul K -

    “couple of” guitar picks

    kenneth keen -

    After destroying one iPod, I learned from my mistakes. Heating it with a hair dryer to loosen the adhesive helped a lot. You need to get the tool between the glass and the lcd display; be very careful not to put pressure on the display!

    Cheryl Berk -

  6. x6BAkUS4cuUPfOUV
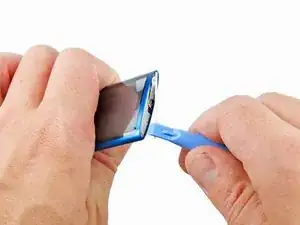
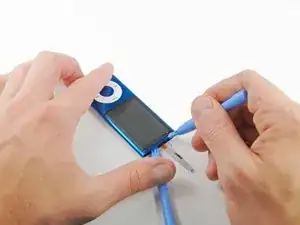
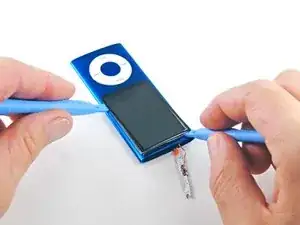
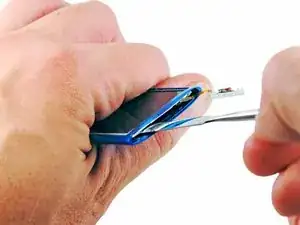
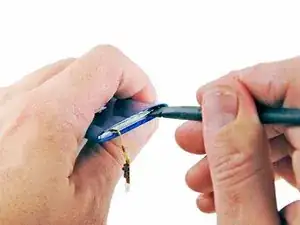
    • Während du mit dem ersten Werkzeug die Scheibe anhebst, führe ein zweites Werkzeug zwischen dem Gehäuse und der oberen linken Seite der Glasscheibe ein.

    • Entferne das erste Werkzeug vom iPod.

    The iPod I repared had a cracked screen. Caution here because it doesn't pop out that easily. I had to apply some force on the plastic opening tool while using another tool to take out the shards (who are glued to the side).

    matthiasvercaemst -

    Mujhe sirf LCD chahiye bhai

    Azam -

    Bhai, ye admi angrezi hai. Os ko Urdu samaj nahi ata hai.

    ian h -

    90% guaranteed you will destroy the LCD in this step. You just dont know how much for to use and if you stress the LCD too much, even with a plastic tool it will be damaged.That’s why ifixit sells those too. My advice is to first completely follow this guide, and if successful, and only then , start ordering parts.

    Omar van Hees -

    Since the display is probably 99 percent broken, I decided to use a different method. I heat the ipod on my 3-printer heating bed to around 70 degrees Celsius, then I take a suction cup and pull on the display glass. When the glue is warm enough, the glass rises and you can carefully detach the glass with an opening pick. the display remains completely intact greeting Andre

    Andre Marten -

  7. M5KQmrRiYOqHZnoW
    M5KQmrRiYOqHZnoW
    mqDRYKAXTcc1Lfiu
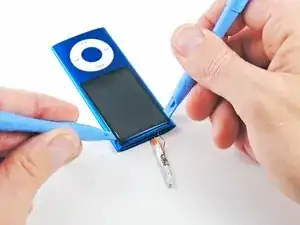
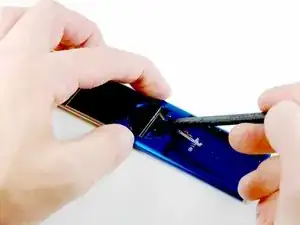
    • Heble leicht am verbleibenden Werkzeug und führe ein zweites Werkzeug zwischen dem Glas und der rechten Seite des Displays ein.

    • Schiebe das zweite Werkzeug an der rechten Seite entlang, um den Kleber zu entfernen.

  8. Xs1HlfTMS6KPomnq
    Xs1HlfTMS6KPomnq
    TQR6OJJDC1yxcmvC
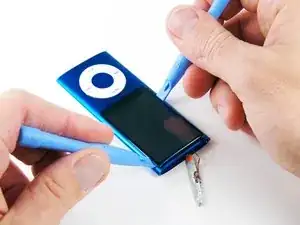
    • Mit einem Werkzeug zwischen dem Glas und dem Gehäuse, führe ein zweites Werkzeug an der rechten Seite ein.

    • Schiebe das linke Werkzeug nach unten, um den Kleber zu entfernen.

  9. MTxN4WTZFDXDClBs
    • Hebe das Glas von der oberen Seite an und entferne es vom iPod.

    It might be a good idea to remove all the adhesive from the screen before trying to slide the internals out. I had a nightmare trying to get mine out, ended up cutting my thumb and finger from holding onto the edges of the screen too tight trying to wiggle it out. And then to top it off, I broke the hold switch ribbon cable too. I don’t know how much the screen glue vs the battery glue was responsible for making it difficult to remove. Also when sliding it out, be careful the lip on the lower edge of the button hole doesn’t snag on the thin steel frame around the screen.

    edorp -

    Is it really needed to remove the glas? Can‘t you just slide out the logic board when glas remains?

    Michael Westermeier -

  10. WZ4U2JtM3XShbdBu
    WZ4U2JtM3XShbdBu
    VJdRo46GSelgtFJr
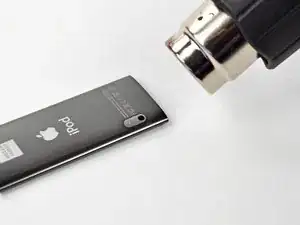
    • Erwärme mit einem Heißluftgebläse die Kunststoffblende am unteren Rand des iPods, so dass der Kleber darunter weich wird.

    • Stelle eine geringe Temperatur ein und halte den Luftstrom nicht zu lange auf eine Stelle, um das Schmelzen der Kunststoffblende zu vermeiden.

    • Heble die Blende mit einem Plastiköffnungswerkzeug vom iPod-Gehäuse und entferne sie.

    On the Nano I worked on I had to do steps 12-14 before step 10 because the metal plate on the bottom is one of the two things holding the click wheel in place.

    ethan -

    You MUST remove the bottom plate BEFORE forcing of the wheel or you WILL tare it apart as there is a lug on the bottom plate that holds the wheel in place ( wish I had known this before I damaged mine)

    also do not lose the very small spring that is under the wheel (I DID )

    Keith -

    +1. There is a tiny piece of plastic containing a little spring just under the wheel. Remove thoses parts before extracting the main board or you will probably loose them.

    jonathanct -

  11. St4t1T5bwHN1UHTP
    St4t1T5bwHN1UHTP
    c2tgSULTXu5ObBTI
    XHyivrrHuRRYQixP
    • Drehe drei Schrauben unten am iPod heraus:

    • Zwei schräg stehende 4,4 mm Kreuzschlitzschrauben.

    • Eine 5,4 mm Kreuzschlitzschraube.

    • Die Schrauben kommen nicht von selbst heraus. Achte darauf, dass du sie beim Entfernen der Verschlussplatte nicht verlierst.

    • Heble die metallische Verschlussplatte mit einem Plastiköffnungswerkzeug unten am iPod heraus und entferne sie.

    A flathead screwdriver or even a tooth pick will do better in this step.

    無敵可愛小松鼠 -

  12. quv2EQYjnqgDFDne
    quv2EQYjnqgDFDne
    TPCOwqZueGogqbqR
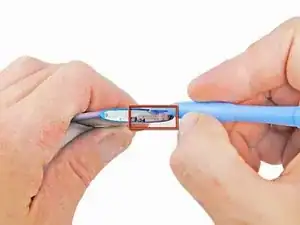
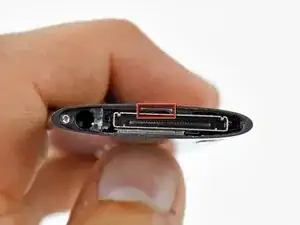
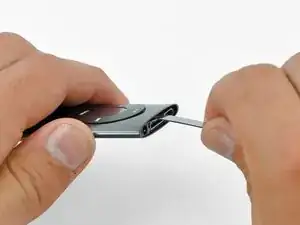
    • Setze einen Metallspatel in den Schlitz an der Unterseite des iPods direkt über dem Dock-Anschluss ein.

    • Heble mit dem Metallspatel die Unterkante des Click Wheels hoch.

  13. kYJLxHvWScyHSwqt
    kYJLxHvWScyHSwqt
    U1xEQXXYcOT2DJbi
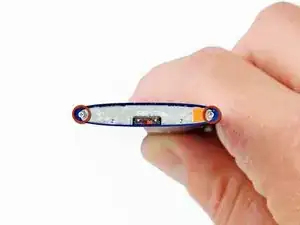
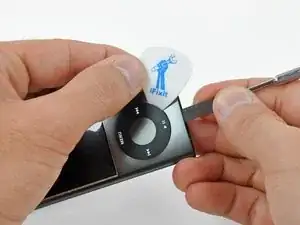
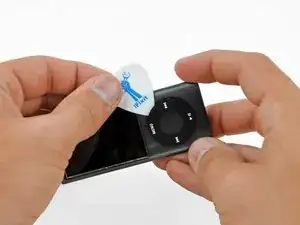
    • Setze ein Plektrum zwischen dem Click Wheel und dem Gehäuse des Nano ein und ziehe den Metallspatel heraus.

    • Heble die Kanten des Click Wheels mit dem Plektrum hoch, bis es sich vom Gehäuse löst.

    • Versuche noch nicht, das Click Wheel ganz zu entfernen, es ist immer noch mit einem Flachbandkabel angeschlossen.

    Use extreme care when inserting the metal plunger to lift up the click wheel. I ended up damaging one of the sensor pads and then needed to order a new click wheel circuit. Not very expensive to replace but I had not intended to replace this item and so my finished repair was delayed.

    Kevin Long -

    also, like someone mentioned below, be careful of the small plastic piece and tiny spring that will fall out after you remove the click wheel.

    edorp -

  14. 4OdwYbRDiEVidlMn
    4OdwYbRDiEVidlMn
    vUPEo2NUHD5SE2el
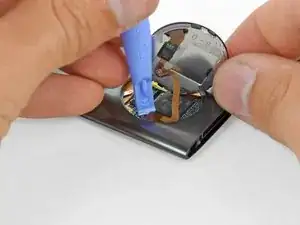
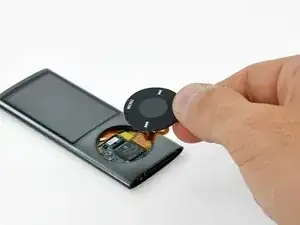
    • Hebe das Click Wheel mit einer Hand aus dem Weg und löse den Stecker des Flachbandabels zum Click Wheel mit dem Plastiköffnungswerkzeug aus seinem Anschluss auf dem Logic Board.

    • Entferne das Click Wheel.

    In the second photo where you can see under the click wheel, just above the square black piece with the apple on it is a black rectangle with a hole in the center. There will be a spring in the hole. Remove the spring and the black piece it is in and set aside or they will fall out and get lost.

    Cheryl Berk -

  15. oXaOvuqkSoTgHI3M
    oXaOvuqkSoTgHI3M
    UYZXbGdHLCL2pVqI
    gXcw1LCodDiGYGTD
    • Erwärme die Einfassung über der Kamera/dem Mikrofon mit einem Heißluftgebläse, so dass der Kleber darunter weich wird.

    • Heble die Einfassung über der Kamera/dem Mikrofon mit einem Metallspatel vom Gehäuse und entferne sie.

    • Es ist äußerst schwer oder sogar unmöglich, dass das Gehäuse des iPods in der Nähe der Kamera dabei unbeschädigt bleibt. Der iPod wird zwar weiterhin funktionieren, sein äußeres Erscheinungsbild leidet allerdings.

    • Du kannst auch mit dieser Methode versuchen, die Abdeckung zu entfernen:

    • Verteile einem Klumpen Heißleim mit der Heißleimpistole über der Fassung.

    • Bewege die Düse der Heißleimpistole 20 Sekunden lang in dem Klumpen, damit der Kleber unter dem Kameraglas heiß wird.

    • Drücke einen Spudger in den heißen Leim und halte ihn dort fest, bis der Leim kalt und hart geworden ist.

    • Ziehe kräftig und gleichmäßig am Spudger und heble gleichzeitig mit dem Fingernagel die Kante der Fassung hoch.

    Use a heatgun/hairdryer for a very long time and use a cutter knife and pry continuously only from the right bottom corner (near the camera lens). If you don't get it open use the heatgun once more.

    Peter Johansson -

    Alternatively use a fabric bag filled with chick peas, put it in a microwave for 4 mn at power 600w and leave it to rest on the iPod 10 / 15 mn. It does the same job. I also use a fresh stanley knife blade (mind your fingers) the blade is very slim and is therefore easier to wedge between the casing and the cover.

    victoriahenri -

    You can remove this lens with zero damage to case or lens:

    Using a hot glue gun, apply a bead of glue across the entire lens but not on the body of the iPod. Move the nozzle back and forth in the glue for about 20 seconds; this keeps the glue hot and heats up the Apple adhesive on the other side.

    Quickly jam an old spudger into the hot glue and hold it until the glue starts to harden; this will happen quickly. Gripping the spudger and digging into the glue over the spudger with the fingernail of your forefinger, pull straight up evenly but firmly. The lens will release pretty easily if you time it right; otherwise it will pop if it has gotten cold.

    I’ve done a dozen of these this way successfully.

    Paul K -

    Thanks Paul! I will add this into the step.

    Arthur Shi -

    This works great, as long as you time it right. I found putting the tip of the glue gun flat against the lens is useful, and a few seconds after the glue stops sticking to your finger is a good time to do it.

    Aydan -

    just use a needle and pull it from the little hole

    Daniel Mauricio Franco Martin -

    have to be careful because after removing the click wheel, when you turn it upside down, the are pieces that fall down. I lost one that fall in my carpet

    Daniel Mauricio Franco Martin -

    I was able to remove it using a pin in the small hole. Once it is out there may be pieces that want to fall off; a round ring and the white retainer piece.

    Cheryl Berk -

    Same here. With some pliers I bent the pointy tip of a push-pin to make a 120 degree angle and used that to lift up the plate using the microphone hole after I heated up the plate. Like a mini crowbar. It came off in 30 seconds including the white indent attached to it.

    Omar van Hees -

  16. x3TFTnkILLeAEQbJ
    • Setze einen Metallspatel von oben am iPod zwischen äußerem Gehäuse und Akku ein, um so den Kleber zu entfernen, mit dem der Akku befestigt ist.

    • Sei dabei sehr vorsichtig und verletze oder beschädige den Akku nicht, er könnte sonst in Brand geraten.

    In case anyone else didn't realize this, you need to push your spudger fairly deep into the iPod to completely seperate the glue from the battery. I just stuck mine in maybe half an inch, then spent 30 minutes struggling to move the logic board. After removing all of the glue, it slid out with relative ease.

    dharris1 -

    I didn’t have a spudger so I used a metal nail file with a rounded end. Heated the back of the iPod with a hair dryer for about a minute first to soften the adhesive and it all worked fairly smoothly. Be gentle with the lcd display.

    Cheryl Berk -

    Keep in mind the only glue holding the logic board to the metal case is a small rectangle of adhesive. In the picture, the author is just scraping away at the glue. You don’t need to insert your spudger any lower than half an inch as there isn’t any other adhesive holding the logic board to the metal case . Once the glue has been scraped away, then the board should slide out easily. If it doesn’t slide out, then the adhesive is still there.

    Alex Devlin -

  17. yQiXLmRnwFTjPxdK
    yQiXLmRnwFTjPxdK
    vH22LsqFWqoIjIgE
    deU1fh6Gix2X3vdM
    • Zwischen Kamera und Mikrofon befindet sich ein kleiner weißer Halter, der innere Bauteile vor Bewegung sichert.

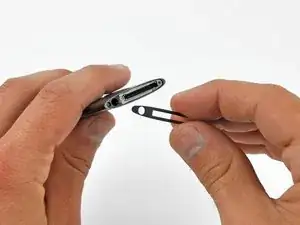
    • Setze eine Pinnwandnadel in das Loch an der Ecke des Halters und hebe ihn aus dem Gehäuse heraus.

    I tried this but with the Nano I worked on the retainer cannot be pushed down, instead there is a small diagonal hole in the retainer that you can fit a pin or needle into and lift out the retainer.

    ethan -

    Yeah step 18 is BS, You need to pull the retainer up with a pin, not depress it. I destroyed my first nano as i pushed so hard trying to depress it that it deformed and I had to give up. Bad bad tip that needs correcting at step 18.

    Dave -

    It can be pulled out with tweezers.

    raul mald -

  18. 6ViNOEGbBGOGvIeP
    • Wenn der Halter entfernt ist, dann ist der Spudger, mit dem das äußere Gehäuse heruntergedrückt worden ist, nicht mehr notwendig.

    • Drücke sanft aber gleichmäßig oben auf das LCD, so dass die Logic Board Einheit an der Unterseite des iPods herausgleitet.

    • Drücke nicht auf den Akku, er könnte dadurch beschädigt werden und in Brand geraten.

    • Denke immer an die Platte mit dem Hold-Schalter, achte darauf, dass sie nicht an einer Kante kratzt und das Flachbandkabel zerreißt.

    I submitted an edit for this step. The first bullet (about the spudger not being needed once the retainer is past the hole in the case) is now irrelevant because step 17 now has us removing the retainer completely.

    Gordon -

  19. wZXckXITpBovmrlc
    wZXckXITpBovmrlc
    2RsvJ4wFWqWgtnUM
    • Drücke die Logic Board Einheit mit dem Spudger weiter durch das äußere Gehäuse des iPods heraus.

    • Die Toleranzen im iPod sind sehr klein. Sei geduldig und arbeite sehr langsam, wenn du die Logic Board Einheit ausbaust. Achte darauf, dass sich keine Bauteile oder Flachbandkabel am Gehäuse verfangen.

    • Um sicherzustellen, dass die Platte mit dem Hold-Schalter sich nicht am Gehäuse des iPods verfängt und dabei ein Kabel zerreißt, musst du den Schalter genau durch die Mitte des Gerätes führen, dort wo die Öffnung am größten ist

  20. UPGeiOSkFf3ANKqK
    • Wenn der obere Rand des LCDs an der Unterkante des äußeren Gehäuses vorbei ist, dann kannst du die Logic Board Einheit vom iPod entfernen.

    • Denke auch hier wieder an die Platte mit dem Hold-Schalter, sie darf sich nicht an der Unterkante der Öffnung für das Click Wheel verfangen.

    I accidentally snapped the little ribbon that held the top of the device. Is it fixable?

    Connor Nicholas -

Abschluss

Um dein Gerät wieder zusammenbauen, folge den Schritten in umgekehrter Reihenfolge.

David Hodson

Mitglied seit: 14/04/10

148365 Reputation

Ein Kommentar

at step 14 when lifting the click wheel have a look at the small black bar, placed to the upper edge of the chip. in its center it holds a very small tiny coil spring thats hardly to see and that easily jumps out. better you lift the click wheel in parallel to the ground. if spring jumps off one time, you will never find it again. i guess it has some grounding purpose a it docks on the metal below the logic on the click wheel. also a point to have an eye on at reassembly

An distege -