Einleitung

Du hast bestimmt viel über das neue Fairphone 2 gehört – die kleine niederländische Firma hat wieder Wellen geschlagen mit ihrem erschwinglichen, modularen und konfliktfreien Mobiltelefon. Und wieder einmal sind wir vorne mit dabei wenn es darum geht, ihr neuestes Gerät zu untersuchen. Als wir das erste Fairphone auseinander nahmen, waren wir vom modularen Aufbau und dem leichten Zugang begeistert. Heute sind wir gespannt darauf, was die zweite Generation an nachhaltigem Design zu bieten hat. Schließe dich der Bewegung an.

Du willst den Insidereinblick? Besuche uns auf Facebook, Twitter und Instagram. So bleibst du immer up-to-date in der Reparaturwelt.

  1. 5e2PTUjoYHhCAX3U
    5e2PTUjoYHhCAX3U
    dgr3kDmkgwiJ2Fwx
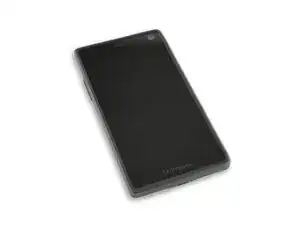
    • Hier ist sie, die zweite Generation des Fairphones. Sowohl am Design als auch am Format des Geräts wurde schwer gearbeitet:

    • 5" 1080p LCD Display (446 ppi) mit Schutz durch Gorilla Glass 3

    • Qualcomm Snapdragon​​ 801

    • 2 GB LPDDR3 RAM Speicher

    • 32 GB interner Speicher + MicroSD Slot zur Speichererweiterung

    • Vom Benutzer entfernbarer Lithiumionen-Akku mit 2420 mAh

    • 8 MP Rückkamera

    • Android​ 5.1 Lollipop

    Wow! That is one ugly looking brick of a phone!

    The cheap looking plastic and design would make me stay way clear of it, even if offered to take itself apart.before repairs.

    I find it hard to believe that there really is a market for something like this... What's the price?

    Victor Szulc -

    I'm not too sure what makes this black rectangle any uglier than the rest available for purchase. The clear back is something of a turn-off, personally, but that's hardly a difficult thing to remedy.

    Dave Davidson -

    The price is 529.38€. The back cover is also available in black matte, black translucent, blue matte, blue translucent.

    Julian Andres Klode -

    a) Beauty is in the eye of the beholder, so you finding this phone ugly is uninteresting. b) If you prefer to continue using a 'beautiful' phone like an iPhone or Samsung, then you understand nothing about the fairphone project.

    Doc Brown -

    I totally love the idea and engineering behind this phone. They even noted how almost all consumers buy a rubberized case after they buy a phone, so they built that right in. That save $30 right there.

    I would buy one in a second if it worked well on American phone frequencies. For all it’s modular design, they didn’t make the radio modular or global which is the only failing I can see.

    The original comment optimizes what is wrong with the phone market today. There isn’t a single high end phone made today that has a removable battery (except this one) or slide out keyboard. Things I miss from my old G1. They all worry about aesthetics rather than repair-ability and battery life. Sure, it’s obvious why the phone manufacturers don’t want these devices to be easily repaired, built in obsolescence. It’s the consumers acting like sheeple parroting the manufactures promotional material that really disappoints.

    Ben Zack -

    The main problem is not the phone companies but the people who will spend $1,300.00 for the latest models. These new units do not make phone calls any better or you internet service any faster than what is available. Yes they may have a lot of fancy bells and whistles. But in the end they are just cell phones. Now I must admit I do like the camera/ video cability, but do not buy them for that. ITS A PHONE. And my old flip phone will do the job just as well as the latest Apple IPhone.

    tjhoodless -

  2. EQTFNpJ6gYooxKpC
    EQTFNpJ6gYooxKpC
    mInUEW5LTLwQwnTN
    5IQfFO3jwD6NwZLF
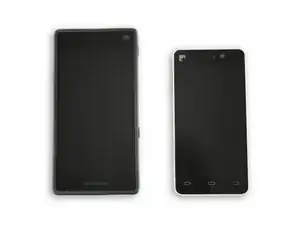
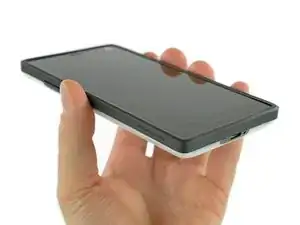
    • Mit den Maßen von 143 × 73 × 11 mm spielt das Fairphone 2 definitiv in einer anderen Liga als die erste Generation.

    • Mit 168g (20g davon macht die Hülle aus) ist das Fairphone 2 dennoch nur sechs Gramm schwerer als die erste Generation.

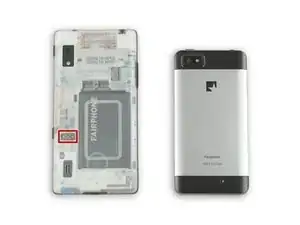
    • Wir können unter der durchsichtigen Hülle schon zwei SIM-Karten Slots sehen. Ein Hoch auf die Flexibilität!

    • Das ganze Mobiltelefon passt perfekt geschützt in die leicht zu entfernende Hülle. Zum Glück gibt es hier keine bösen Überraschungen.

    • Doch was ist das? Ein Anschluss mit 5 Pins, der scheinbar ins Leere geht? Das prüfen wir später noch mal genauer …

    • Das Telefon ist liebevoll gekennzeichnet mit den Worten "Designed to open" (zum Öffnen entworfen) . Das ist Musik in unseren Ohren!

  3. UVRSZiPAAupdtY15
    UVRSZiPAAupdtY15
    niEM3WRfVLlpkrcl
    DAOZxOvEAVqdZMCy
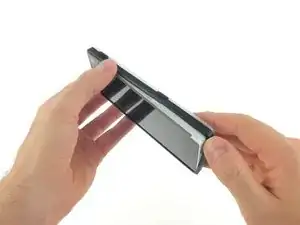
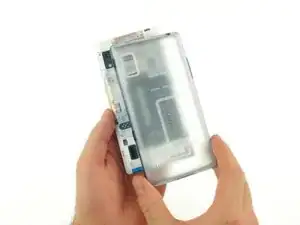
    • Ganz oben auf unserer Agenda steht die durchsichtige Rückschale. Sie sitzt fest und sicher und lässt sich ganz ohne Werkzeug entfernen.

    • Gibt's hier denn keinen Kleber? Träumen wir? Klatsch. Nein, definitiv kein Traum (und kein Kleber).

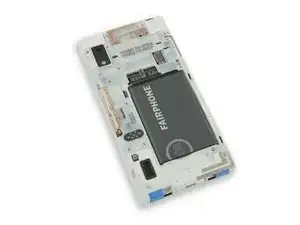
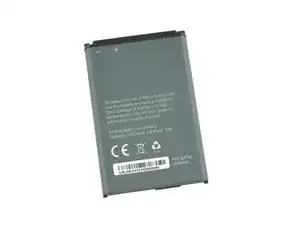
    • "Remove battery before releasing screen" (Entferne den Akku, bevor du das Display löst). Ist das etwa ein Ausbau-Tipp auf dem Akku?

    • Nichts macht uns glücklicher als Hersteller, die ihren Geräten Reparaturanweisungen beilegen, besonders solche auf den Geräten.

    • Wir sind nicht abergläubisch, deuten diese Zeichen aber als Vorboten weiterer guter Nachrichten.

    The picture is misleading. You cannot remove the cover as a whole, it has two pieces that must come separately.

    Aloïs Glibert -

    Hi Aloïs, at the time we did this teardown the back cover was one-piece. It was the first issue ever of the Fairphone 2. A teardowns is not a guide and therefore does not represent the proper way for disassembly or replacing a part. We are planning to update the actual back cover guide to the two-piece version soon. Stay tuned

    Tobias Isakeit -

  4. YSAP2gcJuDi1MQFR
    YSAP2gcJuDi1MQFR
    vYjpLYu5oMcr4K4C
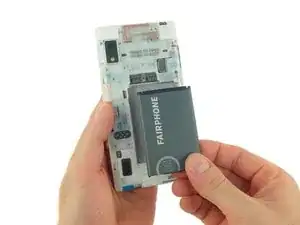
    • Fairphone ruft uns die gute alte Zeit ins Gedächtnis und lässt uns den Akku einfach entnehmen. Kein Kleber, kein Stecker – kein Drama.

    • Der Akku verwendet sogar Federkontakte, anstatt der populär gewordenen Druckkontakte. Wir können den Akku tauschen als wäre es 2005!

    • Dieser handliche 3,8 V Lithiumionen-Akku bringt 2420 mAh und eine Energieeffizienz von 9,2 Wh.

    • Zum Vergleich: Das LG G4 bringt mit seinem 3,85 V Akku mindestens 11,2 Wh, während das iPhone 6 mit seinem 3,82 V Akku auf 6,91 Wh kommt.

  5. 1dYMTwZPYsXJQiej
    1dYMTwZPYsXJQiej
    4UTLc5BVlsNKXuZS
    mJVGdWUJqfpadRGt
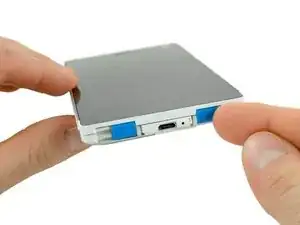
    • Der Mangel an sichtbaren Schrauben hat uns zugegebenermaßen etwas verunsichert, aber dank der gut beschrifteten Clips auch nicht zu lange.

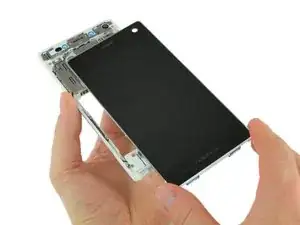
    • Zum Entfernen der Display-Einheit müssen nur die Klammern zur Mitte hin geöffnet werden und schon lässt sich das Panel heraus schieben.

    • Für die, die mitzählen: Bis zum Entfernen der Display Einheit haben wir noch kein einziges Werkzeug verwendet.

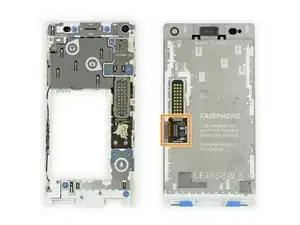
    • Auf dem Mittelrahmen finden wir eine Anordnung von Federkontaktstiften, deren Gegenstücke sich auf der Rückseite der Display-Einheit befinden.

    • Direkt unter den Kontakten auf der Display-Einheit entfernen wir eine Metallabschirmung und sehen die Verbindung zum Breakout-Board.

    • Mit der Nutzung solcher Breakout-Boards modularisiert Fairphone Standardkomponenten und fördert so die Kompatibilität.

    Hi

    I just tried pulling out the screen and I must add that it's not that simple to do it safely...

    The assembly is quite tough, you must give a good amount of strength to disassemble the screen from the board. My technique was to take in my 2 hands the body and to use a strong flat surface (a table is OK) to help me sliding the screen.

    The brackets are very resisting.

    At least it won't be too easy to tear it apart ^^

    Timothee Simiz -

    You are right. The display is mounted very well.

    The steps and descriptions of the teardown aren't meant to be read as replacement guides.

    You will find more information and pictures in the display replacement guide over here:

    Fairphone 2 Display-Einheit ersetzen

    (don't forget to unlock both sliders)

    Tobias Isakeit -

    I saw a very useful tip on youtube, which comes from the Fairphone support: Give the phone a soft massage, push the display against the chassis forwards and backwards several times, only one or two milimeters, and after a short time it will move. I did that wearing latex gloves, because they have a very good friction and I didn't have to give to much pressure on the display, and in the end it was quite easy to remove.

    Bernhard Spranger -

    hello,

    I'm currently designing a modular laptop concept for a project at university and I'm trying to get my hands on some of the pogo / spring loaded contact connectors which they use in this.

    Does anyone have any recommendations for where to find some?

    eddiehamiltonmac -

    Can't help with that, but must mention that that's pretty cool.

    Paul Hendrix -

    The wikipedia article on Pogo pins has links to manufacturers: https://en.wikipedia.org/wiki/Pogo_pin

    amosbatto -

    I guess you find them in Huaqiangbei ( Shenzen, China)

    Andreas Azul Ramalhao -

  6. xrJQX1PHWIMSOThD
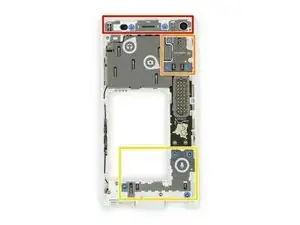
    • Tadaa, hier haben wir den Hauptrahmen mit drei Modulen, die unabhängig voneinander entfernt werden können. Kleine Piktogramme veranschaulichen deren Funktion:

    • Kopfhörerbuchse, Ohrhörer-Lautsprecher und Frontkamera-Modul

    • Rückkamera-Modul

    • Mikrofon-Modul

    • Außerdem entdecken wir eine kleine stolze Karte, welche die konfliktfreien Quellen des im Mobiltelefon verwendeten Zinn und Tantalum zeigt.

    • Erstaunlicherweise haben wir bis hierhin nur ein Werkzeug benötigt: Unsere Hände!

  7. MRwGtUXxRIMUjGaK
    MRwGtUXxRIMUjGaK
    CfwTWwAhsFap1gCp
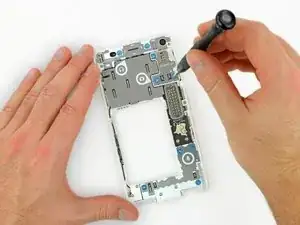
    • Es ist an der Zeit, Nägel mit Köpfen zu machen Schrauben zu lösen und die wirkliche Reparierbarkeit des Fairphone 2 zu testen.

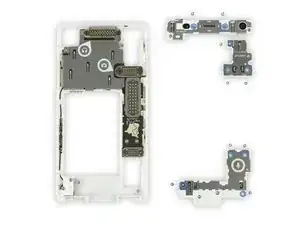
    • Wir schnappen unseren zuverlässigen Kreuzschlitz #0 Schraubendreher und entfernen im Handumdrehen alle drei Module.

    • Darunter finden wir erneut Federkontakte – keine Flexkabel oder Druckkontakte in Sicht.

    • All diese Kreuzschlitzschrauben sind gleich geschaffen. Kein Problem, wenn du sie vermischst, alle sind 5,5 mm lang.

  8. foTyoZOkVx354jCK
    foTyoZOkVx354jCK
    HnERZloP4DMvar5k
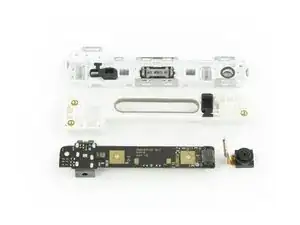
    • Und damit haben wir die erste Ebene der Benutzer-Reparatur abgeschlossen: Das Fairphone ist so gebaut, dass es sich einfach in seine Module zerlegen lässt. Aber was, wenn du ein einzelnes Modul reparieren möchtest?

    • Die Module werden von Torx T5 Schrauben zusammengehalten – wahrscheinlich um unerfahrene Benutzer von tiefergehenden Reparaturen abzuhalten – sind aber dennoch einfach zu öffnen.

    • Wir beginnen mit dem obersten Modul: Die Frontkamera lässt sich dank eines gut gesetzten Flexkabels einfach abnehmen.

    • Federkontakte verbinden den Ohrhörer-Lautsprecher, so dass dieser sich ebenfalls leicht austauschen lässt.

    • Als letzte Komponente ist die Kopfhörerbuchse auf der Platine festgelötet. Glücklicherweise verbleibt nichts wichtiges, wodurch die Platine recht günstig zu ersetzen sein sollte.

  9. mLpIAvCAjpMhOXdT
    mLpIAvCAjpMhOXdT
    QppIGIQTynFlrg6X
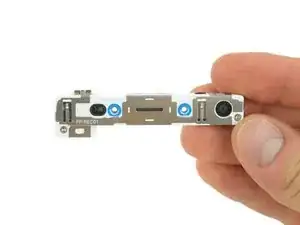
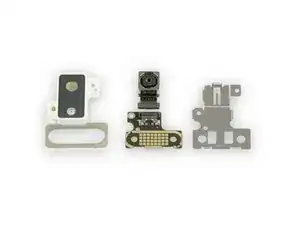
    • Weiter geht's: Das Rückkamera-Modul.

    • Hoffentlich lässt sich dieses Bauteil auch in ein paar Jahren noch nachrüsten, à la Project Ara. Wir drücken die Daumen.

    • Die Kamera selbst ist eine 8 Megapixel CMOS Kamera mit einem 1/3,2" Sensor und einer Blende von ƒ/2,2.

    • Dieses Modul ist genau wie die anderen aufgebaut: Eine Standardkomponente im Kunststoffgehäuse, die mittels Flexkabel und Stecker zu einer Leiterplatte mit Federkontaktstiften verbunden ist.

    • Fairphone hat Kabel und Stecker nicht komplett entfernt, sie haben sie lediglich etwas weiter von den DIY-Bastlern gerückt, was den Tausch von Komponenten bedeutend vereinfacht.

  10. Wcr2gW6tQnmHQqLS
    Wcr2gW6tQnmHQqLS
    lqRPqJksgp1VSUGA
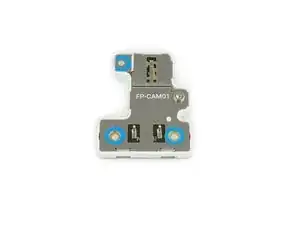
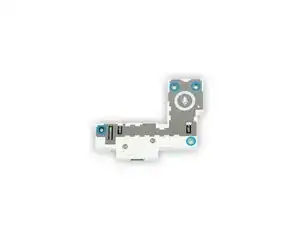
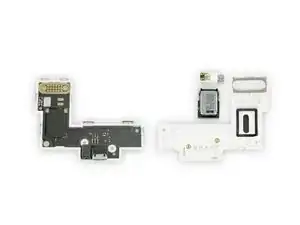
    • Ein letztes Modul, das geöffnet werden muss – obwohl es nur mit einem Mikrofonsymbol gekennzeichnet ist, sind dennoch recht viele Komponenten darin untergebracht.

    • Der Vibrationsmotor und der Lautsprecher sind über Federkontakte verbunden – noch mehr Teile, die man leicht entfernen kann, Hurra!

    • Der USB-Anschluss und das Mikrofon sind auf die Platine gelötet – nicht unbedingt eine schlechte Sache. Der USB Anschluss benötigt die zusätzliche Stabilität und hat deutlich mehr Kontakte als ein Lautsprecher.

  11. vALW2RlESNCfbXFQ
    vALW2RlESNCfbXFQ
    3FyQvURplXYGLe46
    QWRF4QHr5K1qlUnA
    • Die Zeit ist reif, um sich genauer mit dem Herz des Fairphone 2 zu befassen.

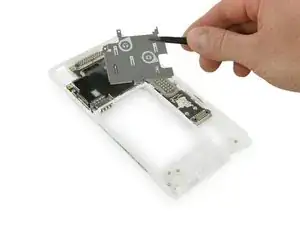
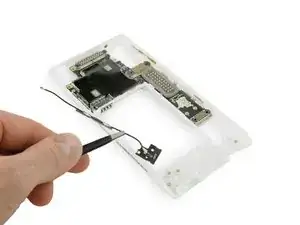
    • Die Metallabschirmung, versehen mit praktischen Piktogrammen, ist als erstes fällig. Darunter finden wir einen Hitzeverteiler, der noch die spannenden Teile verdeckt.

    • Da der Hitzeverteiler beim Abziehen reißt, wird Fairphone ihn als einzelnes Ersatzteil anbieten.

    • Nebenbei finden wir ein HF-Kabel, welches das Signal entlang des Rahmens zur Hauptantenne sendet. Raus damit!

    What kind of tool do i use to open the 2 screws?

    lottevandenberg -

    Those are Torx T-5

    Tobias Isakeit -

    Da mein Handy baden gegangen ist, sieht man am linken, unteren Federkontkat rote Farbe, wohl ein Indikator für den Wasserschaden im Innern, kann man als “Anfänger/Nichtskönner” diesen selbst beheben, wenn man die Metallabschirmung abschraubt oder macht man dann diesen Hitzeverteiler kaputt?

    Marie Selfer -

  12. p1hIwXtZKiCx4vNe
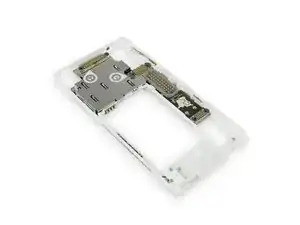
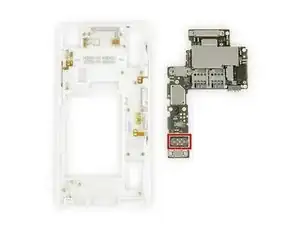
    • Ist das nicht eine Schönheit? Wir stehen voll auf den durchsichtigen Kunststoffrahmen, der uns all seine eingebauten Antennen und Knöpfe präsentiert – alle sind über Federkontakte mit der Hauptplatine verbunden.

    • Am unteren Ende stoßen wir wieder auf die fünf Federkontaktstifte vom Anfang. Dies ist eigentlich eine USB 2.0 Geräteschnittstelle inklusive Stromanschluss – bereit für zukünftige Erweiterungen und ausgefallene Gehäuse.

    • Eine künftige Erweiterung ist möglicherweise ein Gehäuse mit NFC-Unterstützung für schnelle und einfache Geldzahlungen.

    I've had SIM card and SD card sockets go wrong on me before so I was hoping these would be replaceable without throwing away the entire core unit. No such luck it seems. It would have been cool if these had been embedded in the frame instead. I guess that would imply a lot of spring connectors though.

    Matthew Exon -

    Ist schon Einiges diese Bilder. Leider vermisse ich die klassische Art von iFixit mit Angabe der Schauben und der heiklen Stellen.

    Grund: Ich erhielt ein FP 2 mit defektem erstem Slot. Diesen wollte ich reparieren, aber beim Anblick der geklebten gedruckten Leitungen (Antene?) von aussen habe ich es sein gelassen. War mit zu heikel, da ich nicht wusste, ob sie fest mit der Platine verbunden sind. Also habe ich diese “letzte” Platine nicht entfernt, um zu den Slots zu gelangen, die von der weissen Abdeckung geschützt sind. Hier in diesem Beitrag ist auch nichts angegeben, wie man die Platine entfernt. Ich hoffte, wenn ich an die Slots von hinten komme, dass ich die vermutlich verbogenen Kontakte mit Vorsicht wieder zurechtbiegen könnte.

    rada -

    I see, that's pretty clever ! Sadly, they've never made used of it :/

    Polaris -

  13. sZZp41ImYSa4ribZ
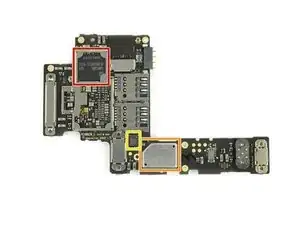
    • Nun für die Techniker unter uns:

    • Samsung KLMBG4WEBC 32 GB eMMC NAND Flash Speicher

    • Qualcomm WCN3680B Wi-Fi 802.11ac Bluetooth Kombination (basierend auf Informationen des Fairphone-Teams!)

    • ST Microelectronics LSM330DLC 6-Achsen-Beschleunigungsmesser + Gyroskop

  14. rD3m4bjEhwws54yI
  15. yXuyUATwQcmYlqlD
    yXuyUATwQcmYlqlD
    i6EUPTbY4LSgpY4U
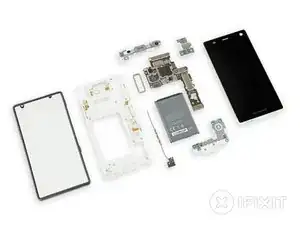
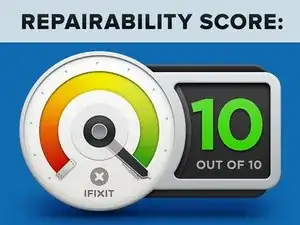
    • Das Fairphone 2 erreicht auf der iFixit Reparierbarkeitsskala: 10 von 10 Punkten (10 ist am einfachsten zu reparieren)

    • LCD und Frontglas sind miteinander verbunden, was die Entnahme vereinfacht, die Kosten eines Display-Tauschs jedoch deutlich erhöht.

    • Die am häufigsten ausfallenden Komponenten, Akku und Display-Einheit, lassen sich ohne Werkzeuge ersetzen.

    • Die internen Module sind einheitlich mit Kreuzschlitzschrauben der Größe #0 fixiert und über simple Federkontakte verbunden.

    • Die einzelnen Module lassen sich öffnen und viele Komponenten können separat getauscht werden.

    • Alle Knöpfe und Kabel sind leicht zu erreichen. Anschlüsse mit Federkontakten ermöglichen zukünftige Upgrades und den einfachen Austausch von Komponenten.

    • Zusätzlich zu den Piktogrammen und Hinweisen im Inneren des Gerätes wird das Fairphone 2 mit vorinstallierten Reparaturanleitungen ausgeliefert.

    • Abschließende Offenlegung: Für die Co-Autorenschaft der Fairphone 2 Reparaturanleitungen erhalten wir Finanzierungsmittel im Rahmen von Initiativen der europäischen Kommission zur Verbesserung der Zusammenarbeit zwischen Reparaturbranche und Herstellern.

    I would have given this a 9/10, and 10/10 if the glass and LCD could be replaced separately, as the glass is a very common point of breakage in drops, as well as being susceptible to scratching. Knowing that replacing damaged glass will not result in the cost of an entire LCD assembly definitely gives a bit more peace of mind. A 9/10 reparability score is still very good though.

    timmytripp -

    i disagree. for now a perfect 10 score is fair,.

    it might warrant a drop in point in the future if a better phone comes out, but for now Repairability Score of 10 is a valid point, as it is the easiest to repair compared to other phone.

    milkboy -

    I disagree, the fusion of display and front glass has a good reason. By removing the air gap between the LCD and the front glass, they can reduce the Light reflections in this surfaces by a good amount.

    So I wouls give this Phone a 10 out of 10.

    Thoth -

    Just to be fair, I believe the idea is to make the phone so robust that the glass is unlikely to get cracked in the first place. Cracked screens are absurdly common because it doesn't hurt the manufacturer to make them fragile. LCD faults are also pretty common though. If you reduce the smashed glass rate to lower than the LCD fault rate, then the risk tradeoff looks much better. And so the phone is designed so that you can drop it from 6 feet without smashing the glass, something I wouldn't suggest trying with an iPhone.

    At least that's the idea. Nothing short of real-life statistics will prove it true or false.

    https://www.fairphone.com/2015/06/16/the...

    Matthew Exon -

    I agree, the fused front assembly should make it a 9/10.

    Mel Rabinowitz -

    but they are fused by design and repairability doesn't involve that. You could maybe give it a 7/10 or 8/10 on modular design but it shouldn't affect repairability score which we're concerned with here.

    Sharad A -

    By that logic even phone gets 10/10 because it's a single module and you can replace the whole thing.

    From the overall design, I'm expecting this phone to be very user repairable, but also pretty unreliable.

    For most users that is a pretty negative trade off.

    alex -

    Hi, the fusion between the LCD ans the screen is understandable but FP should offer discount the price for those who send back the broken screen units for refurbishing.

    Emmanuel Valette -

    I think a 10/10 is warranted because a 9/10 would put it in the same class as many lesser phones.

    But being a happy owner I'm potentially bias.

    Mattias Pettersson -

    Ist es denn möglich einen einzelnen Prozessor (Schritt 14) zu tauschen und wo würde ich den bekommen?

    Hanno

    Hanno Deckert -

    Da der Prozessor am Motherboard verbaut ist, würde dies einen Tausch des Boards bedeuten. Lediglich den Chip zu tauschen (auslöten und wieder einlöten) würde einen sehr großen bis technische fast unmöglichen Aufwand für einen normalen Verbraucher bedeuten. Ob die Chip-Architektur kompatibel ist mit den restlichen Komponenten ist eine ganz andere Frage.

    Tobias Isakeit -

    Is it technically possible to extract the nand flash without damaging it from one Fairphone (totally dead) and to put it into another working Fairphone ? I need this in order to recover the otherwise lost pictures from the dead phone…

    If yes, could you please give me some tips / advice on how to do it properly ?

    Thank you in advance !

    Jane Bayrisch -

    Yes this absolutely is possible! You ideally would need an reflow oven but an heatgun should work too. Look up how to reball/reflow chips for more info.

    t h -

Tobias Isakeit

Mitglied seit: 31/03/14

108043 Reputation

19 Kommentare

Hi people, I am a volunteer in the Repair Café of Deventer and we are very excited about the new Fairphone2 because it showcases what we are working for: Repairable design. We are with over 300 Repair Café's in Holland now and promoting the Fairphone is one of the things I like to do. I cannot wait to receive mine, should be end of this month. So I can take it to Paris on the 12th Decmber for the big Climate March. Super glad and proud with Fiarphone, they deserve 10/10 score all the way!

rodecaban -

Aside from making the phone thinner, fusing the display and digitizer eliminates the issue of dust infiltration (specks of crap under the glass that just can't be cleaned off) which is a warranty/service concern on devices where the two are separate. The combination is also more rigid, providing a subjectively better (firmer) "feel" when the user taps the screen. It's also, all else equal, more resilient against impact or drop damage. From an engineering standpoint, the case can easily be made that these advantages outweigh the potentially increased repair cost, especially since the fused glass is less likely to break to begin with.

gahanj -

need to get me one of these

nev tevi -
Where is the GPS???

Riqz -

Can this be used in the US, and with which carriers?

mgehrking -

Hey iFixit, there is a dead link in step 6 (Fairphone 2 Teardown link in the word 'map'). We changed our site so that is probably the reason. Can you fix it?

Thanks!

@Riqz: The GPS is in the Core module.

@Mgehrking: It can, but you have to research yourself where there is coverage with which carrier. Do realise we do not ship outside Europe (also not for after sales support). https://fairphone.zendesk.com/hc/en-us/a...

Esmée - Fairphone Customer Support

Esmee -

The dead link is now fixed. Thanks for the tip! :)

Jeff Suovanen -

The Philips #1 Screwdriver didn't work that well, I had to use a flat 1.4mm driver to remove the screws. Maybe better to recommend using a #00?

Victor

victorhugolimachi -

Is there going to be a US LTE variant available anytime soon? Me want!

Mike Hayes -

I'm unable to get beyond step #4 - I flipped the blue switches but I can't slide the screen out. Too bad there is no real-life Fairphone community nearer to me than London (I'm in Leamington Spa in Warwickshire). I would so much rather have a hands-on demonstration than attempt to follow a video.

louisaradice -

Hello louisaradice, a teardown is not meant for repairs. You might want to look at the display assembly guide for that. There are also additional comments on step 4 to get the display off. Here you go: Fairphone 2 Display-Einheit ersetzen

Tobias Isakeit -

I have looked at Fairphone 2 Display Assembly Replacement but I'm still none the wiser. Try as I can, I still can't slide the screen out.

louisaradice -

Louisaradice, Have you looked at Fairphone's screen replacement video guide on YouTube? It's also possible that your clips have somehow jammed? If you are still unable to replace the display I suggest posting a question inn our Answers forum, and take photos of the clips to share with our users. Hopefully we can help you troubleshoot!

Sam Goldheart -

Hello,

my Mother's phone has fallen in the water. How can I diagnose which module(s) have to be replaced?

Francesco Maltoni -

Hello Francesco,

first, make sure it is completly dry. You should have removed the battery immediately after the dive.

you can remove all three modules. Then clean the contacts with alcohol.

Then WITHOUT the modules (just screen and core) try start the phone.

If its boots up replace one module at a time then check again.

For futher help: check the fairphone forum https://forum.fairphone.com/

pa sch -

Hi, Do you know the spec of the antenna, and where I can order another one? Thanks!

Elizabeth Adams -

Mine does also very often NOT connect to a telephone network (either 2G, 3G or 4G), all other phones I tried are much better (at the same location and with the same network provider). Would changing the antenna resolve this (I mean, how likely does such a simple part become defective)?

MWalzer -

Ist schon Einiges diese Bilder. Leider vermisse ich die klassische Art von iFixit mit Angabe der Schauben und der heiklen Stellen.

Grund: Ich erhielt ein FP 2 mit defektem erstem Slot. Diesen wollte ich reparieren, aber beim Anblick der geklebten gedruckten Leitungen (Antene?) von aussen habe ich es sein gelassen. War mit zu heikel, da ich nicht wusste, ob sie fest mit der Platine verbunden sind. Also habe ich diese “letzte” Platine nicht entfernt, um zu den Slots zu gelangen, die von der weissen Abdeckung geschützt sind. Hier in diesem Beitrag ist auch nichts angegeben, wie man die Platine entfernt. Ich hoffte, wenn ich an die Slots von hinten komme, dass ich die vermutlich verbogenen Kontakte mit Vorsicht wieder zurechtbiegen könnte.

rada -

Im Teardown findest du solche Angaben generell nicht. Allerdings haben wir tatsächlich keinen Guide um das Motherboard zu entfernen. Hier im Bild lässt sich erkennen, dass es mit Torx Schrauben befestigt ist (ich schätze Größe T4 oder T5). Viel Erfolg

Tobias Isakeit -